
Android Automotive OS lets users install apps in the car. To reach users on this platform, you need to distribute a driver-optimized app that is compatible with Android Automotive OS. You can reuse almost all the code and resources in your Android Auto app, but you must create a separate build that meets the requirements on this page.
Development overview
Adding Android Automotive OS support only requires a few steps, as described in the sections that follow:
- Enable automotive features in Android Studio.
- Create an automotive module.
- Update your Gradle dependencies.
- Optionally, Implement settings and sign-in activities.
- Optionally, Read media host hints.
Design considerations
Android Automotive OS takes care of laying out the media content that it receives from your app's media browser service. This means that your app doesn't draw the UI and doesn't start any of your activities when a user triggers media playback.
If you are implementing settings or sign-in activities, these activities must be vehicle-optimized. Refer to the Design guidelines for Android Automotive OS while designing those areas of your app.
Set up your project
You need to set up several parts of your app's project to enable support for Android Automotive OS.
Enable automotive features in Android Studio
Use Android Studio 4.0 or higher to ensure that all Automotive OS features are enabled.
Create an automotive module
Some components of Android Automotive OS, such as the manifest, have platform-specific requirements. Create a module that can keep the code for these components separate from other code in your project, such as the code used for your phone app.
Follow these steps to add an automotive module to your project:
- In Android Studio, click File > New > New Module.
- Select Automotive Module, then click Next.
- Enter an Application/Library name. This is the name that users see for your app on Android Automotive OS.
- Enter a Module name.
- Adjust the Package name to match your app.
Select API 28: Android 9.0 (Pie) for the Minimum SDK, and then click Next.
All cars that support Android Automotive OS run on Android 9 (API level 28) or higher, so selecting this value targets all compatible cars.
Select No Activity, and then click Finish.
After creating your module in Android Studio, open the AndroidManifest.xml in
your new automotive module:
<manifest xmlns:android="http://schemas.android.com/apk/res/android"
    package="com.example.media">

    <application
        android:allowBackup="true"
        android:icon="@mipmap/ic_launcher"
        android:label="@string/app_name"
        android:roundIcon="@mipmap/ic_launcher_round"
        android:supportsRtl="true"
        android:theme="@style/AppTheme" />

    <uses-feature
        android:name="android.hardware.type.automotive"
        android:required="true" />

</manifest>
The <application> element has some standard app information as well as a
<uses-feature> element that declares support for Android Automotive OS.
Note that there are no activities declared in the manifest.
If you implement settings or sign-in activities, add them here. These activities are triggered by the system using explicit intents and are the only activities you declare within the manifest for your Android Automotive OS app.
After adding any settings or sign-in activities, complete your manifest file by
setting the <application> element's android:appCategory attribute to
"audio".
<application
  ...
  android:appCategory="audio" />
Declare feature requirements
All apps built for Android Automotive OS must meet certain requirements to be distributed using Google Play. See Meet Google Play feature requirements for more information.
Declare media support for Android Automotive OS
Use the following manifest entry to declare that your app supports Android Automotive OS:
<application>
    ...
    <meta-data android:name="com.android.automotive"
        android:resource="@xml/automotive_app_desc"/>
    ...
</application>
This manifest entry refers to an XML file that declares the automotive capabilities that your app supports.
To indicate that you have a media app, add an
XML file named automotive_app_desc.xml to the res/xml/ directory in your
project. Include the following content in this file:
<automotiveApp>
    <uses name="media"/>
</automotiveApp>
Intent filters
Android Automotive OS uses explicit intents to trigger activities in your media
app. Don't include any activities that have
CATEGORY_LAUNCHER
or ACTION_MAIN intent
filters in the manifest file.
Activities like the one in the following example usually target a phone or some other mobile device. Declare these activities in the module that builds the phone app, not in the module that builds your Android Automotive OS app.
<activity android:name=".MyActivity">
    <intent-filter>
        <!-- You can't use either of these intents for Android Automotive OS -->
        <action android:name="android.intent.action.MAIN" />
        <category android:name="android.intent.category.LAUNCHER" />
        <!--
        In their place, you can include other intent filters for any activities
        that your app needs for Android Automotive OS, such as settings or
        sign-in activities.
        -->
    </intent-filter>
</activity>
Update your Gradle dependencies
We recommend that you keep your media browser service in a separate module that you share between your phone app and your automotive module. If you're using this approach, you need to update your automotive module to include the shared module, as shown in the following snippet:
my-auto-module/build.gradle
Groovy
buildscript {
    ...
    dependencies {
        ...
        implementation project(':shared_module_name')
    }
}
Kotlin
buildscript {
    ...
    dependencies {
        ...
        implementation(project(":shared_module_name"))
    }
}
Implement settings and sign-in activities
In addition to your media browser service, you can also provide vehicle-optimized settings and sign-in activities for your Android Automotive OS app. These activities let you provide app functionality that isn't included in the Android Media APIs.
Only implement these activities if your Android Automotive OS app needs to let users sign in or specify app settings. These activities aren't used by Android Auto.
Activity workflows
The following diagram shows how a user interacts with your settings and sign-in activities using Android Automotive OS:
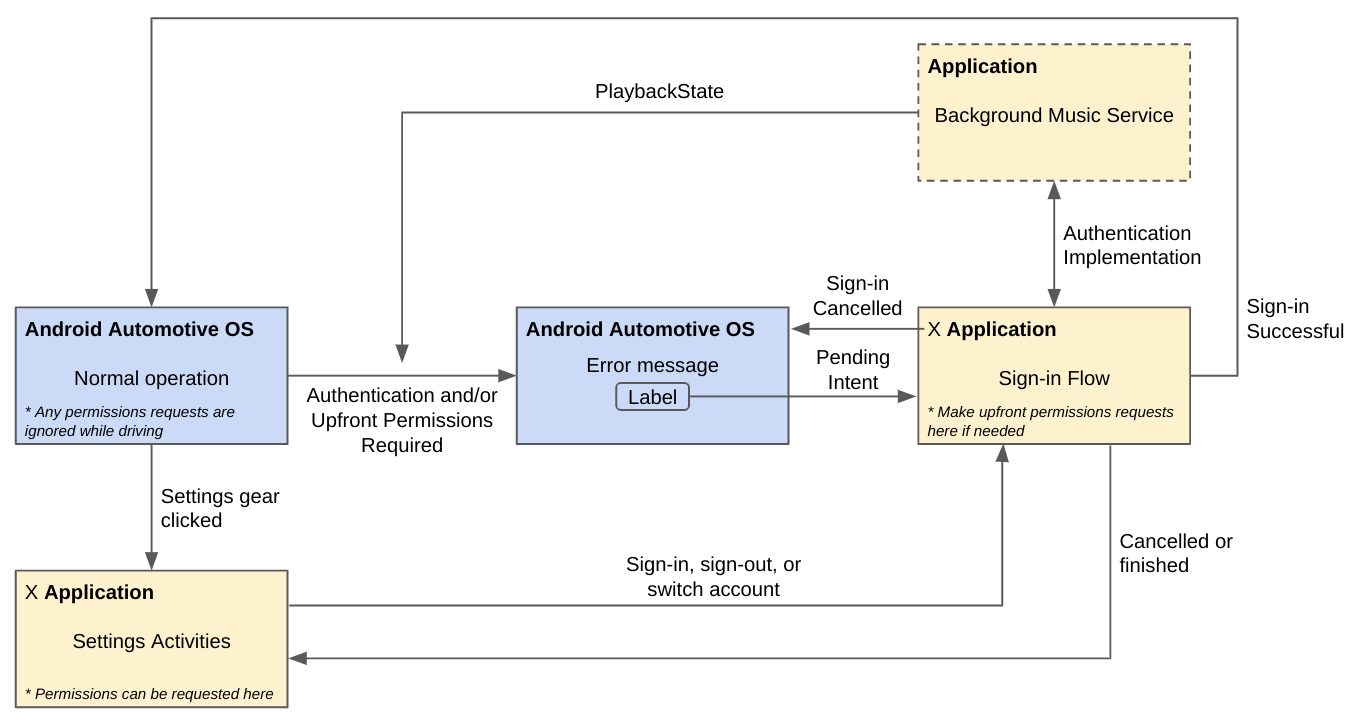
Figure 1. Settings and sign-in activity workflows.
Discourage distractions in your settings and sign-in activities
To ensure your settings and sign-in activities are only available for use
while the user's vehicle is parked, verify that the <activity> element(s)
don't include the following <meta-data> element. Your app will be rejected
during review if such an element is present.
<!-- NOT ALLOWED -->
<meta-data
  android:name="distractionOptimized"
  android:value="true"/>
Add a settings activity
You can add a vehicle-optimized settings activity so that users can configure settings for your app in their car. Your settings activity can also provide other workflows, like signing in or out of a user's account or switching user accounts. Remember that this activity is only triggered by an app running on Android Automotive OS. Phone apps connected to Android Auto don't use it.
Declare a settings activity
You must declare your settings activity in your app's manifest file, as shown in the following code snippet:
<application>
    ...
    <activity android:name=".AppSettingsActivity"
              android:exported="true"
              android:theme="@style/SettingsActivity"
              android:label="@string/app_settings_activity_title">
        <intent-filter>
            <action android:name="android.intent.action.APPLICATION_PREFERENCES"/>
        </intent-filter>
    </activity>
    ...
</application>
Implement your settings activity
When a user launches your app, Android Automotive OS detects the
settings activity that you declared and displays an affordance, such as an icon.
The user can tap or select this affordance using their car's display to navigate
to the activity. Android Automotive OS sends the
ACTION_APPLICATION_PREFERENCES intent that tells your app to start
your settings activity.
The rest of this section shows how you can adapt code from the Universal Android Music Player (UAMP) sample app to implement a settings activity for your app.
To begin, download the sample code:
# Clone the UAMP repositorygit clone https://github.com/android/uamp.git# Fetch the appropriate pull request to your local repositorygit fetch origin pull/323/head:NEW_LOCAL_BRANCH_NAME# Switch to the new branchgit checkout NEW_LOCAL_BRANCH_NAME
To implement your activity, follow these steps:
- Copy the
automotive/automotive-libfolder into your automotive module. - Define a preferences tree as in
automotive/src/main/res/xml/preferences.xml. Implement a
PreferenceFragmentCompatthat your settings activity displays. See theSettingsFragment.ktandSettingsActivity.ktfiles in UAMP and the Android Settings guide for more information.
As you implement your settings activity, consider these best practices for using some of the components in the Preference library:
- Have no more than two levels of depth below the main view in your settings activity.
- Don't use a
DropDownPreference. Use aListPreferenceinstead. - Organizational components:
PreferenceScreen- This must be the top level of your preferences tree.
PreferenceCategory- Used to group
Preferenceobjects together. - Include a
title.
- Used to group
- Include a
keyandtitlein all the following components. You can also include asummary, anicon, or both:Preference- Customize the logic in the
onPreferenceTreeClick()callback of yourPreferenceFragmentCompatimplementation.
- Customize the logic in the
CheckBoxPreference- Can have
summaryOnorsummaryOffinstead ofsummaryfor conditional text.
- Can have
SwitchPreference- Can have
summaryOnorsummaryOffinstead ofsummaryfor conditional text. - Can have
switchTextOnorswitchTextOff.
- Can have
SeekBarPreference- Include a
min,max, anddefaultValue.
- Include a
EditTextPreference- Include
dialogTitle,positiveButtonText, andnegativeButtonText. - Can have one or both of
dialogMessageanddialogLayoutResource.
- Include
com.example.android.uamp.automotive.lib.ListPreference- Derives mostly from
ListPreference. - Used to display a single-choice list of
Preferenceobjects. - Must have an array of
entriesand correspondingentryValues.
- Derives mostly from
com.example.android.uamp.automotive.lib.MultiSelectListPreference- Derives mostly from
MultiSelectListPreference - Used to display a multiple-choice list of
Preferenceobjects. - Must have an array of
entriesand correspondingentryValues.
- Derives mostly from
Add a sign-in activity
If your app requires a user to sign in before they can use your app, you can add a vehicle-optimized sign-in activity that handles signing in and out of your app. You can also add sign-in and sign-out workflows to a settings activity, but use a dedicated sign-in activity if your app can't be used until a user signs in. Remember that this activity is only triggered by an app running on Android Automotive OS. Phone apps connected to Android Auto don't use it.
Require sign in at app start
To require a user to sign in before they can use your app, your media browser service must do the following things:
- In your service's
onLoadChildren()method, sendnullresult using thesendResult()method. - Set the media session's
PlaybackStateCompattoSTATE_ERRORusing thesetState()method. This tells Android Automotive OS that no other operations can be performed until the error has been resolved. - Set the media session's
PlaybackStateCompaterror code toERROR_CODE_AUTHENTICATION_EXPIRED. This tells Android Automotive OS that the user needs to authenticate. - Set the media session's
PlaybackStateCompaterror message using thesetErrorMessage()method. Because this error message is user-facing, localize it for the user's current locale. Set the media session's
PlaybackStateCompatextras using thesetExtras()method. Include the following two or three keys:PLAYBACK_STATE_EXTRAS_KEY_ERROR_RESOLUTION_ACTION_LABEL: a string that is displayed on the button that begins the sign-in workflow. Because this string is user-facing, localize it for the user's current locale.PLAYBACK_STATE_EXTRAS_KEY_ERROR_RESOLUTION_ACTION_INTENT: aPendingIntentthat directs the user to your sign-in activity when the user taps the button referred to by thePLAYBACK_STATE_EXTRAS_KEY_ERROR_RESOLUTION_ACTION_LABEL.PLAYBACK_STATE_EXTRAS_KEY_ERROR_RESOLUTION_USING_CAR_APP_LIBRARY_INTENT: aPendingIntentthat directs the user to your Car App Library sign-in activity. Because the Car App Library host is driving-optimized, the intent automatically bypasses the error resolution screen and immediately displays your sign-in screen. If you set this extra, also set the previous two extras to ensure backwards compatibility with older vehicles.
The following code snippet shows how your app can require the user to sign in before using your app:
Kotlin
import androidx.media.utils.MediaConstants

val signInIntent = Intent(this, SignInActivity::class.java)
val signInActivityPendingIntent = PendingIntent.getActivity(this, 0,
    signInIntent, 0)
val extras = Bundle().apply {
    putString(
        MediaConstants.PLAYBACK_STATE_EXTRAS_KEY_ERROR_RESOLUTION_ACTION_LABEL,
        "Sign in"
    )
    putParcelable(
        MediaConstants.PLAYBACK_STATE_EXTRAS_KEY_ERROR_RESOLUTION_ACTION_INTENT,
        signInActivityPendingIntent
    )
}

val playbackState = PlaybackStateCompat.Builder()
        .setState(PlaybackStateCompat.STATE_ERROR, 0, 0f)
        .setErrorMessage(
            PlaybackStateCompat.ERROR_CODE_AUTHENTICATION_EXPIRED,
            "Authentication required"
        )
        .setExtras(extras)
        .build()
mediaSession.setPlaybackState(playbackState)
Java
import androidx.media.utils.MediaConstants;

Intent signInIntent = new Intent(this, SignInActivity.class);
PendingIntent signInActivityPendingIntent = PendingIntent.getActivity(this, 0,
    signInIntent, 0);
Bundle extras = new Bundle();
extras.putString(
    MediaConstants.PLAYBACK_STATE_EXTRAS_KEY_ERROR_RESOLUTION_ACTION_LABEL,
    "Sign in");
extras.putParcelable(
    MediaConstants.PLAYBACK_STATE_EXTRAS_KEY_ERROR_RESOLUTION_ACTION_INTENT,
    signInActivityPendingIntent);

PlaybackStateCompat playbackState = new PlaybackStateCompat.Builder()
    .setState(PlaybackStateCompat.STATE_ERROR, 0, 0f)
    .setErrorMessage(
            PlaybackStateCompat.ERROR_CODE_AUTHENTICATION_EXPIRED,
            "Authentication required"
    )
    .setExtras(extras)
    .build();
mediaSession.setPlaybackState(playbackState);
After the user is successfully authenticated, set the PlaybackStateCompat
back to a state other than STATE_ERROR,
then take the user back to Android Automotive OS by calling the activity's
finish()
method.
Implement your sign-in activity
Google offers a variety of identity tools that you can use to help users sign in to your app in their cars. Some tools, such as Firebase Authentication, provide full-stack toolkits that can help you build customized authentication experiences. Other tools leverage a user's existing credentials or other technologies to help you build seamless sign-in experiences for users.
The following tools can help you build an easier sign-in experience for users who have previously signed in on another device:
- One Tap Sign-in and Sign-up: if you already implemented One Tap for other devices, such as your phone app, implement it for your Android Automotive OS app to support existing One Tap users.
- Google Sign-in: if you already implemented Google Sign-in for other devices, such as your phone app, implement Google Sign-in for your Android Automotive OS app to support existing Google Sign-in users.
- Autofill with Google: if users have opted into Autofill with Google on their other Android devices, their credentials are saved to the Google password manager. When those users sign in to your Android Automotive OS app, Autofill with Google suggests relevant saved credentials. Using Autofill with Google requires no application development effort. However, application developers can optimize their apps for better quality results. Autofill with Google is supported by all devices running Android 8.0 (API level 26) or higher, including Android Automotive OS.
Use AccountManager
Android Automotive OS apps that have authentication must use
AccountManager, for the following reasons:
- Better UX and ease of account management: users can manage all their accounts from the accounts menu in the system settings, including sign-in and sign-out.
- "Guest" experiences: cars are shared devices, which means OEMs can enable
"guest" experiences in the vehicle, where accounts cannot be added. This
restriction is achieved using
DISALLOW_MODIFY_ACCOUNTSforAccountManager.
Permissions
If you need to request permissions from the user, use the same flow as the authentication activity or the settings activity in the activity workflows diagram shown in a previous section.
Implement sign-out
Regardless of how you've chosen to implement sign in, when the user signs out,
you must call MediaBrowserServiceCompat#notifyChildrenChanged(rootId) to
invalidate your browse tree so that the media host app clears any user-related
information (such as the most recent search query).
Start the media host app
You can create intents to open the media host app to your app or content within your app. For example:
- Your app can post a notification with a pending intent that allows a user to open your app to listen to a new piece of content.
- Your app can handle deep links and open the host app to the most appropriate view.
Determine media host capabilities
Versions of the media host app support different capabilities. Hosts indicate support for different capabilities by including intent filters for the following intent actions:
All media host apps support MEDIA_TEMPLATE intents. To determine if the media
host supports MEDIA_TEMPLATE_V2 intents, you can use
queryIntentActivities() as follows:
val isMediaTemplateV2Supported = packageManager.queryIntentActivities(
  Intent(MediaIntentExtras.ACTION_MEDIA_TEMPLATE_V2),
  //  MATCH_DEFAULT_ONLY  since the host should be started with implicit intents
  //  MATCH_SYSTEM_ONLY  excludes any apps that aren't preinstalled
  PackageManager.MATCH_DEFAULT_ONLY or PackageManager.MATCH_SYSTEM_ONLY
).size > 0
Build and use an intent
Depending on which intent actions are supported by the media host and what your specific use case is, you can provide the following extras when building the intent you use to start the media host app.
| Extra key | Type | Description | Supported actions |
|---|---|---|---|
EXTRA_KEY_MEDIA_COMPONENT |
String |
The flattened component name of the MediaBrowserService the media host app should connect to – generally the one for your app. If this extra is not specified, the media host defaults to the active media source. |
MEDIA_TEMPLATE, MEDIA_TEMPLATE_V2 |
EXTRA_KEY_SEARCH_QUERY |
String |
The search query to be used when calling | MEDIA_TEMPLATE, MEDIA_TEMPLATE_V2 |
EXTRA_KEY_MEDIA_ID |
String |
The media ID to open in the browse view. | MEDIA_TEMPLATE_V2 |
EXTRA_KEY_SEARCH_ACTION |
Integer |
The action to take after the search for the EXTRA_KEY_SEARCH_QUERY completes. |
MEDIA_TEMPLATE_V2 |
For example, with a host that supports MEDIA_TEMPLATE_V2 actions, the
following code will open the media host app, have it connect to
MyMediaBrowserService, perform a search for "Jazz", and then play the first
item from the search results. On all other hosts, it will only open the media
host app and perform a search for "Jazz", leaving the user to select an item
to play from the results.
val startMediaHostIntent = Intent(ACTION_MEDIA_TEMPLATE)
  .putExtra(MediaIntentExtras.EXTRA_KEY_MEDIA_COMPONENT, MyMediaBrowserService::class.java)
  .putExtra(MediaIntentExtras.EXTRA_KEY_SEARCH_QUERY, "Jazz")
  .putExtra(MediaIntentExtras.EXTRA_KEY_SEARCH_ACTION, MediaIntentExtras.EXTRA_VALUE_PLAY_FIRST_ITEM_FROM_SEARCH)

context.startActivity(startMediaHostIntent)
Support deep links
To improve your media app's experience on Android Automotive OS devices, you can add support for deep links to your app. For example, this allows users to open your app directly from a browser or when receiving a URL shared from a phone using Quick Share.
Add deep link intent filters
To inform the OS that your app is able to handle deep links, it needs to have activities with the appropriate intent filters. See Add intent filters for incoming links for guidance on the format of the intent filters used for deep links.
For the best user experience, support all deep links that your
mobile app supports, if they can be reasonably supported by your in-car app. If
your app has settings or sign-in activities, intent filters for handling
settings and sign-in deep links should be declared within the respective
<activity> manifest elements. For media playback and browsing deep links, you
can use a trampoline activity as described later in this section.
Handle deep link intents
See Read data from incoming intents for guidance on how to read and react to the intent that was used to start your app's activity.
Handle media playback and browsing deep links
Because the UI for browsing and playback is drawn by the host app, the activity used to handle deep links for playback and browsing actions shouldn't have any UI of its own.
Instead, it should primarily be used to build and use an intent to start the media host app. If necessary, it can also handle any additional changes to your app's state, such as adding a media items to the queue. The following snippet shows an example trampoline activity implementation:
fun DeepLinkTrampolineActivity : ComponentActivity() {

  override fun onCreate() {
    handleIntent(intent)
  }

  override fun onNewIntent(intent: Intent) {
    handleIntent(intent)
  }

  private fun handleIntent(intent: Intent) {
    // Handle any side effects, such as adding a song to the queue
    ...
    // Build the intent used to start the media host app
    val startMediaHostIntent = ...
    startActivity(intent)
    // Finish the activity immediately so it isn't shown on screen
    finish()
  }
}
Read media host hints
Depending on the system application (including its version) that connects to your media browser service, your application may receive the following extras:
Error handling
Errors in media apps on Android Automotive OS are communicated using the media
session's PlaybackStateCompat. For all errors, set an appropriate error
code and error message in the PlaybackStateCompat. This causes a Toast to
appear in the UI.
When an error occurs but playback can continue, issue a nonfatal error. For example, a user might be able to play music in an app before signing in, but they must sign in before they can skip a song. When you use a nonfatal error, the system can suggest that the user sign in without interrupting playback for the current media item.
When you issue a nonfatal error, preserve the rest of the
PlaybackStateCompat as-is, aside from the error code and error message. Using
this approach lets playback for the current media item to continue while the
user decides whether to sign in.
When playback is not possible, such as when there is no internet connection and
no offline content, set the PlaybackStateCompat state to STATE_ERROR.
On subsequent updates to your PlaybackStateCompat, clear any error codes
and error messages to avoid displaying multiple warnings for the same error.
If at any point you are unable to load a browse tree—for example, if you
require authentication and the user is not signed in—send an empty
browse tree. To signify this, return a null result from onLoadChildren() for
the root media node. When this happens, the system displays a full-screen
error with the error message set in the PlaybackStateCompat.
Actionable errors
If an error is actionable, additionally set the following two extras in the
PlaybackStateCompat:
PLAYBACK_STATE_EXTRAS_KEY_ERROR_RESOLUTION_ACTION_LABEL: a label for the button to click to resolve the error. Because this string is user-facing, localize it for the user's current locale.PLAYBACK_STATE_EXTRAS_KEY_ERROR_RESOLUTION_ACTION_INTENT: thePendingIntentthat the button runs to resolve the error, such as by launching your sign-in activity.
Actionable errors appear as a Dialog and can resolved by users only when
the car is stopped.
Testing error cases
Verify that your app gracefully handles errors in all scenarios, including:
- Different tiers of your product: for example, free versus premium or signed in versus signed out
- Different drive states: for example, parked versus driving
- Different connectivity states: for example, online versus offline
Other considerations
Keep these other considerations in mind when developing your Android Automotive OS app:
Offline content
If applicable, implement offline playback support. Cars with Android Automotive OS are expected to have their own data connectivity, meaning a data plan is included in the cost of the vehicle or paid for by the user. However, cars are also expected to have more variable connectivity than mobile devices.
Here are a few things to keep in mind as you consider your offline support strategy:
- The best time to download content is while your app is in use.
- Don't assume that WiFi is available. A car might never come into WiFi range, or the OEM might have disabled WiFi in favor of a mobile network.
- While it's okay to cache the content you expect users to use, we recommend that you let the user change this behavior through your settings activity.
- The disk space on cars varies, so give users a way to delete offline content, such as through an option in your settings activity.
WebView support
WebViews are supported in Android Automotive OS but are only allowed for your settings and sign-in activities. Activities that use a WebView must have a "close" or "back" affordance outside of the WebView.
Here are some examples of acceptable use-cases for WebViews:
- Displaying your privacy policy, terms of service, or other legal-related links in your settings activity.
- A web-based flow in your sign-in activity.
When using a WebView, you can enable Javascript.
Secure your WebView
Take all precautions possible to help ensure that your WebView isn't an
entry point into the greater internet. See the following code snippet for an
example on how to lock the WebView to the URL used in the
loadUrl()
call and prevent redirects. We highly recommend that you implement safeguards
like this when feasible, such as when displaying
legal-related links.
Kotlin
override fun shouldOverrideUrlLoading(webView: WebView,
                             webResourceRequest: WebResourceRequest): Boolean {
  val originalUri: Uri = Uri.parse(webView.originalUrl)
  // Check for allowed URLs
  if (originalUri.equals(Uri.parse(BLANK_URL))
      || originalUri.equals(webResourceRequest.url)) {
    return false
  }
  if (webResourceRequest.isRedirect) {
    logger.w("Redirect detected, not following")
    return true
  }
  setupWizardWebViewClientListener.onUriBlocked(webResourceRequest.url)
  logger.w(
    String.format(
      "Navigation prevented to %s original is %s", webResourceRequest.url, originalUri))
  return true
}
Java
@Override
public boolean shouldOverrideUrlLoading(WebView webView, WebResourceRequest webResourceRequest) {
  Uri originalUri = Uri.parse(webView.getOriginalUrl());
  // Check for allowed URLs
  if (originalUri.equals(Uri.parse(BLANK_URL))
      || originalUri.equals(webResourceRequest.getUrl())) {
    return false;
  }
  if (webResourceRequest.isRedirect()) {
    logger.w("Redirect detected, not following");
    return true;
  }
  setupWizardWebViewClientListener.onUriBlocked(webResourceRequest.getUrl());
  logger.w(
      String.format(
          "Navigation prevented to %s original is %s", webResourceRequest.getUrl(), originalUri));
  return true;
}
Package names
Because you distribute a separate Android Package Kit (APK) for Android Automotive OS, you can reuse the package name from your mobile app or create a new package name. If you use a different package name, your app has two separate Play Store listings. If you reuse your current package name, your app has a single listing across both platforms.
This is predominantly a business decision. For example, if you have one team working on the mobile app, and a separate team working on your Android Automotive OS app, then it might make sense to have separate package names and let each team manage its own Play Store listing. There is not a large difference in the technical effort required to use either approach.
The following table summarizes some other key differences between keeping your current package name and using a new package name:
| Feature | Same package name | New package name |
|---|---|---|
| Store listing | Single | Multiple |
| Mirrored install | Yes: "fast app reinstall" during the setup wizard | No |
| Play Store Review process | Blocking reviews: if the review fails for one APK, other APKs submitted in the same release are blocked | Individual reviews |
| Statistics, metrics, and vitals | Combined: you can filter for automotive-specific data. | Separate |
| Indexing and search ranking | Build off current standing | No carryover |
| Integrating with other apps | Most likely no changes needed, assuming media code is shared between both APKs | Might have to update the corresponding app, such as for URI playback with Google Assistant. |
Frequently asked questions
See the following sections for answers to some frequently asked questions about Android Automotive OS.
Hardware
Can my app get access to the microphone
For apps targeting Android 10 (API level 29) or higher, refer to the sharing audio input documentation. This is not feasible prior to API level 29.
Which car APIs can we get access to and how?
You are limited to the APIs that are exposed by the OEM. Processes are being developed to standardize how you access these APIs.
Apps can access car APIs using SetProperty()
and GetProperty()
in CarPropertyManager.
Refer to the source code
or reference documentation to see a
list of all available properties. If the property is annotated
with @SystemApi, it is limited to preloaded system apps.
What types of audio codecs are supported?
Refer to the audio codec details in the Android CDD.
Is Widevine DRM supported?
Yes. Widevine DRM is supported.
Development and testing
Are there any restrictions or recommendations for using third-party SDKs and libraries?
We don't have any specific guidelines on using third-party SDKs and libraries. If you choose to use third-party SDKs and libraries, you are still responsible for complying with all the car app quality requirements.
Can I use a foreground service?
The only allowed use-case for a foreground service is downloading content for offline use. If you have another use-case for a foreground service that you want to see support for, get in touch with us using the Android Automotive OS discussion group.
Publishing Android Automotive OS apps
How do I publish my Android Automotive OS app using the Google Play Console?
For details on how to publish your Android Automotive OS app using the Google Play Console, see Distribute to cars.
Additional resources
To learn more about Android Automotive OS, see the following additional resources.
Samples
Guides
- Design for Driving
- Using the media controller test app
- Notifications on Android Automotive OS
- Android app quality for cars
Blogs
Videos
- How to Build Media Apps for Cars (Android Dev Summit '19)
- How to Build Android Apps for Cars (Google I/O'19)
Report an Android Automotive OS media issue
If you run into an issue while developing your media app for Android Automotive OS, you can report it using the Google Issue Tracker. Be sure to fill out all the requested information in the issue template.
Before filing a new issue, check whether it is already reported in the issues list. You can subscribe and vote for issues by clicking the star for an issue in the tracker. For more information, see Subscribing to an Issue.