
Login flows, wizards, or other subflows within your app are usually best represented as nested navigation graphs. By nesting self-contained subnavigation flows in this way, the main flow of your app's UI is easier to comprehend and manage.
In addition, nested graphs are reusable. They also provide a level of
encapsulation—destinations outside of the nested graph don't have direct access
to any of the destinations within the nested graph. Instead, they should
navigate() to the nested graph itself, where the internal logic can
change without affecting the rest of the graph.
Example
Your app's top-level navigation graph should start with the initial destination the user sees when launching the app and should include the destinations that they see as they move about your app.
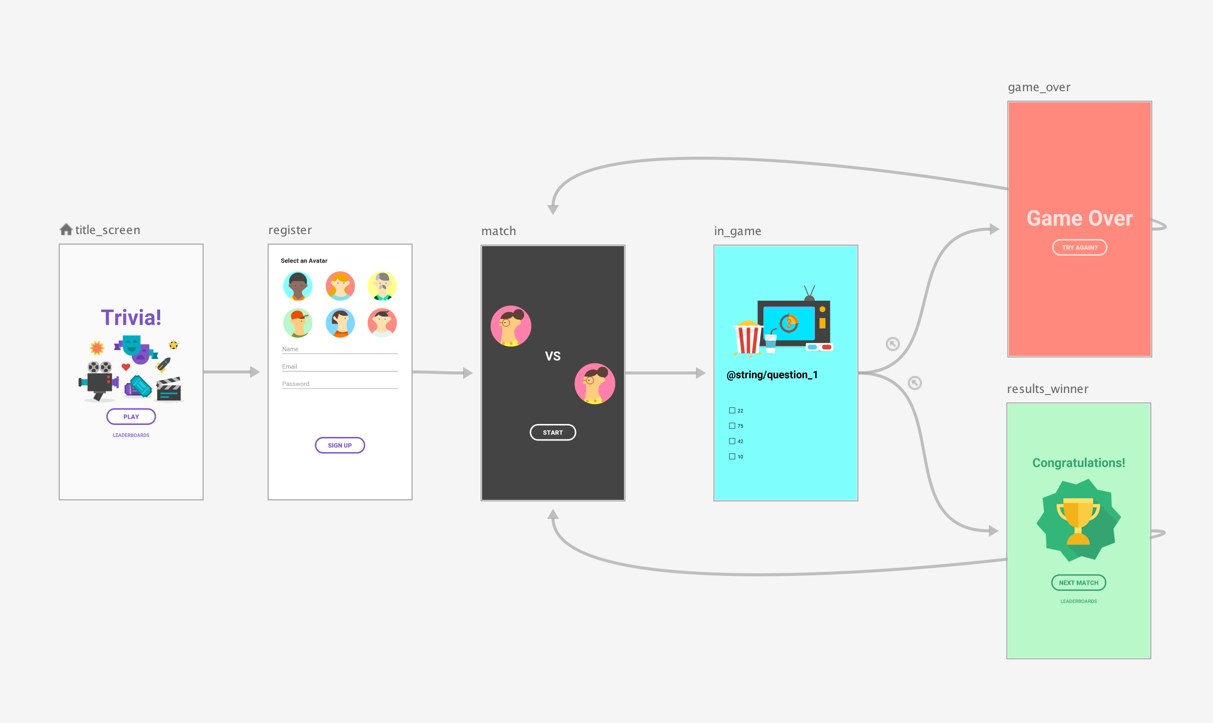
Using the top-level navigation graph from figure 1 as an example, suppose you wanted to require the user to see the title_screen and register screens only when the app launches for the first time. Afterwards, the user information is stored, and in subsequent launches of the app, you should take them straight to the match screen.
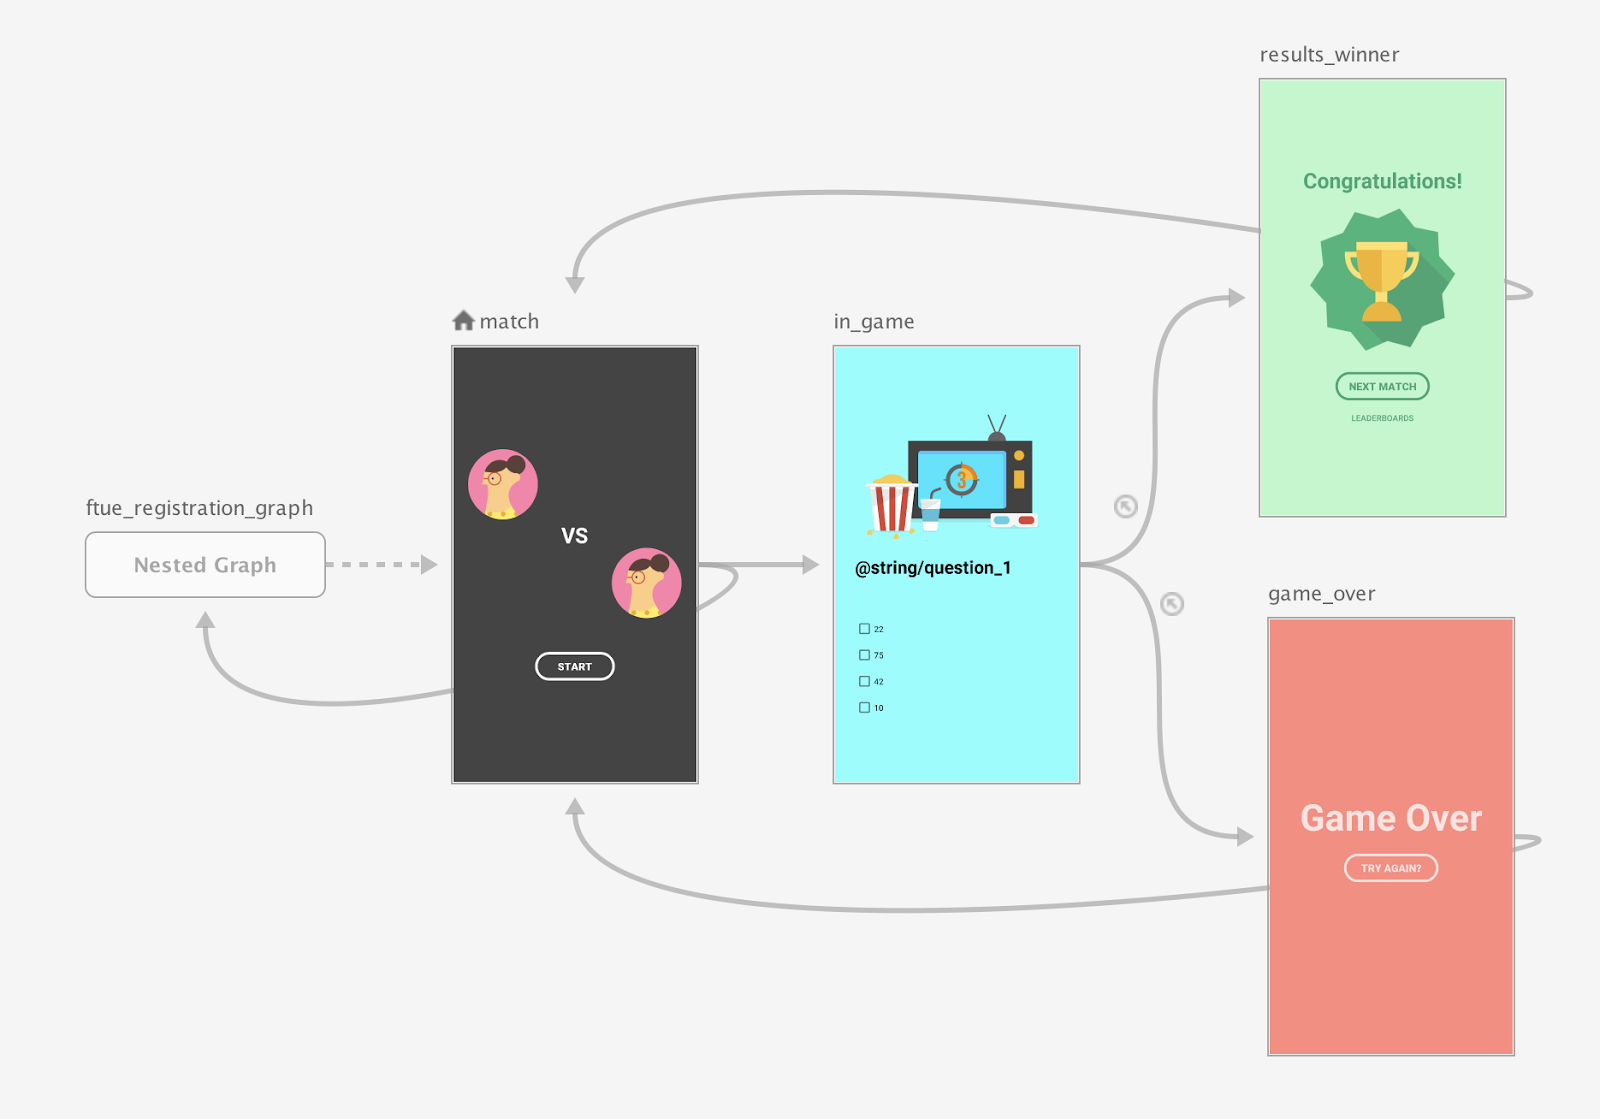
As a best practice, set the match screen as the start destination of the top-level navigation graph and move the title and register screens into a nested graph, as shown in figure 1:
When the match screen launches, check to see if there is a registered user. If the user isn't registered, navigate the user to the registration screen.
For more information on conditional navigation scenarios, see Conditional navigation.
Compose
To create a nested navigation graph using Compose, use the
NavGraphBuilder.navigation() function. You use navigation() just like
NavGraphBuilder.composable() and NavGraphBuilder.dialog()
functions when adding destinations to a graph.
The primary difference is that navigation creates a nested graph rather than a
new destination. You then call composable() and dialog() within
navigation()'s lambda to add destinations to the nested graph.
Consider how the following snippet implements the graph in figure 2 using Compose:
// Routes
@Serializable object Title
@Serializable object Register

// Route for nested graph
@Serializable object Game

// Routes inside nested graph
@Serializable object Match
@Serializable object InGame
@Serializable object ResultsWinner
@Serializable object GameOver

NavHost(navController, startDestination = Title) {
   composable<Title> {
       TitleScreen(
           onPlayClicked = { navController.navigate(route = Register) },
           onLeaderboardsClicked = { /* Navigate to leaderboards */ }
       )
   }
   composable<Register> {
       RegisterScreen(
           onSignUpComplete = { navController.navigate(route = Game) }
       )
   }
   navigation<Game>(startDestination = Match) {
       composable<Match> {
           MatchScreen(
               onStartGame = { navController.navigate(route = InGame) }
           )
       }
       composable<InGame> {
           InGameScreen(
               onGameWin = { navController.navigate(route = ResultsWinner) },
               onGameLose = { navController.navigate(route = GameOver) }
           )
       }
       composable<ResultsWinner> {
           ResultsWinnerScreen(
               onNextMatchClicked = {
                   navController.navigate(route = Match) {
                       popUpTo(route = Match) { inclusive = true }
                   }
               },
               onLeaderboardsClicked = { /* Navigate to leaderboards */ }
           )
       }
       composable<GameOver> {
           GameOverScreen(
               onTryAgainClicked = {
                   navController.navigate(route = Match) {
                       popUpTo(route = Match) { inclusive = true }
                   }
               }
           )
       }
   }
}
To navigate directly to a nested destination, use a route type as you would to any other destination. This is because routes are a global concept used to identify destinations that any screen can navigate to:
navController.navigate(route = Match)
XML
When using XML, you can use the Navigation Editor to create your nested graph. To do so follow these steps:
- In the Navigation Editor, press and hold the Shift key, and click the destinations you want to include in the nested graph.
Right-click to open the context menu, and select Move to Nested Graph > New Graph. The destinations are enclosed in a nested graph. Figure 2 shows a nested graph in the Navigation Editor:
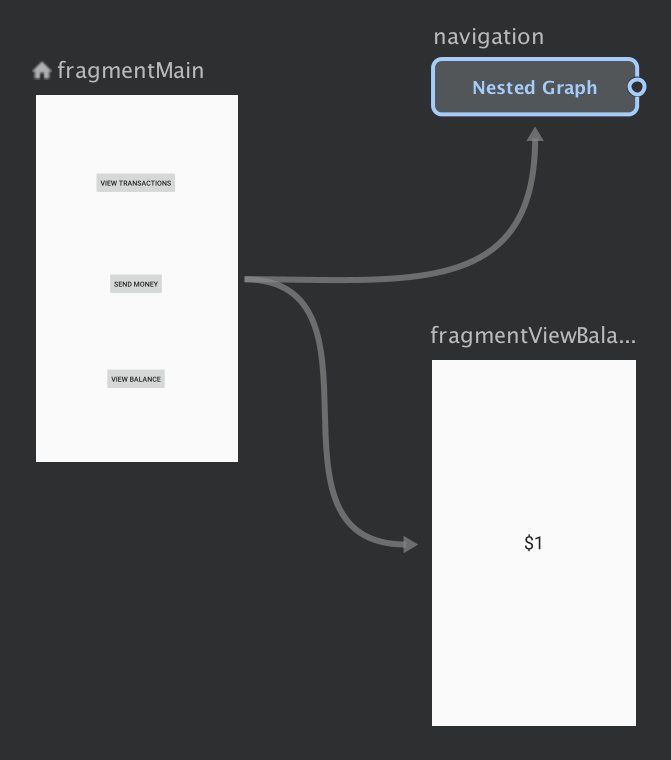
Figure 2. Nested graph in the Navigation Editor Click the nested graph. The following attributes appear in the Attributes panel:
- Type, which contains "Nested Graph"
- ID, which contains a system-assigned ID for the nested graph. This ID is used to reference the nested graph from your code.
Double-click on the nested graph to show its destinations.
Click the Text tab to toggle to the XML view. A nested navigation graph has been added to the graph. This navigation graph has its own
navigationelements along with its own ID and astartDestinationattribute that points to the first destination in the nested graph:<?xml version="1.0" encoding="utf-8"?> <navigation xmlns:app="http://schemas.android.com/apk/res-auto" xmlns:tools="http://schemas.android.com/tools" xmlns:android="http://schemas.android.com/apk/res/android" app:startDestination="@id/mainFragment"> <fragment android:id="@+id/mainFragment" android:name="com.example.cashdog.cashdog.MainFragment" android:label="fragment_main" tools:layout="@layout/fragment_main" > <action android:id="@+id/action_mainFragment_to_sendMoneyGraph" app:destination="@id/sendMoneyGraph" /> <action android:id="@+id/action_mainFragment_to_viewBalanceFragment" app:destination="@id/viewBalanceFragment" /> </fragment> <fragment android:id="@+id/viewBalanceFragment" android:name="com.example.cashdog.cashdog.ViewBalanceFragment" android:label="fragment_view_balance" tools:layout="@layout/fragment_view_balance" /> <navigation android:id="@+id/sendMoneyGraph" app:startDestination="@id/chooseRecipient"> <fragment android:id="@+id/chooseRecipient" android:name="com.example.cashdog.cashdog.ChooseRecipient" android:label="fragment_choose_recipient" tools:layout="@layout/fragment_choose_recipient"> <action android:id="@+id/action_chooseRecipient_to_chooseAmountFragment" app:destination="@id/chooseAmountFragment" /> </fragment> <fragment android:id="@+id/chooseAmountFragment" android:name="com.example.cashdog.cashdog.ChooseAmountFragment" android:label="fragment_choose_amount" tools:layout="@layout/fragment_choose_amount" /> </navigation> </navigation>In your code, pass the resource ID of the action connecting the root graph to the nested graph:
Kotlin
view.findNavController().navigate(R.id.action_mainFragment_to_sendMoneyGraph)
Java
Navigation.findNavController(view).navigate(R.id.action_mainFragment_to_sendMoneyGraph);
- Back in the Design tab, return to the root graph by clicking Root.
Reference other navigation graphs with include
Another way to modularize your graph structure is to include one graph within
another using an <include> element in the parent navigation graph. This
allows the included graph to be defined in a separate module or project
altogether, which maximizes reusability.
The following snippet demonstrates how you can use <include>:
<!-- (root) nav_graph.xml -->
<?xml version="1.0" encoding="utf-8"?>
<navigation xmlns:android="http://schemas.android.com/apk/res/android"
    xmlns:app="http://schemas.android.com/apk/res-auto"
    xmlns:tools="http://schemas.android.com/tools"
    android:id="@+id/nav_graph"
    app:startDestination="@id/fragment">

    <include app:graph="@navigation/included_graph" />

    <fragment
        android:id="@+id/fragment"
        android:name="com.example.myapplication.BlankFragment"
        android:label="Fragment in Root Graph"
        tools:layout="@layout/fragment_blank">
        <action
            android:id="@+id/action_fragment_to_second_graph"
            app:destination="@id/second_graph" />
    </fragment>

    ...
</navigation>
<!-- included_graph.xml -->
<?xml version="1.0" encoding="utf-8"?>
<navigation xmlns:android="http://schemas.android.com/apk/res/android"
    xmlns:app="http://schemas.android.com/apk/res-auto"
    xmlns:tools="http://schemas.android.com/tools"
    android:id="@+id/second_graph"
    app:startDestination="@id/includedStart">

    <fragment
        android:id="@+id/includedStart"
        android:name="com.example.myapplication.IncludedStart"
        android:label="fragment_included_start"
        tools:layout="@layout/fragment_included_start" />
</navigation>