
Navigation describes the way users move around your app. Users interact with UI elements, usually by tapping or clicking on them, and the app responds by displaying new content. If the user wants to go back to the previous content, they use the back gesture or tap the back button.
Modeling navigation state
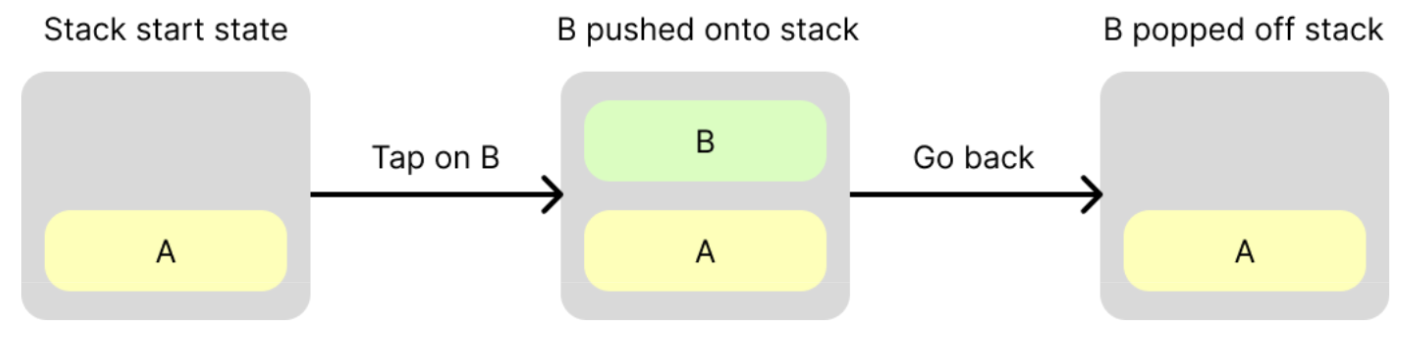
A convenient way of modeling this behavior is with a stack of content. As the user navigates forward to new content, it is pushed on top of the stack. When they go back from that content, it is popped off the stack and the previous content is displayed. In navigation terms, this stack is usually referred to as the back stack because it represents the content that the user can go back to.
Create a back stack
In Navigation 3, the back stack does not actually contain content. Instead, it contains references to content, known as keys. Keys can be any type but are usually simple, serializable data classes. Using references rather than content has the following benefits:
- It is simple to navigate by pushing keys onto the back stack.
- As long as the keys are serializable, the back stack can be saved to persistent storage, allowing it to survive configuration changes and process death. This is important because users expect to leave your app, come back to it later, and pick up where they left off with the same content being displayed. See Save your back stack for more information.
A key concept in the Navigation 3 API is that you own the back stack. The library:
- Expects that your back stack will be a snapshot-state backed
List<T>, whereTis the type of your back stackkeys. You can useAnyor you can provide your own, more strongly-typed keys. When you see the terms "push" or "pop", the underlying implementation is to add or remove items from the end of a list. - Observes your back stack and reflects its state in the UI using a
NavDisplay.
The following example shows how to create keys and a back stack, and modify the back stack in response to user navigation events:
// Define keys that will identify content data object ProductList data class ProductDetail(val id: String) @Composable fun MyApp() { // Create a back stack, specifying the key the app should start with val backStack = remember { mutableStateListOf<Any>(ProductList) } // Supply your back stack to a NavDisplay so it can reflect changes in the UI // ...more on this below... // Push a key onto the back stack (navigate forward), the navigation library will reflect the change in state backStack.add(ProductDetail(id = "ABC")) // Pop a key off the back stack (navigate back), the navigation library will reflect the change in state backStack.removeLastOrNull() }
Resolve keys to content
Content is modeled in Navigation 3 using NavEntry, which is a class
containing a composable function. It represents a destination - a single piece
of content that the user can navigate forward to and back from.
A NavEntry can also contain metadata - information about the content. This
metadata can be read by container objects, like NavDisplay, to help them
decide how to display the NavEntry's content. For example, metadata can be
used to override the default animations for a specific NavEntry. NavEntry
metadata is a map of String keys to Any values, providing versatile data
storage.
To convert a key to a NavEntry, create an Entry Provider. This is a
function that accepts a key and returns a NavEntry for that key. It is
usually defined as a lambda parameter when creating a NavDisplay.
There are two ways to create an Entry Provider, either by creating a lambda
function directly, or by using the entryProvider DSL.
Create an Entry Provider function directly
You typically create an Entry Provider function using a when statement, with
a branch for each of your keys.
entryProvider = { key -> when (key) { is ProductList -> NavEntry(key) { Text("Product List") } is ProductDetail -> NavEntry( key, metadata = mapOf("extraDataKey" to "extraDataValue") ) { Text("Product ${key.id} ") } else -> { NavEntry(Unit) { Text(text = "Invalid Key: $it") } } } }
Use the entryProvider DSL
The entryProvider DSL can simplify your lambda function by avoiding the need
to test against each of your key types, and construct a NavEntry for each one.
Use the entryProvider builder function for this. It also includes default
fallback behavior (throwing an error) if the key isn't found.
entryProvider = entryProvider { entry<ProductList> { Text("Product List") } entry<ProductDetail>( metadata = mapOf("extraDataKey" to "extraDataValue") ) { key -> Text("Product ${key.id} ") } }
Note the following from the snippet:
entryis used to define aNavEntrywith the given type and composable contententryaccepts ametadataparameter to setNavEntry.metadata
Display the back stack
The back stack represents your app's navigation state. Whenever the back stack
changes, the app UI should reflect the new back stack state. In Navigation 3, a
NavDisplay observes your back stack and updates its UI accordingly. Construct
it with following parameters:
- Your back stack - this should be of type
SnapshotStateList<T>, whereTis the type of your back stack keys. It is an observableListso that it triggers recomposition ofNavDisplaywhen it changes. - An
entryProviderto convert the keys in your back stack toNavEntryobjects. - Optionally, supply a lambda to the
onBackparameter. This is called when the user triggers a back event.
The following example shows how to create a NavDisplay.
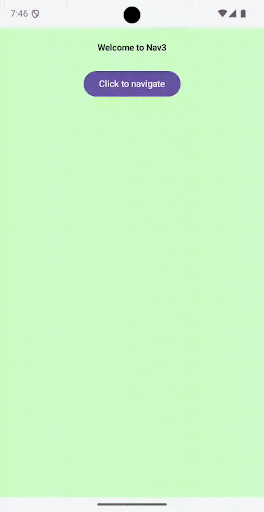
data object Home data class Product(val id: String) @Composable fun NavExample() { val backStack = remember { mutableStateListOf<Any>(Home) } NavDisplay( backStack = backStack, onBack = { backStack.removeLastOrNull() }, entryProvider = { key -> when (key) { is Home -> NavEntry(key) { ContentGreen("Welcome to Nav3") { Button(onClick = { backStack.add(Product("123")) }) { Text("Click to navigate") } } } is Product -> NavEntry(key) { ContentBlue("Product ${key.id} ") } else -> NavEntry(Unit) { Text("Unknown route") } } } ) }
By default, the NavDisplay shows the topmost NavEntry on the back stack in a
single pane layout. The following recording shows this app running:
NavDisplay default behavior with two
destinations.Putting it all together
The following diagram shows how data flows between the various objects in Navigation 3:
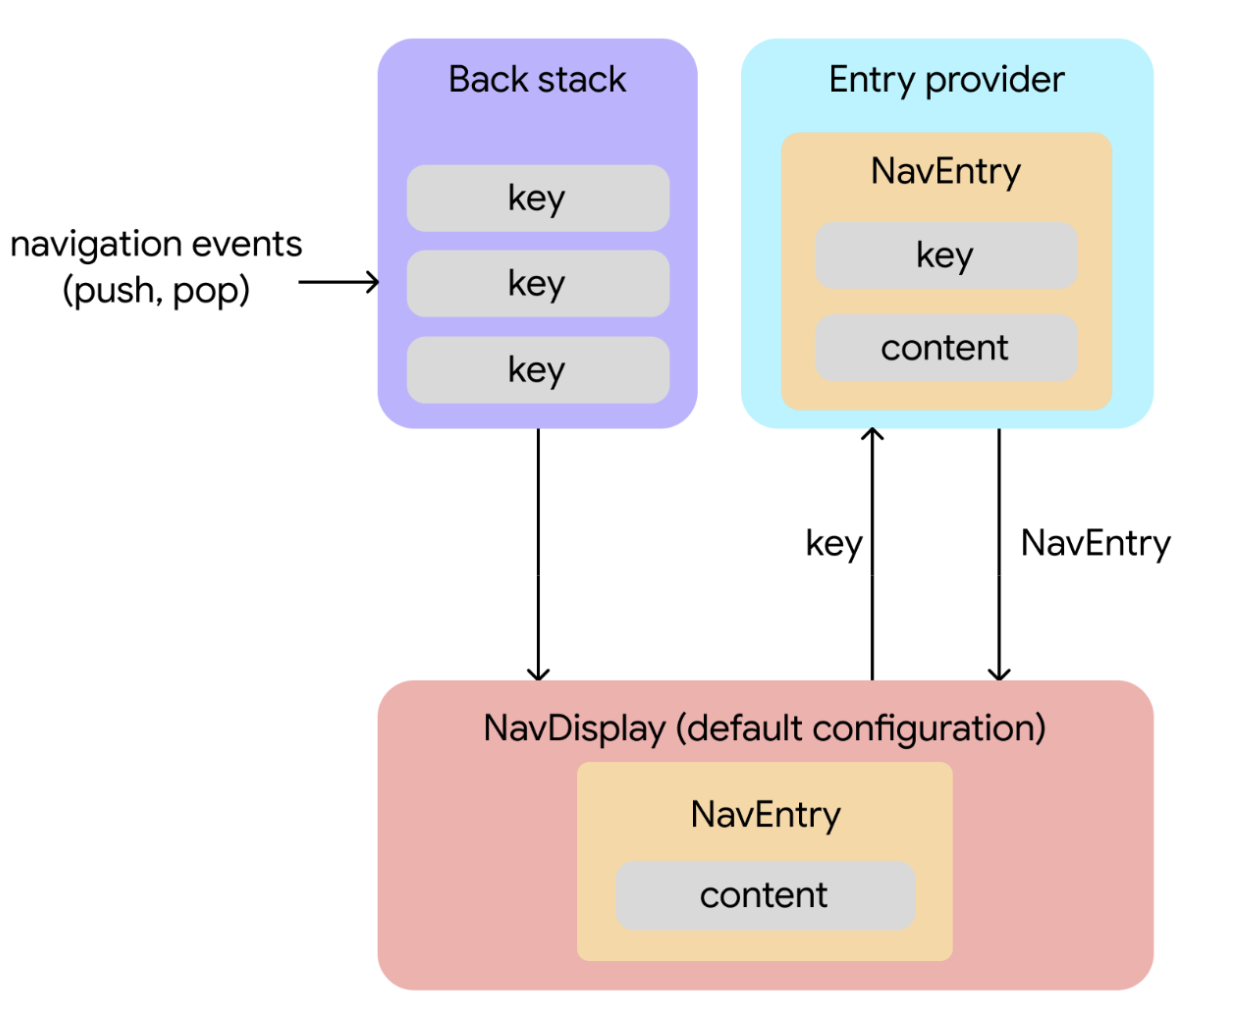
Navigation events initiate changes. Keys are added or removed from the back stack in response to user interactions.
Change in back stack state triggers content retrieval. The
NavDisplay(a composable that renders a back stack) observes the back stack. In its default configuration, it displays the topmost back stack entry in a single pane layout. When the top key on the back stack changes, theNavDisplayuses this key to request the corresponding content from the entry provider.Entry provider supplies content. The entry provider is a function that resolves a key to a
NavEntry. Upon receiving a key from theNavDisplay, the entry provider provides the associatedNavEntry, which contains both the key and the content.Content is displayed. The
NavDisplayreceives theNavEntryand displays the content.