
The Dagger basics page explained how Dagger can help you automate dependency injection in your app. With Dagger, you don't have to write tedious and error-prone boilerplate code.
Best practices summary
- Use constructor injection with
@Injectto add types to the Dagger graph whenever it's possible. When it's not:- Use
@Bindsto tell Dagger which implementation an interface should have. - Use
@Providesto tell Dagger how to provide classes that your project doesn't own.
- Use
- You should only declare modules once in a component.
- Name the scope annotations depending on the lifetime where the
annotation is used. Examples include
@ApplicationScope,@LoggedUserScope, and@ActivityScope.
Adding dependencies
To use Dagger in your project, add these dependencies to your application in
your build.gradle file. You can find the latest version of Dagger
in this GitHub project.
Kotlin
plugins {
  id 'kotlin-kapt'
}

dependencies {
    implementation 'com.google.dagger:dagger:2.x'
    kapt 'com.google.dagger:dagger-compiler:2.x'
}
Java
dependencies {
    implementation 'com.google.dagger:dagger:2.x'
    annotationProcessor 'com.google.dagger:dagger-compiler:2.x'
}
Dagger in Android
Consider an example Android app with the dependency graph from Figure 1.
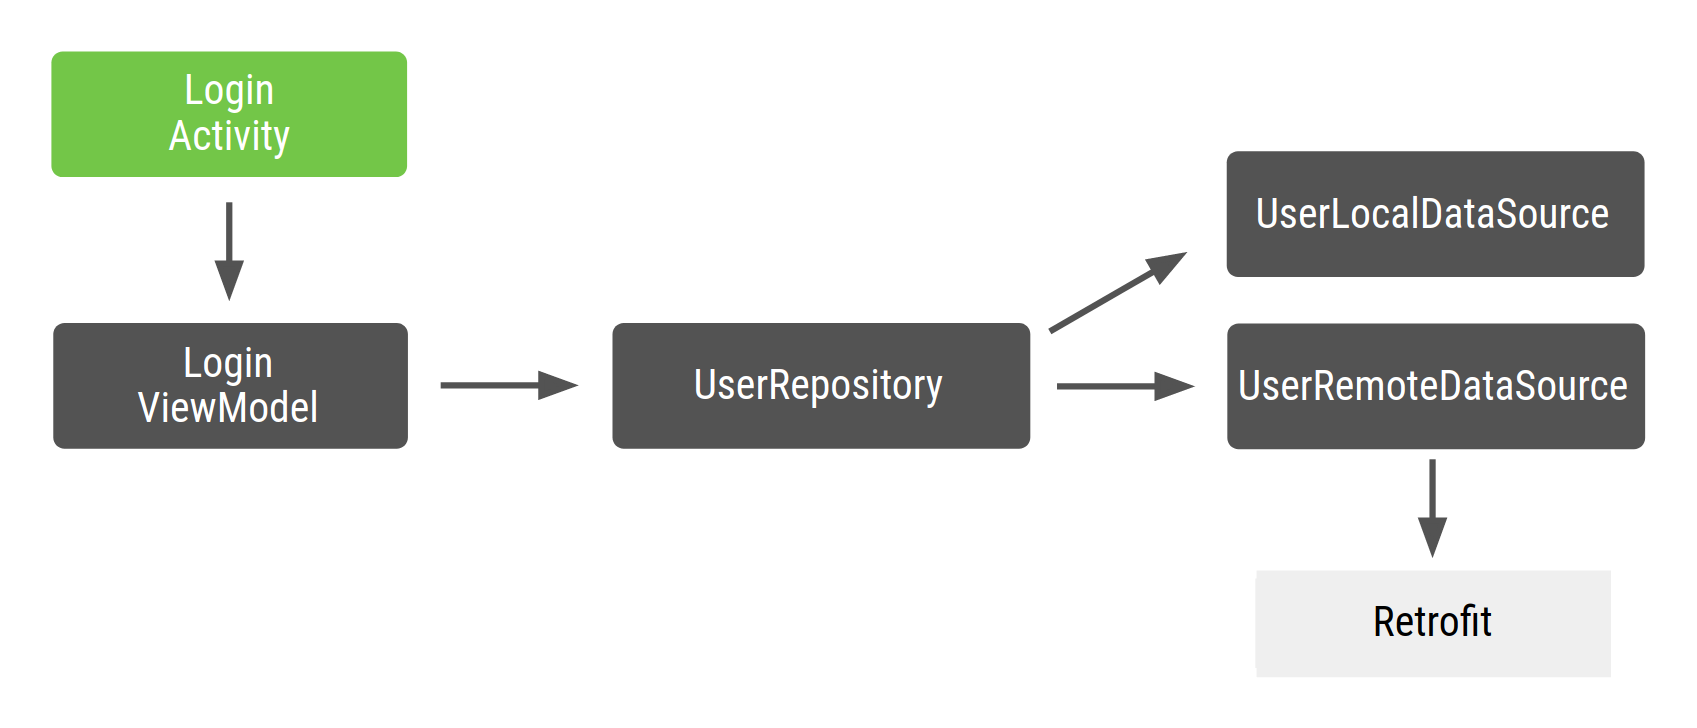
Figure 1. Dependency graph of the example code
In Android, you usually create a Dagger graph that lives in your application
class because you want an instance of the graph to be in memory as long as the
app is running. In this way, the graph is attached to the app lifecycle. In some
cases, you might also want to have the application context available in the
graph. For that, you would also need the graph to be in the
Application class. One advantage of this
approach is that the graph is available to other Android framework classes.
Additionally, it simplifies testing by allowing you to use a custom
Application class in tests.
Because the interface that generates the graph is annotated with @Component,
you can call it ApplicationComponent or ApplicationGraph. You usually keep
an instance of that component in your custom Application class and call it
every time you need the application graph, as shown in the following code
snippet:
Kotlin
// Definition of the Application graph
@Component
interface ApplicationComponent { ... }

// appComponent lives in the Application class to share its lifecycle
class MyApplication: Application() {
    // Reference to the application graph that is used across the whole app
    val appComponent = DaggerApplicationComponent.create()
}
Java
// Definition of the Application graph
@Component
public interface ApplicationComponent {
}

// appComponent lives in the Application class to share its lifecycle
public class MyApplication extends Application {

    // Reference to the application graph that is used across the whole app
    ApplicationComponent appComponent = DaggerApplicationComponent.create();
}
Because certain Android framework classes such as activities and fragments are
instantiated by the system, Dagger can't create them for you. For activities
specifically, any initialization code needs to go into the onCreate() method.
That means you cannot use the @Inject annotation in the constructor of the
class (constructor injection) as you did in the previous examples. Instead,
you have to use field injection.
Instead of creating the dependencies an activity requires in the onCreate()
method, you want Dagger to populate those dependencies for you. For field
injection, you instead apply the @Inject annotation to the fields that you
want to get from the Dagger graph.
Kotlin
class LoginActivity: Activity() {
    // You want Dagger to provide an instance of LoginViewModel from the graph
    @Inject lateinit var loginViewModel: LoginViewModel
}
Java
public class LoginActivity extends Activity {

    // You want Dagger to provide an instance of LoginViewModel from the graph
    @Inject
    LoginViewModel loginViewModel;
}
For simplicity, LoginViewModel is not an Android Architecture Components
ViewModel; it's just a regular class that acts as a ViewModel.
For more information about how to inject these classes, check out the code
in the official Android Blueprints Dagger implementation, in
the dev-dagger branch.
One of the considerations with Dagger is that injected fields cannot be private. They need to have at least package-private visibility like in the preceding code.
Injecting activities
Dagger needs to know that LoginActivity has to access the graph in order to
provide the ViewModel it requires. In the Dagger basics page, you used
the @Component interface to get objects from the graph
by exposing functions with the return type of what you want to get from the
graph. In this case, you need to tell Dagger about an object (LoginActivity
in this case) that requires a dependency to be injected. For that, you expose
a function that takes as a parameter the object that requests injection.
Kotlin
@Component
interface ApplicationComponent {
    // This tells Dagger that LoginActivity requests injection so the graph needs to
    // satisfy all the dependencies of the fields that LoginActivity is requesting.
    fun inject(activity: LoginActivity)
}
Java
@Component
public interface ApplicationComponent {
    // This tells Dagger that LoginActivity requests injection so the graph needs to
    // satisfy all the dependencies of the fields that LoginActivity is injecting.
    void inject(LoginActivity loginActivity);
}
This function tells Dagger that LoginActivity wants to access the graph and
requests injection. Dagger needs to satisfy all the dependencies that
LoginActivity requires (LoginViewModel with its own dependencies).
If you have multiple classes that request injection, you have to specifically
declare them all in the component with their exact type. For example, if you had
LoginActivity and RegistrationActivity requesting injection, you'd have two
inject() methods instead of a generic one covering both cases. A generic
inject() method doesn't tell Dagger what needs to be provided. The functions
in the interface can have any name, but calling them inject() when they
receive the object to inject as a parameter is a convention in Dagger.
To inject an object in the activity, you'd use the appComponent defined in
your Application class and call the inject() method, passing in an instance
of the activity that requests injection.
When using activities, inject Dagger in the
activity's onCreate() method before calling super.onCreate() to avoid issues
with fragment restoration. During the restore phase in super.onCreate(),
an activity attaches fragments that might want to access activity bindings.
When using fragments, inject Dagger in the fragment's onAttach()
method. In this case, it can be done before or after calling super.onAttach().
Kotlin
class LoginActivity: Activity() {
    // You want Dagger to provide an instance of LoginViewModel from the graph
    @Inject lateinit var loginViewModel: LoginViewModel

    override fun onCreate(savedInstanceState: Bundle?) {
        // Make Dagger instantiate @Inject fields in LoginActivity
        (applicationContext as MyApplication).appComponent.inject(this)
        // Now loginViewModel is available

        super.onCreate(savedInstanceState)
    }
}

// @Inject tells Dagger how to create instances of LoginViewModel
class LoginViewModel @Inject constructor(
    private val userRepository: UserRepository
) { ... }
Java
public class LoginActivity extends Activity {

    // You want Dagger to provide an instance of LoginViewModel from the graph
    @Inject
    LoginViewModel loginViewModel;

    @Override
    protected void onCreate(Bundle savedInstanceState) {
        // Make Dagger instantiate @Inject fields in LoginActivity
        ((MyApplication) getApplicationContext()).appComponent.inject(this);
        // Now loginViewModel is available

        super.onCreate(savedInstanceState);
    }
}

public class LoginViewModel {

    private final UserRepository userRepository;

    // @Inject tells Dagger how to create instances of LoginViewModel
    @Inject
    public LoginViewModel(UserRepository userRepository) {
        this.userRepository = userRepository;
    }
}
Let's tell Dagger how to provide the rest of the dependencies to build the graph:
Kotlin
class UserRepository @Inject constructor(
    private val localDataSource: UserLocalDataSource,
    private val remoteDataSource: UserRemoteDataSource
) { ... }

class UserLocalDataSource @Inject constructor() { ... }
class UserRemoteDataSource @Inject constructor(
    private val loginService: LoginRetrofitService
) { ... }
Java
public class UserRepository {

    private final UserLocalDataSource userLocalDataSource;
    private final UserRemoteDataSource userRemoteDataSource;

    @Inject
    public UserRepository(UserLocalDataSource userLocalDataSource, UserRemoteDataSource userRemoteDataSource) {
        this.userLocalDataSource = userLocalDataSource;
        this.userRemoteDataSource = userRemoteDataSource;
    }
}

public class UserLocalDataSource {

    @Inject
    public UserLocalDataSource() {}
}

public class UserRemoteDataSource {

    private final LoginRetrofitService loginRetrofitService;

    @Inject
    public UserRemoteDataSource(LoginRetrofitService loginRetrofitService) {
        this.loginRetrofitService = loginRetrofitService;
    }
}
Dagger modules
For this example, you're using the Retrofit networking library.
UserRemoteDataSource has a dependency on LoginRetrofitService. However,
the way to create an instance of LoginRetrofitService is different from what
you've been doing until now. It's not a class instantiation; it's the result of
calling Retrofit.Builder() and passing in different parameters to configure
the login service.
Apart from the @Inject annotation, there's another way to tell Dagger how to
provide an instance of a class: the information inside Dagger modules. A Dagger
module is a class that is annotated with @Module. There, you can define
dependencies with the @Provides annotation.
Kotlin
// @Module informs Dagger that this class is a Dagger Module
@Module
class NetworkModule {

    // @Provides tell Dagger how to create instances of the type that this function
    // returns (i.e. LoginRetrofitService).
    // Function parameters are the dependencies of this type.
    @Provides
    fun provideLoginRetrofitService(): LoginRetrofitService {
        // Whenever Dagger needs to provide an instance of type LoginRetrofitService,
        // this code (the one inside the @Provides method) is run.
        return Retrofit.Builder()
                .baseUrl("https://example.com")
                .build()
                .create(LoginService::class.java)
    }
}
Java
// @Module informs Dagger that this class is a Dagger Module
@Module
public class NetworkModule {

    // @Provides tell Dagger how to create instances of the type that this function
    // returns (i.e. LoginRetrofitService).
    // Function parameters are the dependencies of this type.
    @Provides
    public LoginRetrofitService provideLoginRetrofitService() {
        // Whenever Dagger needs to provide an instance of type LoginRetrofitService,
        // this code (the one inside the @Provides method) is run.
        return new Retrofit.Builder()
                .baseUrl("https://example.com")
                .build()
                .create(LoginService.class);
    }
}
Modules are a way to semantically encapsulate information on how to provide
objects. As you can see, you called the class NetworkModule to group the logic
of providing objects related to networking. If the application expands, you can
also add how to provide an OkHttpClient here, or how to
configure Gson or Moshi.
The dependencies of a @Provides method are the parameters of that method. For
the previous method, LoginRetrofitService can be provided with no dependencies
because the method has no parameters. If you had declared an OkHttpClient as a
parameter, Dagger would need to provide an OkHttpClient instance from the
graph to satisfy the dependencies of LoginRetrofitService. For example:
Kotlin
@Module
class NetworkModule {
    // Hypothetical dependency on LoginRetrofitService
    @Provides
    fun provideLoginRetrofitService(
        okHttpClient: OkHttpClient
    ): LoginRetrofitService { ... }
}
Java
@Module
public class NetworkModule {

    @Provides
    public LoginRetrofitService provideLoginRetrofitService(OkHttpClient okHttpClient) {
        ...
    }
}
In order for the Dagger graph to know about this module, you have to add it to
the @Component interface as follows:
Kotlin
// The "modules" attribute in the @Component annotation tells Dagger what Modules
// to include when building the graph
@Component(modules = [NetworkModule::class])
interface ApplicationComponent {
    ...
}
Java
// The "modules" attribute in the @Component annotation tells Dagger what Modules
// to include when building the graph
@Component(modules = NetworkModule.class)
public interface ApplicationComponent {
    ...
}
The recommended way to add types to the Dagger graph is by using constructor
injection (i.e. with the @Inject annotation on the constructor of the class).
Sometimes, this is not possible and you have to use Dagger modules. One example
is when you want Dagger to use the result of a computation to determine how to
create an instance of an object. Whenever it has to provide an instance of that
type, Dagger runs the code inside the @Provides method.
This is how the Dagger graph in the example looks right now:
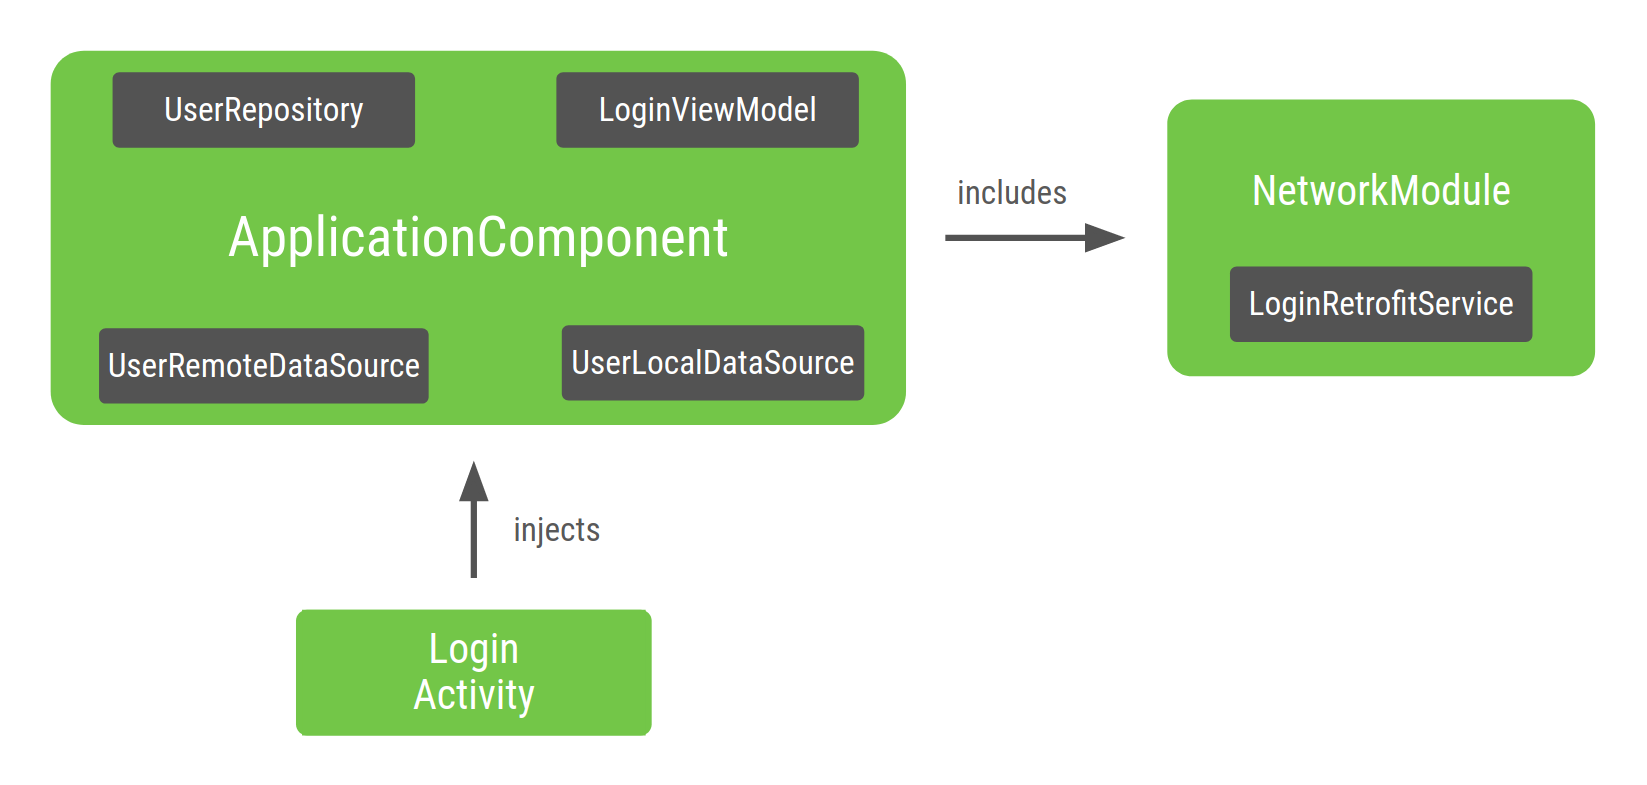
Figure 2. Representation of the graph with
LoginActivity being injected by Dagger
The entry point to the graph is LoginActivity. Because LoginActivity injects
LoginViewModel, Dagger builds a graph that knows how to provide an instance
of LoginViewModel, and recursively, of its dependencies. Dagger knows how to
do this because of the @Inject annotation on the classes' constructor.
Inside the ApplicationComponent generated by Dagger, there's a factory-type
method to get instances of all the classes it knows how to provide. In this
example, Dagger delegates to the NetworkModule included in
ApplicationComponent to get an instance of LoginRetrofitService.
Dagger scopes
Scopes were mentioned on the Dagger basics page as a way to have a unique instance of a type in a component. This is what is meant by scoping a type to the component's lifecycle.
Because you might want to use UserRepository in other features of the app and
might not want to create a new object every time you need it, you can designate
it as a unique instance for the whole app. It is the same for
LoginRetrofitService: it can be expensive to create, and you also want a
unique instance of that object to be reused. Creating an instance of
UserRemoteDataSource is not that expensive, so scoping it to the
component's lifecycle is not necessary.
@Singleton is the only scope annotation that comes with
the javax.inject package. You can use it to annotate ApplicationComponent
and the objects you want to reuse across the whole application.
Kotlin
@Singleton
@Component(modules = [NetworkModule::class])
interface ApplicationComponent {
    fun inject(activity: LoginActivity)
}

@Singleton
class UserRepository @Inject constructor(
    private val localDataSource: UserLocalDataSource,
    private val remoteDataSource: UserRemoteDataSource
) { ... }

@Module
class NetworkModule {
    // Way to scope types inside a Dagger Module
    @Singleton
    @Provides
    fun provideLoginRetrofitService(): LoginRetrofitService { ... }
}
Java
@Singleton
@Component(modules = NetworkModule.class)
public interface ApplicationComponent {
    void inject(LoginActivity loginActivity);
}

@Singleton
public class UserRepository {

    private final UserLocalDataSource userLocalDataSource;
    private final UserRemoteDataSource userRemoteDataSource;

    @Inject
    public UserRepository(UserLocalDataSource userLocalDataSource, UserRemoteDataSource userRemoteDataSource) {
        this.userLocalDataSource = userLocalDataSource;
        this.userRemoteDataSource = userRemoteDataSource;
    }
}

@Module
public class NetworkModule {

    @Singleton
    @Provides
    public LoginRetrofitService provideLoginRetrofitService() { ... }
}
Take care not to introduce memory leaks when applying scopes to objects. As
long as the scoped component is in memory, the created object is in memory
too. Because ApplicationComponent is created when the app is launched (in the
Application class), it is destroyed when the app gets destroyed. Thus, the
unique instance of UserRepository always remains in memory until the
application is destroyed.
Dagger subcomponents
If your login flow (managed by a single LoginActivity) consists of multiple
fragments, you should reuse the same instance of LoginViewModel in all
fragments. @Singleton cannot annotate LoginViewModel to reuse the instance
for the following reasons:
The instance of
LoginViewModelwould persist in memory after the flow has finished.You want a different instance of
LoginViewModelfor each login flow. For example, if the user logs out, you want a different instance ofLoginViewModel, rather than the same instance as when the user logged in for the first time.
To scope LoginViewModel to the lifecycle of LoginActivity you need to create
a new component (a new subgraph) for the login flow and a new scope.
Let's create a graph specific to the login flow.
Kotlin
@Component
interface LoginComponent {}
Java
@Component
public interface LoginComponent {
}
Now, LoginActivity should get injections from LoginComponent because it
has a login-specific configuration. This removes the responsibility to inject
LoginActivity from the ApplicationComponent class.
Kotlin
@Component
interface LoginComponent {
    fun inject(activity: LoginActivity)
}
Java
@Component
public interface LoginComponent {
    void inject(LoginActivity loginActivity);
}
LoginComponent must be able to access the objects from ApplicationComponent
because LoginViewModel depends on UserRepository. The way to tell Dagger that
you want a new component to use part of another component is with
Dagger subcomponents. The new component must be a subcomponent of the
component containing shared resources.
Subcomponents are components that inherit and extend the object graph of a parent component. Thus, all objects provided in the parent component are provided in the subcomponent too. In this way, an object from a subcomponent can depend on an object provided by the parent component.
To create instances of subcomponents, you need an instance of the parent component. Therefore, the objects provided by the parent component to the subcomponent are still scoped to the parent component.
In the example, you must define LoginComponent as a subcomponent of
ApplicationComponent. To do this, annotate LoginComponent with
@Subcomponent:
Kotlin
// @Subcomponent annotation informs Dagger this interface is a Dagger Subcomponent
@Subcomponent
interface LoginComponent {

    // This tells Dagger that LoginActivity requests injection from LoginComponent
    // so that this subcomponent graph needs to satisfy all the dependencies of the
    // fields that LoginActivity is injecting
    fun inject(loginActivity: LoginActivity)
}
Java
// @Subcomponent annotation informs Dagger this interface is a Dagger Subcomponent
@Subcomponent
public interface LoginComponent {

    // This tells Dagger that LoginActivity requests injection from LoginComponent
    // so that this subcomponent graph needs to satisfy all the dependencies of the
    // fields that LoginActivity is injecting
    void inject(LoginActivity loginActivity);
}
You also must define a subcomponent factory inside LoginComponent so that
ApplicationComponent knows how to create instances of LoginComponent.
Kotlin
@Subcomponent
interface LoginComponent {

    // Factory that is used to create instances of this subcomponent
    @Subcomponent.Factory
    interface Factory {
        fun create(): LoginComponent
    }

    fun inject(loginActivity: LoginActivity)
}
Java
@Subcomponent
public interface LoginComponent {

    // Factory that is used to create instances of this subcomponent
    @Subcomponent.Factory
    interface Factory {
        LoginComponent create();
    }

    void inject(LoginActivity loginActivity);
}
To tell Dagger that LoginComponent is a subcomponent of
ApplicationComponent, you have to indicate it by:
Creating a new Dagger module (e.g.
SubcomponentsModule) passing the subcomponent's class to thesubcomponentsattribute of the annotation.Kotlin
// The "subcomponents" attribute in the @Module annotation tells Dagger what
// Subcomponents are children of the Component this module is included in.
@Module(subcomponents = LoginComponent::class)
class SubcomponentsModule {}
Java
// The "subcomponents" attribute in the @Module annotation tells Dagger what
// Subcomponents are children of the Component this module is included in.
@Module(subcomponents = LoginComponent.class)
public class SubcomponentsModule {
}
Adding the new module (i.e.
SubcomponentsModule) toApplicationComponent:Kotlin
// Including SubcomponentsModule, tell ApplicationComponent that
// LoginComponent is its subcomponent.
@Singleton
@Component(modules = [NetworkModule::class, SubcomponentsModule::class])
interface ApplicationComponent {
}
Java
// Including SubcomponentsModule, tell ApplicationComponent that
// LoginComponent is its subcomponent.
@Singleton
@Component(modules = {NetworkModule.class, SubcomponentsModule.class})
public interface ApplicationComponent {
}
Note that
ApplicationComponentdoesn't need to injectLoginActivityanymore because that responsibility now belongs toLoginComponent, so you can remove theinject()method fromApplicationComponent.Consumers of
ApplicationComponentneed to know how to create instances ofLoginComponent. The parent component must add a method in its interface to let consumers create instances of the subcomponent out of an instance of the parent component:Expose the factory that creates instances of
LoginComponentin the interface:Kotlin
@Singleton
@Component(modules = [NetworkModule::class, SubcomponentsModule::class])
interface ApplicationComponent {
// This function exposes the LoginComponent Factory out of the graph so consumers
// can use it to obtain new instances of LoginComponent
fun loginComponent(): LoginComponent.Factory
}
Java
@Singleton
@Component(modules = { NetworkModule.class, SubcomponentsModule.class} )
public interface ApplicationComponent {
// This function exposes the LoginComponent Factory out of the graph so consumers
// can use it to obtain new instances of LoginComponent
LoginComponent.Factory loginComponent();
}
Assigning scopes to subcomponents
If you build the project, you can create instances of both ApplicationComponent
and LoginComponent. ApplicationComponent is attached to the lifecycle of the
application because you want to use the same instance of the graph as long as
the application is in memory.
What's the lifecycle of LoginComponent? One of the reasons why you needed
LoginComponent is because you needed to share the same instance of the
LoginViewModel between Login-related fragments. But also, you want different
instances of LoginViewModel whenever there's a new login flow. LoginActivity
is the right lifetime for LoginComponent: for every new activity, you need
a new instance of LoginComponent and fragments that can use that instance of
LoginComponent.
Because LoginComponent is attached to the LoginActivity lifecycle, you have to
keep a reference to the component in the activity in the same way you kept the
reference to the applicationComponent in the Application class. That way,
fragments can access it.
Kotlin
class LoginActivity: Activity() {
    // Reference to the Login graph
    lateinit var loginComponent: LoginComponent
    ...
}
Java
public class LoginActivity extends Activity {

    // Reference to the Login graph
    LoginComponent loginComponent;

    ...
}
Notice that the variable loginComponent is not annotated with @Inject
because you're not expecting that variable to be provided by Dagger.
You can use the ApplicationComponent to get a reference to LoginComponent
and then inject LoginActivity as follows:
Kotlin
class LoginActivity: Activity() {
    // Reference to the Login graph
    lateinit var loginComponent: LoginComponent

    // Fields that need to be injected by the login graph
    @Inject lateinit var loginViewModel: LoginViewModel

    override fun onCreate(savedInstanceState: Bundle?) {
        // Creation of the login graph using the application graph
        loginComponent = (applicationContext as MyDaggerApplication)
                            .appComponent.loginComponent().create()

        // Make Dagger instantiate @Inject fields in LoginActivity
        loginComponent.inject(this)

        // Now loginViewModel is available

        super.onCreate(savedInstanceState)
    }
}
Java
public class LoginActivity extends Activity {

    // Reference to the Login graph
    LoginComponent loginComponent;

    // Fields that need to be injected by the login graph
    @Inject
    LoginViewModel loginViewModel;

    @Override
    protected void onCreate(Bundle savedInstanceState) {
        // Creation of the login graph using the application graph
        loginComponent = ((MyApplication) getApplicationContext())
                                .appComponent.loginComponent().create();

        // Make Dagger instantiate @Inject fields in LoginActivity
        loginComponent.inject(this);

        // Now loginViewModel is available

        super.onCreate(savedInstanceState);
    }
}
LoginComponent is created in the activity's onCreate() method, and it'll get
implicitly destroyed when the activity gets destroyed.
The LoginComponent must always provide the same instance of LoginViewModel
each time it's requested. You can ensure this by creating a custom annotation
scope and annotating both LoginComponent and LoginViewModel with it. Note
that you cannot use the @Singleton annotation because it's already been used
by the parent component and that'd make the object an application singleton
(unique instance for the whole app). You need to create a different annotation
scope.
In this case, you could have called this scope @LoginScope but it's not a good
practice. The scope annotation's name should not be explicit to the purpose it
fulfills. Instead, it should be named depending on its lifetime because
annotations can be reused by sibling components such as RegistrationComponent
and SettingsComponent. That's why you should call it @ActivityScope instead
of @LoginScope.
Kotlin
// Definition of a custom scope called ActivityScope
@Scope
@Retention(value = AnnotationRetention.RUNTIME)
annotation class ActivityScope

// Classes annotated with @ActivityScope are scoped to the graph and the same
// instance of that type is provided every time the type is requested.
@ActivityScope
@Subcomponent
interface LoginComponent { ... }

// A unique instance of LoginViewModel is provided in Components
// annotated with @ActivityScope
@ActivityScope
class LoginViewModel @Inject constructor(
    private val userRepository: UserRepository
) { ... }
Java
// Definition of a custom scope called ActivityScope
@Scope
@Retention(RetentionPolicy.RUNTIME)
public @interface ActivityScope {}

// Classes annotated with @ActivityScope are scoped to the graph and the same
// instance of that type is provided every time the type is requested.
@ActivityScope
@Subcomponent
public interface LoginComponent { ... }

// A unique instance of LoginViewModel is provided in Components
// annotated with @ActivityScope
@ActivityScope
public class LoginViewModel {

    private final UserRepository userRepository;

    @Inject
    public LoginViewModel(UserRepository userRepository) {
        this.userRepository = userRepository;
    }
}
Now, if you had two fragments that need LoginViewModel, both of them are
provided with the same instance. For example, if you have a
LoginUsernameFragment and a LoginPasswordFragment they need to get injected
by the LoginComponent:
Kotlin
@ActivityScope
@Subcomponent
interface LoginComponent {

    @Subcomponent.Factory
    interface Factory {
        fun create(): LoginComponent
    }

    // All LoginActivity, LoginUsernameFragment and LoginPasswordFragment
    // request injection from LoginComponent. The graph needs to satisfy
    // all the dependencies of the fields those classes are injecting
    fun inject(loginActivity: LoginActivity)
    fun inject(usernameFragment: LoginUsernameFragment)
    fun inject(passwordFragment: LoginPasswordFragment)
}
Java
@ActivityScope
@Subcomponent
public interface LoginComponent {

    @Subcomponent.Factory
    interface Factory {
        LoginComponent create();
    }

    // All LoginActivity, LoginUsernameFragment and LoginPasswordFragment
    // request injection from LoginComponent. The graph needs to satisfy
    // all the dependencies of the fields those classes are injecting
    void inject(LoginActivity loginActivity);
    void inject(LoginUsernameFragment loginUsernameFragment);
    void inject(LoginPasswordFragment loginPasswordFragment);
}
The components access the instance of the component that lives in the
LoginActivity object. Example code for LoginUserNameFragment appears in the
following code snippet:
Kotlin
class LoginUsernameFragment: Fragment() {

    // Fields that need to be injected by the login graph
    @Inject lateinit var loginViewModel: LoginViewModel

    override fun onAttach(context: Context) {
        super.onAttach(context)

        // Obtaining the login graph from LoginActivity and instantiate
        // the @Inject fields with objects from the graph
        (activity as LoginActivity).loginComponent.inject(this)

        // Now you can access loginViewModel here and onCreateView too
        // (shared instance with the Activity and the other Fragment)
    }
}
Java
public class LoginUsernameFragment extends Fragment {

    // Fields that need to be injected by the login graph
    @Inject
    LoginViewModel loginViewModel;

    @Override
    public void onAttach(Context context) {
        super.onAttach(context);

        // Obtaining the login graph from LoginActivity and instantiate
        // the @Inject fields with objects from the graph
        ((LoginActivity) getActivity()).loginComponent.inject(this);

        // Now you can access loginViewModel here and onCreateView too
        // (shared instance with the Activity and the other Fragment)
    }
}
And the same for LoginPasswordFragment:
Kotlin
class LoginPasswordFragment: Fragment() {

    // Fields that need to be injected by the login graph
    @Inject lateinit var loginViewModel: LoginViewModel

    override fun onAttach(context: Context) {
        super.onAttach(context)

        (activity as LoginActivity).loginComponent.inject(this)

        // Now you can access loginViewModel here and onCreateView too
        // (shared instance with the Activity and the other Fragment)
    }
}
Java
public class LoginPasswordFragment extends Fragment {

    // Fields that need to be injected by the login graph
    @Inject
    LoginViewModel loginViewModel;

    @Override
    public void onAttach(Context context) {
        super.onAttach(context);

        ((LoginActivity) getActivity()).loginComponent.inject(this);

        // Now you can access loginViewModel here and onCreateView too
        // (shared instance with the Activity and the other Fragment)
    }
}
Figure 3 shows how the Dagger graph looks with the new subcomponent. The classes
with a white dot (UserRepository, LoginRetrofitService, and LoginViewModel)
are the ones that have a unique instance scoped to their respective components.
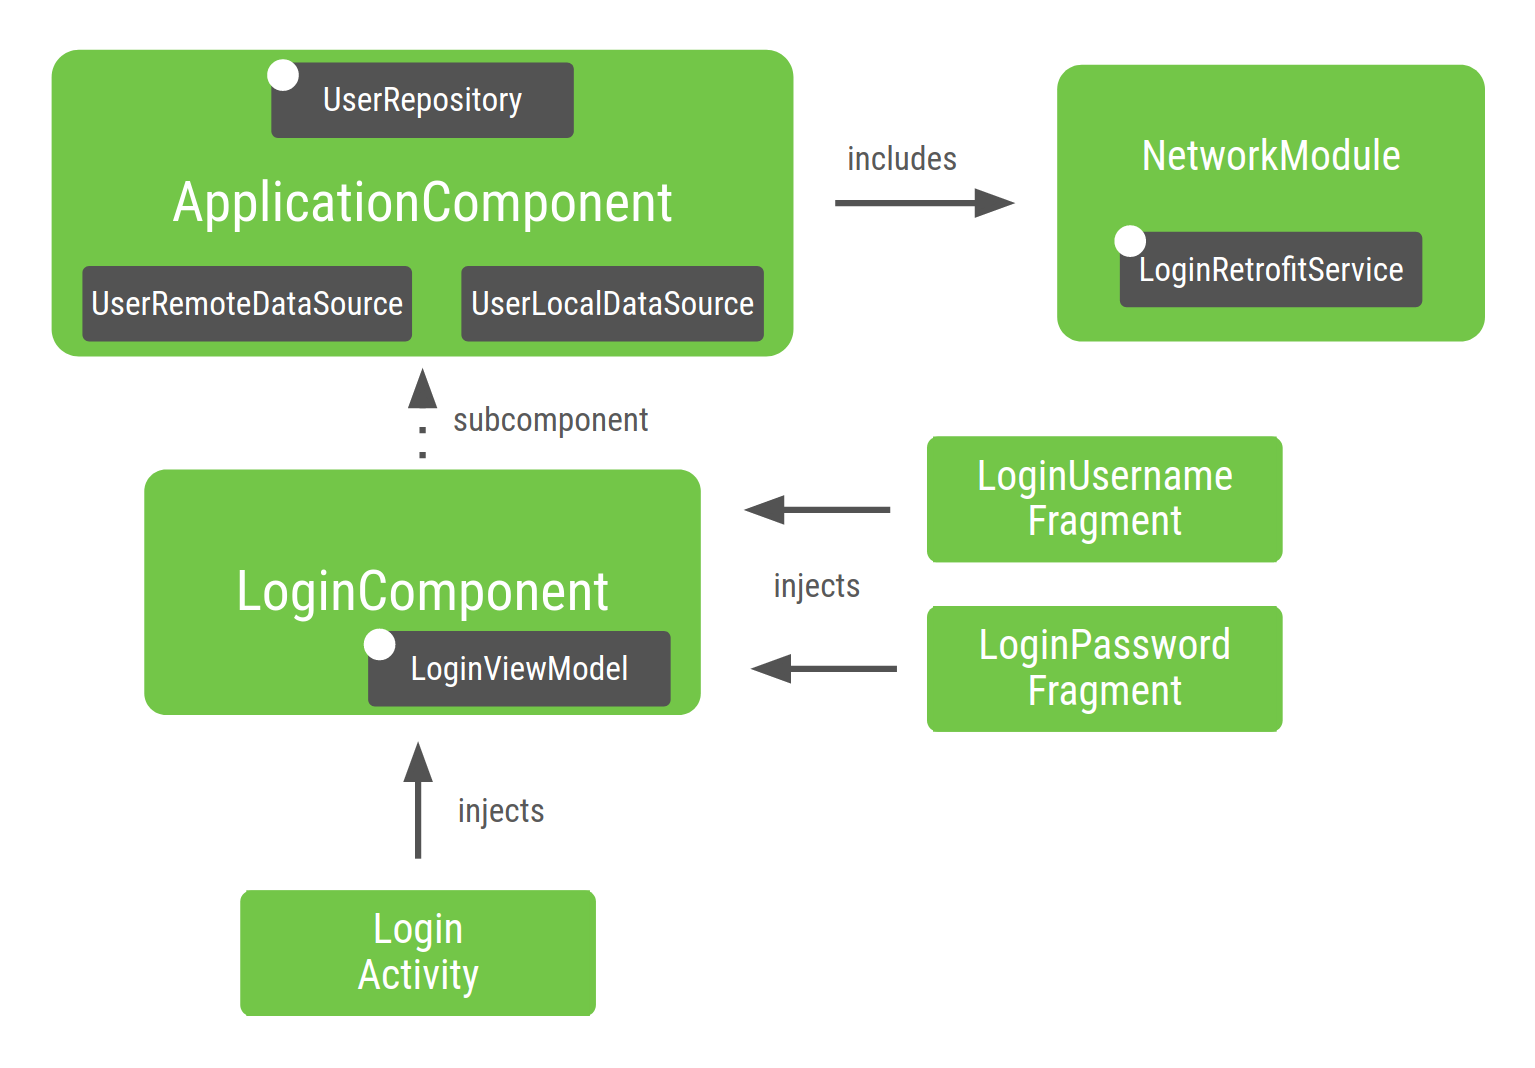
Figure 3. Representation of the graph you built for the Android app example
Let's break down the parts of the graph:
The
NetworkModule(and thereforeLoginRetrofitService) is included inApplicationComponentbecause you specified it in the component.UserRepositoryremains inApplicationComponentbecause it's scoped to theApplicationComponent. If the project grows, you want to share the same instance across different features (e.g. Registration).Because
UserRepositoryis part ofApplicationComponent, its dependencies (i.e.UserLocalDataSourceandUserRemoteDataSource) need to be in this component too in order to be able to provide instances ofUserRepository.LoginViewModelis included inLoginComponentbecause it's only required by the classes injected byLoginComponent.LoginViewModelis not included inApplicationComponentbecause no dependency inApplicationComponentneedsLoginViewModel.Similarly, if you hadn't had scoped
UserRepositorytoApplicationComponent, Dagger would automatically have includedUserRepositoryand its dependencies as part ofLoginComponentbecause that is currently the only placeUserRepositoryis used.
Apart from scoping objects to a different lifecycle, creating subcomponents is a good practice to encapsulate different parts of your application from each other.
Structuring your app to create different Dagger subgraphs depending on the flow of your app helps towards a more performant and scalable application in terms of memory and startup time.
Best practices when building a Dagger graph
When building the Dagger graph for your application:
When you create a component, you should consider what element is responsible for the lifetime of that component. In this case, the
Applicationclass is in charge ofApplicationComponentandLoginActivityis in charge ofLoginComponent.Use scoping only when it makes sense. Overusing scoping can have a negative effect on your app's runtime performance: the object is in memory as long as the component is in memory and getting a scoped object is more expensive. When Dagger provides the object, it uses
DoubleChecklocking instead of a factory-type provider.
Testing a project that uses Dagger
One of the benefits of using dependency injection frameworks like Dagger is that it makes testing your code easier.
Unit tests
You don't have to use Dagger for unit tests. When testing a class that uses constructor injection, you don't need to use Dagger to instantiate that class. You can directly call its constructor passing in fake or mock dependencies directly just as you would if they weren't annotated.
For example, when testing LoginViewModel:
Kotlin
@ActivityScope
class LoginViewModel @Inject constructor(
    private val userRepository: UserRepository
) { ... }

class LoginViewModelTest {

    @Test
    fun `Happy path`() {
        // You don't need Dagger to create an instance of LoginViewModel
        // You can pass a fake or mock UserRepository
        val viewModel = LoginViewModel(fakeUserRepository)
        assertEquals(...)
    }
}
Java
@ActivityScope
public class LoginViewModel {

    private final UserRepository userRepository;

    @Inject
    public LoginViewModel(UserRepository userRepository) {
        this.userRepository = userRepository;
    }
}

public class LoginViewModelTest {

    @Test
    public void happyPath() {
        // You don't need Dagger to create an instance of LoginViewModel
        // You can pass a fake or mock UserRepository
        LoginViewModel viewModel = new LoginViewModel(fakeUserRepository);
        assertEquals(...);
    }
}
End-to-end tests
For integration tests, a good practice is to create a
TestApplicationComponent meant for testing.
Production and testing use a different component configuration.
This requires more up-front design of the modules in your application. The testing component extends the production component and installs a different set of modules.
Kotlin
// TestApplicationComponent extends from ApplicationComponent to have them both
// with the same interface methods. You need to include the modules of the
// component here as well, and you can replace the ones you want to override.
// This sample uses FakeNetworkModule instead of NetworkModule
@Singleton
@Component(modules = [FakeNetworkModule::class, SubcomponentsModule::class])
interface TestApplicationComponent : ApplicationComponent {
}
Java
// TestApplicationComponent extends from ApplicationComponent to have them both
// with the same interface methods. You need to include the modules of the
// Component here as well, and you can replace the ones you want to override.
// This sample uses FakeNetworkModule instead of NetworkModule
@Singleton
@Component(modules = {FakeNetworkModule.class, SubcomponentsModule.class})
public interface TestApplicationComponent extends ApplicationComponent {
}
FakeNetworkModule has a fake implementation of the original NetworkModule.
There you can provide fake instances or mocks of whatever you want to replace.
Kotlin
// In the FakeNetworkModule, pass a fake implementation of LoginRetrofitService
// that you can use in your tests.
@Module
class FakeNetworkModule {
    @Provides
    fun provideLoginRetrofitService(): LoginRetrofitService {
        return FakeLoginService()
    }
}
Java
// In the FakeNetworkModule, pass a fake implementation of LoginRetrofitService
// that you can use in your tests.
@Module
public class FakeNetworkModule {

    @Provides
    public LoginRetrofitService provideLoginRetrofitService() {
        return new FakeLoginService();
    }
}
In your integration or end-to-end tests, you'd use a TestApplication that
creates the TestApplicationComponent instead of an ApplicationComponent.
Kotlin
// Your test application needs an instance of the test graph
class MyTestApplication: MyApplication() {
    override val appComponent = DaggerTestApplicationComponent.create()
}
Java
// Your test application needs an instance of the test graph
public class MyTestApplication extends MyApplication {
    ApplicationComponent appComponent = DaggerTestApplicationComponent.create();
}
Then, this test application is used in a custom TestRunner that you'll use to
run instrumentation tests. For more information about this, check out the Using
Dagger in your Android app codelab.
Working with Dagger modules
Dagger modules are a way to encapsulate how to provide objects in a semantic way. You can include modules in components but you can also include modules inside other modules. This is powerful, but can be easily misused.
Once a module has been added to either a component or another module, it's already in the Dagger graph; Dagger can provide those objects in that component. Before adding a module, check if that module is part of the Dagger graph already by checking if it's already added to the component or by compiling the project and seeing if Dagger can find the required dependencies for that module.
Good practice dictates that modules should only be declared once in a component (outside of specific advanced Dagger use cases).
Let's say you have your graph configured in this way. ApplicationComponent
includes Module1 and Module2 and Module1 includes ModuleX.
Kotlin
@Component(modules = [Module1::class, Module2::class])
interface ApplicationComponent { ... }

@Module(includes = [ModuleX::class])
class Module1 { ... }

@Module
class Module2 { ... }
Java
@Component(modules = {Module1.class, Module2.class})
public interface ApplicationComponent { ... }

@Module(includes = {ModuleX.class})
public class Module1 { ... }

@Module
public class Module2 { ... }
If now Module2 depends on classes provided by ModuleX. A bad practice
is including ModuleX in Module2 because ModuleX is included twice in
the graph as seen in the following code snippet:
Kotlin
// Bad practice: ModuleX is declared multiple times in this Dagger graph
@Component(modules = [Module1::class, Module2::class])
interface ApplicationComponent { ... }

@Module(includes = [ModuleX::class])
class Module1 { ... }

@Module(includes = [ModuleX::class])
class Module2 { ... }
Java
// Bad practice: ModuleX is declared multiple times in this Dagger graph.
@Component(modules = {Module1.class, Module2.class})
public interface ApplicationComponent { ... }

@Module(includes = ModuleX.class)
public class Module1 { ... }

@Module(includes = ModuleX.class)
public class Module2 { ... }
Instead, you should do one of the following:
- Refactor the modules and extract the common module out to the component.
- Create a new module with the objects that both modules share and extract it out to the component.
Not refactoring in this way results in a lot of modules including each other without a clear sense of organization and making it more difficult to see where each dependency is coming from.
Good practice (Option 1): ModuleX is declared once in the Dagger graph.
Kotlin
@Component(modules = [Module1::class, Module2::class, ModuleX::class])
interface ApplicationComponent { ... }

@Module
class Module1 { ... }

@Module
class Module2 { ... }
Java
@Component(modules = {Module1.class, Module2.class, ModuleX.class})
public interface ApplicationComponent { ... }

@Module
public class Module1 { ... }

@Module
public class Module2 { ... }
Good practice (Option 2): Common dependencies from Module1 and Module2
in ModuleX are extracted out to a new module named ModuleXCommon that is
included in the component. Then two other modules named
ModuleXWithModule1Dependencies and ModuleXWithModule2Dependencies are
created with the dependencies that are specific to each module. All modules
are declared once in the Dagger graph.
Kotlin
@Component(modules = [Module1::class, Module2::class, ModuleXCommon::class])
interface ApplicationComponent { ... }

@Module
class ModuleXCommon { ... }

@Module
class ModuleXWithModule1SpecificDependencies { ... }

@Module
class ModuleXWithModule2SpecificDependencies { ... }

@Module(includes = [ModuleXWithModule1SpecificDependencies::class])
class Module1 { ... }

@Module(includes = [ModuleXWithModule2SpecificDependencies::class])
class Module2 { ... }
Java
@Component(modules = {Module1.class, Module2.class, ModuleXCommon.class})
public interface ApplicationComponent { ... }

@Module
public class ModuleXCommon { ... }

@Module
public class ModuleXWithModule1SpecificDependencies { ... }

@Module
public class ModuleXWithModule2SpecificDependencies { ... }

@Module(includes = ModuleXWithModule1SpecificDependencies.class)
public class Module1 { ... }

@Module(includes = ModuleXWithModule2SpecificDependencies.class)
public class Module2 { ... }
Assisted injection
Assisted injection is a DI pattern that is used to construct an object where some parameters may be provided by the DI framework and others must be passed in at creation time by the user.
In Android, this pattern is common in details screens where the id of the element to show is only known at runtime, not at compile time when Dagger generates the DI graph. To learn more about assisted injection with Dagger, see the Dagger documentation.
Conclusion
If you haven't already, review the best practices section. To see how to use Dagger in an Android app, see the Using Dagger in an Android app codelab.