
You can use the Android Emulator to test how your app runs on Android Automotive OS.
Add system images
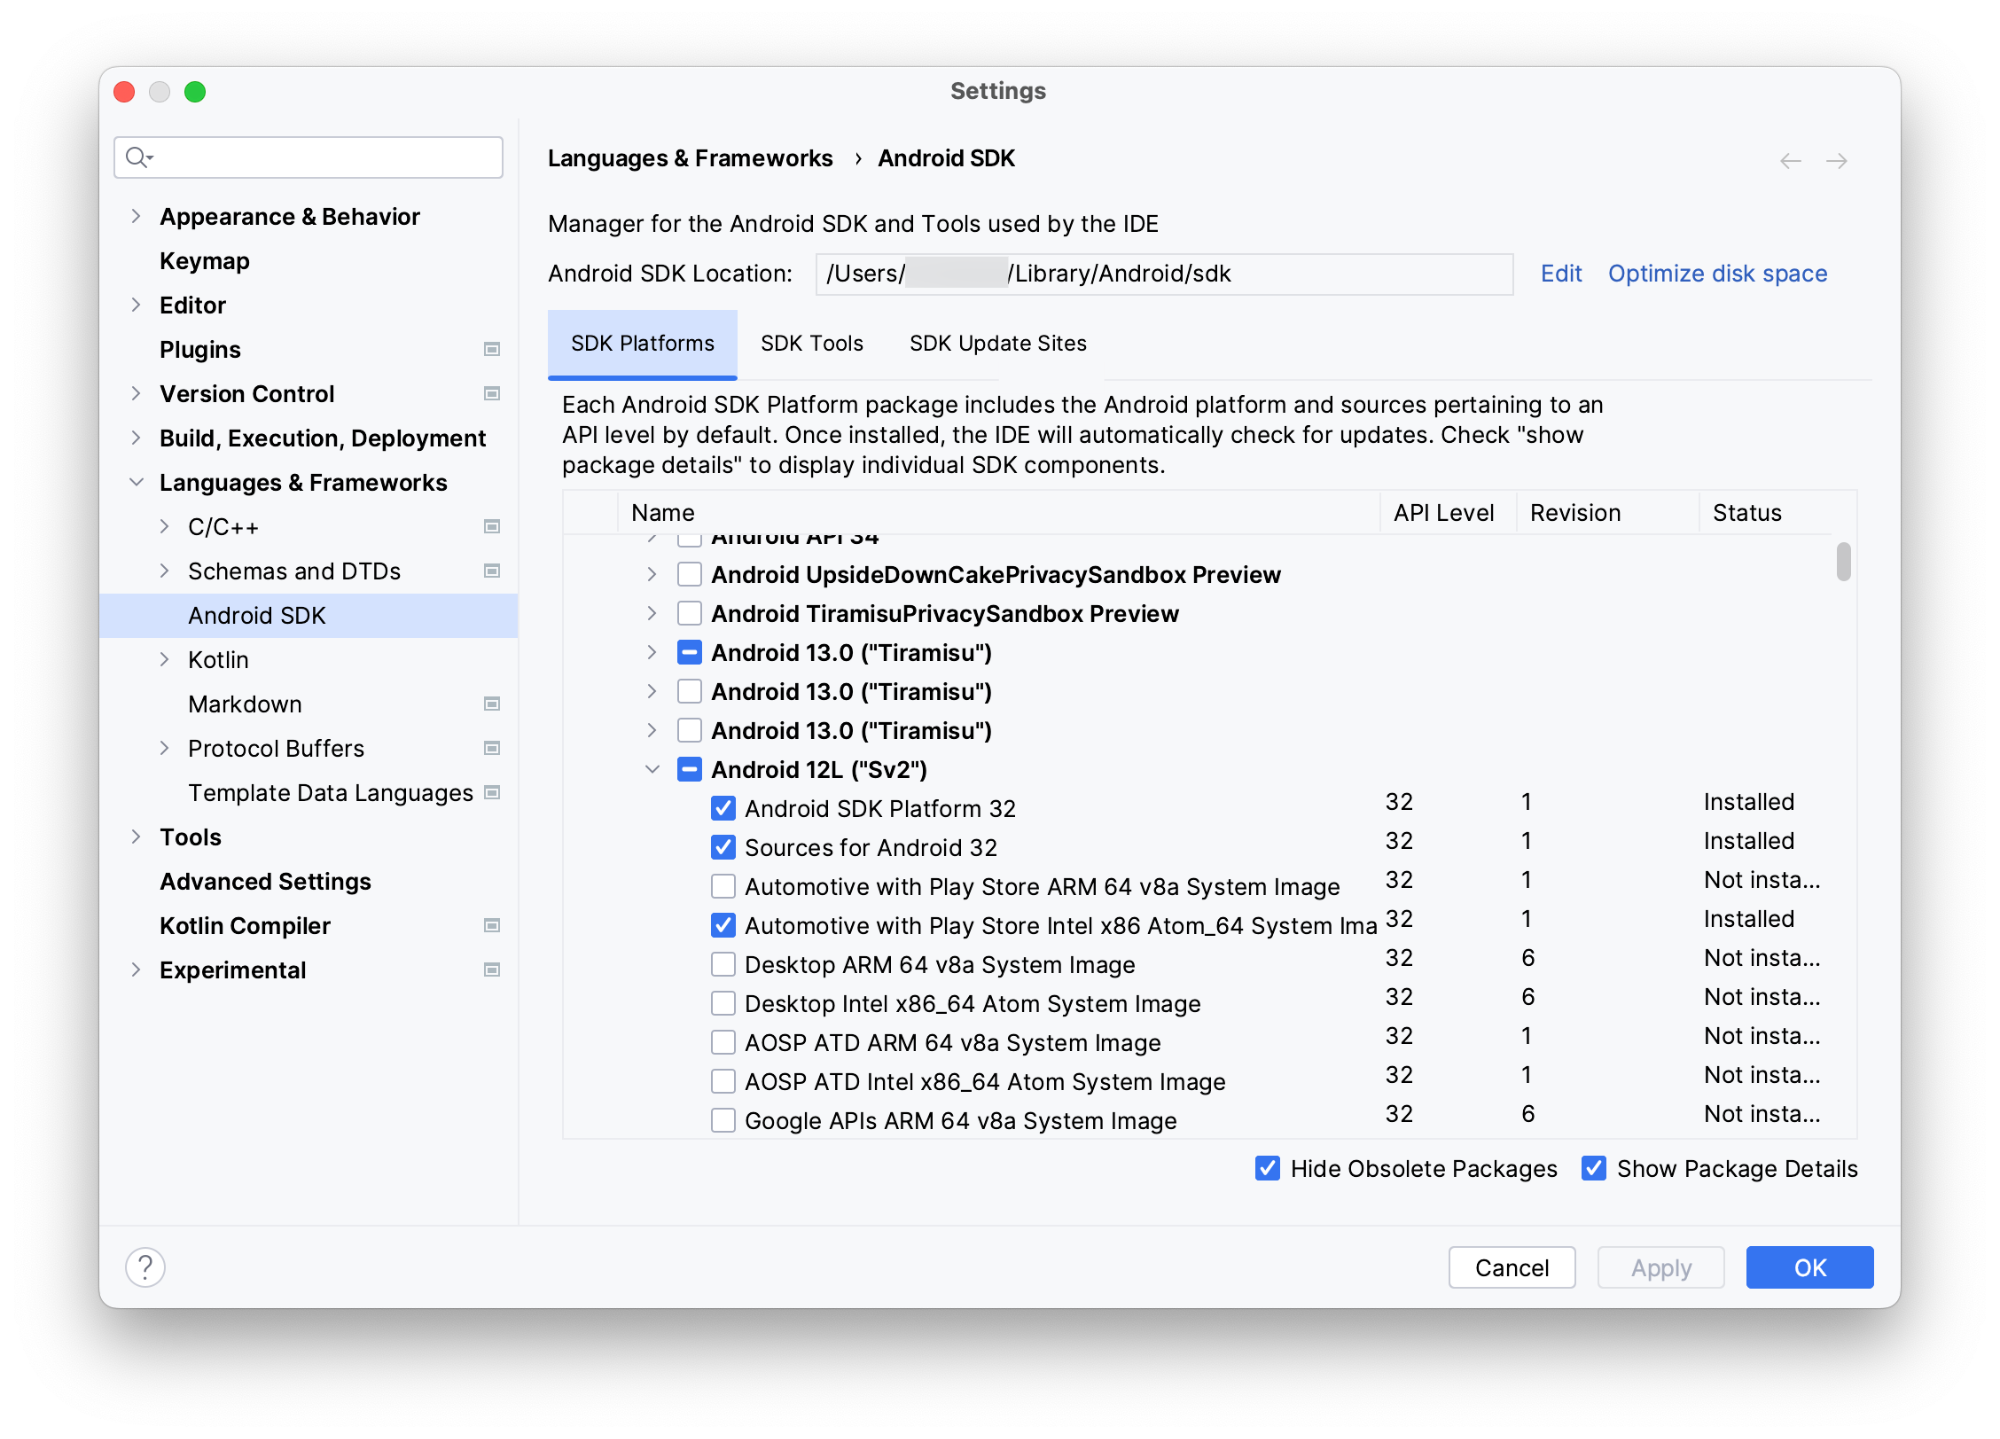
Before you can create Android Automotive OS virtual devices, you need to add system images through the Android Studio SDK Manager.
Add generic system images
Android Studio includes generic system images for Android Automotive OS that you can use to test your app and which you should use when taking screenshots for Google Play. All of these images include:
- Google Play services
- Google Automotive App Host except the API 28 image, as the host is only available on devices running API 29 or higher
| Name | API Level | Architecture | Features | Availability |
|---|---|---|---|---|
| Automotive Intel x86 Atom System Image | 28 | x86 | Google Play Store |  Android Studio preview Android Studio preview |
| Automotive with Play Store Intel x86 Atom System Image | 29 | x86 | Google Play Store | Android Studio preview |
| Automotive with Play Store Intel x86_64 Atom System Image | 30 | x86 | Google Play Store | Android Studio preview |
| Automotive with Play Store ARM 64 v8a System Image | 32 | ARM | Google Play Store | Android Studio preview |
| Automotive with Play Store Intel x86_64 Atom System Image | 32 | x86 | Google Play Store | Android Studio preview |
| Automotive Distant Display with Google APIs arm64-v8a System Image | 32 | ARM | Android Studio preview |
|
| Automotive Distant Display with Google APIs x86_64 System Image | 32 | x86 | Android Studio preview |
|
| Automotive Distant Display with Google Play arm64-v8a System Image | 32 | ARM | Google Play Store | Android Studio preview |
| Automotive Distant Display with Google Play x86_64 System Image | 32 | x86 | Google Play Store | Android Studio preview |
| Android Automotive with Google APIs ARM 64 v8a System Image | 33 | ARM |  Android Studio stable Android Studio stable |
|
| Android Automotive with Google APIs Intel x86_64 Atom System Image | 33 | x86 | Android Studio stable |
|
| Automotive Distant Display with Google Play arm64-v8a System Image | 33 | ARM | Google Play Store | Android Studio stable |
| Automotive Distant Display with Google Play x86_64 System Image | 33 | x86 | Google Play Store | Android Studio stable |
| Android Automotive with Google APIs arm64-v8a System Image | 34-ext9 | ARM |
|
Android Studio stable |
| Android Automotive with Google APIs x86_64 System Image | 34-ext9 | x86 |
|
Android Studio stable |
| Android Automotive with Google Play arm64-v8a System Image | 34-ext9 | ARM |
|
Android Studio stable |
| Android Automotive with Google Play x86_64 System Image | 34-ext9 | x86 |
|
Android Studio stable |
| Android Automotive with Google APIs arm64-v8a System Image | 35-ext15 | ARM |
|
Android Studio stable |
| Android Automotive with Google APIs x86_64 System Image | 35-ext15 | x86 |
|
Android Studio stable |
| Android Automotive with Google Play arm64-v8a System Image | 35-ext15 | ARM |
|
Android Studio stable |
| Android Automotive with Google Play x86_64 System Image | 35-ext15 | x86 |
|
Android Studio stable |
Follow these steps to install generic system images:
- In Android Studio, select Tools > SDK Manager.
- Click the SDK Platforms tab.
- Click Show Package Details.
- Select which image(s) to download. See the preceding table for details.
- Click Apply, then click OK.
Add system images from OEMs
You can also add OEM-specific system images. Follow the steps on OEM developer sites, in alphabetical order:
- Ampere (Renault, Alpine)
- General Motors (Chevrolet, Cadillac, GMC, Buick)
- Honda
- Mazda
- Polestar
- Volvo
Create a car AVD and run the emulator
Follow these steps to create an Android Virtual Device (AVD) that represents an Android Automotive OS vehicle and then use that AVD to run the emulator:
- In Android Studio, select Tools > AVD Manager.
- Click Create Virtual Device.
- From the Select Hardware dialog, select Automotive, and then select a hardware profile. Click Next.
- Select a system image that targets Automotive, such as Android 12L (Automotive with Play Store), and click Next.
- Name your AVD and select any other options that you want to customize, then click Finish.
- From the tool window bar, select your Android Automotive OS AVD as your deployment target.
- Click Run
 .
.
Use bundled hardware profiles
When creating an AVD, you can use the following hardware profiles that are bundled with Android Studio:
| Name | Resolution | Configurable | Compatibility | Availability |
|---|---|---|---|---|
| Automotive (1024p landscape) | 1024x768 | Android Studio stable |
||
| Automotive (1080p landscape) | 1080x600 | ✔ | API 33+ system images without the Google Play Store | Android Studio stable |
|
Automotive (1408p landscape)
Recommended for use with the API 34 images |
1408x792 | API 33+ system images without the Google Play Store | Android Studio stable |
|
|
Automotive (1408p landscape) with Google Play
Recommended for use with the API 34 images |
1408x792 | Android Studio stable |
||
| Automotive Portrait | 800x1280 | API 33+ system images without the Google Play Store | Android Studio stable |
|
| Automotive Large Portrait | 1280x1606 | ✔ | API 33+ system images without the Google Play Store | Android Studio stable |
| Automotive Ultrawide | 3904x1320 | ✔ | API 33+ system images without the Google Play Store | Android Studio stable |
| Automotive Distant Display | 1080x600 | API 32+ Distant display system images without the Google Play Store | Android Studio stable |
|
| Automotive Distant Display with Google Play | 1080x600 | Android Studio stable |
Create a hardware profile
To test hardware configurations other than those covered by the bundled hardware profiles, you can create a hardware profile for use with the Android Automotive OS emulator. Do this by selecting Android Automotive as the device type in the creation flow. Custom hardware profiles are only compatible with system images that don't include the Google Play Store.
Use the emulator's extended controls
In addition to many of the standard extended controls available in other Android emulators, there are some extended controls made specifically for the Android Automotive OS emulator.
Emulate hardware state
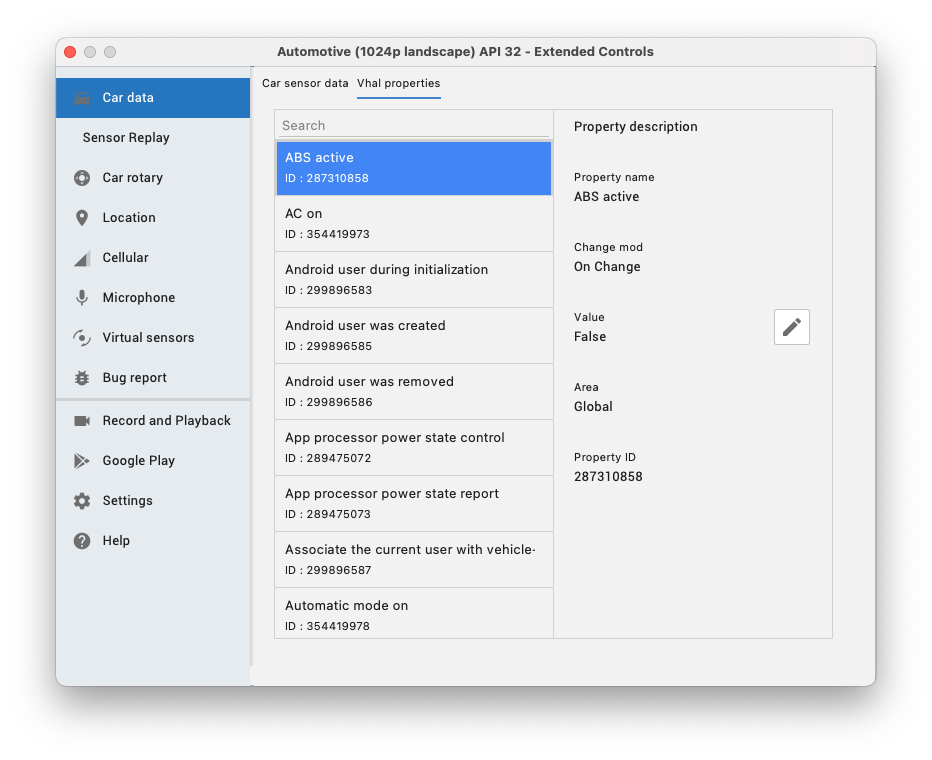
Beyond sensors such as accelerometers and gyroscopes that can be read using the
standard Android APIs when available, additional hardware properties
unique to vehicles are communicated over the Vehicle Hardware Abstraction Layer
(VHAL). These properties are modeled by the VehiclePropertyIds
class.
While the emulator is running, you can modify the values of these properties
from the Car data feature of the extended controls. For example, to set the
current speed of the vehicle, you can find the property for speed
(VehiclePropertyIds.PERF_VEHICLE_SPEED) and change its value.
Simulate driving
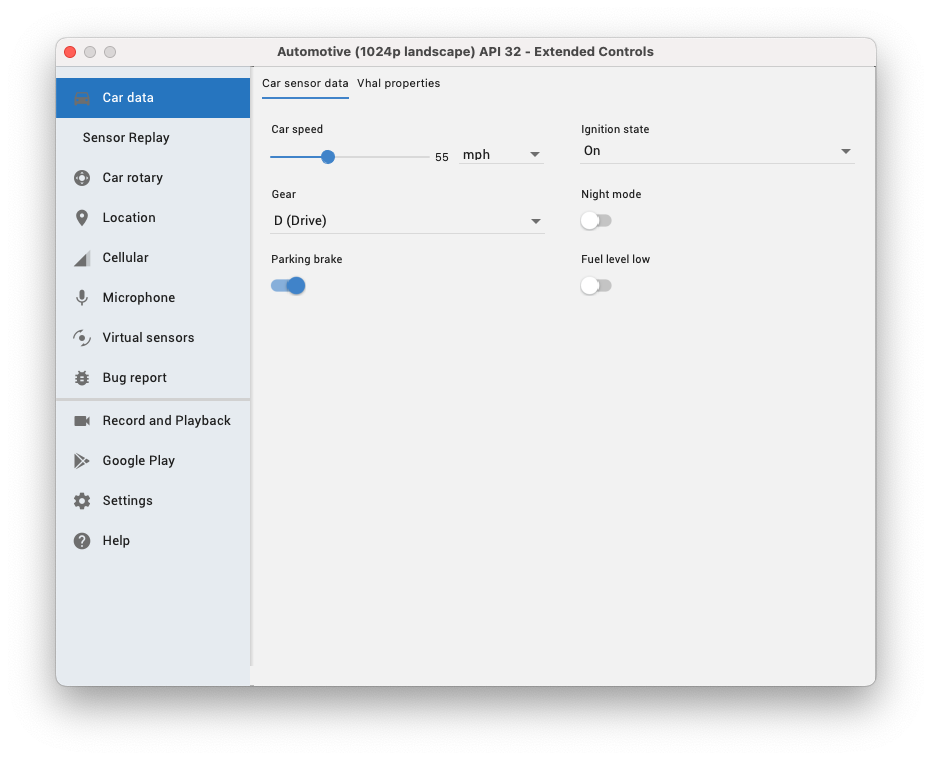
To simulate driving, you should set the Car speed to a non-zero value and Gear to something other than P (Park). To simulate a parked state, all that is necessary is to set the Gear to P (Park). This can be done either by using the sliders and selectors under the Car sensor data tab or by modifying the VHAL properties as described in the prior section.
Test rotary input
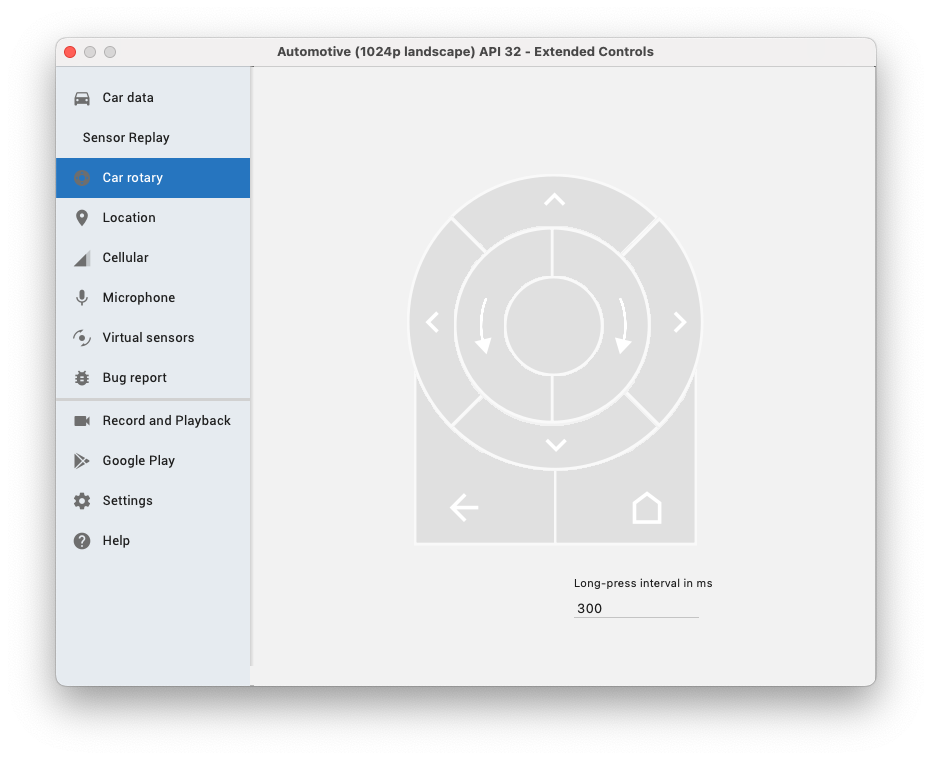
In addition to a touchscreen, some Android Automotive OS vehicles come equipped with a rotary controller, which relies on the same focus APIs as keyboard navigation to let users navigate your app without touching the screen. You can use the Car rotary tool within the extended controls to test your app's support for rotary input.
Edit your run configurations for media apps
Media apps on Automotive OS apps are different than other Android apps. Android Automotive OS interacts with your media app using explicit intents and by sending calls to your media browser service.
To test your app, verify that your app has no launch activity in its manifest, and then prevent your automotive module from launching with an activity by following these steps:
In Android Studio, select Run > Edit Configurations.
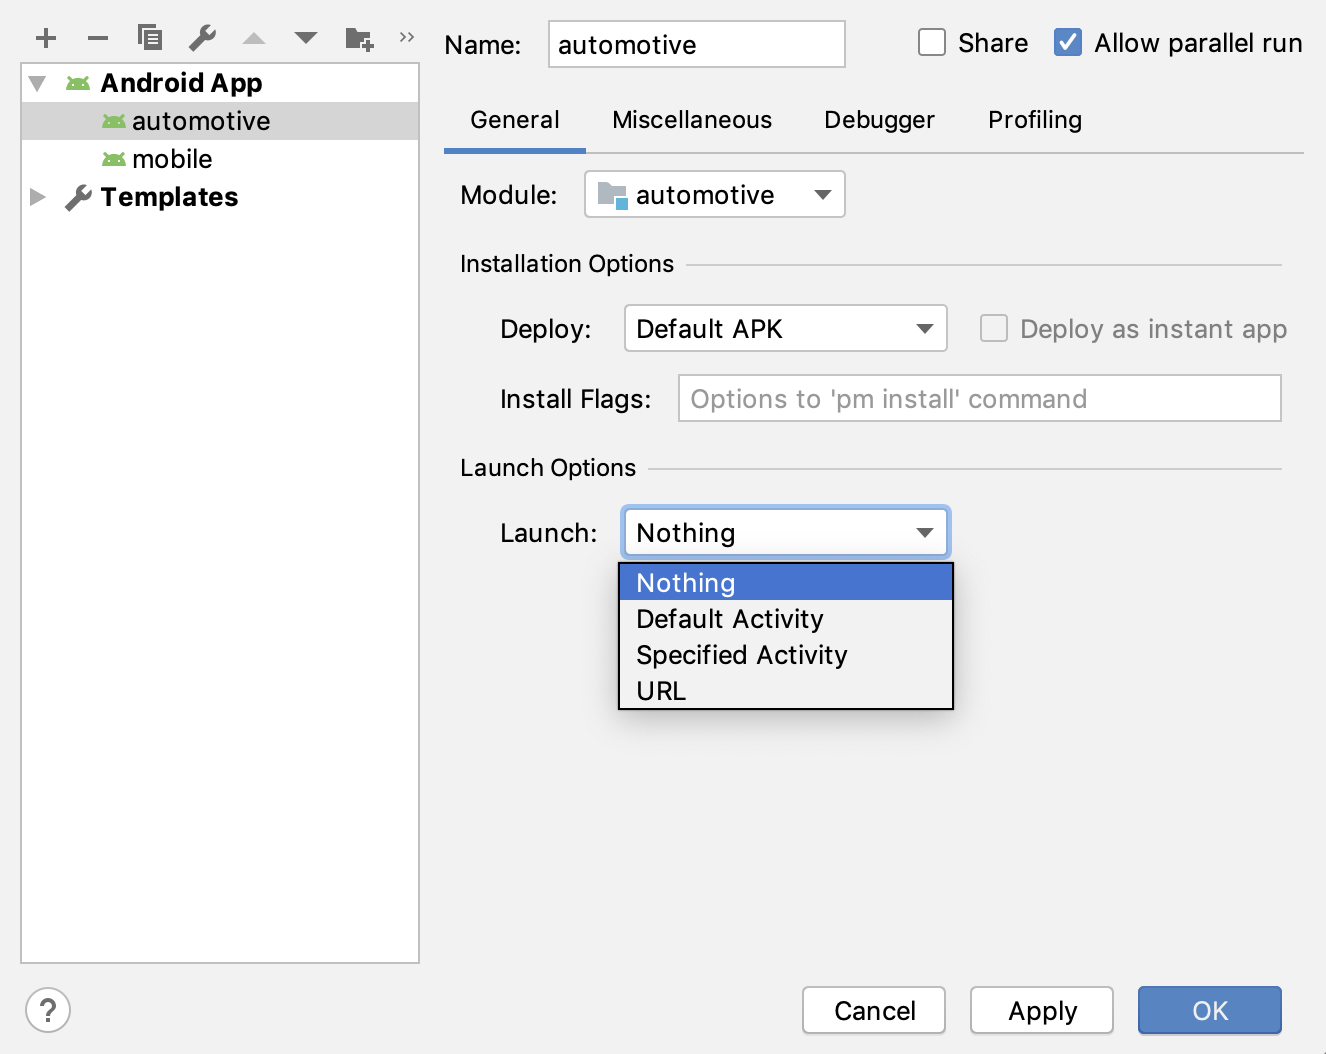
The Run/Debug Configurations dialog. Select your automotive module from the list of modules in your app.
Under Launch Options > Launch, select Nothing.
Click Apply, and then click OK.
Report an Android Automotive OS emulator issue
If you run into an issue or have a feature request while using Android Automotive OS emulator, you can report it using the Google Issue Tracker. Be sure to fill out all the requested information in the issue template. Before filing a new issue, check whether it is already reported in the issues list. You can subscribe and vote for issues by clicking the star for an issue in the tracker. For more information, see Subscribing to an Issue.
View existing issues Create a new issue