

このドキュメントでは、既存のゲームを games v1 SDK から games v2 SDKに移行する方法について説明します。 バージョン 10 以前の Unity 用 Google Play Games プラグインは、games v1 SDK を使用します。
始める前に
- Google Play Console を設定し、Unity エディタをインストールしていることを確認します。
Unity 用 Google Play Games プラグインをダウンロードする
Play Games サービスの最新機能を利用するには、最新バージョンのプラグインをダウンロードしてインストールします。gitHub リポジトリからダウンロードしてください。
古いプラグインを削除する
Unity エディタで、次のフォルダまたはファイルを削除します。
Assets/GooglePlayGames

Assets/GeneratedLocalRepo/GooglePlayGames

Assets/Plugins/Android/GooglePlayGamesManifest.androidlib

Assets/Plugins/Android
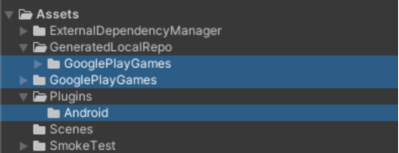
新しいプラグインを Unity プロジェクトにインポートする
プラグインを Unity プロジェクトにインポートする手順は、次のとおりです。
- ゲーム プロジェクトを開きます。
- Unity エディタで、[Assets > Import Package > Custom Package]
をクリックして、ダウンロードした
unitypackageファイルをプロジェクトのアセットにインポートします。 現在のビルド プラットフォームが Android に設定されていることを確認します。
メインメニューで、[File] > [Build Settings] をクリックします。
[Android] を選択し、[Switch Platform] をクリックします。
[Window] > [Google Play Games] に新しいメニュー項目が表示されます。表示されない場合は、[Assets] > [Refresh] をクリックしてアセットを更新し、もう一度ビルド プラットフォームを設定してみてください。
Unity エディタで、[File] > [Build Settings] > [Player Settings] > [Other Settings] をクリックします。
[対象 API レベル] ボックスで、バージョンを選択します。
[Scripting backend] ボックスに「
IL2CPP」と入力します。[Target architectures] ボックスで、値を選択します。
パッケージ名 package_name をメモします。この情報 は後で使用できます。
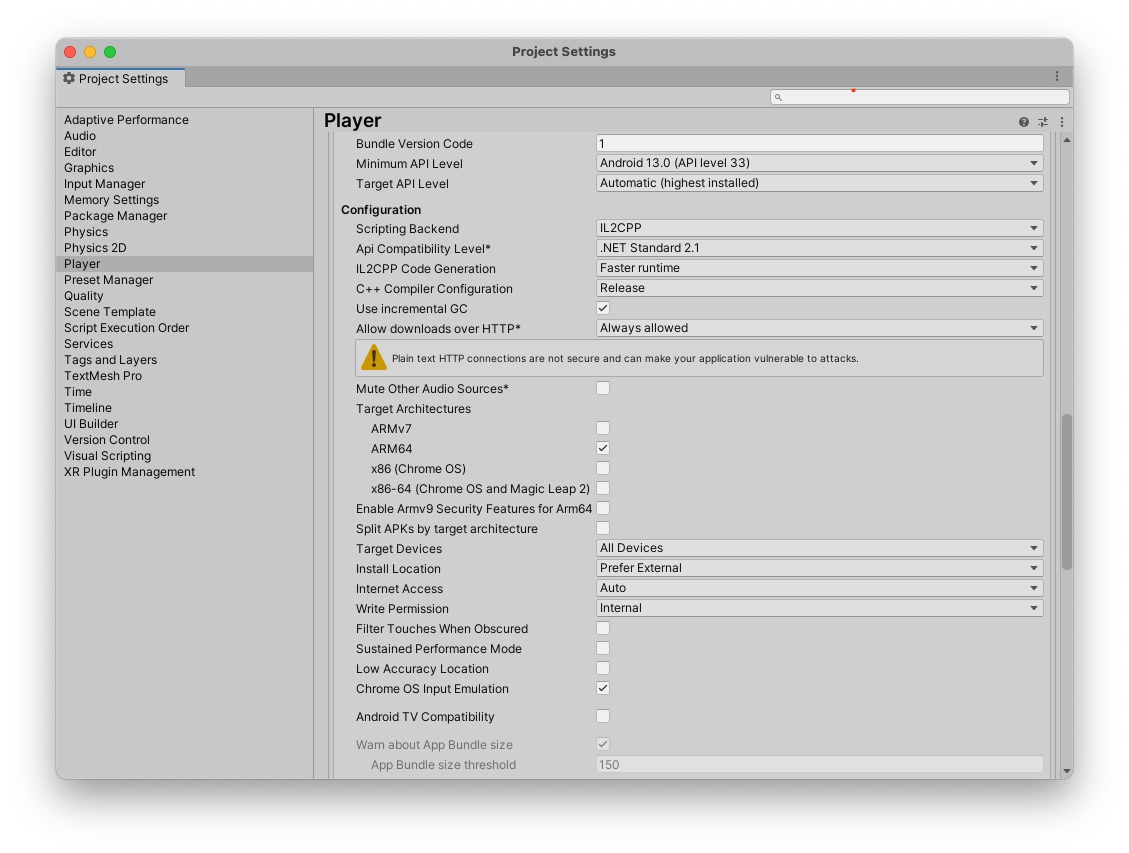
Unity プロジェクトのプレーヤー設定。
移行パス
ゲームの適切な移行パスは、ゲームで Play ゲームサービス v1 を実装する方法と、プレーヤー ID の処理方法によって異なります。スムーズな移行を実現し、プレーヤー データの損失を防ぐため、既存の設定に最も適したシナリオを特定し、対応する手順に沿って操作してください。
オプション 1: IGA が Play ゲームサービス プレーヤー ID にバインドされているゲームの場合
このシナリオは、Play Games サービス Player ID をプレーヤーのゲーム内アカウント(IGA)の一意の識別子として使用し、以前に OpenID をリクエストまたは保存していないゲームに適用されます。主な課題は、プレーヤーの進捗状況との接続を維持しながら、既存の IGA をプライマリ識別子(OpenID)にリンクすることです。
移行フローには次の手順が含まれます。
- ゲームが起動すると、Play Games サービス v2 SDK はプラットフォームを自動的にサイレント認証します。
ゲームのログイン画面が表示されます。この画面には、[Sign in with Google](SiWG) ボタンの代わりに [Google Play] ボタンが表示される必要があります。統合するには:
CredManBridge.java を フォルダにダウンロードします。この Java クラスは、Unity と
androidx.credentialsライブラリ間のブリッジとして機能します。CredManBridge.java
package com.wickedcube.trivialkart; import android.accounts.Account; import android.content.Context; import android.util.Log; import android.os.CancellationSignal; import androidx.credentials.CredentialManager; import androidx.credentials.GetCredentialRequest; import androidx.credentials.GetCredentialResponse; import androidx.credentials.exceptions.GetCredentialException; import androidx.credentials.exceptions.NoCredentialException; import com.google.android.libraries.identity.googleid.GetGoogleIdOption; import com.google.android.libraries.identity.googleid.GoogleIdTokenCredential; import com.google.android.gms.auth.api.identity.AuthorizationClient; import com.google.android.gms.auth.api.identity.AuthorizationRequest; import com.google.android.gms.auth.api.identity.AuthorizationResult; import com.google.android.gms.common.api.ApiException; import com.google.android.gms.auth.api.identity.Identity; import com.google.android.gms.common.api.Scope; import com.unity3d.player.UnityPlayer; import java.util.Collections; import java.util.List; import java.util.concurrent.Executor; import java.util.concurrent.Executors;public class CredManBridge {
// --- MODE 1: SILENT SIGN-IN (Called on Awake) --- // Tries to auto-select an authorized account. If it fails, it does NOT show UI. public static void signInSilent(Context context, String webClientId) { CredentialManager credentialManager = CredentialManager.create(context); CancellationSignal cancellationSignal = new CancellationSignal(); Executor executor = Executors.newSingleThreadExecutor();
Log.d("CredMan", "Attempting Silent Sign-In...");
GetGoogleIdOption silentOption = new GetGoogleIdOption.Builder() .setFilterByAuthorizedAccounts(true) // Strict: Only authorized accounts .setServerClientId(webClientId) .setAutoSelectEnabled(true) // Auto-select if possible .build();
GetCredentialRequest silentRequest = new GetCredentialRequest.Builder() .addCredentialOption(silentOption) .build();
credentialManager.getCredentialAsync( context, silentRequest, cancellationSignal, executor, new androidx.credentials.CredentialManagerCallback<GetCredentialResponse, GetCredentialException>() { @Override public void onResult(GetCredentialResponse result) { Log.d("CredMan", "Silent Sign-In Successful!"); handleSignInResult(context, result, webClientId); }
@Override public void onError(GetCredentialException e) { // Send a specific error code so Unity knows to just stay on the Start Screen Log.d("CredMan", "Silent sign-in failed. Keeping UI hidden."); UnityPlayer.UnitySendMessage("AuthManager", "OnSignInError", "SilentFailed"); } }); }
// --- MODE 2: INTERACTIVE SIGN-IN (Called on Button Click) --- // Forces the Account Selection / "Add Account" sheet to appear. public static void signInInteractive(Context context, String webClientId) { CredentialManager credentialManager = CredentialManager.create(context); CancellationSignal cancellationSignal = new CancellationSignal(); Executor executor = Executors.newSingleThreadExecutor();
Log.d("CredMan", "Starting Interactive Sign-In...");
GetGoogleIdOption interactiveOption = new GetGoogleIdOption.Builder() .setFilterByAuthorizedAccounts(false) // Show ALL accounts (and "Add Account") .setServerClientId(webClientId) .setAutoSelectEnabled(false) // Force the UI to show .build();
GetCredentialRequest interactiveRequest = new GetCredentialRequest.Builder() .addCredentialOption(interactiveOption) .build();
credentialManager.getCredentialAsync( context, interactiveRequest, cancellationSignal, executor, new androidx.credentials.CredentialManagerCallback<getcredentialresponse, getcredentialexception="">() { @Override public void onResult(GetCredentialResponse result) { Log.d("CredMan", "Interactive Sign-In Successful!"); handleSignInResult(context, result, webClientId); }</getcredentialresponse,>
    @Override
    public void onError(GetCredentialException e) {
        Log.e("CredMan", "Interactive Sign-In Canceled or Failed", e);
        UnityPlayer.UnitySendMessage("AuthManager", "OnSignInError", "Canceled");
    }
}
); }
private static void handleSignInResult(Context context, GetCredentialResponse result, String webClientId) { try { GoogleIdTokenCredential credential = GoogleIdTokenCredential.createFrom(result.getCredential().getData()); String email = credential.getId();
Account account = new Account(email, "com.google");
// Requesting GAMES_LITE scope to check for pre-existing V1 grants
List<Scope> requestedScopes = Collections.singletonList(new Scope("https://www.googleapis.com/auth/games_lite"));

AuthorizationRequest authRequest = new AuthorizationRequest.Builder()
    .setRequestedScopes(requestedScopes)
    .setAccount(account)
    .requestOfflineAccess(webClientId)
    .build();

AuthorizationClient authClient = Identity.getAuthorizationClient(context);

authClient.authorize(authRequest)
    .addOnSuccessListener(authorizationResult -> {
        if (authorizationResult.getServerAuthCode() != null) {
            // CASE 1: RETURNING USER (Success)
            // The user has already granted GAMES_LITE in the past.
            // We got the code directly without showing UI.
            Log.i("CredMan", "PGS v1: Existing grant found. Returning user detected. Auth Code retrieved.");
            UnityPlayer.UnitySendMessage("AuthManager", "OnSignInSuccess", authorizationResult.getServerAuthCode());
        }
        else if (authorizationResult.hasResolution()) {
            // CASE 2: NEW USER (PendingIntent)
            // The user has NOT granted GAMES_LITE before. The API returned a PendingIntent
            // (authorizationResult.getPendingIntent()) to show the consent screen.
            // As per your flow, we DISCARD this intent and do not show UI.
            Log.i("CredMan", "PGS v1: No existing grant (PendingIntent returned). This is a NEW user or they revoked access.");
            Log.i("CredMan", "PGS v1: Discarding PendingIntent. Proceeding as New User.");

            // Notify Unity that this is a "New User" so it can trigger V2 logic instead of failing
            UnityPlayer.UnitySendMessage("AuthManager", "OnSignInError", "NewUser_NoGrant");
        }
        else {
            // Edge Case: No code and no resolution?
            Log.e("CredMan", "PGS v1: Authorization success but no Auth Code or Resolution returned.");
            UnityPlayer.UnitySendMessage("AuthManager", "OnSignInError", "No Auth Code returned");
        }
    })
    .addOnFailureListener(e -> {
        // CASE 3: GENERIC FAILURE
        Log.e("CredMan", "PGS v1: Authorization failed completely.", e);
        UnityPlayer.UnitySendMessage("AuthManager", "OnSignInError", "Authorization Failed: " + e.getMessage());
    });
} catch (Exception e) { UnityPlayer.UnitySendMessage("AuthManager", "OnSignInError", "Parsing Error: " + e.getMessage()); } } }
認証情報マネージャーの統合:
- サイレント ログインには、
setFilterByAuthorizedAccounts(true)を指定したGetGoogleIdOptionを使用して、アプリを以前に承認したユーザーのみをログインさせます。 - インタラクティブ ログインには
setFilterByAuthorizedAccounts(false)を使用して、ユーザーがアカウントを選択したり、新しいアカウントを追加したりできるようにします。
- サイレント ログインには、
スコープ リクエスト:
- 基本の Google 認証情報を取得すると、特定のレガシー スコープ(
https://www.googleapis.com/auth/games_lite)をリクエストする
AuthorizationRequestが作成されます。 - このスコープは、サーバーにユーザーのレガシー PlayerID を検索する権限を付与するため、非常に重要です。
- 基本の Google 認証情報を取得すると、特定のレガシー スコープ(
https://www.googleapis.com/auth/games_lite)をリクエストする
結果の処理:
- ユーザーが権限を付与した場合(または以前に付与している場合)、ブリッジは
ServerAuthCodeを Unity に返します。 - ユーザーが権限を付与していない場合(新規ユーザーのシナリオ)、API は
PendingIntentを返します。このサンプルでは、フローを簡略化するために、インテントは破棄され、ユーザーは新規ユーザーとして扱われます。
- ユーザーが権限を付与した場合(または以前に付与している場合)、ブリッジは
認証情報マネージャーと Google Identity サービスをサポートするには、次の依存関係が
mainTemplate.gradleGradle 構成に追加されていることを確認します。dependencies { // Standard Unity dependencies implementation fileTree(dir: 'libs', include: ['*.jar']) // Credential Manager and Identity Libraries implementation 'androidx.credentials:credentials:1.3.0' implementation 'androidx.credentials:credentials-play-services-auth:1.3.0' implementation 'com.google.android.libraries.identity.googleid:googleid:1.1.1' // Play Services Auth for legacy scope handling implementation 'com.google.android.gms:play-services-auth:21.2.0' }
- 認証情報マネージャー: アカウント選択のコア ID オーケストレーションと UI を処理します。
- GoogleID ライブラリ:
OpenIDConnect トークンを取得するためのGetGoogleIdOptionを提供します。 - Play 開発者サービス認証: 互換性を維持し、レガシー
Player IDを取得するためにGAMES_LITEスコープをリクエストする必要があります。
プレーヤーが SiWG ボタンをタップして Google アカウントを選択すると、ゲームは次の 2 つの異なる識別子を取得する必要があります。
OpenID。IGA をバインドするためのプライマリ識別子。- Play Games サービス
Player ID。GAMES_LITEスコープを使用して取得し、バックエンド システムでプレーヤーの IGA を検索してバインドします。
以降のゲームの起動では、プレーヤーは SiWG フローを使用して IGA にアクセスできます。ゲームで
Player IDをプライマリ識別子として使用する必要はありません。
ゲーム クライアントサイドの実装を使用して、ステップ 4 を実行できます。
- デベロッパーは Android Credential Manager API を呼び出して、Google アカウントでユーザーをログインさせます。
- ユーザーが SiwG を完了して Google アカウントを選択すると、デベロッパーは ID トークンとメールアドレスを含む結果オブジェクトを受け取ります。
- デベロッパーはメールアドレスから Account オブジェクトを作成します。
- デベロッパーは、
GAMES_LITEスコープと Account を使用して Authorization API を呼び出します。 - アカウントに
GAMES_LITEスコープに対する既存の権限がある場合、Authorization API はレスポンス オブジェクトでトークンを直接返します。- レスポンス トークンを使用して Play Games サービス サーバーを呼び出し、Play Games サービス
Player IDを取得します。 - デベロッパーは、Play Games サービス
Player IDがゲーム内アカウントにリンクされているかどうかを確認します。- デベロッパーは、これが Play Games サービス v1 からのリピーターであることを認識します。
- デベロッパーは、新しい GAIA ID を以前の Play Games サービス v1 アカウントにリンクできます。
- レスポンス トークンを使用して Play Games サービス サーバーを呼び出し、Play Games サービス
- または、アカウントに
GAMES_LITEスコープに対する既存の権限がない場合、Authorization API は PendingIntent を返します。- デベロッパーは、ユーザーが Play Games サービス v1 の既存のアカウントを持っていないことを認識します。
- デベロッパーは、UI を表示せずに PendingIntent を安全に破棄できます。
オプション 2: IGA を OpenID にすでにバインドしているゲームの場合
このグループのデベロッパーは、最も簡単な移行パスを使用できます。ゲームのゲーム内アカウントがすでに OpenID に主にバインドされている場合は、手順で説明されているように、v1 から v2 への標準の技術的な SDK の移行のみを行う必要があります。
自動ログインコードを更新する
PlayGamesClientConfiguration 初期化クラスを PlayGamesPlatform.Instance.Authenticate() クラスに置き換えます。初期化と有効化は不要です。PlayGamesPlatformPlayGamesPlatform.Instance.Authenticate() を呼び出すと、自動ログインの結果が取得されます。Play Games サービス v2
統合で推奨される認証フローについて詳しくは、理想的な認証フローのユーザー エクスペリエンス ガイドラインをご覧ください。
C#
Unity エディタで、PlayGamesClientConfiguration クラスを含むファイルを探します。
using GooglePlayGames;
using GooglePlayGames.BasicApi;
using UnityEngine.SocialPlatforms;

public void Start() {
    PlayGamesClientConfiguration config =
        new PlayGamesClientConfiguration.Builder()
    // Enables saving game progress
    .EnableSavedGames()
    // Requests the email address of the player be available
    // will bring up a prompt for consent
    .RequestEmail()
    // Requests a server auth code be generated so it can be passed to an
    // associated backend server application and exchanged for an OAuth token
    .RequestServerAuthCode(false)
    // Requests an ID token be generated. This OAuth token can be used to
    // identify the player to other services such as Firebase.
    .RequestIdToken()
    .Build();

    PlayGamesPlatform.InitializeInstance(config);
    // recommended for debugging:
    PlayGamesPlatform.DebugLogEnabled = true;
    // Activate the Google Play Games platform
    PlayGamesPlatform.Activate();
}
それを次のように更新します。
using GooglePlayGames;

public void Start() {
    PlayGamesPlatform.Instance.Authenticate(ProcessAuthentication);
}

internal void ProcessAuthentication(SignInStatus status) {
    if (status == SignInStatus.Success) {
        // Continue with Play Games Services
    } else {
        // Disable your integration with Play Games Services or show a login
        // button to ask users to sign-in. Clicking it should call
        // PlayGamesPlatform.Instance.ManuallyAuthenticate(ProcessAuthentication).
    }
}
ソーシャル プラットフォームを選択する
ソーシャル プラットフォームを選択するには、 ソーシャル プラットフォームを選択するをご覧ください。
サーバー認証コードを取得する
サーバー側のアクセスコードを取得するには、 サーバー認証コードを取得するをご覧ください。
ログアウトコードを削除する
ログアウトのコードを削除します。Play Games サービスでは、ゲーム内のログアウト ボタンは不要になりました。
次の例に示すコードを削除します。
C#
// sign out
PlayGamesPlatform.Instance.SignOut();
ゲームをテストする
ゲームをテストして、設計どおりに機能することを確認します。実行するテストは、ゲームの機能によって異なります。
実行する一般的なテストのリストを次に示します。
ログインに成功する 。
自動ログインが機能する。ゲームを起動すると、ユーザーは Play ゲームサービスにログインします。
ウェルカム ポップアップが表示される。
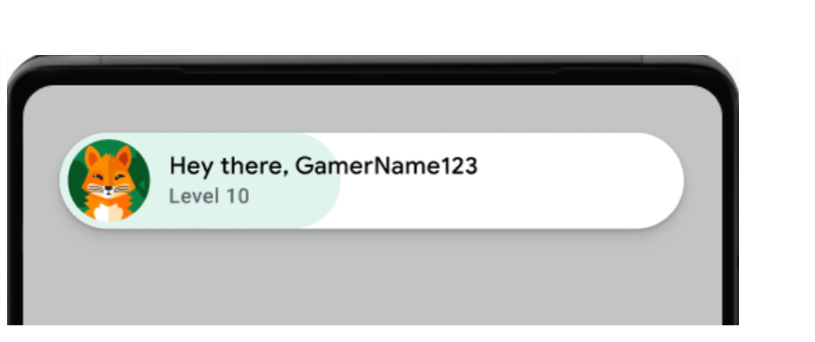
ウェルカム ポップアップの例(クリックして拡大)。 成功したログメッセージが表示される。ターミナルで、次のコマンドを実行します。
adb logcat | grep com.google.android.
成功したログメッセージを次の例に示します。
[
UI コンポーネントの一貫性を確保する 。
ポップアップ、リーダーボード、実績が、Google Play ゲームサービス UI のさまざまな画面サイズと向きで正しく一貫して表示される。
ログアウト オプションが Play Games サービス UI に表示されない。
Player ID を正常に取得できること、および該当する場合はサーバーサイドの機能が想定どおりに動作することを確認します。
ゲームでサーバーサイド認証を使用する場合は、
requestServerSideAccessフローを徹底的にテストします。サーバーが認証コードを受け取り、アクセス トークンと交換できることを確認します。 ネットワーク エラー、無効なclient IDシナリオの成功と失敗の両方のシナリオをテストします。
ゲームで次のいずれかの機能を使用していた場合は、移行前と同じように動作することを確認するためにテストします。
- リーダーボード: スコアを送信してリーダーボードを表示します。プレーヤー名とスコアのランキングと表示が正しいことを確認します。
- 実績: 実績をアンロックし、正しく記録され、Play Games UI に表示されることを確認します。
- 保存済みゲーム: ゲームで保存済みゲームを使用する場合は、ゲームの進行状況の保存と読み込みが問題なく動作することを確認します。これは、複数のデバイスでテストする場合や、アプリの更新後にテストする場合に特に重要です。
移行後のタスク
games v2 SDK に移行したら、次の手順を完了します。