
This document guides you through setting up your Unity project to use the Google Play Games plugin for Unity. You learn how to install the plugin and configure your Unity project. The document also covers how to verify the authentication service.
Before you begin
Review the software requirements. Set up Play Console and install the Unity Editor.
Set up Play Console for your game.
Install Unity Editor and build your game in Unity.
Plugin Installation
To download and install the Google Play Games plugin for Unity, follow these steps in Unity Editor:
Download the GitHub repo.
In the
current-builddirectory, locate theunitypackagefile. This file represents the plugin. For example, it should resemble the following:current-build/GooglePlayGamesPluginForUnity-X.YY.ZZ.unitypackage
Set up Unity project
To set up a Unity project in player settings, follow these steps:
Open your game project.
In the Unity Editor, click Assets > Import Package > Custom Package to import the
unitypackagefile into your project's assets.Make sure that your current build platform is set to Android.
In the main menu, click File > Build Settings.
Select Android and click Switch Platform.
There should be a new menu item under Window > Google Play Games. If there isn't, refresh the assets by clicking Assets > Refresh and then try setting the build platform again.
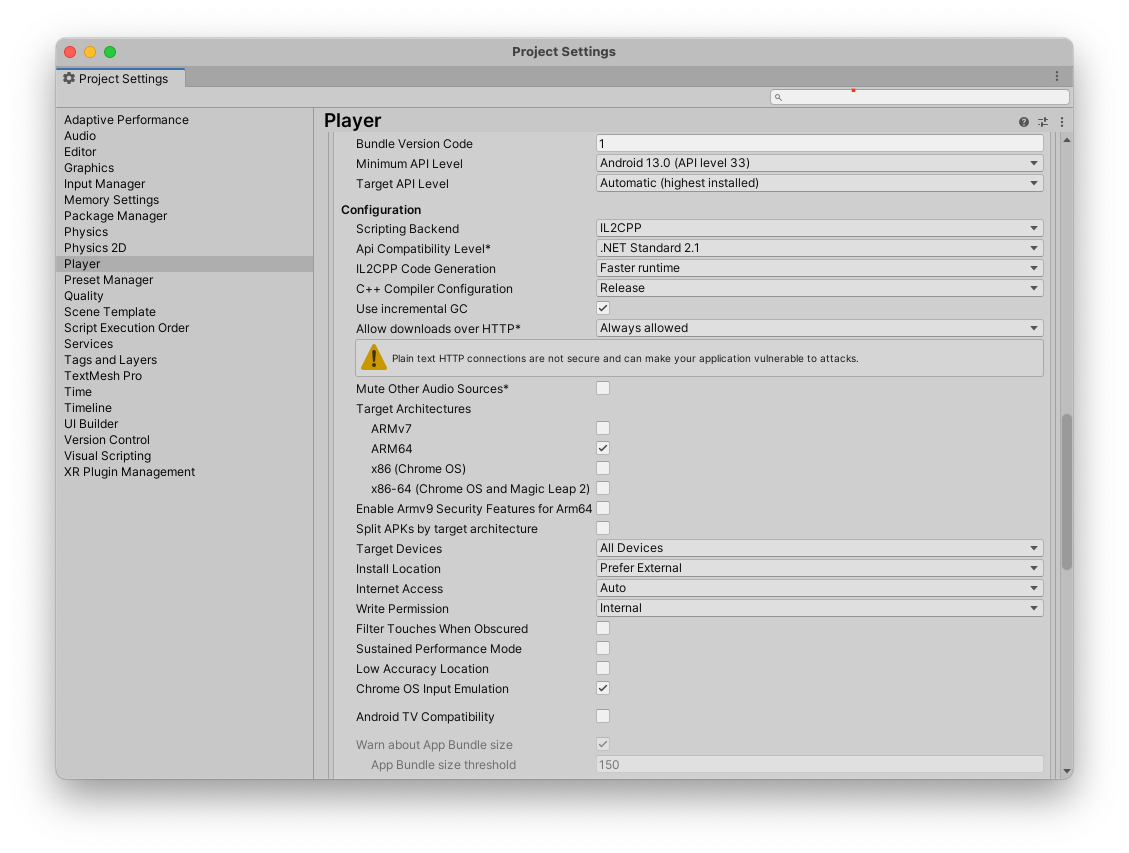
In the Unity Editor, click File > Build Settings > Player Settings > Other Settings.
In the Target API level box, select a version.
In the Scripting backend box, enter
IL2CPP.In the Target architectures box, select a value.
Note the package name package_name.You can use this information later.
Create a new keystore
To validate your credentials, you need a key. Follow these steps:
- In the Unity Editor, click File > Build settings > Player settings.
- In the Publishing settings section, click Keystore manager.
- In the Keystore manager window, click Keystore > Create new > Anywhere.
- Select a folder and provide a name for the keystore.
- In the Password box, enter a password and confirm.
- Click Add key.
Note the folder name. You can use this name to create a credential in Google Cloud.
Copy the Android resources from Play Console
Each achievement, leaderboard, and event you create in Play Console includes an Android resource that you use when you set up your Unity project.
To get the Android resources for your game, follow these steps:
In the Google Play Console, open the game.
In the Play Games Services - Configuration page (Grow users > Play Games Services > Setup and management > Configuration), click Get resources.
In the Resources window, click the Android(XML) tab.
Select and copy the Android resources (
AndroidManifest.xml) content.
Add the Android resources to your Unity project
Add the following Android resources to your Unity project:
In the Unity Editor, click Window > Google Play Games > Setup > Android Setup.
- In the Directory to save constants field, enter the folder name for the constants file.
In the Constants class name field, enter the name of the C# class to create, including the namespace.
For example, if the C# class is
id.csand present under Assets > myproject > scripts > id.cs. The constants class name can bemyproject.scripts.id.In the Resources definition field, paste the Android resources data (
AndroidManifest.xmlfile) you copied from the Google Play Console.Optional: In the Client ID field, enter the client ID of the linked web app.
To get the client ID for your game from Google Cloud, see Creating client IDs.
This is only needed if you have a web-based backend for your game and need a server auth code to exchange for an access token by the backend server, or if you need an ID token for the player to make other non-game API calls.
Click Setup. This configures your game with the client ID and generates a C# class that contains constants for each of your Android resources.
In the Unity Editor, click Window > Google Play Games > Setup > Nearby Connections Setup.
In the Nearby connection service ID field, enter the package_name.
Use the same package_name that you used in set up Unity project.
Click Setup.
Choose a social platform
The Google Play Games Services plugin implements Unity's social interface, for compatibility with games that already use that interface when integrating with other platforms. However, some features are unique to Play Games and are offered as extensions to the standard social interface provided by Unity.
The standard API calls can be accessed through the Social.Active object, which is a reference to an ISocialPlatform interface. The non-standard Google Play Games Services extensions can be accessed by casting the Social.Active object to the PlayGamesPlatform class, where the additional methods are available.
Use the plugin without overriding the default social platform
When you call
PlayGamesPlatform.Activate,
Google Play Games Services becomes your default social platform implementation. This means
that the Google Play Games Services plugin carries out static calls to methods in Social and
Social.Active, which is the expected behavior for most games using the plugin.
However, if for some reason you want to keep the default implementation accessible (for example, to use it to submit achievements and leaderboards to a different social platform), you can use the Google Play Games Services plugin without overriding the default one. To do this:
- Call the
PlayGamesPlatform.Activatemethod. - If
Xyzis the name of a method that you call on theSocialclass, don't callSocial.Xyz. Instead, callPlayGamesPlatform.Instance.Xyz. - Use the
PlayGamesPlatform.Instanceproperty instead ofSocial.Activewhen you interact with Google Play Games Services.
That way, you can even submit scores and achievements simultaneously to two or more social platforms:
    // Submit achievement to original default social platform
    Social.ReportProgress("MyAchievementIdHere", 100.0f, callback);

    // Submit achievement to Google Play
    PlayGamesPlatform.Instance.ReportProgress("MyGooglePlayAchievementIdHere", 100.0f, callback);
Verify the authentication service
A connection to Play Games Services is automatically attempted using the Platform authentication when your game is opened. If the connection succeeds, your game displays a sign-in prompt and is ready to use the Google Play Games Services plugin for Unity.
If a user has never used Google Play Games Services on their device, they are automatically taken through one-time setup screen to create a Play Games account.
In the Start method of your script, listen to the result of the automatic
authentication attempt, fetch the authentication status, and disable Play Games
Services features if the user is not authenticated.
If the Unity plugin version is before v11, you can't use the authentication
feature.
    using GooglePlayGames;

    public void Start() {
      PlayGamesPlatform.Instance.Authenticate(ProcessAuthentication);
    }

    internal void ProcessAuthentication(SignInStatus status) {
      if (status == SignInStatus.Success) {
        // Continue with Play Games Services
      } else {
        // Disable your integration with Play Games Services or show a login button
        // to ask users to authenticate. Clicking it should call
        // PlayGamesPlatform.Instance.ManuallyAuthenticate(ProcessAuthentication).
      }
    }
The result code is an enum that you can use to identify the reason for and authentication failure.
If you prefer using Unity's Social platform, you can alternatively use the following code:
  using GooglePlayGames;

  public void Start() {
    PlayGamesPlatform.Activate();
    Social.localUser.Authenticate(ProcessAuthentication);
  }
You cannot make any Google Play Games Services API calls until you get a successful
return value from Authenticate. As a result, we recommend that games display a
standby screen until the callback is called to ensure users can't start playing
the game until authentication completes.
Prevent auto-triggered profile creation
You can disable auto-triggered profile creation prompts through the manifest file. This allows users without a Play Games Services profile to continue to load the game without being prompted to create a Play Games Services profile. For more information, see Profile creation options.
To use this feature, ensure the following conditions are met:
- The device has no Play Games Services profile on any of the signed-in Google Accounts.
- Your game is integrated with Play Games Services
Unity plugin
2.1.0or higher.
In the
AndroidManifest.xmlfile, add thecom.google.android.gms.games.SUPPRESS_GAME_PROFILE_CREATIONtag in the<meta-data>element and attributes to the<application>element:<application> ... <meta-data android:name="com.google.android.gms.games.SUPPRESS_GAME_PROFILE_CREATION" android:value="true" /> ... </application>
Setting this flag to true informs Play Games Services that your game will handle the profile creation process. Consequently, the Play Games Services won't automatically display the profile creation user interface for users on the device who don't have an existing Play Games Services profile.
To handle cases where a user is unauthenticated due to a missing Play Games Services profile, you can use PlayGamesPlatform.Instance.IsAuthenticated(). This method returns
falsebecause profile creation fails. To resolve this, start the profile creation process by calling PlayGamesPlatform.Instance.ManuallyAuthenticate().if (!PlayGamesPlatform.Instance.IsAuthenticated()) { // The user is unauthenticated, likely due to a missing Play Games profile. // Calling PlayGamesPlatform.Instance.ManuallyAuthenticate() will trigger // the profile creation UI. PlayGamesPlatform.Instance.ManuallyAuthenticate((SignInStatus status) => { // ... }); }After you add the suppression tag, use the
logcatwindow to verify the addition. Thelogcatoutput contains a message similar to the following: "Game opted out of automatic profile creation prompt (using manifest)".
Use Play App Signing
Google manages and protects your app's signing key using Play App Signing. You can use Play App Signing to sign optimized, distribution of Android APP Bundle files. Play App Signing stores your app signing key on Google's secure infrastructure. To use Play App Signing, you have to first create and download an AAB file from Unity Editor. You can then upload the AAB file to Play Console and create an internal testing release.
Create an AAB file
To create an AAB file in Unity Editor, follow these steps:
- In the Unity Editor, click File > Build settings.
Select Build App Bundle ( Google Play ).
For more information, see Android Build Settings reference.
Click Build.
Download the AAB file from the Unity Editor.
Create an internal testing release
To create an internal testing release and add testers in Play Console, perform the following steps:
- In the Google Play Console, select a game.
- Navigate to the Test and release page (Testing > Internal testing).
- Click Upload and select the AAB file.
- In the Release details field, enter a name.
- Click Next and review the release details.
- Click Save and publish.
On the Testers tab, click Create email list to add up to 100 testers.
For more information, see Internal test: manage up to 100 testers.
In the Feedback URL or email address, enter a feedback URL or and email address to provide feedback.
Click Save.
Verify your App signing credentials
- In the Google Play Console, select a game.
- Navigate to the Test and release page (Setup > App signing).
- Verify your App signing credentials.
Build and run the project
You can build and run the game project at this point. When game starts, you'll see the automatic authentication attempt.
You need a physical Android-powered device with USB debugging enabled or an emulator that can run the developed project.
Retrieve server authentication codes
In order to access Google APIs on a backend web server on behalf of the current player, you need to get an authentication code from the client application and pass this to your web server application. The code can then be exchanged for an access token to make calls to the various APIs. For information about the workflow, see sign in with Google for web.
To get the server side access code:
- Add the web client ID for your game in the Play Console.
- In the Google Play Console, select your game.
- In the Configuration page (Grow users > Play Games Services > Setup and Management > Configuration), click Add credential.
- In the Add credential page, select Game server.
- Generate an OAuth 2.0 client ID.
- Note the client ID value. You'll need to provide this value later.
Add the web client ID to Unity hub.
- In the Unity hub, set up Google Play Games for Unity and authenticate.
- In the Unity hub, go to Window > Google Play Games > Setup > Android Setup.
- Enter the client ID value.
Retrieve server auth code for additional scopes.
C#
using GooglePlayGames.BasicApi; // Define selectedScope having additional identity scopes. private List
selectedScopes = new List (); // Add scopes you want to request. selectedScopes.Add(AuthScope.OPEN_ID); selectedScopes.Add(AuthScope.PROFILE); selectedScopes.Add(AuthScope.EMAIL); // Call RequestServerSideAccess with additional scopes and retrieve // authcode and grantedscopes list. PlayGamesPlatform.Instance.RequestServerSideAccess( /* forceRefreshToken= */ false,selectedScopes (AuthResponse authResponse) => { string authCode = authResponse.GetAuthCode(); List grantedScopes = authResponse.GetGrantedScopes(); // send authCode to server... });
Set up and add features
Enable Play Games Services features.
Add features to your game using the Play Games Services APIs:
Recall API for Unity (supported only for Unity plugin version v11 and above)