
This page describes how to set up Google Play Games Services for your Android game using Google Play Console. The Play Console provides a centralized place for you to manage game services and configure the metadata used to authorize and authenticate your game.
To add your game to Play Console, follow these general steps:
Create a game project for your game and specify details such as the name and description of the game.
Create and link the necessary credentials to authorize and authenticate your game to Google Play Games Services.
Before you start
Complete the following steps before you configure Google Play Games Services.
Create a Google Play Developer account
You must have a Google Play Developer account set up in Play Console. For more information, see the Register for a Google Play Developer account.
Grant edit permission: To edit Play Games Services settings in Play Console, your team must have permissions to manage Play Games Services. For more information, see Add developer account users and manage permissions.
Create a Google Cloud project
You must have set up a Google Cloud project. For more information, see
To use Play Console, you must enable the APIs you plan to use with your project.
Console
gcloud
gcloud services enable \
   --project "PROJECT" \
   "games.googleapis.com"
Sign in to the Play Console
To sign in, go to Google Play Console. If you haven't registered for the Play Console before, you will be prompted to do so.
Add your game to the Play Console
To add your game, follow these steps:
In Play Console, create an app and specify that it's a game. For more information, see Create and set up your app.
Go to Grow users > Play Games Services > Setup and management > Configuration.
Specify whether your game already uses Google APIs (such as Firebase). It is important that you choose the correct option; otherwise, your game may experience issues when using Google APIs. Here's the options:
No, my game doesn't use Google APIs: If you are creating a new game, or you have never set up a Google API for it, choose this option. Enter your game's name and then click Create.
Yes, my game already uses Google APIs: Choose this option if you have already set up a Google API for the Game. If this is the case, you will see a list of your projects from Google Cloud Console. Select your project from the list and then click Use.
Use an existing Play Games Services project: If you want to use an existing Play Games Services project, choose this option. You will see a list of existing Play Games Services projects for your account. Select your game project from the list and then click Use. This is not a typical choice, but you might do this if you are creating a new game in Play Console in order to change the package name, or if you have free and paid versions of your game with different package names.
A Play Games Services game project is created, and a corresponding entry is created for you in the Google Cloud Console.
In the Properties section, click Edit Properties to add information, such as the description, category, and graphic assets for your game. Here's some guidelines for configuring the properties:
Only the display name is required for testing. The other fields must be filled out before you can publish your game.
The display name and description for your game should match what you set up in your game's Play Store listing.
For guidelines on creating the graphic assets, see Add preview assets to showcase your app and the Google Play Featured-Image Guidelines.
Generate an OAuth 2.0 client ID
Your game must have an OAuth 2.0 client ID in order to be authenticated and authorized to call the Google Play Games Services. To set up a credential for Play Games Services, which is the association between a client ID and your game, use Google Cloud to create the client ID. Then, use Google Play Console to add a credential, linking the client ID to your game.
For more detailed instructions, see the following steps:
Configure the OAuth consent screen
If you haven't yet configured the OAuth consent screen, the Credentials section will display a message prompting you to configure.
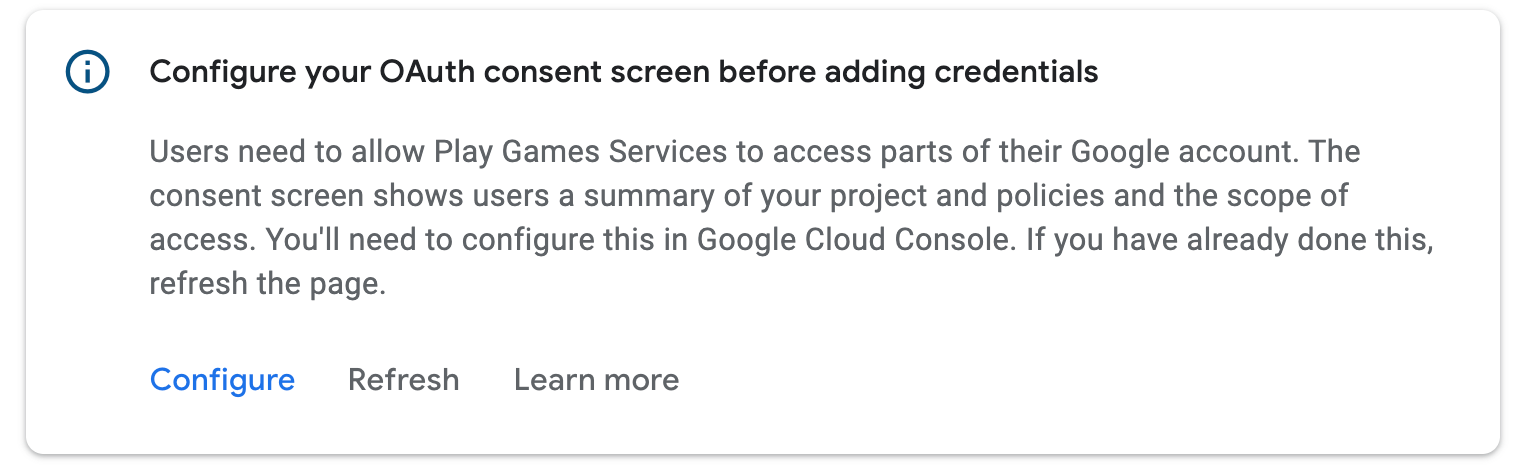
Click Configure. This opens a dialog with further instructions and a deep link to the Google Cloud.
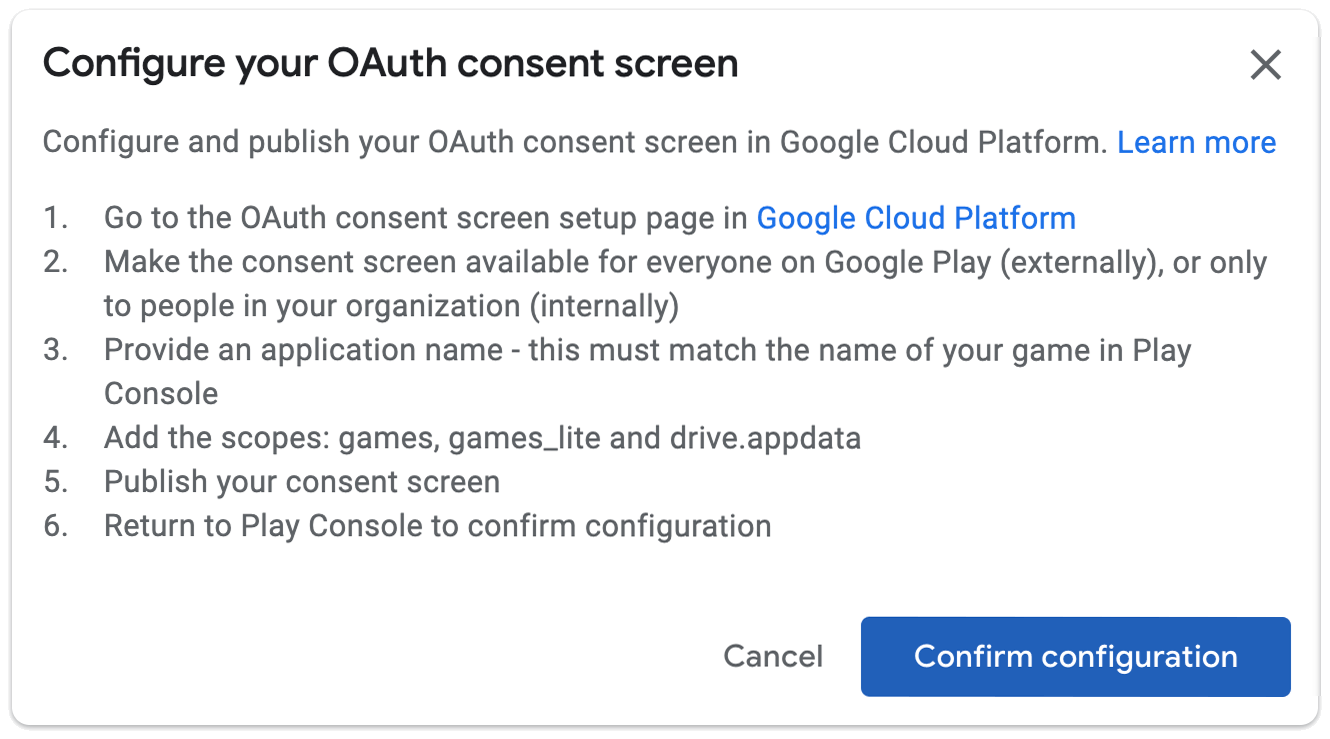
Make sure that the consent screen is available to everyone that the game is
available to. The final list of scopes needs to include games, games_lite,
and drive.appdata; none of these scopes will require app verification. We
recommend publishing the consent screen immediately. If that is not possible,
you can make the consent screen available to testers to allow them to
authenticate to the game.
If you have completed the setup of the OAuth consent screen, click Done. Google Play Console refreshes automatically, and if configuration was successful you will be able to create a credential:
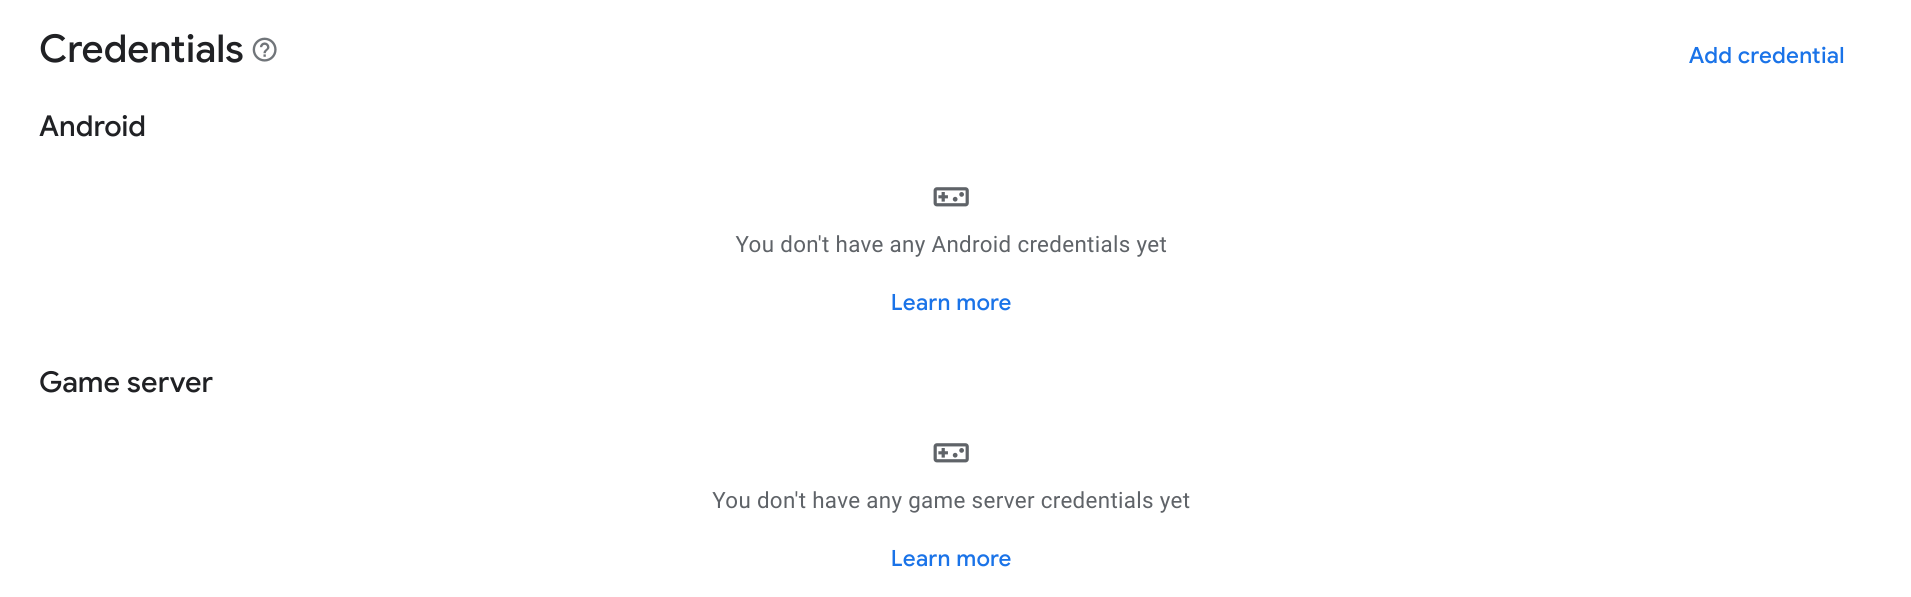
Create a credential
In order to authorize your game to communicate with Google Play Games Services, you must create a credential with an authorized OAuth2 client ID.
In the Credentials section, click Add credential.
In the wizard, choose whether you want to create an Android credential (if your game APK will authenticate the user and use Play Games Services APIs) or a game server credential (if your game server will use Play Games Services APIs). Follow the instructions specific to your credential type.
Android
Set up credential details
Ensure that the name in the Name field matches the name of your game. Choose whether to enable Anti-Piracy.
Set up authorization
Next, choose an OAuth client ID to use for this game project. If you already have OAuth2 client IDs, you can choose one. However, you will usually create a new one. Click Create OAuth client. This opens a dialog with a link to the Google Cloud.
In Google Cloud, follow these steps:
- Select Android as the application type.
- Enter your game's name in the Name field.
- Enter your Android application's package name in the Package name field.
- If your game is distributed from the Play Store, use the app signing by Google Play. Copy the SHA-1 fingerprint from the app signing page of the Play Console.
If you manage your own keystore and signing keys, use the Keytool utility to get the SHA-1 fingerprints of the release and debug certificates.
To get the release certificate fingerprint, run the following command:
keytool -list -keystore <path-to-production-keystore> -vTo get the debug certificate fingerprint, run the following command:
keytool -list -keystore <path-to-debug-keystore> -vNote: On Windows, the debug keystore is located atC:\Users\<USERNAME>\.android\debug.keystore. On Mac or Linux, the debug keystore is typically located at~/.android/debug.keystore.Optional: If you have created a new keystore using Unity Hub, don't create a new certificate using the instructions in the previous step. Use the SHA-1 fingerprint that you created in Unity.
- Use the following command to print the SHA-1 fingerprint to the terminal:
keytool -list -keystore <var>path</var>/<var>name_of_keystore</var>.keystore
-v
- The keytool utility prompts you to enter a password for the keystore. The keytool then prints the fingerprint to the terminal.
- Paste the SHA-1 fingerprint into the Signing certificate fingerprint (SHA-1) field.
- Click Create.
For more information about OAuth 2.0 on Android, see Authenticating to OAuth2 Services.
After you click Done in the dialog, the available Client IDs will refresh. Choose the credential you created from the drop-down menu and then click Save Changes. This creates the credential as a draft, enabling you to authenticate to Play Games Services in your game.
You may want to create two credentials: one with the release certificate fingerprint, and one with the debug certificate fingerprint. Make sure to use the same package name for both. This allows Google Play Games Services to recognize calls from your linked APKs that are signed with either certificate. For more information about certificate signing for Android, see Sign your app.
Game server
Set up credential details
Ensure that the name in the Name field matches the name of your game.
Set up authorization
Next, choose an OAuth client ID to use for this game project. If you already have OAuth2 client IDs, you can choose one. However, you will usually create a new one. Click Create OAuth client. This opens a dialog with a link to the Google Cloud.
In the Google Cloud, follow these steps:
- Select Web application as the application type.
- Enter your game's name in the Name field.
- Click Create.
For more information about OAuth 2.0 on Android, see Authenticating to OAuth2 Services.
After you click Done in the dialog, the available Client IDs will refresh. Choose the credential you created from the drop-down menu and then click Save Changes. This creates the credential as a draft, enabling you to authenticate to Play Games Services from your game server. For more information about using Play Games Services with your game server, see Enabling Server-Side Access to Google Play Games Services.
Enable testing
To ensure that Google Play Games Services is functioning correctly in your game, you should test your game services before publishing your game changes on Google Play.
If your game is in an unpublished state, grant access to your testers by adding their user accounts to the allowlist. Otherwise, your testers will encounter OAuth and 404 errors when attempting to access Play Games Services endpoints, such as the platform authentication endpoint.
Users with authorized test accounts will have access to your unpublished Play Games Services game project and can test that your configured Play Games Services are working correctly.
There are two ways to enable testers to use Play Games Services APIs for your game:
At an individual level, by adding individual email addresses.
At a group level, by enabling Play Games Services for a Play Console release track.
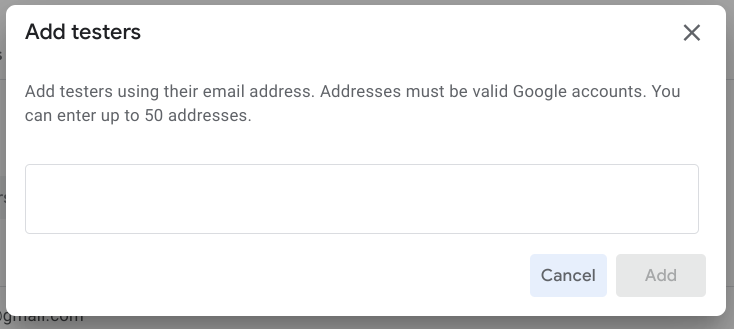
To add individual testers to your game project:
- Open the Testers tab for your game in the Google Play Console (Grow users > Play Games Services > Setup and management > Testers).
- Click the Add testers button.
- In the dialog that appears, enter the email addresses of the Google Accounts that you want to add as testers (separated with commas or one email address per line).
- Click Add to save the users as testers. The tester accounts you added should be able to access Play Games Services within a couple of hours.
To give testing access to a group, enable a release track to access Play Games Services:
Google Play distributes pre-release versions of your app to controlled groups of trusted users with the release track features. See Set up an open, closed, or internal test on the Google Play Help website.
You can grant access to test your game to all users who have access to test APKs on a given release track. This works the same as if you had added them to the tester list individually. To do this, follow these steps:
- Open the PGS Testers section (Grow users > Play Games Services > Setup and management > Testers) and select the Release tracks tab. On this page, you can also see the list of tracks that are already enabled for Play Games Services testing.
- Click Add tracks.
- Select one or more tracks to enable for Play Games Services testing.
- Click Add Tracks.
The selected release tracks will now appear on the list of tracks enabled for Play Games Services testing.
This feature is only available if you have an Android app linked to your game in Google Play Console.
Avoid common issues
To avoid common setup mistakes, make sure to follow these recommendations when setting up your game to use Google Play Games Services.
- 1. Set up your game with the Play Console
- If you created an Oauth 2.0 client ID for your app in the Google Cloud Console, Google Play Games Services won't know about the association between the game's achievement and leaderboards and the client ID. To create this association, you must create a credential using the Oauth 2.0 client ID as described in Create a credential.
- 2. Use the correct application ID in Android
- The application ID is a required string resource that you must reference in your Android manifest. The application ID string consists only of the digits (typically 12 or more) at the beginning of the client ID provided by the Play Console. The application ID can be found at the top of the Configuration page and is labeled as Project ID below the name of your game.
- 3. Sign your APK with the correct certificate
- When linking your Android app to your game in the Play Console, you must use exactly the same package name and certificate fingerprint that you used to publish your app. If there is a mismatch, calls to Google Play Games Services will fail. You should create two client IDs, one with the release certificate fingerprint and another with the debug certificate fingerprint, and use the same package name for both. To learn more about how to specify the signing certificate in the Play Console, see Signing Your Applications.
- 4. When developing for Android, include the Play Games SDK as a library project, not as a standalone JAR.
- Make sure that the Google Play services SDK is referenced as a library project in your Android project, otherwise this could lead to errors when your app is unable to find Google Play services resources. To learn how to set up your Android project to use Google Play services, see Setting Up Google Play services.
- 5. Sign in with a tester account during development
- If you have not published your game setting changes in the Play Console, you might encounter errors during testing if you are not signed in with a tester account. You should always enable your Play Console publisher account for testing. To learn how to manage tester accounts, see Enabling accounts for testing.
- 6. Publish the consent screen in Google Cloud
- Before publishing the app in the Play Console, publish the consent screen in Google Cloud. Without this step, the public audience won't be able to use any of the Play Games Services features.
- 7. At release, publish the Play Games Services settings first before you publish your game
- Developers might accidentally publish their app without publishing the corresponding Play Games Services settings for their app. This might cause players who are authenticating in with non-tester accounts to encounter errors since the app cannot reference the correct game settings. When releasing your game, remember to first publish your game settings by using the Publish Game option in the Play Console. To learn how to publish your changes, see Publishing your game changes.
For additional tips, see the Android troubleshooting guide.
Next steps
Once you complete the initial setup tasks, you can enable Play Games Services features for your game, such as saved games, leaderboards, and achievements.