
Debug your project with the Visual Studio Debugger (LLDB) when using the Android Game Development Extension.
Run the debugger
Before you can run the debugger, you must be able to build, deploy, and run your game on Android. See the Run the sample section for details.
Once you make sure you can run your game without the debugger, you can use the debugger by pressing F5 or selecting the Start Debugging item in the Debug menu. You should see a dialog while the debugger is attaching to the game.
Launching the debugger takes between 10 seconds to 1 minute or more depending on the size of your application and the amount of symbols that need to be loaded at startup. It takes more time when attaching to a new device for the first time as the debugger has to download some Android libraries from the device to the host machine. If it is taking longer than 1 minute on your first few attempts with a new device, consider canceling the debug session and then restarting it.
When you run the debugger this way, the game is started in Waiting for Debugger mode and it will not execute any of your game's code until the debugger connects. This allows you to also debug the initialization section of your game.
You can find more information on specific Visual Studio debugger features by reading the Visual Studio Documentation.
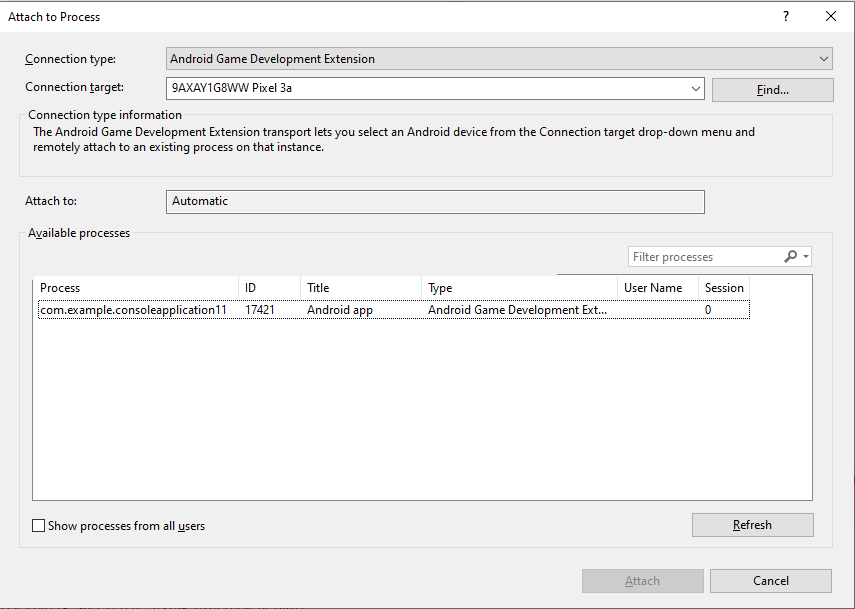
Attaching to a process
If you want to debug a game that is already running on a physical or virtual device, you can attach the debugger to the process from Visual Studio.
In Visual Studio, make sure an Android solution is open, and:
- Go to the Debug menu and select Attach to Process....
- From the Transport dropdown, select Android Game Development Extension.
- From the Qualifier dropdown, select your Android device.
- Select the game process from the list of available processes and click Attach.
Executing LLDB.Shell commands
With a debugging session active, use Visual Studio's Command Window to run LLDB.Shell commands.
Command format:
LLDB.Shell [command]
Example:
>LLDB.Shell expr myIntVariable = 9
Status:  Success
Output Message:
(int) $2 = 9
Data visualization
Format Specifiers
You can change the format in which a value is displayed in the Autos, Locals, Watch, and variable DataTip windows using format specifiers.
Format specifiers are found at the end of expressions. They begin with a comma
followed by a short string. For example, the ,x specifier in the _myInt,x
expression will format myInt as a lowercase hexadecimal.
Format specifiers can be used directly in the Watch window or in the Autos, Locals, and DataTip windows by adding them to your Natvis expressions. See Natvis for more information.
List of support specifiers
| Format Name | Specifier(s) | Description |
|---|---|---|
| boolean | B | show this as a true/false boolean, using the customary rule that 0 is false and everything else is true |
| binary | b | show this as a sequence of bits |
| binary, no leading 0b | bb | show this as a sequence of bits without 0b prefix |
| bytes | y | show the bytes, but try to display them as ASCII characters as well e.g. (int *) c.sp.x = 50 f8 bf 5f ff 7f 00 00 P.._.... |
| bytes with ASCII | Y | show the bytes, but try to display them as ASCII characters as well e.g. (int *) c.sp.x = 50 f8 bf 5f ff 7f 00 00 P.._.... |
| character | c | show the bytes as ASCII characters e.g. (int *) c.sp.x = P\xf8\xbf_\xff\x7f\0\0 |
| printable character | C | show the bytes as printable ASCII characters e.g. (int *) c.sp.x = P.._.... |
| complex float | F | interpret this value as the real and imaginary part of a complex floating-point number e.g. (int *) c.sp.x = 2.76658e+19 + 4.59163e-41i |
| decimal | d, i | show this as a signed integer number (this does not perform a cast, it simply shows the bytes as an integer with sign) |
| enumeration | E,en | show this as an enumeration, printing the value's name if available or the integer value otherwise e.g. (enum enumType) val_type = eValue2 |
| hexadecimal - smallcase | x, h | show this in lowercase hexadecimal notation (this does not perform a cast, it simply shows the bytes as hex) |
| hexadecimal - uppercase | X, H | show this in uppercase hexadecimal notation (this does not perform a cast, it simply shows the bytes as hex) |
| hexadecimal - smallcase, no leading 0x | xb, hb | show this in lowercase hexadecimal notation without 0x prefix (this does not perform a cast, it simply shows the bytes as hex) |
| hexadecimal - uppercase, no leading 0x | Xb, Hb | show this in uppercase hexadecimal notation without 0x prefix (this does not perform a cast, it simply shows the bytes as hex) |
| float | f | show this as a floating-point number (this does not perform a cast, it simply interprets the bytes as an IEEE754 floating-point value) |
| octal | o | show this in octal notation |
| OS type | O | show this as a MacOS OSType e.g. (float) x = '\n\x1f\xd7\n' |
| string - C-string | s | show this as a 0-terminated C string e.g. "hello world" |
| string - C-string, no quotation marks | sb | show this as a 0-terminated C string without quotation marks, e.g. hello world |
| string - UTF-8 | s8 | show this as a 0-terminated UTF-8 string e.g. u8"hello world ☕" |
| string - UTF-8, no quotation marks | s8b | show this as a 0-terminated UTF-8 string without quotation mark e.g. hello world ☕ |
| string - UTF-16 | su | show this as a 0-terminated UTF-16 string e.g. u"hello world ☕" |
| string - UTF-16, no quotation marks | sub | show this as a 0-terminated UTF-16 string without quotation marks e.g. hello world ☕ |
| string - UTF-32 | s32 | show this as a 0-terminated UTF-32 string e.g. U"hello world ☕" |
| string - UTF-32, no quotation marks | s32b | show this as a 0-terminated UTF-32 string without quotation marks e.g. hello world ☕ |
| unicode16 | U | show this as UTF-16 characters e.g. (float) x = 0xd70a 0x411f |
| unicode32 | U32 | show this as UTF-32 characters e.g. (float) x = 0x411fd70a |
| unsigned decimal | u | show this as an unsigned integer number (this does not perform a cast, it simply shows the bytes as unsigned integer) |
| pointer | p | show this as a native pointer (unless this is really a pointer, the resulting address will probably be invalid) |
| complex integer | I | interpret this value as the real and imaginary part of a complex integer number e.g. (int *) pointer = 1048960 + 1i |
| character array | a | show this as an array of characters e.g. (char) *c.sp.z = {X} |
| Raw | ! | raw format, ignoring any data type views customization |
Natvis
The Natvis framework allows you to customize the way Visual Studio displays native types in the debugger variable windows. For example, use Natvis to customize the displays for the Watch, Locals, and Data Tips windows.
The Natvis feature is enabled by default but can be disabled from Visual Studio by setting the Tools > Options > Android Game Development Extension > Natvis flag to Disabled.
Loading Natvis files
Visual Studio loads Natvis files from the three locations listed below, and reloads them each time you start a debugging session. Files must adhere to the Visual Studio 2017 Natvis schema.
.natvisfiles that are part of a loaded project or top-level solution item.- The user-specific directory
(
%USERPROFILE%\Documents\Visual Studio 2017\Visualizers) - The system-wide directory
(
%VSINSTALLDIR%\Common7\Packages\Debugger\Visualizers)
Reloading Natvis files
Reload Natvis files during a debug session by evaluating .natvisreload in the
Command Window or Watch window.
Sample Natvis file
This sample Natvis file includes all of the tags and attributes are currently supported.
<?xml version="1.0" encoding="utf-8"?>
<AutoVisualizer xmlns="http://schemas.microsoft.com/vstudio/debugger/natvis/2010">
<Type Name="demo::Vector<*>">
<AlternativeType Name="MySimilarVectorType<*>"/>
<!-- Included to show the <SmartPointer> feature is supported. -->
<SmartPointer Optional="true" Usage="Minimal">ptr</SmartPointer>
<!-- Included to show the <DisplayString> feature is supported. -->
<DisplayString Condition="_size == 0" Optional="true">()</DisplayString>
<DisplayString Condition="_size == 1">(x={_items[0]})</DisplayString>
<DisplayString Condition="_size == 2">(x={_items[0]}, y={_items[1]})</DisplayString>
<DisplayString Condition="_size == 3">(x={_items[0]}, y={_items[1]}, z={_items[2]})</DisplayString>
<DisplayString>[Size={_size,x}] (x={_items[0]}, y={_items[1]}, z={_items[2]}, ...)</DisplayString>
<!-- Included to show the <StringView> feature is supported. -->
<StringView Condition="true" Optional="true">_stringViewText</StringView>
<Expand HideRawView="false">
<!-- Included to show the <Item> feature is supported. -->
<Item Name="X" Condition="_size < 4 && _size >= 1" Optional="true">_items[0]</Item>
<Item Name="Y" Condition="_size < 4 && _size >= 2" Optional="true">_items[1]</Item>
<Item Name="Z" Condition="_size < 4 && _size >= 3" Optional="true">_items[2]</Item>
<!-- Included to show the <ArrayItems> feature is supported. -->
<ArrayItems Condition="_size >= 4" Optional="true">
<Size Condition="true" Optional="true">_size</Size>
<ValuePointer Condition="true">_items</ValuePointer>
</ArrayItems>
<!-- Included to show the <IndexListItems> feature is supported. -->
<IndexListItems Condition="true" Optional="true">
<Size Condition="true" Optional="true">_listSize</Size>
<ValueNode Condition="true">_list[%i]</ValueNode>
</IndexListItems>
<!-- Included to show the <LinkedListItems> feature is supported. -->
<LinkedListItems Condition="true" Optional="true">
<Size Optional="true">_listSize</Size>
<HeadPointer>_head</HeadPointer>
<NextPointer>_next</NextPointer>
<ValueNode>_value</ValueNode>
</LinkedListItems>
<!-- Included to show the <ExpandedItem> feature is supported. -->
<ExpandedItem Condition="true" Optional="true">_childVar</ExpandedItem>
<!-- Included to show the <Synthetic> feature is supported. -->
<Synthetic Name="[Size]" Condition="true" Optional="true">
<DisplayString>_size</DisplayString>
<Expand HideRawView="true">
<!-- Any supported <Expand> sub-tags. -->
</Expand>
</Synthetic>
<!-- Included to show the <TreeItems> feature is supported. -->
<TreeItems Condition="true" Optional="true">
<Size>_treeSize</Size>
<HeadPointer>_head</HeadPointer>
<LeftPointer>_left</LeftPointer>
<RightPointer>_right</RightPointer>
<ValueNode>_value</ValueNode>
</TreeItems>
<!-- Included to show format specifiers are supported. -->
<Item Name="[Hex Dump at {_index,x}]">myInt[_index],x</Item>
</Expand>
</Type>
</AutoVisualizer>
Authoring Natvis files
Visual Studio supports authoring your own Natvis files. For more information about customizing the debugger variable windows, see MSDN.
Debugging Natvis files
In some cases errors will be presented as the Value of a variable (e.g. in
the Auto, Watch, etc. windows). For example: <error: use of undeclared
identifier 'missingVar'>
You can access more details about the error by opening the GoogleAndroid.log
file from the Android Game Development Extension toolbar.
Known limitations
If your tag or attribute isn't listed in the example file above, it is not currently supported. Visual Studio ignores unsupported tags and attributes, so you can leave them in an existing Natvis file and the file will work, as long as it uses our schema.
The
Usageattribute, albeit required by the schema, is not supported for<SmartPointer>. However, LLDB does not restrict the access to operators defined in C++, so that any required operator can be defined in C++ instead.