
Play Games Hizmetleri projenizi doğrudan Google Cloud'da görüntülemek ve düzenlemek isteyebileceğiniz durumlar olabilir.
Tipik senaryolar şunlardır:
- Projeniz için ek API'leri (ör. Google Drive) etkinleştirme
- OAuth 2.0 iletişim kutusunda oyununuzun markalama bilgilerini düzenleme
- API kotanızı görüntüleme ve gerekirse daha fazla kota isteme
- Geçmişte oluşturduğunuz istemci kimliklerinde yetkili URI'leri veya JavaScript başlangıç noktalarını düzenleme.
Projenizi görüntüleyin
Projenizi Google Cloud'da görüntülemek için:
- Yapılandırma sayfasında oyununuz için bir kimlik bilgisi seçin (Kullanıcı sayısını artırın > Play Games Hizmetleri > Kurulum ve yönetim > Yapılandırma).
- Authentication (Kimlik Doğrulama) bölümüne gidip View in Google Cloud'u (Google Cloud'da görüntüle) tıklayın.
API kullanım kotalarını ayarlama
Google Cloud'da, oyununuz için belirlenen API kullanım sınırlarını ve kullanılan kota miktarını görüntüleyebilirsiniz. Ayrıca, kötüye kullanımda bulunan bir kullanıcının (veya hatalı bir oyun istemcisinin) kotanızı tüketmesini önlemek için kullanıcı başına sınırlar da belirleyebilirsiniz.
Projenizin kullanım sınırlarını görüntülemek, değiştirmek veya kotanızda artış talep etmek için şunları yapın:
- Projeniz için faturalandırma hesabınız yoksa hesap oluşturun.
- API Konsolu'nda API kitaplığının Etkin API'ler sayfasına gidin ve listeden bir API seçin.
- Kota ile ilgili ayarları görüntülemek ve değiştirmek için Kotalar'ı seçin. Kullanım istatistiklerini görüntülemek için Kullanım'ı seçin.
"Kullanıcıların", kota isteğinde bulunan istemcinin IP adresine göre belirlendiğini unutmayın. Örneğin, tüm istekleriniz tek bir sunucudan geliyorsa bu sunucu yanlışlıkla tek bir spam gönderen kullanıcı olarak etiketlenebilir. Bunu önlemek için API uç nokta isteklerinize bir userIp=x.x.x.x bağımsız değişkeni ekleyebilirsiniz.
Kullanıcı başına kota belirleme hakkında daha fazla bilgi edinmek için API kullanımını sınırlama başlıklı makaleyi inceleyin.
Kullanıcı başına sınırın yanı sıra Google Play Games Hizmetleri API'si için uygulama genelinde günlük sınır da vardır. Genellikle önceden ayrılmış limiti değiştirmeniz gerekmez. Ancak hacimde büyük bir artış olacağını tahmin ediyorsanız (örneğin, yaklaşan bir lansman etkinliği için) Daha fazla iste bağlantısını tıklayarak ek kota isteğinde bulunabilirsiniz.
OAuth hız sınırlarını ve yeni kullanıcı sınırlarını görüntüleme
OAuth kullanıcı yetkilendirme verme oranları ve yeni kullanıcı sınırlarıyla ilgili kotaları görüntülemek için:
- Google Cloud Console'a gidin.
- Doğru projeyi seçtiğinizden emin olun.
- API'ler ve Hizmetler > OAuth kullanıcı rızası ekranı'na gidin.
- Bu sayfada, mevcut kullanıcı yetkilendirme izni oranını (veya belirteç izni oranını) ve toplam yeni kullanıcı sınırını görüntüleyebilirsiniz.

Oyununuzun yakında hız sınırına ulaşacağını görüyorsanız hız sınırı kotasının artırılmasını isteyerek oyuncuların kesinti yaşamaması için önlem almanız gerekir.
Daha fazla bilgi için OAuth Uygulaması Hız Sınırları başlıklı makaleyi inceleyin.
Diğer API'leri etkinleştirme
Play Console'da istemci kimliğinizi oluşturduğunuzda, projeniz için Google Play Games Hizmetleri API'si otomatik olarak etkinleştirilir. Diğer Google API'lerini Google Cloud'dan etkinleştirebilirsiniz.
Projenizde bir API'yi etkinleştirmek için aşağıdakileri yapın:
Google API Konsolu'nda API kitaplığını açın. İstenirse bir proje seçin veya yeni bir proje oluşturun. API Kitaplığı, kullanılabilir tüm API'leri ürün ailesine ve popülerliğe göre gruplandırarak listeler.
Etkinleştirmek istediğiniz API listede görünmüyorsa bulmak için aramayı kullanın.
Etkinleştirmek istediğiniz API'yi seçin ve Etkinleştir düğmesini tıklayın.
İstenirse faturalandırmayı etkinleştirin.
İstenirse API'nin hizmet şartlarını kabul edin.
Markalama bilgilerini değiştirme
OAuth 2.0 iletişim kutusunda görünen oyununuzun marka bilgilerini (başlık, logo vb.) değiştirmek için Google Cloud'un izin ekranındaki özellikleri ayarlayın.
Projenizin izin ekranını ayarlamak için aşağıdakileri yapın:
- Play Console'da İzin ekranı sayfasını açın. İstenirse bir proje seçin veya yeni bir proje oluşturun.
- Formu doldurun ve Kaydet'i tıklayın.
OAuth kullanıcı türünü değiştirme
Üretim (Test ve yayınlama > Üretim) test kanalında kişisel test hesabı kullanarak test yapıyorsanız Google Cloud'daki OAuth kitle ayarınızı da Harici olarak yapılandırmış olmanız gerekir. Daha fazla bilgi için Uygulama kitlesini yönetme başlıklı makaleyi inceleyin.
Müşteri kimliğiyle ilgili özellikleri değiştirme
OAuth 2.0 istemci kimliğinizle (web uygulaması için web kaynakları ve yönlendirme URL'leri vb.) ilgili özellikleri değiştirmek için:
- Play Console'u açıp oyununuza gidin.
- Yapılandırma sayfasında oyununuz için bir kimlik bilgisi seçin (Kullanıcı sayısını artırın > Play Games Hizmetleri > Kurulum ve yönetim > Yapılandırma).
- Kimlik doğrulama bölümünün en altına gidin ve Google Cloud'da görüntüle'yi tıklayın.
- Google Cloud'da projenizi seçin.
- Soldaki kenar çubuğunda API'ler ve kimlik doğrulama'yı seçin. Görüntülenen API listesinde Google Play Games Hizmetleri API'sinin durumunun AÇIK olduğundan emin olun.
- Soldaki kenar çubuğunda Kayıtlı uygulamalar'ı seçin.
- OAuth 2.0 İstemci Kimliği bölümünü genişletin ve düzenlenecek özelliği bulun.
OAuth istemcilerini mevcut bir Cloud projesinden taşıma
Projenizi Google Cloud'da görüntülemek için Projenizi görüntüleme bölümündeki adımları uygulayın.
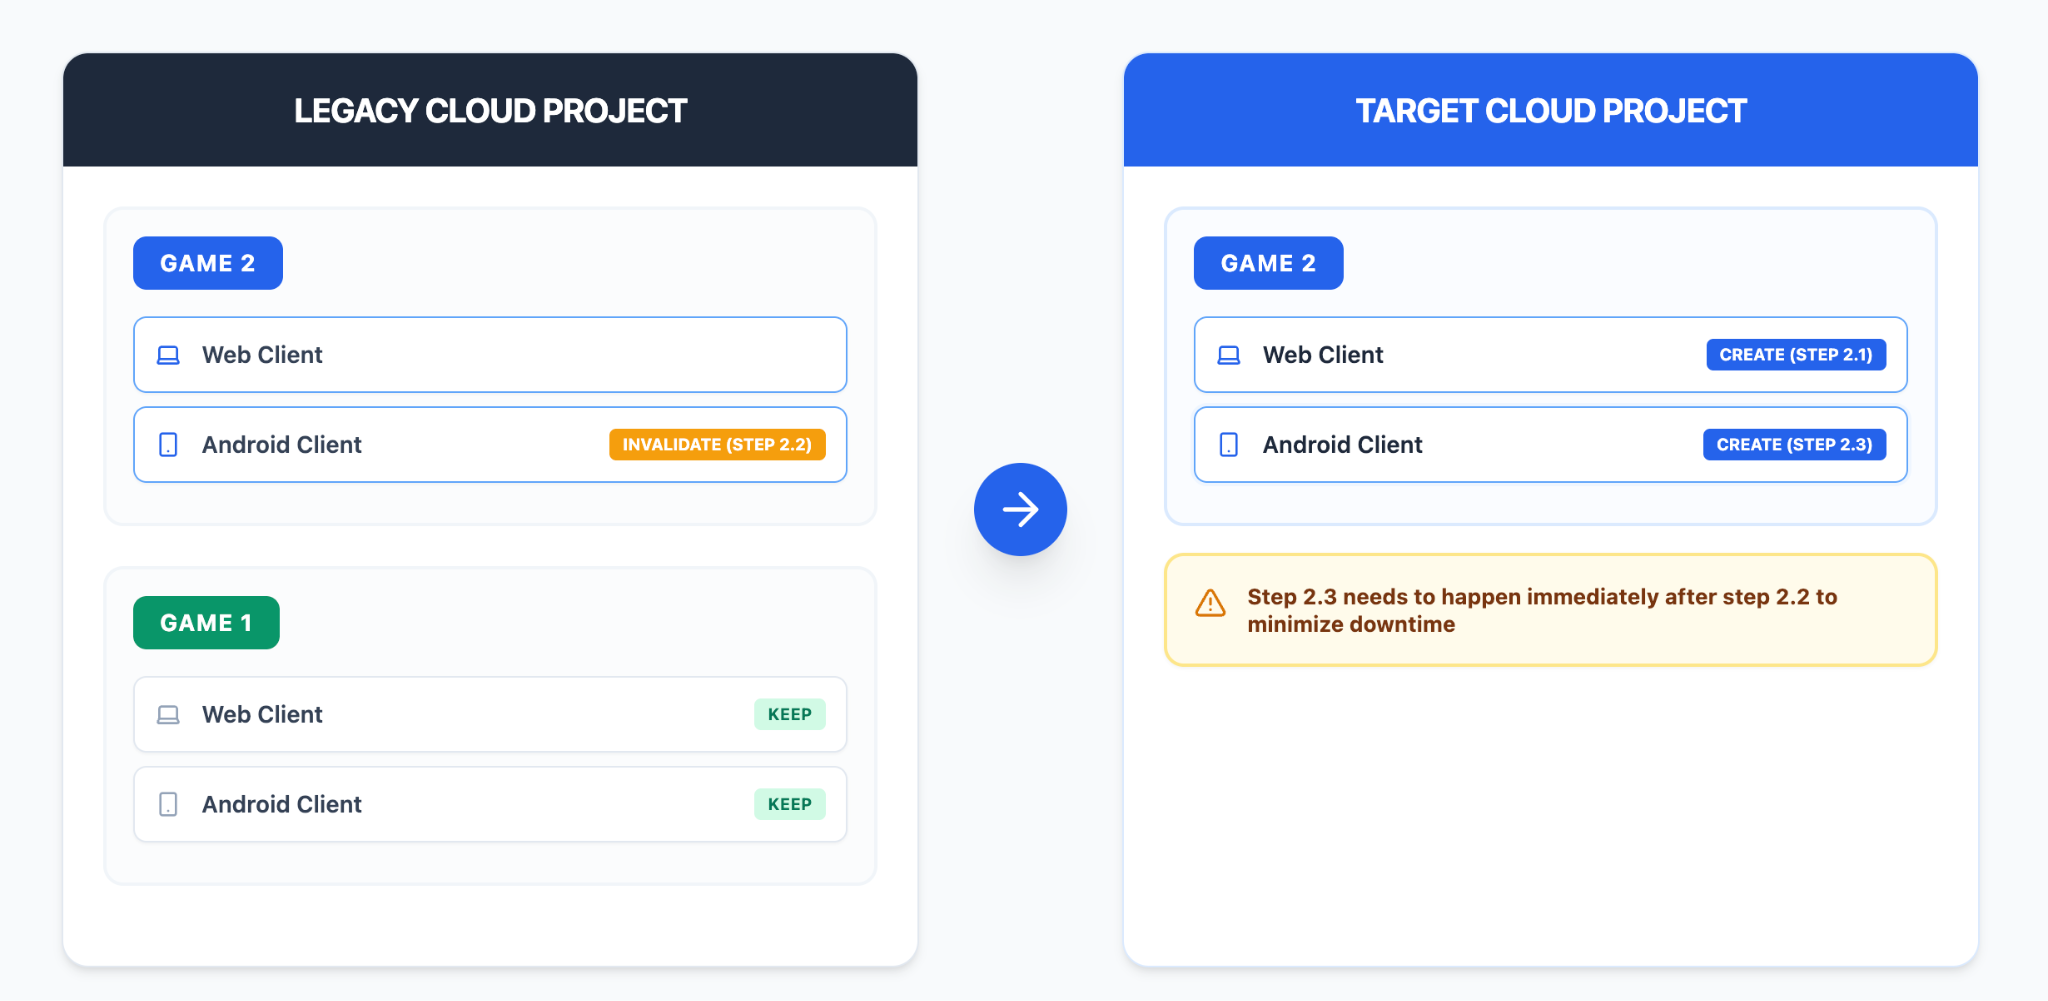
Play Games Hizmetleri'ni (PGS) kurmak için benzersiz bir Google Cloud projesi gerekir. Birden fazla oyun tek bir Cloud projesini paylaşıyorsa uygun yapılandırmayı sağlamak için Android OAuth istemcilerini bağımsız projelere taşımanız gerekir.
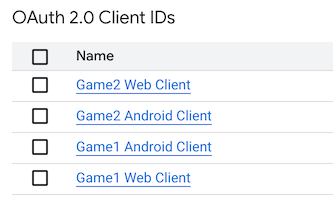
Önceki örnekte, 1. Oyun ve 2. Oyun, Google ile oturum açma için web ve Android istemcilerini tek bir Google Cloud projesinde oluşturmuştur. 2. Oyun'un web ve Android istemcilerini mevcut eski Google Cloud projesinden yeni bir hedef Google Cloud projesine taşımamız gerekiyor.
1. adım: Arka uç hazırlığı
Geçişi gerçekleştirmeden önce, hem eski hem de yeni web istemci kimliklerinin aynı anda var olmasını işlemek için arka uç ve istemcilerinizi uyarlamanız gerekir.
- Sunucu tarafı yapılandırması: Sunucunuz, kimlik jetonundaki web istemcisi kimliğini doğruluyorsa sunucu tarafı mantığınızı, hem eski istemciler tarafından verilen kimlik jetonlarını (Legacy Cloud Project'teki) hem de hedef bulut projesinde oluşturmanız gereken yeni istemcileri aynı anda destekleyecek şekilde güncellemeniz gerekir.
- İstemci tarafı yapılandırması: İstemci uygulamanız, geçiş yaparken yeni web istemci kimliğiyle oturum açmak için birden fazla web istemci kimliğini desteklemelidir. Aşağıdaki yöntemlerden herhangi birini kullanabilirsiniz:
- İstemci uygulamasında yerleşik 2 web istemci kimliği vardır. Eski istemci kimliğinin süresi dolduğunda yeni web istemci kimliğine geçilir.
- Geçişi tamamlamak için sunucudan dinamik olarak en son web istemci kimliğini alın.
- Web istemcilerini önceden oluşturma: Atomik geçiş sırasında olası gecikmeleri önlemek için hedef projenizde önceden yeni bir web istemcisi oluşturmanız gerekir.
2. adım: Yeni web ve Android OAuth istemcilerini doğru Google Cloud'da yapılandırın
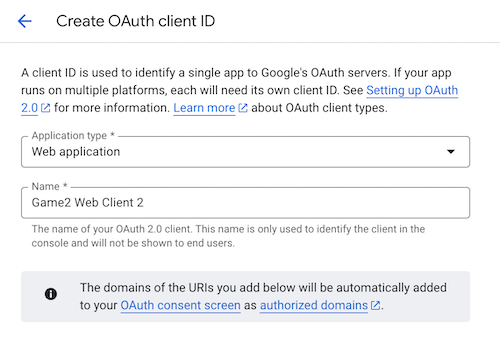
2.1. adım: Hedef Google Cloud projesinde 2. oyun için yeni bir web OAuth istemcisi oluşturun:

2.2. adım: Uyarı: Android istemcisinde yapılan değişiklikler, oyununuzun kullanıcılarının Google ile oturum açma özelliğini kullanarak oyununuzda oturum açmasını engeller. Bu nedenle, 2.2. adımdan hemen sonra 2.3. adımı uyguladığınızdan emin olmanız gerekir. İşlemlerin, değişiklik ve yeniden oluşturma arasındaki zaman aralığını en aza indirmesi için aynı anda 2 web sayfası açmanız önerilir.
Eski Google Cloud projesinde 2. Oyun'un Android istemcisinin paket adını com.noexist.none gibi geçersiz bir değerle değiştirin.
2.3. adım: Hedef Google Cloud projesinde, 2. Oyun'un SHA-1 parmak izi ve paket adıyla aynı olacak şekilde 2. Oyun için hemen yeni bir Android istemcisi oluşturun:

3. adım: Gerçek zamanlı yapılandırma dağıtımı
Hedef projede yeni Android istemcisini başarıyla oluşturduktan sonra hemen aşağıdakileri yapın:
- İstemcileri yönlendirme: İstemci uygulamasını hemen yeni web istemci kimliğini kullanmaya başlayacak şekilde değiştirmek için dinamik yapılandırma mekanizmanızı (ör. Remote Config) kullanın.
- Eski istemcileri tutma: Herhangi bir sorun ortaya çıkarsa önceki OAuth istemcisi oturum açma işlemine geri dönmek için eski OAuth istemcilerini yedek seçenek olarak saklayın.