

本指南將說明如何調整遊戲,使其適用於各種 Android 板型規格。
開始前,請先參閱「支援大螢幕大小調整功能」。Android 上的現代遊戲應能適應所有螢幕大小,不需仰賴系統相容性層。這樣一來,您就能隨時控管遊戲的顯示方式,並在 XR 等板型規格或無法旋轉螢幕的裝置上,提供優質的玩家體驗。
如要這樣做,請完成下列工作:
- 停用系統上下黑邊,並在引擎中自行實作上下黑邊。
- 讓上下黑邊區域可供使用,且主題合適。
- 解決設計考量,讓遊戲能從 21:9 縮放至 1:1 和 9:21。
測試指令
建構及測試遊戲時,請確認遊戲會自行算繪任何上下黑邊。您也應該強制遊戲進入直向和橫向模式,因為電視和車內螢幕等裝置無法從預設的橫向或直向模式旋轉。
如要檢查遊戲引擎是否使用系統上下黑邊,請使用 adb shell cmd window set-letterbox-style 指令。舉例來說,下列指令會將系統上下黑邊設為亮綠色,並在遊戲中加入圓角半徑,讓您能清楚看出遊戲是否改用作業系統的相容模式:
adb shell "cmd window set-letterbox-style --backgroundType solid_color --backgroundColor '#00FF00' --cornerRadius 30 --isEducationEnabled false"
如要強制設定方向進行測試,請使用 adb shell cmd window user-rotation lock。這有助於模擬遊戲在不支援應用程式方向覆寫的裝置上的行為,或瞭解使用者在 XR 或電腦等裝置上看到的內容,在這些裝置上,視窗可以直向或橫向顯示,不受裝置方向影響。
首先,請將裝置設為可覆寫應用程式方向的狀態:
adb shell cmd window set-ignore-orientation-request true
adb shell cmd window fixed-to-user-rotation enabled
接著,測試將遊戲變更為橫向:
adb shell cmd window user-rotation lock 1
接著,測試將遊戲變更為直向:
adb shell cmd window user-rotation lock 0
重新啟動或執行下列指令,將裝置重設為原始設備製造商 (OEM) 設定:
adb shell cmd window reset-letterbox-style
adb shell cmd window fixed-to-user-rotation default
adb shell cmd window user-rotation free
adb shell cmd window set-ignore-orientation-request reset
為什麼要停用系統上下黑邊?
系統一律會控制系統上下黑邊。自行偵測螢幕大小並管理顯示區域,即可減少輸入內容離開遊戲區域時發生的問題,例如輸入內容遺失。您也可以將非遊戲玩法元素展開至螢幕邊緣,即使遊戲內容仍固定在中間也沒關係。系統相容模式可讓遊戲正常運作,但身為遊戲開發人員,您必須為玩家提供優質的遊戲體驗。

上下黑邊實作範例
大多數遊戲引擎都可讓您控制攝影機在螢幕上的算繪位置。如要自行實作上下黑邊,請測量算繪區域的顯示比例,並調整未使用區域的裁剪矩形,而不是讓系統為遊戲加上上下黑邊。以下範例將一部攝影機限制為在限定顯示比例內算繪,同時允許 UI 攝影機或傳遞擴展至完整邏輯螢幕大小:
Unity
[SerializeField]
private float minAspectRatio = 4f / 3f;

[SerializeField]
private float maxAspectRatio = 21f / 9f;

private Camera _camera;

private void Awake()
{
    _camera = GetComponent<Camera>();
}

public void MaintainAspectRatio()
{
    int viewWidth = Screen.width;
    int viewHeight = Screen.height;

    // 1. Calculate screen aspect ratio
    float scaleScreen = viewWidth / (float)viewHeight;
    Rect rect = _camera.pixelRect;

    // 2. Scale to the fullest of the lower between width or height
    if (scaleScreen > maxAspectRatio)
    {
        // use height, lock width to max at aspect scale
        rect.width = viewHeight * maxAspectRatio;
        rect.height = viewHeight;
    }
    else if (scaleScreen < minAspectRatio)
    {
        // use width, lock height to min at aspect scale
        rect.width = viewWidth;
        rect.height = viewWidth / minAspectRatio;
    }
    else
    {
        // within allowed aspect ratio range, use full screen
        rect.width = viewWidth;
        rect.height = viewHeight;
    }

    rect.x = Mathf.Floor((viewWidth - rect.width) * 0.5f);
    rect.y = Mathf.Floor((viewHeight - rect.height) * 0.5f);

    Debug.Log("camera view width = " + rect.width +
        " height = " + rect.height +
        " x = " + rect.x +
        " y = " + rect.y);

    // 3. Commit the new size to the camera so that it takes effect
    _camera.pixelRect = rect;
}
C++ (Vulkan)
/**
 * @brief Calculates a bounded-aspect-ratio gameplay viewport and scissor
 * rectangle and records them directly into a Vulkan command buffer.
 *
 * @note Requires `VK_DYNAMIC_STATE_VIEWPORT` and `VK_DYNAMIC_STATE_SCISSOR` to
 * be enabled on the bound graphics `VkPipeline`.
 *
 * @param command_buffer   Active `VkCommandBuffer` in the recording state.
 * @param window_width     Full physical window or swapchain width in pixels.
 * @param window_height    Full physical window or swapchain height in pixels.
 * @param min_aspect_ratio Minimum allowed aspect ratio (`width / height`).
 * @param max_aspect_ratio Maximum allowed aspect ratio (`width / height`).
 */
void MaintainAspectRatio(VkCommandBuffer command_buffer, uint32_t window_width,
                         uint32_t window_height, float min_aspect_ratio,
                         float max_aspect_ratio) {
  if (command_buffer == VK_NULL_HANDLE || window_width == 0 ||
      window_height == 0 || min_aspect_ratio <= 0.0f ||
      max_aspect_ratio < min_aspect_ratio) {
    return;
  }

  // 1. Calculate screen aspect ratio.
  const float view_width = static_cast<float>(window_width);
  const float view_height = static_cast<float>(window_height);
  const float scale_screen = view_width / view_height;

  // 2. Scale to the fullest of the lower between width or height.
  float rect_width = view_width;
  float rect_height = view_height;
  if (scale_screen > max_aspect_ratio) {
    // Use height, lock width to max at aspect scale (pillarbox).
    rect_width = std::floor(view_height * max_aspect_ratio);
    rect_height = view_height;
  } else if (scale_screen < min_aspect_ratio) {
    // Use width, lock height to min at aspect scale (letterbox).
    rect_width = view_width;
    rect_height = std::floor(view_width / min_aspect_ratio);
  } else {
    // Within allowed aspect ratio range, use full screen.
    rect_width = view_width;
    rect_height = view_height;
  }

  const float rect_x = std::floor((view_width - rect_width) * 0.5f);
  const float rect_y = std::floor((view_height - rect_height) * 0.5f);

  // 3. Commit the new viewport and scissor to the command buffer so that
  // subsequent gameplay draw calls are transformed and clipped to this region.
  const VkViewport viewport = {
      .x = rect_x,
      .y = rect_y,
      .width = rect_width,
      .height = rect_height,
      .minDepth = 0.0f,
      .maxDepth = 1.0f,
  };
  const VkRect2D scissor = {
      .offset =
          {
              .x = static_cast<int32_t>(rect_x),
              .y = static_cast<int32_t>(rect_y),
          },
      .extent =
          {
              .width = static_cast<uint32_t>(rect_width),
              .height = static_cast<uint32_t>(rect_height),
          },
  };

  vkCmdSetViewport(command_buffer, 0, 1, &viewport);
  vkCmdSetScissor(command_buffer, 0, 1, &scissor);
}
如需 Unity 的逐步操作說明,請參閱「針對大螢幕和摺疊式裝置最佳化 Unity 遊戲」程式碼實驗室。
處理大螢幕和小螢幕
在較小的螢幕上 (例如手機和折疊式裝置的外螢幕),鎖定直向或橫向的遊戲可能提供最佳的使用者體驗。隨著螢幕變大 (例如平板電腦、Chromebook、車內螢幕或摺疊式裝置的內螢幕),旋轉裝置變得較不理想,甚至不可能,但較大的實體螢幕仍可讓遊戲在非軸向顯示比例下遊玩。
為了提供玩家最佳體驗,請在執行階段偵測螢幕大小,並在必要時限制旋轉,同時在螢幕大小增加時提供玩家更多彈性。Android 認為理想的切點為 sw600dp,即最小寬度為 600 密度獨立像素 (600dp)。這與 WindowSizeClass.WIDTH_DP_MEDIUM_LOWER_BOUND 相關。使用 computeMaximumWindowMetrics 驗證多螢幕設定中的可用螢幕大小。
如要在遊戲中支援這項功能,請在資訊清單中支援所有螢幕方向,然後在 onCreate() 和 onConfigurationChanged() 中評估最小寬度,並適當設定螢幕方向鎖定:
移除資訊清單中的靜態螢幕方向鎖定,並宣告設定變更處理方式:
<activity
    android:name=".MainActivity"
    android:resizeableActivity="true"
    android:configChanges="orientation|screenSize|smallestScreenSize|screenLayout|density|keyboard|keyboardHidden" />
新增必要的匯入項目:
import android.content.pm.ActivityInfo
import android.content.res.Configuration
import android.os.Bundle
import androidx.activity.enableEdgeToEdge
import androidx.window.core.layout.WindowSizeClass
import androidx.window.layout.WindowMetricsCalculator
import kotlin.math.min
同時處理
onCreate和onConfigurationChanged:override fun onCreate(savedInstanceState: Bundle?) { enableEdgeToEdge() super.onCreate(savedInstanceState) applyAdaptiveOrientationPolicy() // ... } override fun onConfigurationChanged(newConfig: Configuration) { super.onConfigurationChanged(newConfig) applyAdaptiveOrientationPolicy() // ... }根據最小螢幕寬度更新要求的螢幕方向,將精簡螢幕鎖定為遊戲偏好的設計方向:
private fun applyAdaptiveOrientationPolicy() {
    // compute the smallest screen bound in dp
    val maxMetrics = WindowMetricsCalculator.getOrCreate().computeMaximumWindowMetrics(this)
    val minDimensionPx = min(maxMetrics.bounds.width(), maxMetrics.bounds.height())
    val displaySmallestWidthDp = minDimensionPx / maxMetrics.density

    val targetOrientation = if (displaySmallestWidthDp >= WindowSizeClass.WIDTH_DP_MEDIUM_LOWER_BOUND) {
        // Large display (>= 600dp): allow free rotation in any orientation
        ActivityInfo.SCREEN_ORIENTATION_UNSPECIFIED
    } else {
        // Compact display (< 600dp): lock to your game's preferred orientation
        // (use SCREEN_ORIENTATION_SENSOR_LANDSCAPE for landscape-first games)
        ActivityInfo.SCREEN_ORIENTATION_PORTRAIT
    }

    // Guard against redundant setter calls to avoid configuration change loops
    if (requestedOrientation != targetOrientation) {
        requestedOrientation = targetOrientation
    }
}
設計時考量常見問題
支援多種顯示比例和螢幕方向,可為玩家提供最佳使用者體驗。與手機不同,大型螢幕通常固定為橫向或直向,有時螢幕幾乎是正方形。在這些大螢幕裝置上,玩家通常會一邊玩遊戲,一邊執行其他工作。充分利用螢幕空間,就能吸引更多玩家,提高遊玩頻率和時間。
下列各節提供的解決方案可讓遊戲在各種板型規格上提供優質體驗,而非只是將手機遊戲嵌入非手機螢幕。
可感知顯示比例的相機
在 3D 遊戲中,如果螢幕過高,玩家可能會覺得自己是透過狹窄的縫隙觀看遊戲;如果螢幕過寬,玩家可能會錯過設計的互動。就像 2D 遊戲一樣,您可以讓「安全區域」保持可見。下列程式碼會根據有效顯示比例與參考顯示比例 (1920x1080) 的比較結果,在水平視野和垂直視野之間切換相機。這樣一來,設計師就能為 1080p 螢幕打造遊戲,並確保在該參考框架內設計的所有內容都能正常顯示:
Unity
[SerializeField]
private Camera _camera;

[SerializeField]
private float _referenceWidth = 1920f;

[SerializeField]
private float _referenceHeight = 1080f;

[SerializeField]
private float _referenceVerticalFov = 60f;

public float ReferenceAspectRatio => _referenceWidth / Mathf.Max(0.0001f, _referenceHeight);

private void Awake()
{
    if (_camera == null)
    {
        _camera = GetComponent<Camera>();
    }
}

// Built-in Render Pipeline callback. In URP, subscribe to
// RenderPipelineManager.beginCameraRendering or call UpdateFov() on resize.
private void OnPreCull()
{
    UpdateFov();
}

public void UpdateFov()
{
    if (_camera == null || _camera.orthographic)
    {
        return;
    }

    float referenceAspect = ReferenceAspectRatio;
    float currentAspect = _camera.aspect;
    if (currentAspect <= 0.0001f)
    {
        return;
    }

    float targetVerticalFov;

    if (currentAspect >= referenceAspect)
    {
        // Viewport is wider than (or equal to) the reference safe area
        targetVerticalFov = _referenceVerticalFov;
    }
    else
    {
        // Viewport is skinnier than the reference safe area
        float referenceHorizontalFov = Camera.VerticalToHorizontalFieldOfView(_referenceVerticalFov, referenceAspect);
        targetVerticalFov = Camera.HorizontalToVerticalFieldOfView(referenceHorizontalFov, currentAspect);
        targetVerticalFov = Mathf.Clamp(targetVerticalFov, 1f, 179f);
    }

    if (!Mathf.Approximately(_camera.fieldOfView, targetVerticalFov))
    {
        _camera.fieldOfView = targetVerticalFov;
    }
}
C++ (Vulkan)
/**
 * @brief Calculates an aspect-aware Vulkan perspective projection matrix using
 * GLM that keeps a reference safe area (e.g., 1920x1080) visible across
 * aspect ratios.
 *
 * @note Uses `glm::perspectiveZO` for Vulkan's `[0, 1]` depth range and
 * inverts `projection[1][1]` for Vulkan's top-left (`+Y` down) clip space.
 *
 * @param viewport_width         Active gameplay viewport width in pixels.
 * @param viewport_height        Active gameplay viewport height in pixels.
 * @param reference_width        Authored safe-area reference width in pixels.
 * @param reference_height       Authored safe-area reference height in pixels.
 * @param reference_vertical_fov Authored vertical FOV in degrees (e.g., 60.0f).
 * @param near_plane             Near clipping plane distance (`zNear > 0.0f`).
 * @param far_plane              Far clipping plane distance (`zFar > zNear`).
 * @return Aspect-aware `glm::mat4` perspective projection matrix for Vulkan.
 */
glm::mat4 CalculateAspectAwareProjectionMatrix(
    float viewport_width, float viewport_height, float reference_width = 1920.0f,
    float reference_height = 1080.0f, float reference_vertical_fov = 60.0f,
    float near_plane = 0.1f, float far_plane = 100.0f) {
  if (viewport_width <= 0.0001f || viewport_height <= 0.0001f) {
    return glm::mat4(1.0f);
  }

  // 1. Compare the active viewport aspect ratio against the reference safe
  // area.
  const float reference_aspect =
      reference_width / std::max(0.0001f, reference_height);
  const float current_aspect = viewport_width / viewport_height;

  float target_vertical_fov_rad = glm::radians(reference_vertical_fov);

  if (current_aspect >= reference_aspect) {
    // Viewport is wider than (or equal to) the reference safe area (Hor+).
    target_vertical_fov_rad = glm::radians(reference_vertical_fov);
  } else {
    // Viewport is skinnier than the reference safe area (Vert+):
    // Convert reference vertical FOV -> reference horizontal FOV -> new
    // vertical FOV at current_aspect so the safe area is never cropped.
    const float tan_half_horiz =
        std::tan(target_vertical_fov_rad * 0.5f) * reference_aspect;
    target_vertical_fov_rad = 2.0f * std::atan(tan_half_horiz / current_aspect);
    target_vertical_fov_rad = std::clamp(
        target_vertical_fov_rad, glm::radians(1.0f), glm::radians(179.0f));
  }

  // 2. Build the Vulkan [0, 1] depth perspective matrix and flip +Y clip space.
  glm::mat4 projection = glm::perspectiveZO(
      target_vertical_fov_rad, current_aspect, near_plane, far_plane);
  projection[1][1] *= -1.0f;
  return projection;
}
完全互動式信箱
有些遊戲的設計具有固定的遊玩區域,通常符合類型設計考量,例如垂直射擊遊戲的固定欄位,或用於復古美學的翻轉螢幕捲動。
這類遊戲應縮放遊戲畫面區域,讓遊戲的一個軸一律最大化,填滿遊戲畫面區域。最大化的軸可能會根據遊戲和顯示邊界的相對顯示比例而變更。
將 HUD 和 UI 元素固定在螢幕的安全邊緣:避免挖孔,但盡可能將虛擬控制項、生命值條和迷你地圖等互動元素,放在遊戲畫面區域外。這樣一來,遊戲的互動部分就會使用整個螢幕,平板電腦和摺疊式裝置等板型規格的玩家可以舒適地玩遊戲,不必過度伸展手指。
最後,請為上下黑邊區域設定適當的主題或情境。建議您使用與螢幕調色盤或圖塊組相符的邊框、桌遊或復古遊戲的虛擬桌子或螢幕,或延伸的小地圖和裝飾性視覺效果。
在以下範例中,遊戲會以完整大小顯示,適用於大多數顯示比例。如果顯示比例窄於 4:3,系統會算繪主題色天空盒,並繼續將控制項等 UI 元素放在螢幕邊緣:
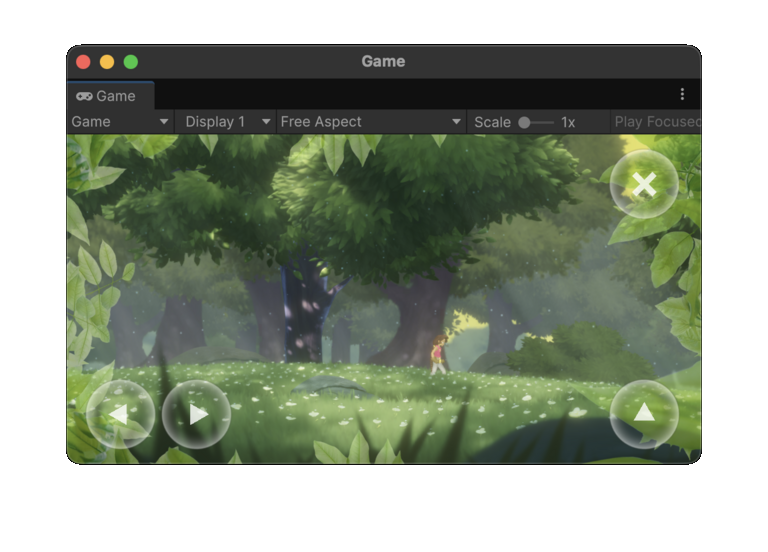 |
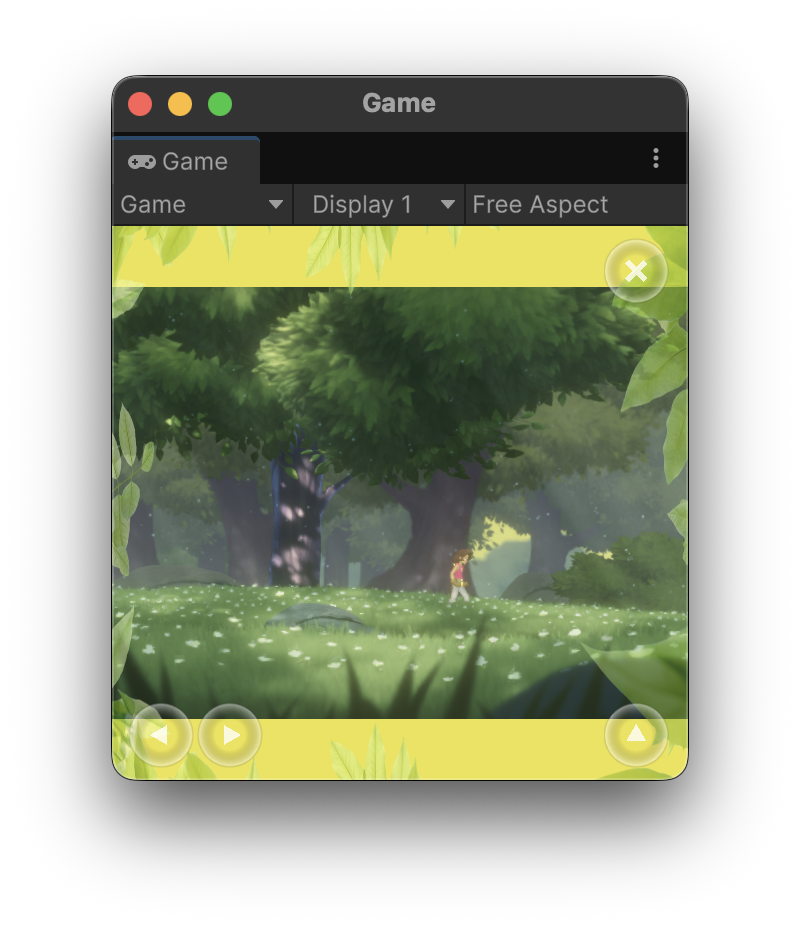
|
戰爭迷霧
許多遊戲開發人員擔心,玩家可能會利用極端的垂直或水平顯示比例,取得不公平優勢。舉例來說,在多人線上戰術競技遊戲 (MOBA) 等競爭激烈的遊戲中,玩家可能會使用非常垂直的螢幕,深入查看對手的路線。
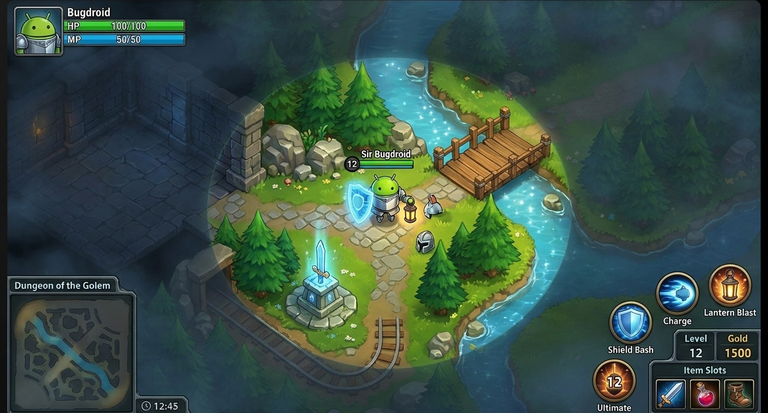
如果是俯視策略和模擬遊戲,建議您算繪戰爭迷霧:
- 在玩家能看到幾何圖形前,不要算繪幾何圖形。
- 將玩家角色無法主動看到的幾何圖形轉譯為暗色,不含任何動態元素。
- 只算繪玩家角色能主動看見的對手、可收集物品和其他動態物件。
如果將這項技術與完全互動式上下黑邊結合,並將 UI 算繪至螢幕邊緣,玩家就能獲得精緻且符合預期的體驗,您也不必重新設計關卡結構或團隊平衡。
如果將這款遊戲展開至填滿較大螢幕,但沒有戰爭迷霧,就會顯示玩家不應看到的地圖部分:
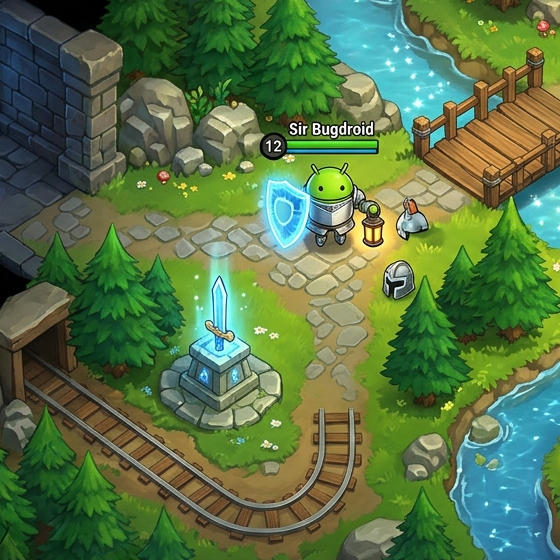 |
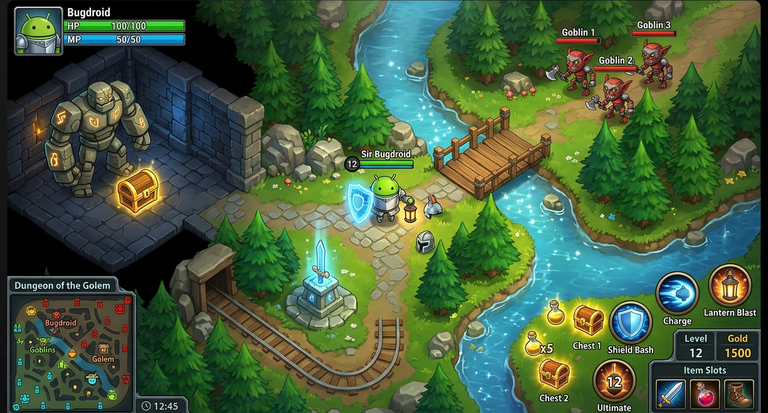
|
透過渲染戰爭迷霧並隱藏敵人、道具等動態元素,您可以在使用遊戲可用的完整影格時,維持遊戲公平性:
|
|
|
淡出幾何圖形
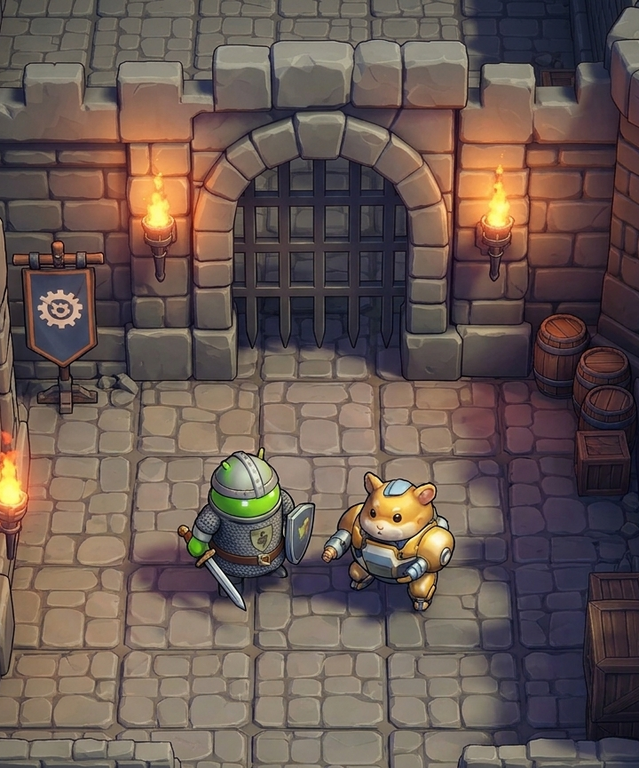
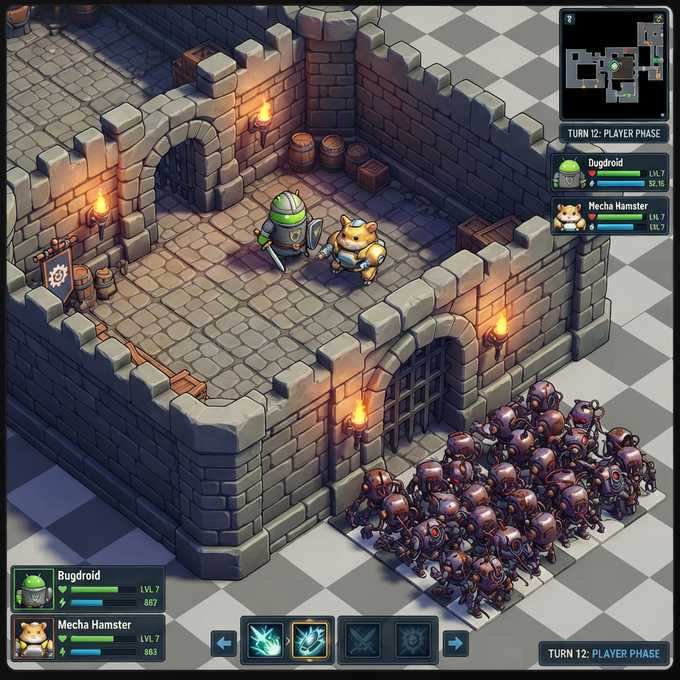
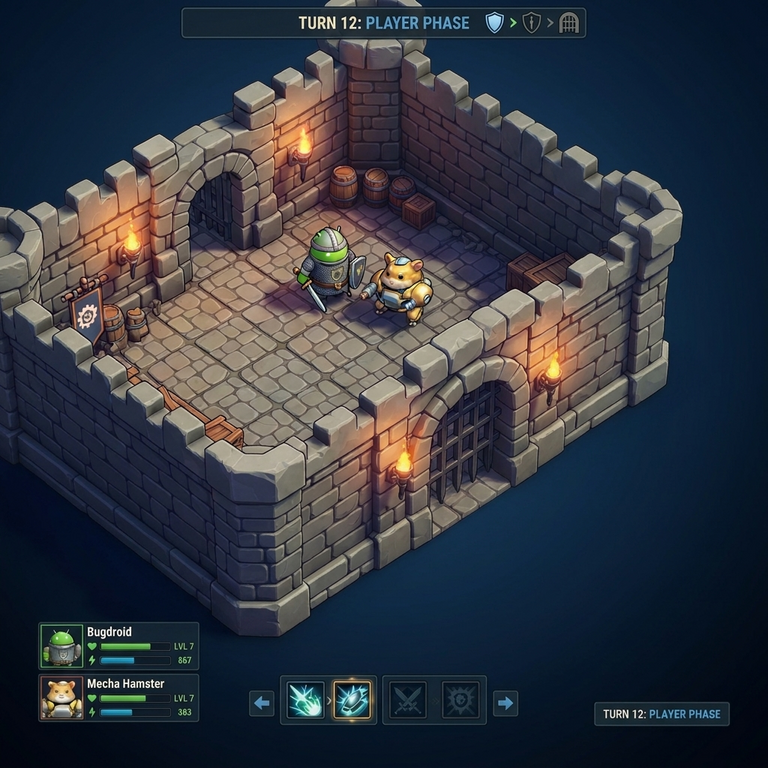
許多遊戲 (尤其是回合制策略遊戲) 會使用類似上一節所述的戰爭迷霧技術,不轉譯玩家尚未發現或無法在特定場景中互動的幾何圖形。
如果擴大視野會顯示玩家不應看到的場景或過場動畫部分,請以乾淨俐落的方式遮蓋場景的特定部分,這樣就能達到與上下黑邊相同的實際效果,而不會有固定靜態邊框的感覺。
在以下範例中,將遊戲展開至較大的顯示比例後,城堡牆外出現了一群殭屍:
|
|
您可以省略目前遊戲區域範圍外的轉譯關卡幾何圖形:
|
|
|
故事內界線
在沉浸式 3D 遊戲中,擴大視野可能會在第一人稱或第三人稱多人遊戲中帶來競爭優勢,或在固定場景遊戲中揭露未經授權的區域,因此請考慮在遊戲中加入敘事元素,以限制視野,而非依賴矩形上下黑邊。例如:
- 汽車或飛機等交通工具的內部駕駛艙
- 安全帽內部
- 表示玩家視野邊緣的暈影
UI 和 HUD 元素仍應延伸至螢幕邊緣,或融入敘事邊界,最好能動態調整。這些敘事元素也能幫助容易暈眩的玩家 (特別是在 XR 裝置上),除了提供無障礙輔助功能,還能降低新顯示比例的複雜度。
避免在非互動式靜態場景中的表面上算繪遊戲。雖然這種做法比在上下黑邊和左右黑邊中顯示黑色長條更好,但玩家很快就會注意到靜態邊框,如果他們最愛的遊戲在非手機板型規格上,只顯示手機大小的畫面,可能會感到不滿。
|
在這個範例中,專為標準手機螢幕設計的遊戲,會在模擬電視中顯示,並搭配擬真遊戲手把,以配合折疊式裝置內螢幕常見的方形顯示比例: 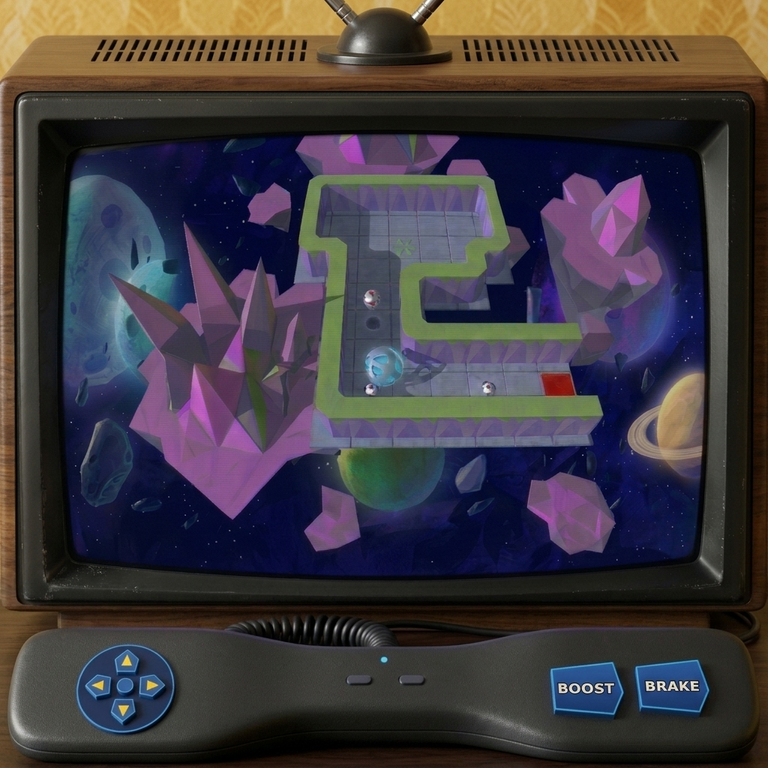
|
基於競爭公平性或設計考量,某些 3D 遊戲可能需要限制視野。建議使用駕駛艙、頭盔或其他敘事隱喻來限制視野,而非使用黑色長條: 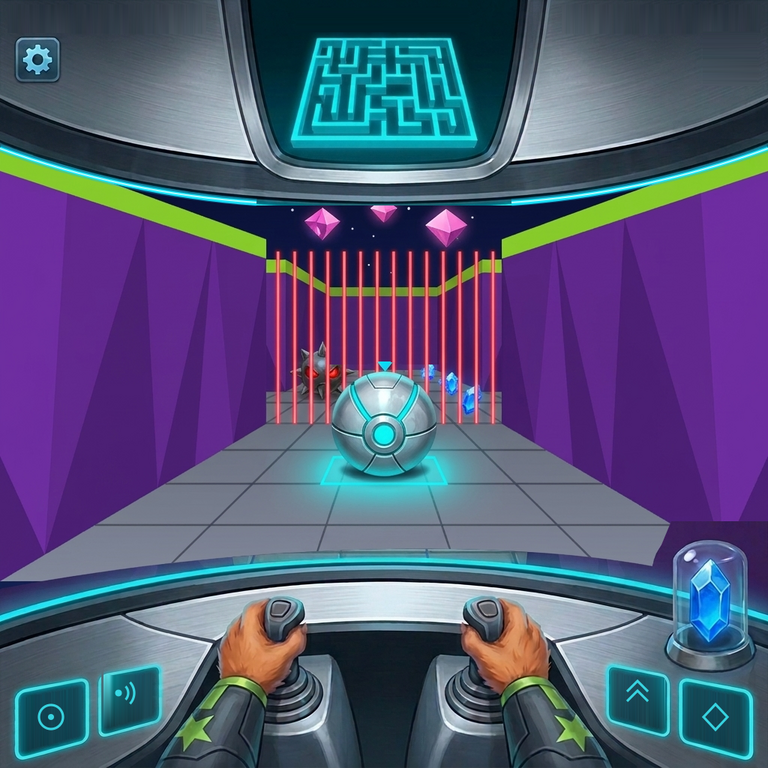
|