
Để cho người dùng lần đầu biết cách khai thác tối đa ứng dụng của bạn, hãy trình bày thông tin giới thiệu khi khởi động ứng dụng. Sau đây là một số ví dụ về thông tin tham gia:
- Trình bày thông tin chi tiết về những kênh có sẵn khi người dùng truy cập vào một ứng dụng kênh lần đầu tiên.
- Thu hút sự chú ý đến các tính năng đáng chú ý trong ứng dụng của bạn.
- Minh hoạ mọi bước bắt buộc hoặc được đề xuất mà người dùng cần thực hiện khi sử dụng ứng dụng lần đầu tiên.
Thư viện androidx.leanback cung cấp lớp OnboardingSupportFragment để trình bày thông tin người dùng lần đầu. Hướng dẫn này mô tả cách dùng lớp OnboardingSupportFragment để trình bày thông tin giới thiệu xuất hiện khi ứng dụng khởi chạy lần đầu tiên.
OnboardingSupportFragment sử dụng các phương pháp hay nhất về giao diện người dùng trên TV để trình bày thông tin theo cách phù hợp với kiểu giao diện người dùng trên TV và dễ dàng điều hướng trên các thiết bị TV.
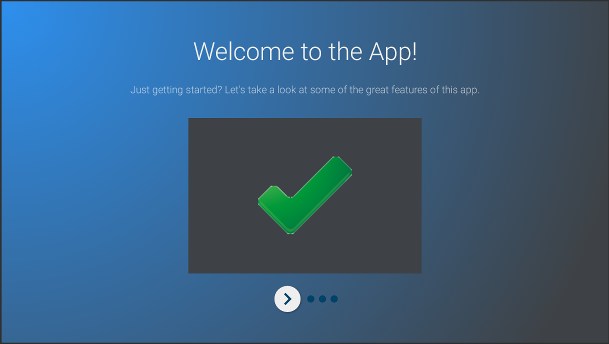
Hình 1. Ví dụ: OnboardingSupportFragment.
OnboardingSupportFragment không phù hợp với mọi trường hợp sử dụng.
Không dùng OnboardingSupportFragment khi bạn cần thêm các phần tử trên giao diện người dùng yêu cầu người dùng nhập dữ liệu, chẳng hạn như nút và trường.
Ngoài ra, không sử dụng OnboardingSupportFragment cho những việc mà người dùng sẽ làm thường xuyên. Cuối cùng, nếu bạn cần trình bày một giao diện người dùng nhiều trang yêu cầu người dùng nhập dữ liệu, hãy cân nhắc sử dụng GuidedStepSupportFragment.
Thêm OnboardingSupportFragment
Để thêm OnboardingSupportFragment vào ứng dụng, hãy triển khai một lớp mở rộng lớp OnboardingSupportFragment. Thêm mảnh này vào một hoạt động, bằng cách sử dụng XML bố cục của hoạt động hoặc theo cách lập trình. Đảm bảo rằng hoạt động hoặc mảnh sử dụng một giao diện bắt nguồn từ Theme_Leanback_Onboarding, như mô tả trong phần Tuỳ chỉnh giao diện.
Trong phương thức onCreate() của hoạt động chính trong ứng dụng, hãy gọi startActivity() bằng một Intent trỏ đến hoạt động cấp độ gốc của OnboardingSupportFragment.
Điều này giúp đảm bảo rằng OnboardingSupportFragment sẽ xuất hiện ngay khi ứng dụng của bạn khởi động.
Để đảm bảo rằng OnboardingSupportFragment chỉ xuất hiện trong lần đầu tiên người dùng khởi động ứng dụng, hãy sử dụng một đối tượng SharedPreferences để theo dõi xem người dùng đã xem OnboardingSupportFragment hay chưa. Xác định một giá trị boolean thay đổi thành true khi người dùng xem xong OnboardingSupportFragment. Kiểm tra giá trị này trong phương thức onCreate() của hoạt động chính và chỉ khởi động hoạt động gốc OnboardingSupportFragment nếu giá trị là false.
Ví dụ sau đây minh hoạ một chế độ ghi đè onCreate() giúp kiểm tra giá trị SharedPreferences và nếu giá trị này không được đặt thành true, thì sẽ gọi startActivity() để hiện OnboardingSupportFragment:
Kotlin
override fun onCreate(savedInstanceState: Bundle?) {
    super.onCreate(savedInstanceState)
    setContentView(R.layout.activity_main)
    PreferenceManager.getDefaultSharedPreferences(this).apply {
        // Check if we need to display our OnboardingSupportFragment
        if (!getBoolean(MyOnboardingSupportFragment.COMPLETED_ONBOARDING_PREF_NAME, false)) {
            // The user hasn't seen the OnboardingSupportFragment yet, so show it
            startActivity(Intent(this@OnboardingActivity, OnboardingActivity::class.java))
        }
    }
}
Java
@Override
protected void onCreate(Bundle savedInstanceState) {
    super.onCreate(savedInstanceState);
    setContentView(R.layout.activity_main);
    SharedPreferences sharedPreferences =
            PreferenceManager.getDefaultSharedPreferences(this);
    // Check if we need to display our OnboardingSupportFragment
    if (!sharedPreferences.getBoolean(
            MyOnboardingSupportFragment.COMPLETED_ONBOARDING_PREF_NAME, false)) {
        // The user hasn't seen the OnboardingSupportFragment yet, so show it
        startActivity(new Intent(this, OnboardingActivity.class));
    }
}
Sau khi người dùng xem OnboardingSupportFragment, hãy đánh dấu là đã xem bằng đối tượng SharedPreferences. Để thực hiện việc này, hãy ghi đè onFinishFragment() trong OnboardingSupportFragment và đặt giá trị SharedPreferences thành true, như trong ví dụ sau:
Kotlin
override fun onFinishFragment() {
    super.onFinishFragment()
    // User has seen OnboardingSupportFragment, so mark our SharedPreferences
    // flag as completed so that we don't show our OnboardingSupportFragment
    // the next time the user launches the app
    PreferenceManager.getDefaultSharedPreferences(context).edit().apply {
        putBoolean(COMPLETED_ONBOARDING_PREF_NAME, true)
        apply()
    }
}
Java
@Override
protected void onFinishFragment() {
    super.onFinishFragment();
    // User has seen OnboardingSupportFragment, so mark our SharedPreferences
    // flag as completed so that we don't show our OnboardingSupportFragment
    // the next time the user launches the app
    SharedPreferences.Editor sharedPreferencesEditor =
            PreferenceManager.getDefaultSharedPreferences(getContext()).edit();
    sharedPreferencesEditor.putBoolean(
            COMPLETED_ONBOARDING_PREF_NAME, true);
    sharedPreferencesEditor.apply();
}
Thêm các trang OnboardingSupportFragment
OnboardingSupportFragmenthiển thị nội dung trong một loạt trang có thứ tự. Sau khi thêm OnboardingSupportFragment, bạn cần xác định các trang bắt đầu. Mỗi trang có thể có một tiêu đề, nội dung mô tả và một số khung hiển thị phụ có thể chứa hình ảnh hoặc ảnh động.
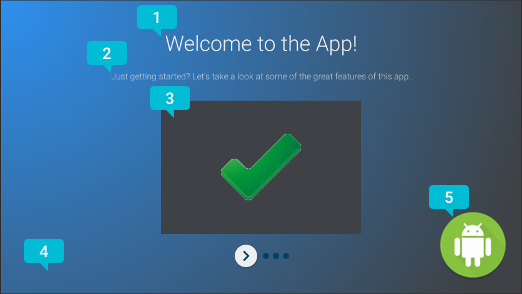
Hình 2. OnboardingSupportFragment
phần tử trang.
Hình 2 minh hoạ một trang mẫu có chú thích đánh dấu các phần tử trang có thể tuỳ chỉnh mà OnboardingSupportFragment của bạn có thể cung cấp. Các phần tử trên trang bao gồm:
- Tiêu đề trang.
- Nội dung mô tả trang.
- Chế độ xem nội dung trang, trong trường hợp này là một dấu kiểm màu xanh lục đơn giản trong một hộp màu xám. Chế độ xem này là không bắt buộc. Sử dụng chế độ xem này để minh hoạ thông tin chi tiết về trang. Ví dụ: bạn có thể thêm ảnh chụp màn hình làm nổi bật tính năng của ứng dụng mà trang mô tả.
- Chế độ xem nền trang, trong trường hợp này là một hiệu ứng chuyển màu xanh lam đơn giản. Khung hiển thị này luôn hiển thị phía sau các khung hiển thị khác trên trang. Chế độ xem này là không bắt buộc.
- Khung hiển thị nền trước của trang, trong trường hợp này là một biểu trưng. Khung hiển thị này luôn hiển thị trước tất cả các khung hiển thị khác trên trang. Chế độ xem này là không bắt buộc.
Khởi chạy thông tin trang khi OnboardingSupportFragment được tạo lần đầu hoặc được đính kèm vào hoạt động gốc, vì hệ thống yêu cầu thông tin trang khi tạo khung hiển thị của mảnh. Bạn có thể khởi tạo thông tin trang trong hàm khởi tạo lớp hoặc trong một phương thức ghi đè của onAttach().
Ghi đè từng phương thức sau đây, cung cấp thông tin trang cho hệ thống:
getPageCount()trả về số trang trongOnboardingSupportFragment.getPageTitle()trả về tiêu đề cho số trang được yêu cầu.getPageDescription()trả về nội dung mô tả cho số trang được yêu cầu.
Ghi đè từng phương thức sau đây để cung cấp các khung hiển thị phụ không bắt buộc nhằm hiển thị hình ảnh hoặc ảnh động:
onCreateBackgroundView()trả về mộtViewmà bạn tạo để đóng vai trò là khung hiển thị nền hoặc giá trị rỗng nếu không cần khung hiển thị nền.onCreateContentView()trả về mộtViewmà bạn tạo để đóng vai trò là khung hiển thị nội dung hoặc giá trị rỗng nếu không cần khung hiển thị nội dung.onCreateForegroundView()trả về mộtViewmà bạn tạo để đóng vai trò là thành phần hiển thị nền trước hoặc giá trị rỗng nếu không cần thành phần hiển thị nền trước.
Hệ thống sẽ thêm View mà bạn tạo vào bố cục trang. Ví dụ sau đây ghi đè onCreateContentView() và trả về ImageView:
Kotlin
private lateinit var contentView: ImageView
...
override fun onCreateContentView(inflater: LayoutInflater?, container: ViewGroup?): View? {
    return ImageView(context).apply {
        scaleType = ImageView.ScaleType.CENTER_INSIDE
        setImageResource(R.drawable.onboarding_content_view)
        setPadding(0, 32, 0, 32)
        contentView = this
    }
}
Java
private ImageView contentView;
...
@Override
protected View onCreateContentView(LayoutInflater inflater, ViewGroup container) {
    contentView = new ImageView(getContext());
    contentView.setScaleType(ImageView.ScaleType.CENTER_INSIDE);
    contentView.setImageResource(R.drawable.onboarding_content_view);
    contentView.setPadding(0, 32, 0, 32);
    return contentView;
}
Thêm màn hình biểu trưng ban đầu
OnboardingSupportFragment có thể bắt đầu bằng một màn hình biểu trưng không bắt buộc để giới thiệu ứng dụng của bạn. Nếu bạn muốn hiển thị Drawable làm màn hình biểu trưng, hãy gọi setLogoResourceId() bằng mã nhận dạng của Drawable trong phương thức onCreate() của OnboardingSupportFragment.
Hệ thống sẽ làm mờ và hiển thị nhanh Drawable, sau đó làm mờ Drawable trước khi hiển thị trang đầu tiên của OnboardingSupportFragment.
Nếu muốn cung cấp một ảnh động tuỳ chỉnh cho màn hình có biểu trưng, thay vì gọi setLogoResourceId(), hãy ghi đè onCreateLogoAnimation() và trả về một đối tượng Animator kết xuất ảnh động tuỳ chỉnh, như minh hoạ trong ví dụ sau:
Kotlin
public override fun onCreateLogoAnimation(): Animator =
        AnimatorInflater.loadAnimator(context, R.animator.onboarding_logo_screen_animation)
Java
@Override
public Animator onCreateLogoAnimation() {
    return AnimatorInflater.loadAnimator(getContext(),
            R.animator.onboarding_logo_screen_animation);
}
Tuỳ chỉnh ảnh động trên trang
Hệ thống sử dụng ảnh động mặc định khi hiển thị trang đầu tiên của OnboardingSupportFragment và khi người dùng chuyển đến một trang khác. Bạn có thể tuỳ chỉnh các ảnh động này bằng cách ghi đè các phương thức trong OnboardingSupportFragment.
Để tuỳ chỉnh ảnh động xuất hiện trên trang đầu tiên, hãy ghi đè onCreateEnterAnimation() và trả về Animator.
Ví dụ sau đây tạo một Animator có thể điều chỉnh tỷ lệ khung hiển thị nội dung theo chiều ngang:
Kotlin
override fun onCreateEnterAnimation(): Animator =
    ObjectAnimator.ofFloat(contentView, View.SCALE_X, 0.2f, 1.0f)
            .setDuration(ANIMATION_DURATION)
Java
@Override
protected Animator onCreateEnterAnimation() {
    Animator startAnimator = ObjectAnimator.ofFloat(contentView,
            View.SCALE_X, 0.2f, 1.0f).setDuration(ANIMATION_DURATION);
    return startAnimator;
}
Để tuỳ chỉnh ảnh động được dùng khi người dùng chuyển đến một trang khác, hãy ghi đè onPageChanged().
Trong phương thức onPageChanged(), hãy tạo các đối tượng Animator để xoá trang trước và hiển thị trang tiếp theo, thêm các đối tượng này vào một AnimatorSet rồi phát tập hợp. Ví dụ sau đây sử dụng ảnh động mờ dần để xoá trang trước, cập nhật hình ảnh trong khung hiển thị nội dung và sử dụng ảnh động mờ dần để hiển thị trang tiếp theo:
Kotlin
override fun onPageChanged(newPage: Int, previousPage: Int) {
    // Create a fade-out animation for previousPage and, once
    // done, swap the contentView image with the next page's image
    val fadeOut = ObjectAnimator.ofFloat(mContentView, View.ALPHA, 1.0f, 0.0f)
            .setDuration(ANIMATION_DURATION)
            .apply {
                addListener(object : AnimatorListenerAdapter() {

                    override fun onAnimationEnd(animation: Animator) {
                        mContentView.setImageResource(pageImages[newPage])
                    }
                })
            }
    // Create a fade-in animation for nextPage
    val fadeIn = ObjectAnimator.ofFloat(mContentView, View.ALPHA, 0.0f, 1.0f)
            .setDuration(ANIMATION_DURATION)
    // Create AnimatorSet with fade-out and fade-in animators and start it
    AnimatorSet().apply {
        playSequentially(fadeOut, fadeIn)
        start()
    }
}
Java
@Override
protected void onPageChanged(final int newPage, int previousPage) {
    // Create a fade-out animation for previousPage and, once
    // done, swap the contentView image with the next page's image
    Animator fadeOut = ObjectAnimator.ofFloat(mContentView,
            View.ALPHA, 1.0f, 0.0f).setDuration(ANIMATION_DURATION);
    fadeOut.addListener(new AnimatorListenerAdapter() {
        @Override
        public void onAnimationEnd(Animator animation) {
            mContentView.setImageResource(pageImages[newPage]);
        }
    });
    // Create a fade-in animation for nextPage
    Animator fadeIn = ObjectAnimator.ofFloat(mContentView,
            View.ALPHA, 0.0f, 1.0f).setDuration(ANIMATION_DURATION);
    // Create AnimatorSet with fade-out and fade-in animators and start it
    AnimatorSet set = new AnimatorSet();
    set.playSequentially(fadeOut, fadeIn);
    set.start();
}
Để biết thêm thông tin về cách tạo các đối tượng Animator và đối tượng AnimatorSet, hãy xem phần
Tổng quan về ảnh động thuộc tính.
Tuỳ chỉnh giao diện
Mọi phương thức triển khai OnboardingSupportFragment đều phải sử dụng giao diện Theme_Leanback_Onboarding hoặc một giao diện kế thừa từ Theme_Leanback_Onboarding. Đặt giao diện cho OnboardingSupportFragment bằng cách thực hiện một trong những thao tác sau:
- Đặt hoạt động mẹ của
OnboardingSupportFragmentđể sử dụng giao diện mong muốn. Ví dụ sau đây cho biết cách đặt một hoạt động để sử dụngTheme_Leanback_Onboardingtrong tệp kê khai ứng dụng:<activity android:name=".OnboardingActivity" android:enabled="true" android:exported="true" android:theme="@style/Theme.Leanback.Onboarding"> </activity>
-
Đặt giao diện trong hoạt động mẹ bằng cách sử dụng thuộc tính
LeanbackOnboardingTheme_onboardingThemetrong một giao diện hoạt động tuỳ chỉnh. Chỉ định thuộc tính này cho một giao diện tuỳ chỉnh khác mà chỉ các đối tượngOnboardingSupportFragmenttrong hoạt động của bạn sử dụng. Hãy sử dụng phương pháp này nếu hoạt động của bạn đã sử dụng một giao diện tuỳ chỉnh và bạn không muốn áp dụng các kiểuOnboardingSupportFragmentcho những khung hiển thị khác trong hoạt động. - Ghi đè
onProvideTheme()và trả về giao diện mong muốn. Hãy sử dụng phương pháp này nếu nhiều hoạt động dùngOnboardingSupportFragmenthoặc nếu hoạt động gốc không thể dùng chủ đề mong muốn. Ví dụ sau đây ghi đèonProvideTheme()và trả vềTheme_Leanback_Onboarding:Kotlin
override fun onProvideTheme(): Int = R.style.Theme_Leanback_Onboarding
Java
@Override
public int onProvideTheme() {
   return R.style.Theme_Leanback_Onboarding;
}