
Lorsqu'un utilisateur navigue dans votre application, en sort et y revient, les instances Activity de votre application passent par différents états de leur cycle de vie.
La classe Activity fournit un certain nombre de rappels qui permettent à l'activité de savoir quand un état change ou que le système crée, arrête ou reprend une activité, ou détruit le processus dans lequel l'activité réside.
Dans les méthodes de rappel du cycle de vie, vous pouvez déclarer le comportement de votre activité lorsque l'utilisateur la quitte et y revient. Par exemple, si vous créez un lecteur vidéo en streaming, vous pouvez mettre la vidéo en pause et mettre fin à la connexion réseau lorsque l'utilisateur passe à une autre application. Lorsque l'utilisateur revient, vous pouvez vous reconnecter au réseau et lui permettre de reprendre la vidéo au même endroit.
Chaque rappel vous permet d'effectuer un travail spécifique adapté à un changement d'état donné. Effectuer les bonnes tâches au bon moment et gérer correctement les transitions rendent votre application plus robuste et performante. Par exemple, une bonne implémentation des rappels de cycle de vie peut aider votre application à éviter les problèmes suivants :
- Plantage si l'utilisateur reçoit un appel téléphonique ou passe à une autre application pendant qu'il utilise la vôtre.
- Consommer de précieuses ressources système lorsque l'utilisateur ne l'utilise pas activement.
- Perte de la progression de l'utilisateur s'il quitte votre application et y revient ultérieurement.
- L'application plante ou la progression de l'utilisateur est perdue lorsque l'écran passe du mode paysage au mode portrait.
Ce document décrit en détail le cycle de vie d'une activité. Le document commence par décrire le paradigme du cycle de vie. Ensuite, il explique chacun des rappels : ce qui se passe en interne lors de leur exécution et ce que vous devez implémenter pendant leur exécution.
Il présente ensuite brièvement la relation entre l'état d'une activité et la vulnérabilité d'un processus à être arrêté par le système. Enfin, il aborde plusieurs sujets liés aux transitions entre les états d'activité.
Pour en savoir plus sur la gestion des cycles de vie, y compris sur les bonnes pratiques, consultez Cycle de vie dans Jetpack Compose et Enregistrer les états de l'UI. Pour découvrir comment concevoir une application robuste et de qualité en production à l'aide d'activités combinées à des composants d'architecture, consultez le Guide sur l'architecture des applications.
Concepts du cycle de vie d'une activité
Pour gérer les transitions entre les étapes du cycle de vie d'une activité, la classe Activity fournit un ensemble de six rappels : onCreate, onStart, onResume, onPause, onStop et onDestroy. Le système appelle chacun de ces rappels lorsque l'activité passe à un nouvel état.
La figure 1 présente une représentation visuelle de ce paradigme.
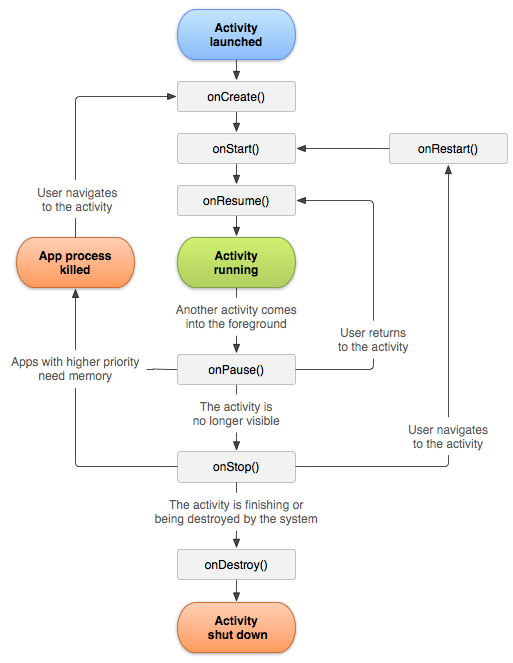
Lorsque l'utilisateur commence à quitter l'activité, le système appelle des méthodes pour la démanteler. Dans certains cas, l'activité n'est que partiellement démontée et réside toujours en mémoire, par exemple lorsque l'utilisateur passe à une autre application. Dans ces cas, l'activité peut toujours revenir au premier plan.
Si l'utilisateur revient à l'activité, elle reprend là où il l'avait laissée. À quelques exceptions près, les applications ne sont pas autorisées à démarrer des activités lorsqu'elles s'exécutent en arrière-plan.
La probabilité que le système arrête un processus donné, ainsi que les activités qu'il contient, dépend de l'état de l'activité au moment de l'arrêt. Pour en savoir plus sur la relation entre l'état et la vulnérabilité à l'éjection, consultez la section sur l'état d'une activité et l'éjection de la mémoire.
En fonction de la complexité de votre activité, vous n'aurez probablement pas besoin d'implémenter toutes les méthodes de cycle de vie. Toutefois, il est important que vous compreniez chacun d'eux et que vous implémentiez ceux qui font que votre application se comporte comme les utilisateurs s'y attendent.
Compose et le cycle de vie
Dans Compose, évitez de placer la logique métier ou la configuration manuelle de l'observateur directement dans les rappels d'activité tels que onStart ou onResume. Utilisez plutôt des effets tenant compte du cycle de vie et des observateurs tenant compte de l'état qui s'alignent automatiquement sur la présence de l'UI à l'écran.
- Collecte tenant compte du cycle de vie : utilisez
collectAsStateWithLifecyclepour consommer les flux de votreViewModel. Cette API commence automatiquement la collecte lorsque l'UI passe à l'état "Started" (Démarré) et l'arrête lorsqu'elle passe en arrière-plan, ce qui évite une consommation inutile de ressources. Après avoir collecté le flux en tant qu'état, vous pouvez utiliserLifecycleEffectspour exécuter du code lorsqu'un événement de cycle de vie se produit. - Flux logique : en utilisant ces API, l'UI réagit naturellement à l'état du cycle de vie via l'arborescence de composition, ce qui garantit que la logique métier ne s'exécute que lorsque l'utilisateur interagit activement avec le composant.
Pour en savoir plus sur Compose et le cycle de vie, consultez Cycle de vie dans Jetpack Compose.
Rappels de cycle de vie
Cette section fournit des informations conceptuelles et d'implémentation sur les méthodes de rappel utilisées pendant le cycle de vie de l'activité.
Certaines actions appartiennent aux méthodes du cycle de vie de l'activité. Toutefois, placez le code qui implémente les actions d'un composant dépendant dans le composant, plutôt que dans la méthode de cycle de vie de l'activité. Pour ce faire, vous devez rendre le composant dépendant conscient du cycle de vie. Pour savoir comment rendre vos composants dépendants compatibles avec le cycle de vie, consultez Cycle de vie dans Jetpack Compose.
onCreate
Vous devez implémenter ce rappel, qui se déclenche lorsque le système crée l'activité pour la première fois. Lors de la création d'une activité, celle-ci passe à l'état Créé. Dans la méthode onCreate, exécutez la logique de démarrage de base de l'application qui ne se produit qu'une seule fois pour toute la durée de vie de l'activité.
Par exemple, votre implémentation de onCreate peut lier des données à des listes, associer l'activité à un ViewModel et instancier certaines variables de portée de classe. Cette méthode reçoit le paramètre savedInstanceState, qui est un objet Bundle contenant l'état de l'activité précédemment enregistré. Si l'activité n'a jamais existé auparavant, la valeur de l'objet Bundle est nulle.
Si vous avez un composant tenant compte du cycle de vie qui est associé au cycle de vie de votre activité, il reçoit l'événement ON_CREATE. La méthode annotée avec @OnLifecycleEvent est appelée pour que votre composant tenant compte du cycle de vie puisse exécuter le code de configuration dont il a besoin pour l'état créé.
L'exemple suivant montre comment intégrer un composable Text dans une activité minimale :
class ExampleActivity : ComponentActivity() { override fun onCreate(savedInstanceState: Bundle?) { super.onCreate(savedInstanceState) setContent { // In here, we can call composables! MaterialTheme { Greeting(name = "compose") } } } } @Composable fun Greeting(name: String) { Text(text = "Hello $name!") }
Votre activité ne reste pas à l'état "Créée". Une fois la méthode onCreate exécutée, l'activité passe à l'état Démarré et le système appelle rapidement les méthodes onStart et onResume.
onStart
Lorsque l'activité passe à l'état "Démarré", le système appelle onStart.
Cet appel rend l'activité visible pour l'utilisateur pendant que l'application se prépare à ce que l'activité passe au premier plan et devienne interactive. Par exemple, c'est dans cette méthode que le code qui gère l'UI est initialisé.
Lorsque l'activité passe à l'état "Démarré", tout composant tenant compte du cycle de vie associé au cycle de vie de l'activité reçoit l'événement ON_START.
La méthode onStart se termine rapidement et, comme pour l'état "Created", l'activité ne reste pas à l'état "Started". Une fois ce rappel terminé, l'activité passe à l'état Reprise et le système appelle la méthode onResume.
onResume
Lorsque l'activité passe à l'état "Reprise", elle passe au premier plan et le système appelle le rappel onResume. Il s'agit de l'état dans lequel l'application interagit avec l'utilisateur. L'application reste dans cet état jusqu'à ce qu'un événement lui fasse perdre le focus (par exemple, l'appareil reçoit un appel téléphonique, l'utilisateur accède à une autre activité ou l'écran de l'appareil s'éteint).
Lorsque l'activité passe à l'état "Reprise", tout composant tenant compte du cycle de vie associé au cycle de vie de l'activité reçoit l'événement ON_RESUME. C'est là que les composants du cycle de vie peuvent activer toute fonctionnalité qui doit s'exécuter lorsque le composant est visible et au premier plan, comme le démarrage d'un aperçu de caméra.
Lorsqu'un événement interruptif se produit, l'activité passe à l'état Paused (Mise en pause) et le système appelle le rappel onPause.
Si l'activité revient à l'état "Reprise" à partir de l'état "Pause", le système appelle à nouveau la méthode onResume. Pour cette raison, implémentez onResume pour initialiser les composants que vous libérez pendant onPause et pour effectuer toute autre initialisation qui doit avoir lieu chaque fois que l'activité passe à l'état "Reprise".
Voici un exemple de composant compatible avec le cycle de vie qui accède à la caméra lorsque le composant reçoit l'événement ON_RESUME :
class CameraComponent : LifecycleObserver {
    ...
    @OnLifecycleEvent(Lifecycle.Event.ON_RESUME)
    fun initializeCamera() {
        if (camera == null) {
            getCamera()
        }
    }
    ...
}
Le code précédent initialise la caméra une fois que LifecycleObserver reçoit l'événement ON_RESUME. En mode multifenêtre, votre activité peut être entièrement visible même lorsqu'elle est en pause. Par exemple, lorsque l'application est en mode multifenêtre et que l'utilisateur appuie sur la fenêtre qui ne contient pas votre activité, celle-ci passe à l'état "En pause".
Si vous souhaitez que la caméra ne soit active que lorsque l'application est en mode "Reprise" (visible et active au premier plan), initialisez la caméra après l'événement ON_RESUME présenté précédemment. Si vous souhaitez que la caméra reste active lorsque l'activité est mise en pause, mais visible (par exemple, en mode multifenêtre), initialisez la caméra après l'événement ON_START.
Toutefois, si l'appareil photo est actif alors que votre activité est mise en veille, une autre application en mode multifenêtre peut se voir refuser l'accès à l'appareil photo. Il est parfois nécessaire de maintenir la caméra active lorsque votre activité est mise en pause, mais cela peut en fait dégrader l'expérience utilisateur globale.
Pour cette raison, réfléchissez bien à l'endroit du cycle de vie où il est le plus approprié de prendre le contrôle des ressources système partagées dans le contexte du mode multifenêtre. Pour en savoir plus sur la prise en charge du mode multifenêtre, consultez Prise en charge du mode multifenêtre.
Quel que soit l'événement de création que vous choisissez pour effectuer une opération d'initialisation, veillez à utiliser l'événement de cycle de vie correspondant pour libérer la ressource. Si vous initialisez un élément après l'événement ON_START, libérez-le ou mettez-y fin après l'événement ON_STOP. Si vous initialisez après l'événement ON_RESUME, libérez après l'événement ON_PAUSE.
L'extrait de code précédent place le code d'initialisation de la caméra dans un composant compatible avec le cycle de vie. Vous pouvez plutôt placer ce code directement dans les rappels de cycle de vie de l'activité, tels que onStart et onStop, mais nous ne le recommandons pas. L'ajout de cette logique à un composant indépendant et tenant compte du cycle de vie vous permet de réutiliser le composant dans plusieurs activités sans avoir à dupliquer le code. Pour savoir comment créer un composant tenant compte du cycle de vie, consultez Cycle de vie dans Jetpack Compose.
onPause
Le système appelle cette méthode comme première indication que l'utilisateur quitte votre activité, mais cela ne signifie pas toujours que l'activité est détruite. Cela indique que l'activité n'est plus au premier plan, mais qu'elle est toujours visible si l'utilisateur est en mode multifenêtre. Plusieurs raisons peuvent expliquer qu'une activité passe à cet état :
- Un événement qui interrompt l'exécution de l'application, comme décrit dans la section sur le rappel
onResume, met en pause l'activité en cours. Il s'agit du cas le plus courant. - En mode multifenêtre, une seule application est active à la fois, et le système met en pause toutes les autres applications.
- L'ouverture d'une nouvelle activité semi-transparente, telle qu'une boîte de dialogue, met en pause l'activité qu'elle recouvre. Tant que l'activité est partiellement visible, mais pas ciblée, elle reste en pause.
Lorsqu'une activité passe à l'état "En pause", tout composant tenant compte du cycle de vie lié au cycle de vie de l'activité reçoit l'événement ON_PAUSE. C'est là que les composants du cycle de vie peuvent arrêter toute fonctionnalité qui n'a pas besoin de s'exécuter lorsque le composant n'est pas au premier plan, comme l'arrêt d'un aperçu de caméra.
Utilisez la méthode onPause pour suspendre ou ajuster les opérations qui ne peuvent pas se poursuivre, ou qui peuvent se poursuivre de manière modérée, lorsque le Activity est à l'état "Suspendu" et que vous prévoyez de reprendre sous peu.
Vous pouvez également utiliser la méthode onPause pour libérer les ressources système, les handles vers les capteurs (comme le GPS) ou toute ressource qui affecte l'autonomie de la batterie lorsque votre activité est mise en pause et que l'utilisateur n'en a pas besoin.
Toutefois, comme indiqué dans la section sur onResume, une activité mise en pause peut toujours être entièrement visible si l'application est en mode multifenêtre. Envisagez d'utiliser onStop au lieu de onPause pour libérer ou ajuster complètement les ressources et opérations liées à l'UI afin de mieux prendre en charge le mode multifenêtre.
L'exemple suivant de LifecycleObserver réagissant à l'événement ON_PAUSE est la contrepartie de l'exemple d'événement ON_RESUME précédent, qui libère la caméra qui s'initialise après la réception de l'événement ON_RESUME :
class CameraComponent : LifecycleObserver {
    ...
    @OnLifecycleEvent(Lifecycle.Event.ON_PAUSE)
    fun releaseCamera() {
        camera?.release()
        camera = null
    }
    ...
}
Cet exemple place le code de déclenchement de l'appareil photo après que l'événement ON_PAUSE a été reçu par LifecycleObserver.
L'exécution de onPause est très brève et ne laisse pas forcément assez de temps pour effectuer des opérations d'enregistrement. Pour cette raison, n'utilisez pas onPause pour enregistrer des données d'application ou des informations sur l'utilisateur, effectuer des appels réseau ou exécuter des transactions de base de données.
Il est possible que ces opérations ne soient pas terminées avant la fin de la méthode.
Effectuez plutôt les opérations d'arrêt à forte charge pendant onStop. Pour en savoir plus sur les opérations appropriées à effectuer pendant onStop, consultez la section suivante. Pour en savoir plus sur l'enregistrement des données, consultez la section sur l'enregistrement et la restauration de l'état.
L'exécution de la méthode onPause ne signifie pas que l'activité quitte l'état "En pause". L'activité reste dans cet état jusqu'à ce qu'elle reprenne ou devienne complètement invisible pour l'utilisateur. Si l'activité reprend, le système appelle à nouveau le rappel onResume.
Si l'activité passe de l'état "En pause" à l'état "Reprise", le système conserve l'instance Activity en mémoire et la rappelle lorsqu'il appelle onResume. Dans ce cas, vous n'avez pas besoin de réinitialiser les composants créés lors de l'une des méthodes de rappel menant à l'état "Reprise". Si l'activité devient complètement invisible, le système appelle onStop.
onStop
Lorsque votre activité n'est plus visible par l'utilisateur, elle passe à l'état Arrêtée et le système appelle le rappel onStop. Cela peut se produire lorsqu'une activité nouvellement lancée couvre l'intégralité de l'écran. Le système appelle également onStop lorsque l'activité a terminé de s'exécuter et est sur le point d'être arrêtée.
Lorsque l'activité passe à l'état "Arrêtée", tout composant tenant compte du cycle de vie associé au cycle de vie de l'activité reçoit l'événement ON_STOP. C'est là que les composants du cycle de vie peuvent arrêter toute fonctionnalité qui n'a pas besoin de s'exécuter lorsque le composant n'est pas visible à l'écran.
Dans la méthode onStop, libérez ou ajustez les ressources qui ne sont pas nécessaires lorsque l'application n'est pas visible par l'utilisateur. Par exemple, votre application peut mettre en pause les animations ou passer de mises à jour de position précises à des mises à jour moins précises. L'utilisation de onStop au lieu de onPause signifie que le travail lié à l'UI se poursuit, même lorsque l'utilisateur affiche votre activité en mode multifenêtre.
Utilisez également onStop pour effectuer des opérations d'arrêt relativement gourmandes en ressources processeur. Par exemple, si vous ne trouvez pas de meilleur moment pour enregistrer des informations dans une base de données, vous pouvez le faire pendant onStop. L'exemple suivant montre une implémentation de onStop qui enregistre le contenu d'une note provisoire dans un espace de stockage persistant :
override fun onStop() {
    super.onStop()

    // Delegate the save operation to the ViewModel, which handles the
    // background thread operations (e.g., using Kotlin Coroutines and Room).
    noteViewModel.saveDraft()
}
Lorsque votre activité passe à l'état "Arrêtée", l'objet Activity est conservé en mémoire : il conserve toutes les informations d'état et de membre, mais n'est pas associé au gestionnaire de fenêtres. Lorsque l'activité reprend, elle rappelle ces informations.
À partir de l'état "Arrêtée", l'activité revient pour interagir avec l'utilisateur ou elle a terminé de s'exécuter et disparaît. Si l'activité revient au premier plan, le système appelle onRestart. Si l'exécution de Activity est terminée, le système appelle onDestroy.
onDestroy
onDestroy est appelé avant la destruction de l'activité. Le système appelle ce rappel pour l'une des deux raisons suivantes :
- L'activité se termine, car l'utilisateur l'a complètement ignorée ou parce que
finisha été appelé sur l'activité. - Le système détruit temporairement l'activité en raison d'une modification de la configuration, comme la rotation de l'appareil ou le passage en mode multifenêtre.
Lorsque l'activité passe à l'état détruit, tout composant tenant compte du cycle de vie lié au cycle de vie de l'activité reçoit l'événement ON_DESTROY. C'est là que les composants du cycle de vie peuvent nettoyer tout ce dont ils ont besoin avant que Activity ne soit détruit.
Au lieu de placer la logique dans votre Activity pour déterminer pourquoi elle est détruite, utilisez un objet ViewModel pour contenir les données de vue pertinentes pour votre Activity. Si Activity est recréé en raison d'une modification de la configuration, ViewModel n'a rien à faire, car il est conservé et transmis à la prochaine instance Activity.
Si Activity n'est pas recréé, la méthode onCleared est appelée pour ViewModel, ce qui lui permet de nettoyer toutes les données dont il a besoin avant d'être détruit. Vous pouvez faire la distinction entre ces deux scénarios à l'aide de la méthode isFinishing.
Si l'activité se termine, onDestroy est le dernier rappel de cycle de vie que l'activité reçoit. Si onDestroy est appelé à la suite d'une modification de la configuration, le système crée immédiatement une instance d'activité, puis appelle onCreate sur cette nouvelle instance dans la nouvelle configuration.
Le rappel onDestroy libère toutes les ressources qui n'ont pas été libérées par les rappels précédents, comme onStop.
État de l'activité et éjection de la mémoire
Le système arrête les processus lorsqu'il a besoin de libérer de la RAM. La probabilité que le système arrête un processus donné dépend de l'état du processus au moment de l'arrêt. L'état du processus dépend de l'état de l'activité en cours d'exécution dans le processus. Le tableau 1 montre les corrélations entre l'état du processus, l'état de l'activité et la probabilité que le système arrête le processus. Ce tableau ne s'applique que si un processus n'exécute pas d'autres types de composants d'application.
Probabilité d'être tué |
État du processus |
État final de l'activité |
La plus faible |
Premier plan (avec ou sur le point d'être sélectionné) |
A repris |
Faible |
Visible (sans sélection) |
Démarré/Mis en pause |
Supérieure |
Arrière-plan (invisible) |
Arrêtée |
La plus élevée |
Vide |
Détruite |
Tableau 1. Relation entre le cycle de vie du processus et l'état de l'activité.
Le système ne met jamais fin à une activité directement pour libérer de la mémoire. Au lieu de cela, il arrête le processus dans lequel l'activité s'exécute, détruisant non seulement l'activité, mais également tout ce qui s'exécute dans le processus. Pour savoir comment préserver et restaurer l'état de l'UI de votre activité en cas d'arrêt d'un processus initié par le système, consultez la section sur l'enregistrement et la restauration de l'état.
L'utilisateur peut également arrêter un processus en utilisant le Gestionnaire d'applications, sous Paramètres, pour arrêter l'application correspondante.
Pour en savoir plus sur les processus, consultez Présentation des processus et des threads.
Enregistrer et restaurer l'état transitoire de l'UI
Un utilisateur s'attend à ce que l'état de l'interface utilisateur d'une activité reste le même en cas de modification de la configuration, par exemple en cas de rotation ou d'un passage en mode multifenêtre. Toutefois, le système détruit par défaut l'activité lorsqu'une telle modification de configuration se produit, effaçant tout état d'interface utilisateur stocké dans l'instance d'activité.
De même, un utilisateur s'attend à ce que l'état de l'UI reste le même s'il passe temporairement de votre application à une autre, puis revient plus tard à la vôtre. Cependant, le système peut détruire le processus de votre application lorsque l'utilisateur est absent et que votre activité est arrêtée.
Lorsque des contraintes système détruisent l'activité, conservez l'état d'UI transitoire de l'utilisateur à l'aide d'une combinaison de ViewModel (pour la logique métier et l'état d'écran complexes), de l'API Jetpack Compose rememberSaveable (pour l'état d'UI léger) et/ou du stockage local. Pour en savoir plus sur les attentes des utilisateurs par rapport au comportement du système, et sur la façon de préserver au mieux les données d'état d'UI complexes en cas d'arrêt d'activité et de processus initié par le système, consultez Enregistrer des états d'interface utilisateur.
rememberSaveable survit automatiquement aux changements de configuration et à l'arrêt d'un processus initié par le système en regroupant l'état en arrière-plan, ce qui offre une expérience fluide sans avoir besoin de code passe-partout au niveau de l'activité.
État de l'instance
Dans certains cas, votre activité est détruite en raison du comportement normal de l'application, par exemple lorsque l'utilisateur appuie sur le bouton Retour ou que votre activité signale sa propre destruction en appelant la méthode finish.
Lorsque votre activité est détruite parce que l'utilisateur appuie sur Retour ou que l'activité se termine d'elle-même, le concept d'instance Activity disparaît à jamais, à la fois pour le système et pour l'utilisateur. Dans ces scénarios, l'attente de l'utilisateur correspond au comportement du système, et vous n'avez aucun travail supplémentaire à effectuer.
Toutefois, si le système détruit l'activité en raison de contraintes système (telles qu'une modification de la configuration ou une pression sur la mémoire), même si l'instance Activity réelle a disparu, le système se souvient de son existence. Si l'utilisateur tente de revenir à l'activité, le système crée une instance de cette activité à l'aide d'un ensemble de données enregistrées qui décrivent l'état de l'activité lorsqu'elle a été détruite.
Les données enregistrées que le système utilise pour restaurer l'état précédent sont appelées état de l'instance. En interne, il s'agit d'une collection de paires clé/valeur. Par défaut, le système utilise l'état de l'instance pour enregistrer des informations de base sur la mise en page de votre UI, telles que le texte saisi par l'utilisateur ou les positions de défilement.
Vous vous connectez à ce comportement du système à l'aide de rememberSaveable. Si votre instance d'activité est détruite et recréée, tout état d'UI encapsulé dans rememberSaveable est automatiquement restauré, sans que vous ayez besoin d'ajouter de code supplémentaire au niveau de l'activité.
Toutefois, votre activité aura probablement des informations d'état plus complexes que vous souhaiterez restaurer, telles que des données utilisateur, des réponses réseau ou des variables membres qui suivent la progression de l'utilisateur. Le mécanisme d'état d'instance (et, par extension, rememberSaveable) n'est pas adapté à la conservation d'une quantité de données non négligeable, car il nécessite une sérialisation sur le thread principal et consomme de la mémoire du processus système.
Pour conserver une quantité de données plus importante, adoptez une approche combinée en utilisant le stockage local persistant, la classe ViewModel et l'élévation d'état Compose, comme indiqué dans Enregistrer les états de l'UI.
Enregistrer un état d'UI simple et léger à l'aide de rememberSaveable
Lorsque votre activité commence à s'arrêter, le système se prépare à enregistrer les informations d'état dans un bundle d'état d'instance. Pour vous connecter à ce comportement du système, vous utilisez rememberSaveable directement dans vos fonctions composables.
rememberSaveable enregistre et restaure automatiquement l'état transitoire de l'UI, comme le texte saisi par l'utilisateur ou les positions de défilement, lors de la recréation d'une activité.
Pour enregistrer des informations d'état personnalisées et légères (comme la progression d'un utilisateur dans un jeu), déclarez votre état à l'aide de rememberSaveable. Le framework Compose gère la sérialisation dans le bundle d'état de l'instance en arrière-plan :
var userTypedQuery by rememberSaveable(typedQuery, stateSaver = TextFieldValue.Saver) { mutableStateOf( TextFieldValue(text = typedQuery, selection = TextRange(typedQuery.length)) ) }
Pour enregistrer des données persistantes, telles que les préférences utilisateur ou les données d'une base de données, saisissez les occasions appropriées lorsque votre activité est au premier plan. Si aucune opportunité de ce type ne se présente, enregistrez les données persistantes pendant la méthode onStop.
Restaurer l'état de l'UI d'une activité à l'aide de l'état d'instance enregistré
Lorsque votre activité est recréée après avoir été détruite, la restauration de l'état est automatique. Lorsque vous utilisez rememberSaveable, vous n'avez pas besoin d'écrire de logique de restauration explicite, de vérifier les bundles nuls ni de remplacer les rappels d'activité. Le code qui initialise et enregistre votre état le restaure également de manière fluide lorsque l'activité revient :
var userTypedQuery by rememberSaveable(typedQuery, stateSaver = TextFieldValue.Saver) { mutableStateOf( TextFieldValue(text = typedQuery, selection = TextRange(typedQuery.length)) ) }
Activités et navigation
Une application est susceptible de passer d'un écran à un autre de nombreuses fois au cours de sa durée de vie, par exemple lorsque l'utilisateur appuie sur le bouton Retour de l'appareil ou sélectionne une nouvelle destination. Les applications Android modernes utilisent généralement une architecture à activité unique.
Au lieu de démarrer un nouveau Activity pour chaque écran, votre application héberge un seul Activity et utilise le composant Navigation pour remplacer les écrans composables au sein de cette activité.
Pour savoir comment implémenter une navigation moderne et axée sur Compose, consultez le guide de la bibliothèque Navigation 3 de Jetpack Compose.
Démarrer une activité à partir d'une autre
Une activité peut avoir besoin de démarrer une autre activité à un moment donné. Ce besoin se présente, par exemple, lorsqu'une application doit passer de l'écran actuel à un nouvel écran.
Selon que votre activité souhaite ou non obtenir un résultat de la nouvelle activité qu'elle s'apprête à démarrer, vous démarrez la nouvelle activité à l'aide de la méthode startActivity ou startActivityForResult. Dans les deux cas, vous transmettez un objet Intent.
L'objet Intent spécifie l'activité exacte que vous souhaitez démarrer ou décrit le type d'action que vous souhaitez effectuer. Le système sélectionne l'activité appropriée pour vous, qui peut même provenir d'une autre application. Un objet Intent peut également transporter de petites quantités de données à utiliser par l'activité qui est lancée. Pour en savoir plus sur la classe Intent, consultez Intents et filtres d'intent.
startActivity
Si l'activité nouvellement démarrée n'a pas besoin de renvoyer de résultat, l'activité actuelle peut la démarrer en appelant la méthode startActivity.
Lorsque vous travaillez dans votre propre application, vous devez souvent simplement lancer une activité connue. Par exemple, l'extrait de code suivant montre comment lancer une activité appelée SignInActivity.
val context = LocalContext.current

Button(onClick = {
    val intent = Intent(context, SignInActivity::class.java)
    context.startActivity(intent)
}) {
    Text("Sign In")
}
Démarrer des activités externes
Bien que la navigation interne à l'application soit gérée par Navigation, votre Activity devra parfois démarrer d'autres activités. Cela se produit généralement lorsque vous souhaitez utiliser une application externe pour effectuer une action spécifique, comme ouvrir un navigateur Web, envoyer un e-mail ou prendre une photo.
Pour ce faire, vous utilisez un objet Intent pour décrire le type d'action que vous souhaitez effectuer. Le système lance alors l'activité appropriée à partir d'une autre application.
Par exemple, si vous souhaitez permettre à l'utilisateur d'envoyer un e-mail, vous pouvez créer l'intention suivante :
val intent = Intent(Intent.ACTION_SEND).apply {
    putExtra(Intent.EXTRA_EMAIL, recipientArray)
}
startActivity(intent)
Si vous devez lancer une activité externe et obtenir un résultat (par exemple, demander à l'application Appareil photo de prendre une photo et de renvoyer l'image), utilisez les API de résultat Activity modernes plutôt que le rappel startActivityForResult obsolète.
Coordonner les activités
Lorsqu'une activité en démarre une autre, elles subissent toutes les deux des transitions de cycle de vie. La première activité cesse de fonctionner et passe à l'état "En pause" ou "Arrêtée", tandis que l'autre activité est créée. Si ces activités partagent des données enregistrées sur le disque ou ailleurs, il est important de comprendre que la première activité n'est pas complètement arrêtée avant la création de la seconde. En effet, le processus de démarrage du deuxième chevauche celui d'arrêt du premier.
L'ordre des rappels de cycle de vie est bien défini, en particulier lorsque les deux activités se trouvent dans le même processus (c'est-à-dire la même application) et que l'une démarre l'autre. Voici l'ordre des opérations qui se produisent lorsque l'activité A démarre l'activité B :
- La méthode
onPausede l'activité A s'exécute. - Les méthodes
onCreate,onStartetonResumede l'activité B s'exécutent séquentiellement. L'activité B reçoit désormais le focus de l'utilisateur. - Si l'activité A n'est plus visible à l'écran, sa méthode
onStops'exécute.
Cette séquence de rappels de cycle de vie vous permet de gérer la transition des informations d'une activité à une autre.
Ressources supplémentaires
Pour en savoir plus sur le cycle de vie des activités, consultez les ressources supplémentaires suivantes :