
使用 Android Game Development Extension 時,透過 Visual Studio Debugger (LLDB) 進行偵錯。
執行偵錯工具
您必須先在 Android 裝置上建構、部署及執行遊戲,然後才能執行偵錯工具。詳情請參閱「執行範例」一節。
確定在不使用偵錯工具的情況下也能執行遊戲後,您可以使用 按一下「F5」或選取「Start Debugging」項目,執行偵錯工具 「Debug」選單中。偵錯工具附加到遊戲時,您應該會看到一個對話方塊。
偵錯工具啟動作業需要 10 秒鐘到 1 分鐘以上 取決於應用程式大小和需要的符號數量 等待動畫載入。隨身攜帶新裝置, 因為偵錯工具必須先從 複製到主體機器如果使用新裝置的前幾次嘗試中須等待超過 1 分鐘,請考慮取消偵錯工作階段,再重新啟動。
以這個方式執行偵錯工具時,遊戲會從「Waiting for Debugger」模式啟動,且在偵錯工具連線之前不會執行任何遊戲的程式碼。這也可以對遊戲的初始化部分進行偵錯。
如要進一步瞭解 Visual Studio 偵錯工具的功能,請參閱「Visual Studio 說明文件」。
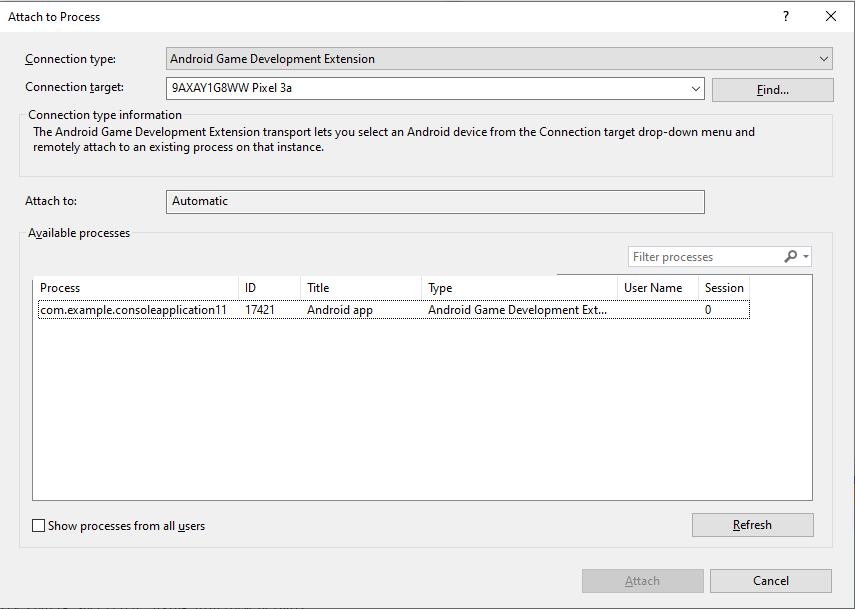
附加至程序
如要對已在實體或虛擬裝置上執行的遊戲進行偵錯,您可以將偵錯工具附加至 Visual Studio 的處理程序。
在 Visual Studio 中,確認已開啟 Android 解決方案,且:
- 前往「Debug」選單,然後選取「Attach to Process...」。
- 從「Transport」下拉式選單中,選取「Android Game Development Extension」。
- 從「Qualifier」下拉式選單中,選取您的 Android 裝置。
- 從可用程序清單中選取遊戲程序,並 點選「附加」。
執行 LLDB.Shell 指令
啟用偵錯工作階段後,請透過 Visual Studio 的指令視窗執行 LLDB.Shell 指令。
指令格式:
LLDB.Shell [command]
範例:
>LLDB.Shell expr myIntVariable = 9
Status:  Success
Output Message:
(int) $2 = 9
資料視覺化
格式指定碼
您可以變更值在 Autos 中顯示的格式, 本機、Watch 和變數 DataTip 視窗。
格式指定碼位於運算式結尾。開頭是半形逗號,後面接著短字串。例如,_myInt,x 運算式中的 ,x 指定碼會將「myInt」的格式設為小寫十六進位值。
透過加入 Natvis 運算式,格式指定碼即可直接用於「Watch」視窗,或是「Autos」、「Locals」和「DataTip」視窗。詳情請參閱「Natvis」一節。
支援指定碼清單
| 格式名稱 | 指定碼 | 說明 |
|---|---|---|
| 布林值 | B | 將這個值顯示為 true/false 布林值,使用 0 為「false」,其他則為「true」的自訂規則 |
| 二進位檔 | b | 以一連串的位元呈現 |
| 二進位檔,無前置 0b | bb | 以一連串的位元呈現,不含 0b 前置碼 |
| 位元組 | y | 顯示位元組,但也試著顯示 ASCII 字元, 例如(int *) c.sp.x = 50 f8 bf 5f ff 7f 00 00 P.._... |
| 含有 ASCII 的位元組 | Y | 顯示位元組,但也試著顯示 ASCII 字元, 例如(int *) c.sp.x = 50 f8 bf 5f ff 7f 00 00 P.._... |
| 字元 | c | 將位元組顯示為 ASCII 字元 例如(int *) c.sp.x = P\xf8\xbf_\xff\x7f\0\0 |
| 可列印半形字元 | C | 將位元組顯示為可列印的 ASCII 半形字元, 例如:(int *) c.sp.x = P.._...。 |
| 複雜浮動值 | F | 將這個值解讀為複雜浮點數值的實部和虛部, 例如:(int *) c.sp.x = 2.76658e+19 + 4.59163e-41i |
| 小數點 | d、i | 顯示為帶正負號的整數 (此項不會執行層級轉換,只是會將位元組顯示為帶正負號的整數) |
| 列舉 | E、en | 顯示為列舉值,列印值名稱 (如有) 或整數值, 例如:(enum enumType) val_type = eValue2 |
| 十六進位 - 小寫 | x、h | 以小寫十六進位標記法顯示 (此項不會執行層級轉換,只是會以十六進位顯示位元組) |
| 十六進位 - 大寫 | X、H | 以大寫十六進位標記法顯示 (此項不會執行層級轉換,只是會以十六進位顯示位元組) |
| 十六進位 - 小寫,沒有前置 0x | xb、hb | 以小寫十六進位標記法顯示,不含 0x 前置碼 (此項不會執行層級轉換,只是會以十六進位顯示位元組) |
| 十六進位 - 大寫,無前置 0x | Xb、Hb | 以大寫十六進位標記法顯示,不含 0x 前置碼 (此項不會執行層級轉換,只是會以十六進位顯示位元組) |
| 浮動值 | f | 顯示為浮點數 (此項不會執行層級轉換,只是會將位元組解讀為 IEEE754 浮點值) |
| 八進位 | o | 以八進位標記法顯示 |
| OS 類型 | O | 顯示為 MacOS OSType, 例如:(float) x = '\n\x1f\xd7\n' |
| 字串 - C 字串 | s | 顯示為以 0 結尾的 C 字串, 例如:"hello world" |
| 字串 - C 字串 (無引號) | sb | 顯示為以 0 結尾的 C 字串 (無引號), 例如:hello world |
| 字串 – UTF-8 | s8 | 顯示為以 0 結尾的 UTF-8 字串, 例如:u8"hello world ☕" |
| 字串 - UTF-8 (無引號) | s8b | 顯示為以 0 結尾的 UTF-8 字串 (無引號), 例如:hello world ☕ |
| 字串 - UTF-16 | su | 顯示為以 0 結尾的 UTF-16 字串, 例如:u"hello world ☕" |
| 字串 - UTF-16 (無引號) | sub | 顯示為以 0 結尾的 UTF-16 字串 (無引號), 例如:hello world ☕ |
| 字串 - UTF-32 | s32 | 顯示為以 0 結尾的 UTF-32 字串, 例如:U"hello world ☕" |
| 字串 - UTF-32 (無引號) | s32b | 顯示為以 0 結尾的 UTF-32 字串 (無引號), 例如:hello world ☕ |
| unicode16 | U | 顯示為 UTF-16 半形字元, 例如:(float) x = 0xd70a 0x411f |
| unicode32 | U32 | 顯示為 UTF-32 半形字元, 例如:(float) x = 0x411fd70a |
| 無符號十進制 | u | 顯示為不帶正負號的整數 (此項不會執行層級轉換,只是會將位元組顯示為不帶正負號的整數) |
| 指標 | p | 顯示為原生指標 (除非實際為指標,否則產生的位址可能無效) |
| 複雜的整數 | I | 將這個值解讀為複雜整數的實部和虛部, 例如:(int *) pointer = 1048960 + 1i |
| 半形字元陣列 | a | 顯示為半形字元陣列, 例如:(char) *c.sp.z = {X} |
| 原始 | ! | 原始格式,忽略所有資料類型檢視畫面自訂 |
Natvis
Natvis 架構可讓您自訂 Visual Studio 在偵錯工具變數視窗中顯示原生類型的方式。例如,使用 Natvis 自訂「Watch」、「Locals」和「DataTip」視窗的顯示畫面。
Natvis 功能預設為啟用,但可以從 Visual Studio 停用 設定工具 >選項 >Android Game Development Extension >Natvis 標記為「已停用」。
載入 Natvis 檔案
Visual Studio 會從下列三個位置載入 Natvis 檔案,並在您啟動偵錯工作階段時重新載入檔案。檔案必須遵循 Visual Studio 2017 Natvis 結構定義。
- 屬於已載入專案或頂層解決方案項目的
.natvis檔案。 - 使用者專屬的目錄 (
%USERPROFILE%\Documents\Visual Studio 2017\Visualizers) - 系統層級的目錄 (
%VSINSTALLDIR%\Common7\Packages\Debugger\Visualizers)
重新載入 Natvis 檔案
在「Command」視窗或「Watch」視窗中評估 .natvisreload,以在偵錯工作階段期間重新載入 Natvis 檔案。
Natvis 範例檔案
以下的 Natvis 範例檔案包含目前支援的所有標記和屬性。
<?xml version="1.0" encoding="utf-8"?>
<AutoVisualizer xmlns="http://schemas.microsoft.com/vstudio/debugger/natvis/2010">
<Type Name="demo::Vector<*>">
<AlternativeType Name="MySimilarVectorType<*>"/>
<!-- Included to show the <SmartPointer> feature is supported. -->
<SmartPointer Optional="true" Usage="Minimal">ptr</SmartPointer>
<!-- Included to show the <DisplayString> feature is supported. -->
<DisplayString Condition="_size == 0" Optional="true">()</DisplayString>
<DisplayString Condition="_size == 1">(x={_items[0]})</DisplayString>
<DisplayString Condition="_size == 2">(x={_items[0]}, y={_items[1]})</DisplayString>
<DisplayString Condition="_size == 3">(x={_items[0]}, y={_items[1]}, z={_items[2]})</DisplayString>
<DisplayString>[Size={_size,x}] (x={_items[0]}, y={_items[1]}, z={_items[2]}, ...)</DisplayString>
<!-- Included to show the <StringView> feature is supported. -->
<StringView Condition="true" Optional="true">_stringViewText</StringView>
<Expand HideRawView="false">
<!-- Included to show the <Item> feature is supported. -->
<Item Name="X" Condition="_size < 4 && _size >= 1" Optional="true">_items[0]</Item>
<Item Name="Y" Condition="_size < 4 && _size >= 2" Optional="true">_items[1]</Item>
<Item Name="Z" Condition="_size < 4 && _size >= 3" Optional="true">_items[2]</Item>
<!-- Included to show the <ArrayItems> feature is supported. -->
<ArrayItems Condition="_size >= 4" Optional="true">
<Size Condition="true" Optional="true">_size</Size>
<ValuePointer Condition="true">_items</ValuePointer>
</ArrayItems>
<!-- Included to show the <IndexListItems> feature is supported. -->
<IndexListItems Condition="true" Optional="true">
<Size Condition="true" Optional="true">_listSize</Size>
<ValueNode Condition="true">_list[%i]</ValueNode>
</IndexListItems>
<!-- Included to show the <LinkedListItems> feature is supported. -->
<LinkedListItems Condition="true" Optional="true">
<Size Optional="true">_listSize</Size>
<HeadPointer>_head</HeadPointer>
<NextPointer>_next</NextPointer>
<ValueNode>_value</ValueNode>
</LinkedListItems>
<!-- Included to show the <ExpandedItem> feature is supported. -->
<ExpandedItem Condition="true" Optional="true">_childVar</ExpandedItem>
<!-- Included to show the <Synthetic> feature is supported. -->
<Synthetic Name="[Size]" Condition="true" Optional="true">
<DisplayString>_size</DisplayString>
<Expand HideRawView="true">
<!-- Any supported <Expand> sub-tags. -->
</Expand>
</Synthetic>
<!-- Included to show the <TreeItems> feature is supported. -->
<TreeItems Condition="true" Optional="true">
<Size>_treeSize</Size>
<HeadPointer>_head</HeadPointer>
<LeftPointer>_left</LeftPointer>
<RightPointer>_right</RightPointer>
<ValueNode>_value</ValueNode>
</TreeItems>
<!-- Included to show format specifiers are supported. -->
<Item Name="[Hex Dump at {_index,x}]">myInt[_index],x</Item>
</Expand>
</Type>
</AutoVisualizer>
編寫 Natvis 檔案
Visual Studio 支援編寫您自己的 Natvis 檔案。如要進一步瞭解如何自訂偵錯工具變數視窗,請參閱 MSDN。
對 Natvis 檔案進行偵錯
在某些情況下,錯誤將以變數的「值」的形式呈現 (例如
「Auto」、「Watch」等視窗)。例如:<error: use of undeclared
identifier 'missingVar'>
如要查看錯誤詳情,請開啟 GoogleAndroid.log
檔案。
已知限制
如果上方範例檔案未列出您的標記或屬性,表示目前不支援。Visual Studio 會忽略不支援的標記和屬性,因此 可以將這些檔案留在現有的 Natvis 檔案中 就會使用結構定義
雖然結構定義需要
Usage屬性,但<SmartPointer>不支援該屬性。不過,LLDB 不會限制以 C++ 定義的運算子存取權,因此您需要以 C++ 定義所有必要的運算子。