Sử dụng bộ sưu tập để sắp xếp ngăn nắp các trang
Lưu và phân loại nội dung dựa trên lựa chọn ưu tiên của bạn.
Thiết lập Android Game Development Extension trên máy tính chạy Windows và chạy một dự án Visual Studio C++ mẫu trên thiết bị Android hoặc trình mô phỏng.
Điều kiện tiên quyết
Làm theo các bước trong phần này để chuẩn bị cài đặt tiện ích (extension) này trên máy tính Windows:
Tải và cài đặt một trong các phiên bản Visual Studio được hỗ trợ:
Tải xuống và cài đặt JDK 17 cho AGDE 23.1.82 trở lên, hoặc JDK 11 cho AGDE 22.2.71 trở xuống và thiết lập biến môi trường JAVA_HOME.
Cài đặt tiện ích
Làm theo các bước trong phần này để tải và cài đặt Android Game Development Extension:
Đóng tất cả thực thể Visual Studio đang mở.
Tải bộ cài đặt tiện ích và mẫu mới nhất xuống qua trang Downloads (Tải xuống).
Tại vị trí tải xuống của bạn, hãy nhấp đúp vào trình cài đặt. Quá trình cài đặt sẽ mất vài phút để hoàn tất.
Nếu bạn đã cài đặt nhiều phiên bản Visual Studio, hãy chọn các phiên bản mà bạn muốn cài đặt tiện ích này.
Nhấp vào Finish (Hoàn tất) để hoàn tất quá trình cài đặt.
Cài đặt NDK và SDK Android
Bạn có thể cài đặt SDK Android và Native Development Kit (NDK) dành cho Android bằng Android Studio hoặc Android Game Development Extension. Để cài đặt SDK và NDK bằng tiện ích, hãy sử dụng SDK Manager. Công cụ này nằm trong thanh công cụ extension (tiện ích) của Studio.
Khi cài đặt NDK, hãy nhớ sử dụng hộp đánh dấu NDK (Side by side) (NDK cạnh nhau) để tiện ích này có thể định vị NDK. Bạn phải cài đặt một phiên bản NDK mà tiện ích này hỗ trợ (xem nhật ký sửa đổi NDK).
Để cài đặt SDK ở một vị trí khác với vị trí mặc định, hãy đặt biến môi trường ANDROID_SDK_ROOT trên máy tính:
Đảm bảo bạn đã đóng Visual Studio.
Trong Windows Search, hãy tìm kiếm Environment Variables.
Chọn Edit the system environment variables (Chỉnh sửa biến môi trường hệ thống).
Nhấp vào Environment Variables (Biến môi trường).
Trong User Variables (Biến người dùng), hãy nhấp vào New (Mới).
Trong hộp Variable Name (Tên biến), hãy nhập ANDROID_SDK_ROOT.
Trong hộp Variable Value (Giá trị biến), hãy nhập đường dẫn đến SDK Android.
Khởi động lại máy tính.
Bạn không thể sửa đổi vị trí của SDK bằng cách sử dụng cửa sổ SDK Manager vì biến môi trường này là nguồn dữ liệu duy nhất cho vị trí SDK.
Chạy mẫu
Làm theo các bước trong phần này để chạy mẫu được cung cấp trên trình mô phỏng rồi sau đó trên thiết bị Android thực.
Định cấu hình nền tảng
Giải nén tệp zip của mẫu vào thư mục bạn chọn. Trong đó có các mẫu sau đây:
endless-tunnel
HelloJNI
Teapot
Khởi động Visual Studio nếu phần mềm này chưa chạy.
Mở thư mục mẫu. Chọn File > Open > Project/Solution (Tệp > Mở > Dự án/Giải pháp) rồi chuyển đến tệp .sln.
Chọn một nền tảng Android:
Chọn Build > Configuration Manager (Xây dựng > Trình quản lý cấu hình).
Trong Active solution platform (Nền tảng giải pháp đang hoạt động), hãy chọn Android-x86_64.
Các nền tảng Android đã được định cấu hình sẵn trong mẫu (xem bài viết thêm các nền tảng Android khác để biết cách thêm nền tảng).
Đảm bảo dự án mẫu có các thuộc tính SDK và NDK Android đã định cấu hình:
Hình
1. Các thuộc tính của nền tảng Android
Trong Solution Explorer (Trình khám phá giải pháp), hãy nhấp chuột phải vào dự án rồi chọn Properties (Thuộc tính).
Chọn thẻ thuộc tính General (Chung) rồi tìm các thuộc tính Platform (Nền tảng) cho Android.
Chọn thẻ thuộc tính Android Packaging (Đóng gói Android).
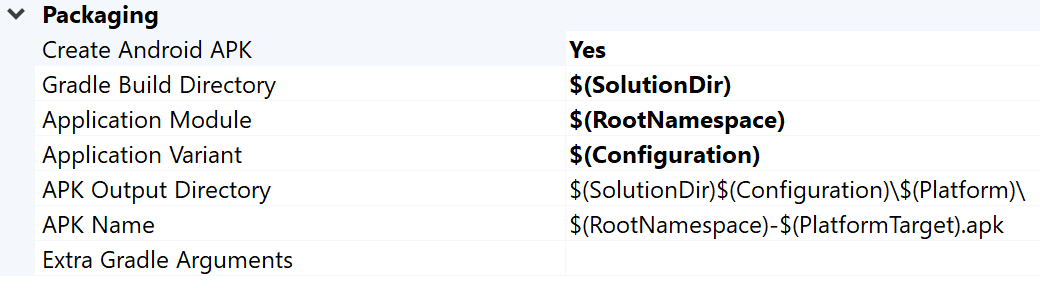
Hình
2. Các thuộc tính đóng gói Android
Bạn có thể thay đổi tên và thư mục của tệp APK đầu ra qua thẻ này. Lưu ý rằng một số thuộc tính cấu hình Android được xác định trong các trang thuộc tính và được truyền cho Gradle. Ví dụ: thuộc tính tên tệp APK MSBUILD_ANDROID_OUTPUT_APK_NAME sẽ chuyển tên này đến tệp build.gradle của ứng dụng.
Trong Trình quản lý thiết bị Android ảo, hãy nhấp vào Create Virtual Device (Tạo thiết bị ảo).
Chọn định nghĩa cho thiết bị (ví dụ: Pixel 2).
Chọn một hình ảnh hệ thống. Bạn nên chọn ABI (Giao diện nhị phân ứng dụng) x86_64 vì giao diện này hoạt động nhanh hơn trong trình mô phỏng.
Xác minh cấu hình rồi nhấp vào Finish (Hoàn tất).
Khởi động thiết bị ảo bằng cách nhấp vào nút Chạy Trình quản lý thiết bị Android ảo.
Trong Vision Studio, thiết bị ảo sẽ xuất hiện bên cạnh nút Start Debugging (Bắt đầu gỡ lỗi) trên thanh công cụ. Nhấp vào Start debugging (Bắt đầu gỡ lỗi) để mở ứng dụng mẫu trên thiết bị. Có thể mất một vài phút để đính kèm trình gỡ lỗi vào ứng dụng. Nếu đang chạy mẫu Teapot, bạn có thể xoay ấm trà bằng cách kéo con trỏ chuột ngang ấm trà.
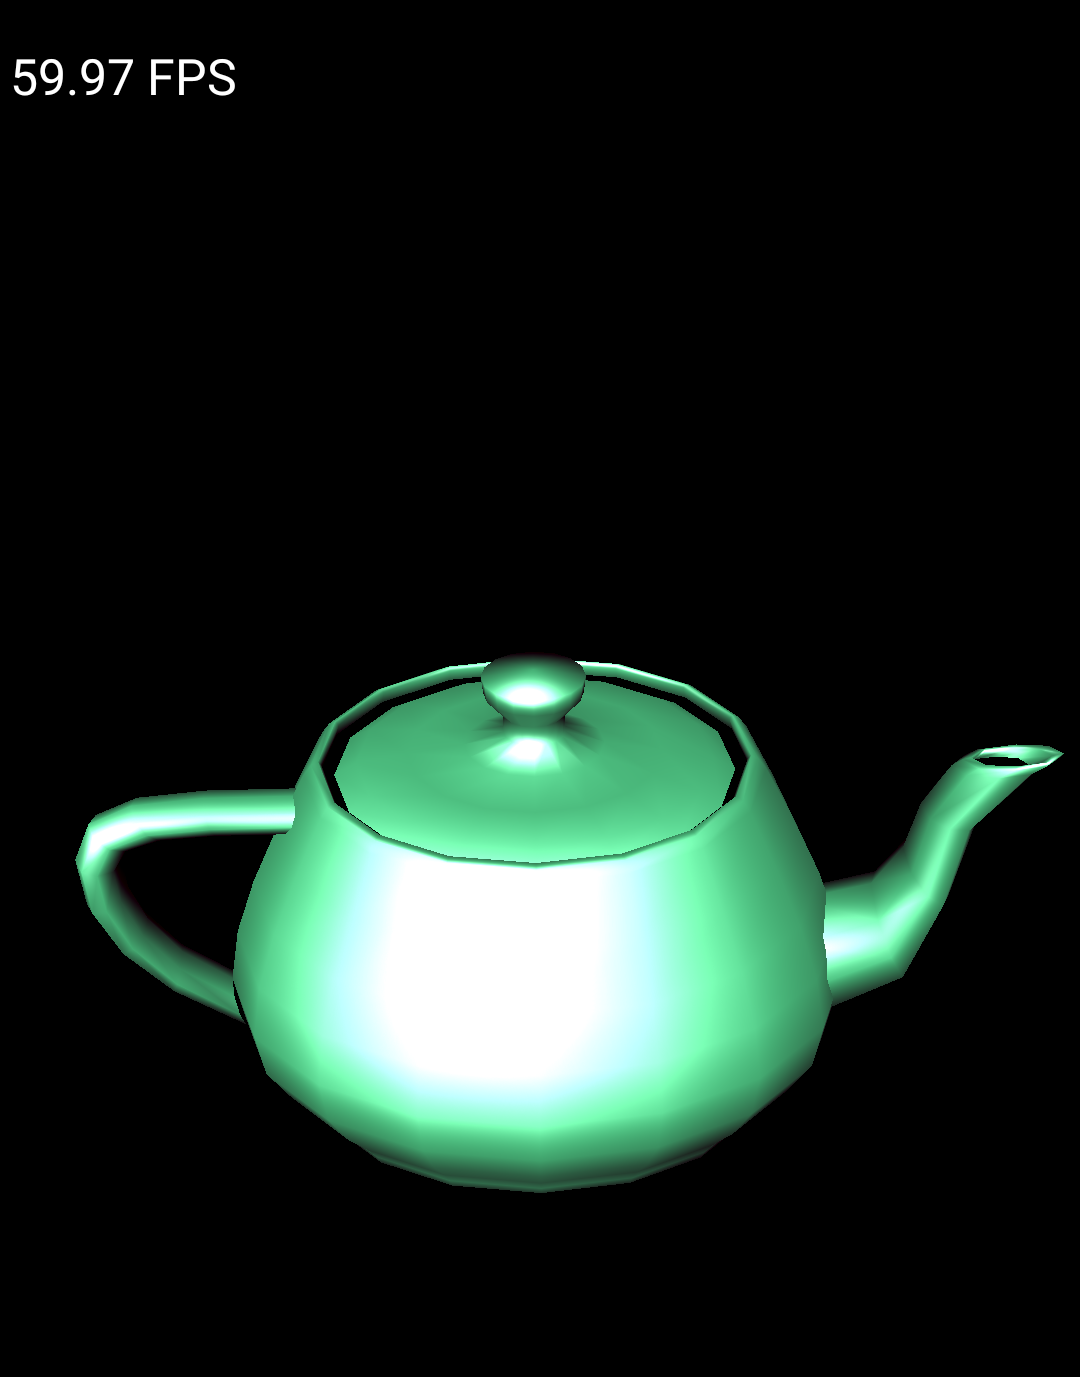
Hình
3. Mẫu Teapot chạy trên trình mô phỏng Android
Thiết lập thiết bị
Để chạy mẫu này trên một thiết bị Android thực, có thể bạn sẽ phải tạo một nền tảng Android mới trong dự án. Nền tảng này phải phù hợp với cấu trúc của thiết bị. Để tạo nền tảng mới, hãy làm theo các bước sau trong Visual Studio:
Chọn Build > Configuration Manager (Xây dựng > Trình quản lý cấu hình).
Trong Active solution platform (Nền tảng giải pháp đang hoạt động), hãy chọn <New> (Mới).
Nhập một trong các nội dung sau cho nền tảng mới:
Android-armeabi-v7a
Android-arm64-v8a
Android-x86
Android-x86_64
Trong hộp Copy settings from (Sao chép chế độ cài đặt từ), hãy chọn một nền tảng Android khác hiện có (hoặc chọn None (Không) nếu bạn chưa có nền tảng Android nào).
Hãy nhớ bật tính năng Create new project platforms (Tạo nền tảng mới cho dự án).
Kết nối thiết bị Android với máy tính bằng cáp USB. Loại thiết bị sẽ xuất hiện bên cạnh nút thanh công cụ Start Debugging (Bắt đầu gỡ lỗi).
Hình
4. Thiết bị Android đã kết nối xuất hiện bên cạnh nút Start Debugging (Bắt đầu gỡ lỗi) trên thanh công cụ
Nếu thiết bị không xuất hiện, hãy kiểm tra những mục sau:
Lựa chọn nền tảng có phù hợp với ABI (Giao diện nhị phân ứng dụng) của thiết bị không.
Kết nối của cáp USB liên kết giữa thiết bị và máy tính.
Kết nối của cáp USB hỗ trợ kết nối dữ liệu (chứ không chỉ cấp nguồn).
Nhấp vào nút Start debugging (Bắt đầu gỡ lỗi) trên thanh công cụ để chạy ứng dụng mẫu trên thiết bị. Có thể mất vài phút để đính kèm trình gỡ lỗi vào ứng dụng. Sau khi đính kèm, bạn có thể tương tác với ứng dụng trên thiết bị của mình.
Câu hỏi thường gặp
Sau đây là một số câu hỏi thường gặp về Android Game Development Extension.
Nhật ký của trình bổ trợ nằm ở đâu?
Bạn có thể mở tệp nhật ký của trình bổ trợ (plugin) bằng cách sử dụng biểu tượng Mở nhật ký trong thanh công cụ Android Game Development Extension.
Trình bổ trợ sử dụng những biến môi trường nào?
Trình bổ trợ này sử dụng các biến môi trường sau:
ANDROID_SDK_ROOT
ANDROID_SDK_HOME
TEMP
GOOGLE_ANDROID_LOG_DIR
Các bước tiếp theo
Để sử dụng tiện ích này trong dự án của riêng bạn, bạn phải định cấu hình dự án theo hướng dẫn cấu hình dự án.
Nội dung và mã mẫu trên trang này phải tuân thủ các giấy phép như mô tả trong phần Giấy phép nội dung. Java và OpenJDK là nhãn hiệu hoặc nhãn hiệu đã đăng ký của Oracle và/hoặc đơn vị liên kết của Oracle.
Cập nhật lần gần đây nhất: 2025-07-27 UTC.
[[["Dễ hiểu","easyToUnderstand","thumb-up"],["Giúp tôi giải quyết được vấn đề","solvedMyProblem","thumb-up"],["Khác","otherUp","thumb-up"]],[["Thiếu thông tin tôi cần","missingTheInformationINeed","thumb-down"],["Quá phức tạp/quá nhiều bước","tooComplicatedTooManySteps","thumb-down"],["Đã lỗi thời","outOfDate","thumb-down"],["Vấn đề về bản dịch","translationIssue","thumb-down"],["Vấn đề về mẫu/mã","samplesCodeIssue","thumb-down"],["Khác","otherDown","thumb-down"]],["Cập nhật lần gần đây nhất: 2025-07-27 UTC."],[],[],null,["# Quickstart\n\nSet up the Android Game Development Extension on a Windows computer and run a sample Visual\nStudio C++ project on an Android device or emulator.\n\nPrerequisites\n-------------\n\nFollow the steps in this section to prepare your Windows computer for\ninstallation of the extension:\n\n1. Download and install one of the supported versions of Visual Studio:\n\n - [Visual Studio 2017 Version 15.4.0 (October 9th, 2017) or higher](https://docs.microsoft.com/en-us/visualstudio/install/update-visual-studio?view=vs-2017).\n - [Visual Studio 2019 Version 16.0.0 or higher](https://docs.microsoft.com/en-us/visualstudio/install/update-visual-studio?view=vs-2019).\n - [Visual Studio 2022 Version 17.0.0 or higher](https://docs.microsoft.com/en-us/visualstudio/install/update-visual-studio?view=vs-2022).\n2. [Download and install .NET Core SDK 2.2](https://dotnet.microsoft.com/download/thank-you/dotnet-sdk-2.2.107-windows-x64-installer).\n\n3. [Android Studio 3.5 or higher](/studio) is optional, but can be used\n instead of the Android Game Development Extension to install the\n [Android SDK and NDK](#install-sdk-ndk).\n\n4. Download and install [JDK 17](https://jdk.java.net/archive/) for AGDE\n 23.1.82 or newer, or [JDK 11](https://jdk.java.net/archive/) for up to AGDE\n 22.2.71, and set your `JAVA_HOME` environment variable.\n\nInstall the extension\n---------------------\n\nFollow the steps in this section to download and install the\nAndroid Game Development Extension:\n\n1. Close all instances of Visual Studio.\n\n2. Download the latest extension installer and samples from the\n [Downloads](/games/agde#downloads) page.\n\n3. From your download location, double-click the installer. The installer takes\n several minutes to complete.\n\n4. If you have more than one version of Visual Studio installed, select the\n versions that you would like the extension to be installed for.\n\n5. Click **Finish** to complete the installation.\n\nInstall the Android SDK and NDK\n-------------------------------\n\nYou can install the Android SDK and the Android\n[Native Development Kit (NDK)](/studio/projects/install-ndk#specific-version)\nwith Android Studio or the Android Game Development Extension. To install the SDK and NDK from\nthe extension, use the **SDK Manager**, which is located in the\nextension toolbar of Visual Studio.\n\nWhen installing the NDK, make sure to use the **NDK (Side by side)** checkbox so\nthat the extension can locate it. You must install an NDK version\nthat is supported by the extension\n(see [NDK revision history](/ndk/downloads/revision_history)).\n\nTo install the SDK to a different location than the default, set the\n`ANDROID_SDK_ROOT` environment variable on your computer:\n\n1. Ensure that Visual Studio is closed.\n2. In Windows Search, search for `Environment Variables`.\n3. Select **Edit the system environment variables**.\n4. Click **Environment Variables**.\n5. Under **User Variables** , click **New**.\n6. In the **Variable Name** box, type `ANDROID_SDK_ROOT`.\n7. In the **Variable Value** box, enter the path to the Android SDK.\n8. Reboot your computer.\n\nThe location of the SDK cannot be modified using the SDK Manager window as this\nenvironment variable is the only source-of-truth for the SDK location.\n\nRun the sample\n--------------\n\nFollow the steps in this section to run a provided sample on an\nemulator and then on a physical Android device.\n\n### Configure the platform\n\n1. Unzip the samples zip file into a directory of your choice. The following\n samples are included:\n\n - endless-tunnel\n - HelloJNI\n - Teapot\n2. Start Visual Studio if it is not already running.\n\n3. Open the samples directory. Select **File \\\u003e Open \\\u003e Project/Solution** and\n navigate to the `.sln` file.\n\n4. Select an Android platform:\n\n 1. Select **Build \\\u003e Configuration Manager**.\n 2. Under **Active solution platform** , select **Android-x86_64**.\n\n Android platforms are already configured in the samples (see [add\n more Android platforms](#add-platform) for adding platforms).\n | **Note:** Typical emulator images use x86 or x86_64 ABIs.\n5. Make sure the sample project has the Android SDK and NDK properties\n configured:\n\n **Figure\n 1.** Android platform properties\n - In the **Solution Explorer** , right-click the project and select\n **Properties**.\n\n - Select the **General** properties tab and find the **Platform**\n properties for Android.\n\n | **Note:** Make sure you select an NDK that is installed.\n6. Select the **Android Packaging** properties tab.\n\n **Figure\n 2.** Android packaging properties\n\n You can change the output APK name and directory from this tab. Note that\n some of the Android configuration properties are defined in the property\n pages and are passed to Gradle. For example, the APK name property\n `MSBUILD_ANDROID_OUTPUT_APK_NAME` passes this name to the app `build.gradle`\n file.\n\n### Set up the emulator\n\n1. Start AVD Manager from the extension toolbar in Visual Studio.\n Configure a virtual device and then\n [run it in the Android emulator](/studio/run/emulator).\n\n 1. In the Android Virtual Device Manager, click **Create Virtual Device**.\n 2. Choose a device definition (for example, Pixel 2).\n 3. Select a system image. You should select an x86_64 ABI because this architecture performs faster in the emulator.\n 4. Verify the configuration and click **Finish**.\n2. Start the virtual device by clicking the **Run**\n button in the Android\n Virtual Device Manager.\n\n3. In Visual Studio, the virtual device should appear next to the\n **Start Debugging** toolbar button. Click **Start Debugging** to launch the\n sample app on the device. It may take a few moments for the debugger\n to attach to the app. If you are running the Teapot sample, you can rotate\n the teapot by dragging your mouse cursor across it.\n\n \u003cbr /\u003e\n\n\n **Figure\n 3**. Teapot sample running on an Android emulator\n\n### Set up the device\n\n1. To run the sample on a physical Android device, you may need to create a\n new Android platform in the project. This platform must match the architecture\n of the device. To create a new platform, do the following in Visual Studio:\n\n 1. Select **Build \\\u003e Configuration Manager**.\n 2. Under **Active solution platform** , select **\\\u003cNew\\\u003e**.\n 3. Type one of the following for the new platform:\n\n - **Android-armeabi-v7a**\n - **Android-arm64-v8a**\n - **Android-x86**\n - **Android-x86_64**\n 4. In the **Copy settings from** box, select another existing Android\n platform (or **None** if you do not have any Android platforms yet).\n Make sure you enabled **Create new project platforms**.\n\n2. Connect an Android device to your computer using a USB cable. The device\n type should be shown next to the **Start Debugging** toolbar button.\n\n \u003cbr /\u003e\n\n\n **Figure\n 4** . Connected Android device shown next to the **Start Debugging** toolbar button\n\n If the device is not shown, check the following:\n - The platform selection matches the ABI of your device.\n - [Developer options and USB debugging](/studio/debug/dev-options) are enabled on the device.\n - The USB cable is connected from the device to the computer.\n - The USB cable supports a data connection (and not just power).\n3. Click the **Start Debugging** toolbar button to launch the sample app on the\n device. It may take a few moments for the debugger to attach to the app.\n Once it is attached, you can interact with the app on your device.\n\nFAQ\n---\n\nThe following are some frequently asked questions about the Android Game Development Extension.\n\n### Where are the logs for the plugin located?\n\nYou can open the log file for the plugin using the **Open Logs** icon in the\n**Android Game Development Extension** toolbar.\n\n### What environment variables does the plugin use?\n\nThe plugin uses the following environment variables:\n\n- `ANDROID_SDK_ROOT`\n- `ANDROID_SDK_HOME`\n- `TEMP`\n- `GOOGLE_ANDROID_LOG_DIR`\n\nWhat's next\n-----------\n\nTo use your own project with the extension, you must configure it according to\nthe [project configuration](/games/agde/adapt-existing-project) guide."]]