
En este documento, se describe cómo configurar una variedad de pruebas Espresso comunes.
Cómo hacer coincidir una vista junto a otra
Un diseño puede contener ciertas vistas que no son únicas por sí solas. Para
ejemplo, un botón de llamada recurrente en una tabla de contactos podría tener la misma
R.id, contienen el mismo texto y tienen las mismas propiedades que otra llamada.
dentro de la jerarquía de vistas.
Por ejemplo, en esta actividad, la vista con el texto "7" se repite en varias
filas:

A menudo, la vista que no es única se empareja con alguna etiqueta única que se encuentra
junto a ella, como el nombre del contacto junto al botón de llamada. En este caso,
Puedes usar el comparador hasSibling() para acotar tu selección:
Kotlin
onView(allOf(withText("7"), hasSibling(withText("item: 0"))))
    .perform(click())
Java
onView(allOf(withText("7"), hasSibling(withText("item: 0"))))
    .perform(click());
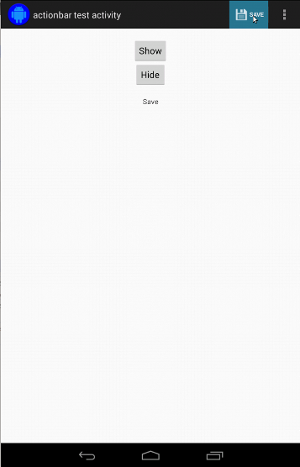
Cómo hacer coincidir una vista que está dentro de una barra de acciones
ActionBarTestActivity tiene dos barras de acciones diferentes: una normal
la barra de acciones y la barra de acciones contextuales que se crea a partir de un menú de opciones. Ambas opciones
las barras de acciones tienen un elemento que siempre está visible y dos elementos que solo
se puede ver en el menú ampliado. Cuando se hace clic en un elemento, se cambia una TextView a la
contenido del elemento en el que se hizo clic.
Hacer coincidir los íconos visibles en ambas barras de acción es sencillo, como se muestra en el siguiente fragmento de código:
Kotlin
fun testClickActionBarItem() {
    // We make sure the contextual action bar is hidden.
    onView(withId(R.id.hide_contextual_action_bar))
        .perform(click())

    // Click on the icon - we can find it by the r.Id.
    onView(withId(R.id.action_save))
        .perform(click())

    // Verify that we have really clicked on the icon
    // by checking the TextView content.
    onView(withId(R.id.text_action_bar_result))
        .check(matches(withText("Save")))
}
Java
public void testClickActionBarItem() {
    // We make sure the contextual action bar is hidden.
    onView(withId(R.id.hide_contextual_action_bar))
        .perform(click());

    // Click on the icon - we can find it by the r.Id.
    onView(withId(R.id.action_save))
        .perform(click());

    // Verify that we have really clicked on the icon
    // by checking the TextView content.
    onView(withId(R.id.text_action_bar_result))
        .check(matches(withText("Save")));
}
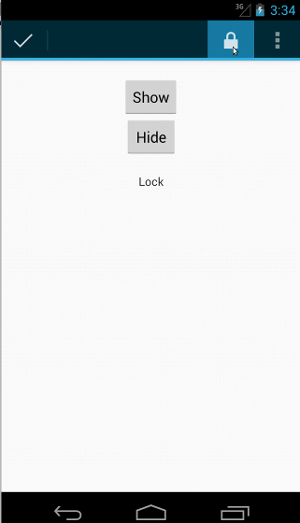
El código es idéntico al de la barra de acciones contextuales:
Kotlin
fun testClickActionModeItem() {
    // Make sure we show the contextual action bar.
    onView(withId(R.id.show_contextual_action_bar))
        .perform(click())

    // Click on the icon.
    onView((withId(R.id.action_lock)))
        .perform(click())

    // Verify that we have really clicked on the icon
    // by checking the TextView content.
    onView(withId(R.id.text_action_bar_result))
        .check(matches(withText("Lock")))
}
Java
public void testClickActionModeItem() {
    // Make sure we show the contextual action bar.
    onView(withId(R.id.show_contextual_action_bar))
        .perform(click());

    // Click on the icon.
    onView((withId(R.id.action_lock)))
        .perform(click());

    // Verify that we have really clicked on the icon
    // by checking the TextView content.
    onView(withId(R.id.text_action_bar_result))
        .check(matches(withText("Lock")));
}
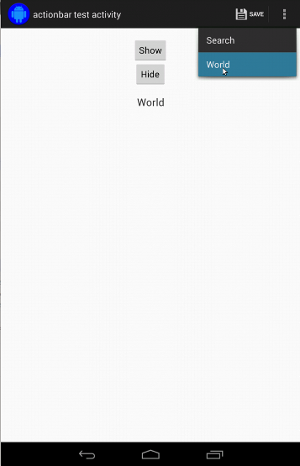
Hacer clic en elementos del menú ampliado es un poco más complicado para la acción normal. ya que algunos dispositivos tienen un botón de menú ampliado de hardware, que abre la pantalla elementos excesivos en un menú de opciones, y algunos dispositivos tienen un exceso de software el botón de menú, que abre un menú normal ampliado. Afortunadamente, Espresso se encarga de eso por nosotros.
Barra de acciones normal:
Kotlin
fun testActionBarOverflow() {
    // Make sure we hide the contextual action bar.
    onView(withId(R.id.hide_contextual_action_bar))
        .perform(click())

    // Open the options menu OR open the overflow menu, depending on whether
    // the device has a hardware or software overflow menu button.
    openActionBarOverflowOrOptionsMenu(
            ApplicationProvider.getApplicationContext<Context>())

    // Click the item.
    onView(withText("World"))
        .perform(click())

    // Verify that we have really clicked on the icon by checking
    // the TextView content.
    onView(withId(R.id.text_action_bar_result))
        .check(matches(withText("World")))
}
Java
public void testActionBarOverflow() {
    // Make sure we hide the contextual action bar.
    onView(withId(R.id.hide_contextual_action_bar))
        .perform(click());

    // Open the options menu OR open the overflow menu, depending on whether
    // the device has a hardware or software overflow menu button.
    openActionBarOverflowOrOptionsMenu(
            ApplicationProvider.getApplicationContext());

    // Click the item.
    onView(withText("World"))
        .perform(click());

    // Verify that we have really clicked on the icon by checking
    // the TextView content.
    onView(withId(R.id.text_action_bar_result))
        .check(matches(withText("World")));
}
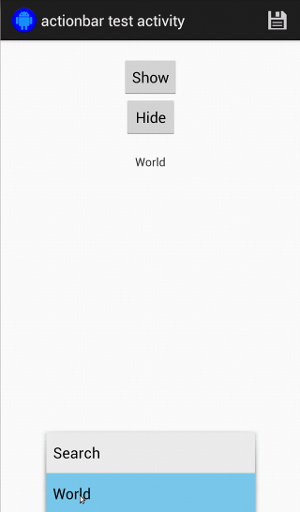
Esta es la apariencia en dispositivos que incluyen un botón de menú ampliado de hardware:
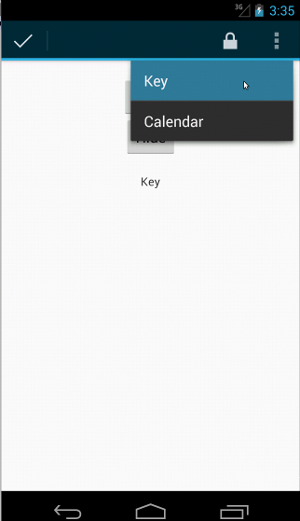
En el caso de la barra de acciones contextuales, el procedimiento es muy sencillo también:
Kotlin
fun testActionModeOverflow() {
    // Show the contextual action bar.
    onView(withId(R.id.show_contextual_action_bar))
        .perform(click())

    // Open the overflow menu from contextual action mode.
    openContextualActionModeOverflowMenu()

    // Click on the item.
    onView(withText("Key"))
        .perform(click())

    // Verify that we have really clicked on the icon by
    // checking the TextView content.
    onView(withId(R.id.text_action_bar_result))
        .check(matches(withText("Key")))
    }
}
Java
public void testActionModeOverflow() {
    // Show the contextual action bar.
    onView(withId(R.id.show_contextual_action_bar))
        .perform(click());

    // Open the overflow menu from contextual action mode.
    openContextualActionModeOverflowMenu();

    // Click on the item.
    onView(withText("Key"))
        .perform(click());

    // Verify that we have really clicked on the icon by
    // checking the TextView content.
    onView(withId(R.id.text_action_bar_result))
        .check(matches(withText("Key")));
    }
}
Para ver el código completo de estas muestras, consulta la
Ejemplo de ActionBarTest.java en GitHub.
Cómo confirmar que no se muestra una vista
Después de realizar una serie de acciones, querrás confirmar
estado de la IU que estás probando. A veces, este puede ser un caso negativo, como cuando
no está sucediendo algo. Recuerda que puedes convertir cualquier vista de Hamcrest
comparador en una ViewAssertion mediante ViewAssertions.matches().
En el siguiente ejemplo, tomamos el comparador isDisplayed() y lo revertimos usando
el comparador not() estándar:
Kotlin
import androidx.test.espresso.Espresso.onView
import androidx.test.espresso.assertion.ViewAssertions.matches
import androidx.test.espresso.matcher.ViewMatchers.isDisplayed
import androidx.test.espresso.matcher.ViewMatchers.withId
import org.hamcrest.Matchers.not

onView(withId(R.id.bottom_left))
    .check(matches(not(isDisplayed())))
Java
import static androidx.test.espresso.Espresso.onView;
import static androidx.test.espresso.assertion.ViewAssertions.matches;
import static androidx.test.espresso.matcher.ViewMatchers.isDisplayed;
import static androidx.test.espresso.matcher.ViewMatchers.withId;
import static org.hamcrest.Matchers.not;

onView(withId(R.id.bottom_left))
    .check(matches(not(isDisplayed())));
El enfoque anterior funciona si la vista sigue siendo parte de la jerarquía. Si es
no, obtendrás un NoMatchingViewException y deberás usar
ViewAssertions.doesNotExist()
Cómo confirmar que una vista no está presente
Si la vista desapareció de la jerarquía de vistas, lo que puede suceder cuando
acción causó una transición a otra actividad, debes usar
ViewAssertions.doesNotExist():
Kotlin
import androidx.test.espresso.Espresso.onView
import androidx.test.espresso.assertion.ViewAssertions.doesNotExist
import androidx.test.espresso.matcher.ViewMatchers.withId

onView(withId(R.id.bottom_left))
    .check(doesNotExist())
Java
import static androidx.test.espresso.Espresso.onView;
import static androidx.test.espresso.assertion.ViewAssertions.doesNotExist;
import static androidx.test.espresso.matcher.ViewMatchers.withId;

onView(withId(R.id.bottom_left))
    .check(doesNotExist());
Cómo confirmar que un elemento de datos no está en un adaptador
Para probar que un elemento de datos en particular no está dentro de un AdapterView, debes hacerlo.
las cosas de forma un poco diferente. Debemos encontrar el AdapterView que nos interesa
e interrogar los datos que retienen. No hace falta usar onData().
En su lugar, usamos onView() para encontrar la AdapterView y, luego, usamos otro
para trabajar con los datos dentro de la vista.
Primero el comparador:
Kotlin
private fun withAdaptedData(dataMatcher: Matcher<Any>): Matcher<View> {
    return object : TypeSafeMatcher<View>() {

        override fun describeTo(description: Description) {
            description.appendText("with class name: ")
            dataMatcher.describeTo(description)
        }

        public override fun matchesSafely(view: View) : Boolean {
            if (view !is AdapterView<*>) {
                return false
            }

            val adapter = view.adapter
            for (i in 0 until adapter.count) {
                if (dataMatcher.matches(adapter.getItem(i))) {
                    return true
                }
            }

            return false
        }
    }
}
Java
private static Matcher<View> withAdaptedData(final Matcher<Object> dataMatcher) {
    return new TypeSafeMatcher<View>() {

        @Override
        public void describeTo(Description description) {
            description.appendText("with class name: ");
            dataMatcher.describeTo(description);
        }

        @Override
        public boolean matchesSafely(View view) {
            if (!(view instanceof AdapterView)) {
                return false;
            }

            @SuppressWarnings("rawtypes")
            Adapter adapter = ((AdapterView) view).getAdapter();
            for (int i = 0; i < adapter.getCount(); i++) {
                if (dataMatcher.matches(adapter.getItem(i))) {
                    return true;
                }
            }

            return false;
        }
    };
}
Luego, todo lo que se necesita es onView() para encontrar la AdapterView:
Kotlin
fun testDataItemNotInAdapter() {
    onView(withId(R.id.list))
          .check(matches(not(withAdaptedData(withItemContent("item: 168")))))
    }
}
Java
@SuppressWarnings("unchecked")
public void testDataItemNotInAdapter() {
    onView(withId(R.id.list))
          .check(matches(not(withAdaptedData(withItemContent("item: 168")))));
    }
}
Y tenemos una aserción que fallará si un elemento que es igual a "item: 168". en una vista de adaptador con la lista de IDs.
Para obtener el ejemplo completo, consulta el método testDataItemNotInAdapter() dentro de
AdapterViewTest.java
en GitHub.
Cómo usar un controlador de fallas personalizado
Si reemplazas el FailureHandler predeterminado en Espresso por uno personalizado, podrás hacer lo siguiente:
manejo de errores adicional o diferente, como tomar una captura de pantalla o pasar
junto con la información de depuración adicional.
En el ejemplo de CustomFailureHandlerTest, se muestra cómo implementar una interfaz
controlador de fallas:
Kotlin
private class CustomFailureHandler(targetContext: Context) : FailureHandler {
    private val delegate: FailureHandler

    init {
        delegate = DefaultFailureHandler(targetContext)
    }

    override fun handle(error: Throwable, viewMatcher: Matcher<View>) {
        try {
            delegate.handle(error, viewMatcher)
        } catch (e: NoMatchingViewException) {
            throw MySpecialException(e)
        }

    }
}
Java
private static class CustomFailureHandler implements FailureHandler {
    private final FailureHandler delegate;

    public CustomFailureHandler(Context targetContext) {
        delegate = new DefaultFailureHandler(targetContext);
    }

    @Override
    public void handle(Throwable error, Matcher<View> viewMatcher) {
        try {
            delegate.handle(error, viewMatcher);
        } catch (NoMatchingViewException e) {
            throw new MySpecialException(e);
        }
    }
}
Este controlador de fallas arroja un MySpecialException en lugar de un
NoMatchingViewException y delega todas las demás fallas al
DefaultFailureHandler El CustomFailureHandler se puede registrar con
Espresso en el método setUp() de la prueba:
Kotlin
@Throws(Exception::class)
override fun setUp() {
    super.setUp()
    getActivity()
    setFailureHandler(CustomFailureHandler(
            ApplicationProvider.getApplicationContext<Context>()))
}
Java
@Override
public void setUp() throws Exception {
    super.setUp();
    getActivity();
    setFailureHandler(new CustomFailureHandler(
            ApplicationProvider.getApplicationContext()));
}
Para obtener más información, consulta la
FailureHandler
interfaz y
Espresso.setFailureHandler()
Cómo orientar interacciones a ventanas no predeterminadas
Android es compatible con el uso de varias ventanas. Normalmente, esto es transparente para los usuarios
y el desarrollador de la app. Sin embargo, en ciertos casos, se muestran varias ventanas, como
como cuando una ventana de autocompletar se dibuja sobre la ventana principal de la aplicación en
el widget de búsqueda. Para simplificar, de forma predeterminada, Espresso utiliza una heurística para
adivina con qué Window quieres interactuar. Esta heurística es casi
siempre es lo suficientemente bueno; Sin embargo, en casos excepcionales, deberás especificar qué período
debe orientarse una interacción. Para ello, proporciona tu propia ventana raíz
comparador o Root:
Kotlin
onView(withText("South China Sea"))
    .inRoot(withDecorView(not(`is`(getActivity().getWindow().getDecorView()))))
    .perform(click())
Java
onView(withText("South China Sea"))
    .inRoot(withDecorView(not(is(getActivity().getWindow().getDecorView()))))
    .perform(click());
Como es el caso con
ViewMatchers:
proporcionamos un conjunto de parámetros
RootMatchers
Por supuesto, siempre puedes implementar tu propio objeto Matcher.
Observa la clase MultipleWindowTest muestra en GitHub.
Cómo hacer coincidir un encabezado o un pie de página en una vista de lista
Los encabezados y los pies de página se agregan a ListViews con addHeaderView() y
addFooterView(). Para asegurarse de que Espresso.onData() sepa qué objeto de datos
para que coincida, asegúrate de pasar un valor de objeto de datos predeterminado como el segundo parámetro
a addHeaderView() y addFooterView(). Por ejemplo:
Kotlin
const val FOOTER = "FOOTER"
...
val footerView = layoutInflater.inflate(R.layout.list_item, listView, false)
footerView.findViewById<TextView>(R.id.item_content).text = "count:"
footerView.findViewById<TextView>(R.id.item_size).text
        = data.size.toString
listView.addFooterView(footerView, FOOTER, true)
Java
public static final String FOOTER = "FOOTER";
...
View footerView = layoutInflater.inflate(R.layout.list_item, listView, false);
footerView.findViewById<TextView>(R.id.item_content).setText("count:");
footerView.findViewById<TextView>(R.id.item_size).setText(String.valueOf(data.size()));
listView.addFooterView(footerView, FOOTER, true);
Luego puedes crear un comparador para el pie de página:
Kotlin
import org.hamcrest.Matchers.allOf
import org.hamcrest.Matchers.instanceOf
import org.hamcrest.Matchers.`is`

fun isFooter(): Matcher<Any> {
    return allOf(`is`(instanceOf(String::class.java)),
            `is`(LongListActivity.FOOTER))
}
Java
import static org.hamcrest.Matchers.allOf;
import static org.hamcrest.Matchers.instanceOf;
import static org.hamcrest.Matchers.is;

@SuppressWarnings("unchecked")
public static Matcher<Object> isFooter() {
    return allOf(is(instanceOf(String.class)), is(LongListActivity.FOOTER));
}
Y cargar la vista en una prueba es muy sencillo:
Kotlin
import androidx.test.espresso.Espresso.onData
import androidx.test.espresso.action.ViewActions.click
import androidx.test.espresso.sample.LongListMatchers.isFooter

fun testClickFooter() {
    onData(isFooter())
        .perform(click())

    // ...
}
Java
import static androidx.test.espresso.Espresso.onData;
import static androidx.test.espresso.action.ViewActions.click;
import static androidx.test.espresso.sample.LongListMatchers.isFooter;

public void testClickFooter() {
    onData(isFooter())
        .perform(click());

    // ...
}
Observa la muestra de código completa que se encuentra en el método testClickFooter() de
AdapterViewTest.java
en GitHub.