Menginstal Godot dan mengonfigurasi project untuk Android
Tetap teratur dengan koleksi
Simpan dan kategorikan konten berdasarkan preferensi Anda.
Panduan ini akan membahas langkah-langkah berikut:
Memilih versi dan rilis Godot
Mendownload dan menginstal Godot
Mengonfigurasi Godot untuk pengembangan Android.
Mengonfigurasi sistem untuk pengembangan dan ekspor C# (khusus mono rilis Godot).
Memilih versi
Gunakan rilis stabil Godot yang terbaru jika memungkinkan. Untuk pengembangan Android,
gunakan versi 3.3 atau yang lebih tinggi.
Mendownload dan menjalankan Godot
Kunjungi
halaman download Godot
untuk mendownload game engine bagi lingkungan pilihan Anda.
Godot menawarkan dua rilis di halaman download: standar dan Mono. Keduanya dapat
digunakan untuk mengembangkan Android. Rilis Mono diperlukan untuk pengembangan C#.
Godot didistribusikan sebagai aplikasi mandiri. Godot tidak memerlukan
proses penginstalan; setelah mengekstrak arsip download, Anda dapat menjalankannya sebagaimana adanya.
Mengonfigurasi dukungan Android
Mengonfigurasi setelan SDK Android Studio
Jika Anda belum melakukannya, download dan instal
rilis Android Studio terbaru yang stabil.
Luncurkan Android Studio.
Di jendela Welcome to Android Studio, buka menu dropdown Configure
lalu pilih SDK Manager.
Di bagian atas jendela, catat Lokasi SDK Android
di komputer. Anda harus menentukan lokasi tersebut di editor Godot.
Di tab SDK Platforms, temukan entri daftar untuk Android 11.0 R.
Centang item jika tidak dicentang.
Di tab SDK Tools, temukan item daftar untuk NDK (Side by side),
Alat Command-line Android SDK, dan CMake. Centang item jika
tidak dicentang.
Jika ada item daftar yang statusnya ditetapkan ke Update Available, aktifkan
kotak centang untuk mengupdate ke versi terbaru.
Klik tombol OK. Konfirmasi unduhan dan setujui perjanjian
lisensi untuk menyelesaikan penginstalan.
Membuat keystore debug
Aplikasi Android harus ditandatangani secara digital
agar dapat berjalan di perangkat. Untuk pengujian lokal, file keystore debug dapat digunakan untuk menandatangani
aplikasi. Android Studio akan otomatis membuat keystore debug default. Jika
sebelumnya Anda telah membuat aplikasi menggunakan konfigurasi debug dengan Android Studio,
file debug.keystore harus berada di direktori berikut:
Microsoft Windows: C:\Users\$username\.android\debug.keystore
Linux/macOS: ~\.android\debug.keystore
Jika file debug.keystore tidak ada, buat file dengan melakukan
langkah-langkah berikut:
Luncurkan Android Studio.
Di jendela Welcome to Android Studio, pilih
opsi Impor Contoh Kode Android.
Pilih contoh Ndk -> Hello GL2 dari daftar dan klik tombol Next.
Pilih lokasi untuk project lalu klik tombol Selesai.
Tunggu sampai project dimuat dan disinkronkan dengan Gradle, lalu pilih
Build -> Make Project dari panel menu Android Studio.
Tunggu hingga build selesai, lalu verifikasi bahwa file debug.keystore telah
dibuat di direktori yang sesuai.
Menyetel Android SDK dan debug lokasi keystore di editor Godot
Luncurkan editor Godot.
Membuat atau membuka project.
Pilih Editor -> Setelan Editor... dari panel menu Editor.
Di jendela Setelan Editor, pilih item Ekspor -> Android
di panel kiri.
Di panel kanan, buka kotak teks untuk Jalur Android Sdk dan masukkan
jalur ke Android SDK.
Dalam kotak teks untuk Keystore Debug, masukkan jalur
ke file debug.keystore.
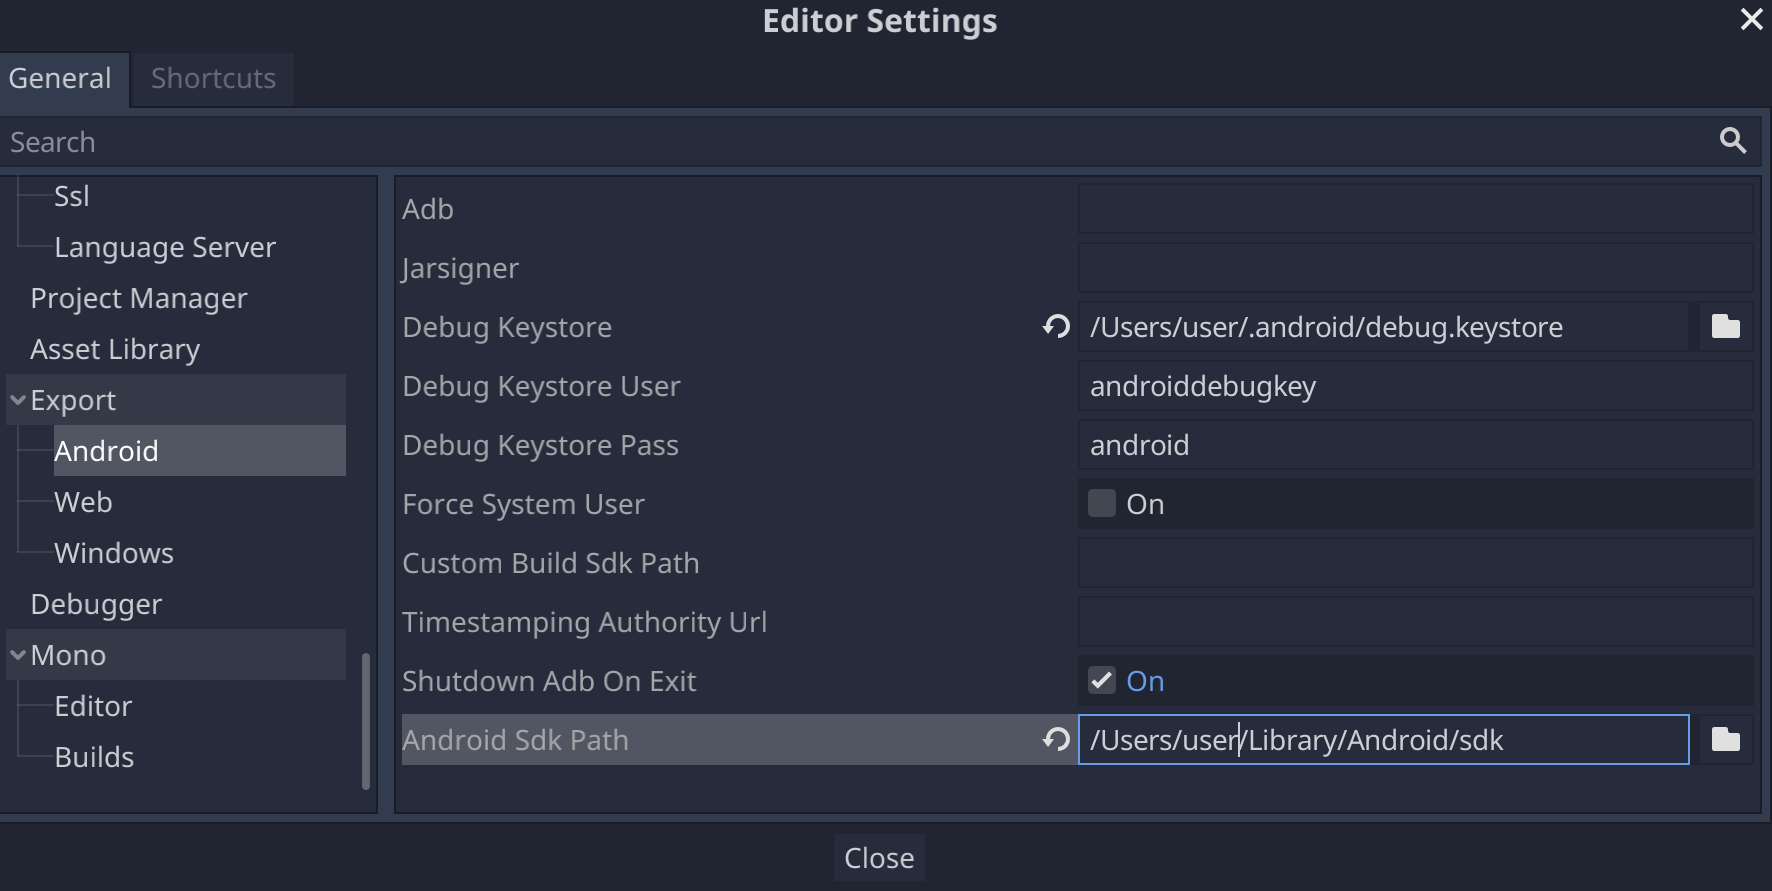
Gambar 1. Kolom Android Sdk Path di Setelan Editor
Menyiapkan Mono
Menginstal MSBuild
Rilis Monot dari Godot memerlukan MSBuild untuk membuat dan mengekspor project yang menggunakan
C#. Untuk menginstal MSBuild:
Dukungan Godot untuk mengedit kode C# sangat terbatas. Sangat disarankan untuk
menggunakan editor eksternal untuk file C#. Godot mendukung editor C# berikut:
Microsoft Visual Studio/Visual Studio untuk Mac
Microsoft Visual Studio Code
JetBrains Rider
MonoDevelop
Untuk mengonfigurasi editor C# eksternal, buka project di editor Godot dan
lakukan langkah berikut:
Pilih Editor -> Setelan Editor… dari panel menu editor.
Di jendela Editor Settings, pilih item Mono -> Editor di panel kiri.
Pilih editor yang diinginkan dari menu dropdown Editor Eksternal.
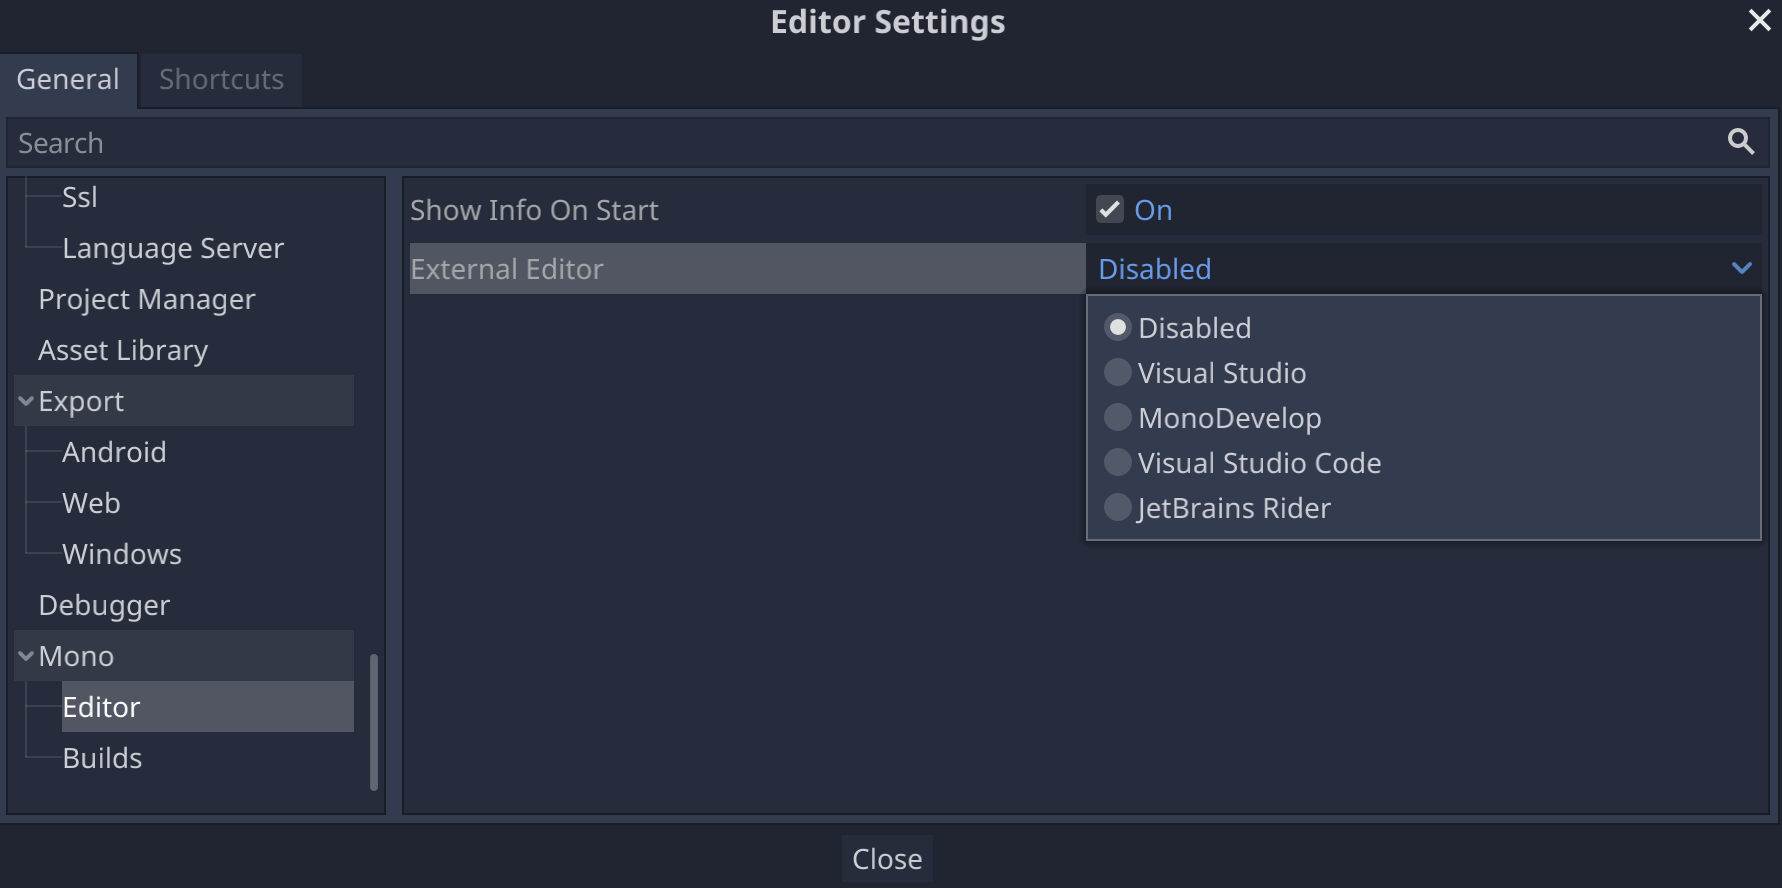
Gambar 2: Kolom Editor Eksternal di Setelan Editor
Plugin editor C# untuk Godot
Alat C# untuk Godot:
Plugin untuk Microsoft Visual Studio Code yang menambahkan dukungan debug C# dan
fitur penyelesaian kode sebagian.
Konten dan contoh kode di halaman ini tunduk kepada lisensi yang dijelaskan dalam Lisensi Konten. Java dan OpenJDK adalah merek dagang atau merek dagang terdaftar dari Oracle dan/atau afiliasinya.
Terakhir diperbarui pada 2025-07-27 UTC.
[[["Mudah dipahami","easyToUnderstand","thumb-up"],["Memecahkan masalah saya","solvedMyProblem","thumb-up"],["Lainnya","otherUp","thumb-up"]],[["Informasi yang saya butuhkan tidak ada","missingTheInformationINeed","thumb-down"],["Terlalu rumit/langkahnya terlalu banyak","tooComplicatedTooManySteps","thumb-down"],["Sudah usang","outOfDate","thumb-down"],["Masalah terjemahan","translationIssue","thumb-down"],["Masalah kode / contoh","samplesCodeIssue","thumb-down"],["Lainnya","otherDown","thumb-down"]],["Terakhir diperbarui pada 2025-07-27 UTC."],[],[],null,["# Install Godot and configure projects for Android\n\nThis guide will cover the following steps:\n\n- Selecting a version and release of Godot.\n- Downloading and installing Godot.\n- Configuring Godot for Android development.\n- Configuring your system for C# development and export (Mono release of Godot only).\n\nSelect a version\n----------------\n\nUse the latest stable release of Godot when possible. For Android development,\nuse version 3.3 or higher.\n| **Note:** Starting in August 2021, Google Play will require all Android apps to be submitted as Android App Bundles. Versions of Godot lower than 3.3 don't meet this requirement. For more information, see the [Target API Level](/distribute/best-practices/develop/target-sdk) page.\n\nDownload and run Godot\n----------------------\n\nVisit the\n[Godot download page](https://godotengine.org/download)\nto download the game engine for your preferred environment.\n\nGodot offers two releases on its download page: standard and Mono. Either may be\nused to develop for Android. The Mono release is required for C# development.\n\nGodot is distributed as a standalone application. It does not require an\ninstallation process; after extracting the download archive, you can run it as-is.\n\nConfigure Android support\n-------------------------\n\n### Configure the Android Studio SDK settings\n\n1. If you haven't already done so, [download](/studio) and [install](/studio/install) the latest stable release of Android Studio.\n2. Launch Android Studio.\n3. In the Welcome to Android Studio window, open the **Configure** dropdown menu and select **SDK Manager**.\n4. At the top of the window, make a note of the **Android SDK Location** on your computer. You will need to specify that location in Godot editor.\n5. In the **SDK Platforms** tab, find the list entry for **Android 11.0 R**. Check the item if it is unchecked.\n6. In the **SDK Tools** tab, find the list items for **NDK (Side by side)** , **Android SDK Command-line Tools** , and **CMake**. Check them if they are unchecked.\n7. If any list items have their status set to **Update Available**, enable their check box to update to the latest version.\n8. Click the **OK** button. Confirm the download and accept the license agreements to complete the installation.\n\n### Create a debug keystore\n\nAndroid apps must be [digitally signed](/studio/publish/app-signing#certificates-keystores)\nto run on a device. For local testing, a debug keystore file may be used to sign\napps. Android Studio will automatically create a default debug keystore. If you\nhave previously built apps using a debug configuration with Android Studio, a\n`debug.keystore` file should be located in the following directory:\n\n- **Microsoft Windows** : `C:\\Users\\$username\\.android\\debug.keystore`\n- **Linux/macOS** : `~\\.android\\debug.keystore`\n\nIf the `debug.keystore` file does not exist, create one by performing the\nfollowing steps:\n\n1. Launch Android Studio.\n2. In the Welcome to Android Studio window, select the **Import an Android Code Sample** option.\n3. Select the **Ndk -\\\u003e Hello GL2** sample from the list and click the **Next** button.\n4. Choose a location for the project and click the **Finish** button.\n5. Wait for the project to load and sync with Gradle, then select **Build -\\\u003e Make Project** from the Android Studio menu bar.\n6. Wait for the build to finish, then verify a `debug.keystore` file was created in the appropriate directory.\n\n### Set the Android SDK and debug keystore location in Godot editor\n\n1. Launch the Godot editor.\n2. Create or open a project.\n3. Select **Editor -\\\u003e Editor Settings...** from the **Editor** menu bar.\n4. In the **Editor Settings** window, select the **Export -\\\u003e Android** item in the left panel.\n5. In the right panel, go to the text box for **Android Sdk Path** and enter the path to the Android SDK.\n6. In the text box for **Debug Keystore** enter the path to the `debug.keystore` file.\n\n**Figure 1.** The **Android Sdk Path** field in **Editor Settings**\n\nSet up Mono\n-----------\n\n### Install MSBuild\n\nThe Mono release of Godot requires MSBuild to build and export projects that use\nC#. To install MSBuild:\n\n**Linux and macOS**\n\n- [Download](https://www.mono-project.com/download/stable/) and [install](https://www.mono-project.com/docs/) the latest version of the Mono SDK.\n\n**Microsoft Windows**\n\n- Install [Microsoft Visual Studio](https://visualstudio.microsoft.com/downloads/) or [Microsoft Visual Studio Build Tools](https://visualstudio.microsoft.com/thank-you-downloading-visual-studio/?sku=BuildTools&rel=15). When you run the installer, ensure you have the **.NET Framework 4.5** targeting pack selected for installation.\n\n### Configure a C# editor\n\nGodot has very limited support for editing C# code. Using an external editor for\nC# files is strongly recommended. Godot supports the following C# editors:\n\n- Microsoft Visual Studio/Visual Studio for Mac\n- Microsoft Visual Studio Code\n- JetBrains Rider\n- MonoDevelop\n\nTo configure an external C# editor, open a project in the Godot editor and\nperform the following steps:\n\n1. Select **Editor -\\\u003e Editor Settings...** from the editor menu bar.\n2. In the **Editor Settings** window, select the **Mono -\\\u003e Editor** item in the left panel.\n3. Choose the desired editor from the **External Editor** dropdown menu.\n\n**Figure 2:** The **External Editor** field in **Editor Settings**\n\n### C# editor plugins for Godot\n\n- [C# Tools for Godot](https://marketplace.visualstudio.com/items?itemName=neikeq.godot-csharp-vscode): A plugin for Microsoft Visual Studio Code that adds C# debugging support and partial code completion features.\n- [JetBrains Rider plugin](https://plugins.jetbrains.com/plugin/13882-godot-support): Adds C# debugging support."]]