Tetap teratur dengan koleksi
Simpan dan kategorikan konten berdasarkan preferensi Anda.
Menyiapkan Android Game Development Extension di komputer Windows dan menjalankan contoh project Visual
Studio C ++ di perangkat Android atau emulator.
Prasyarat
Ikuti langkah-langkah di bagian ini guna menyiapkan komputer Windows untuk
menginstal ekstensi:
Download dan instal salah satu versi Visual Studio yang didukung:
Download dan instal JDK 17 untuk AGDE 23.1.82 atau yang lebih baru, atau JDK 11 untuk AGDE 22.2.71 dan yang lebih lama, lalu setel variabel lingkungan JAVA_HOME Anda.
Menginstal ekstensi
Ikuti langkah-langkah di bagian ini untuk mendownload dan menginstal
Android Game Development Extension.
Tutup semua instance Visual Studio.
Download penginstal ekstensi dan contoh terbaru dari halaman
Download.
Dari lokasi download, klik dua kali penginstal. Penginstal memerlukan waktu
beberapa menit untuk menyelesaikannya.
Jika memiliki lebih dari satu versi Visual Studio yang diinstal, pilih
versi yang ekstensi-nya ingin Anda diinstal.
Klik Finish untuk menyelesaikan penginstalan.
Menginstal Android SDK dan NDK
Anda dapat menginstal Android SDK dan
Native Development Kit (NDK)
Android menggunakan Android Studio atau Android Game Development Extension Untuk menginstal SDK dan NDK dari
ekstensi, gunakan SDK Manager yang terletak di
toolbar ekstensi Visual Studio.
Saat menginstal NDK, pastikan Anda menggunakan kotak centang NDK (Side by side) sehingga
ekstensi dapat menemukannya. Anda harus menginstal versi NDK
yang didukung oleh ekstensi
(lihat histori revisi NDK):
Untuk menginstal SDK ke lokasi selain default, tetapkan variabel lingkungan ANDROID_SDK_ROOT di komputer Anda:
Pastikan Visual Studio ditutup.
Di Penelurusan Windows, telusuri Environment Variables.
Pilih Edit the system environment variables.
Klik Environment Variables.
Di bagian User Variables, klik New.
Di kotak Variable Name, ketik ANDROID_SDK_ROOT.
Di kotak Variable Value, masukkan jalur ke Android SDK.
Reboot komputer.
Lokasi SDK tidak dapat diubah menggunakan jendela SDK Manager karena variabel lingkungan ini adalah satu-satunya sumber tepercaya untuk lokasi SDK.
Menjalankan contoh
Ikuti langkah-langkah di bagian ini untuk menjalankan contoh yang disediakan di
emulator, lalu di perangkat Android fisik.
Mengonfigurasi platform
Ekstrak file zip contoh ke direktori pilihan Anda. Contoh
berikut disertakan:
endless-tunnel
HelloJNI
Teapot
Mulai Visual Studio jika belum dijalankan.
Buka direktori contoh. Pilih File > Open > Project/Solution, lalu
buka file .sln.
Pilih platform Android:
Pilih Build > Configuration Manager.
Di bagian Active solution platform, pilih Android-x86_64.
Pastikan properti Android SDK dan NDK project contoh telah
dikonfigurasi:
Gambar
1. Properti platform Android
Di Solution Explorer, klik kanan project, lalu pilih
Properties.
Pilih tab properti General dan cari properti Platform
untuk Android.
Pilih tab properti Android Packaging.
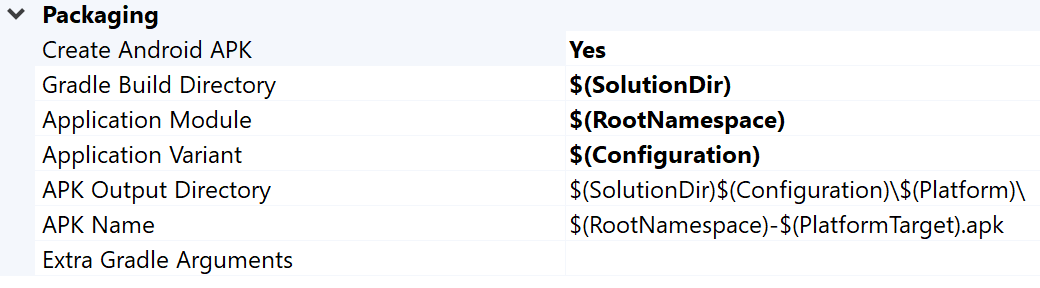
Gambar
2. Properti paket Android
Anda dapat mengubah nama dan direktori APK output dari tab ini. Perlu diketahui
bahwa properti konfigurasi Android tertentu ditentukan di halaman
properti dan diteruskan ke Gradle. Misalnya, properti nama APK
MSBUILD_ANDROID_OUTPUT_APK_NAME meneruskan nama ini ke file build.gradle
aplikasi.
Menyiapkan emulator
Mulai AVD Manager dari toolbar ekstensi di Visual Studio.
Konfigurasikan perangkat virtual, lalu
jalankan di emulator Android.
Di Pengelola Perangkat Virtual Android, klik Create Virtual Device.
Pilih definisi perangkat (misalnya, Pixel 2).
Pilih image sistem. Anda harus memilih ABI x86_64 karena arsitektur ini berperforma lebih cepat di emulator.
Verifikasi konfigurasi, lalu klik Finish.
Mulai perangkat virtual dengan mengklik tombol Run di Pengelola
Perangkat Virtual Android.
Di Visual Studio, perangkat virtual akan muncul di samping
tombol toolbar Start Debugging. Klik Start Debugging untuk meluncurkan
aplikasi contoh di perangkat. Mungkin diperlukan waktu beberapa saat hingga debugger
terpasang ke aplikasi. Jika menjalankan contoh Teapot, Anda dapat memutar
teapot dengan menarik kursor mouse ke atasnya.
Gambar
3. Sampel teapot yang berjalan di Android Emulator
Menyiapkan perangkat
Untuk menjalankan contoh di perangkat Android fisik, Anda mungkin perlu membuat
platform Android baru dalam project. Platform ini harus cocok dengan arsitektur
perangkat. Untuk membuat platform baru, lakukan hal berikut di Visual Studio:
Pilih Build > Configuration Manager.
Di bagian Active solution platform, pilih <New>.
Ketik salah satu dari berikut ini untuk platform baru:
Android-armeabi-v7a
Android-arm64-v8a
Android-x86
Android-x86_64
Di kotak Copy settings from, pilih platform Android lain yang sudah ada (atau None jika Anda belum memiliki platform Android).
Pastikan Anda telah mengaktifkan Create new project platforms.
Hubungkan perangkat Android ke komputer menggunakan kabel USB. Jenis
perangkat akan ditampilkan di samping tombol toolbar Start Debugging.
Gambar
4. Perangkat Android yang terhubung ditampilkan di samping tombol toolbar Start Debugging
Jika perangkat tidak ditampilkan, periksa hal berikut:
Kabel USB mendukung koneksi data (dan bukan hanya daya).
Klik tombol toolbar Start Debugging untuk meluncurkan aplikasi contoh di
perangkat. Mungkin diperlukan waktu beberapa saat hingga debugger terpasang ke aplikasi.
Setelah terpasang, Anda dapat berinteraksi dengan aplikasi di perangkat Anda.
FAQ
Berikut adalah beberapa pertanyaan umum tentang Android Game Development Extension.
Di mana lokasi log untuk plugin?
Anda dapat membuka file log untuk plugin menggunakan ikon Open Logs di
toolbar Android Game Development Extension.
Variabel lingkungan apa yang digunakan plugin?
Plugin menggunakan variabel lingkungan berikut:
ANDROID_SDK_ROOT
ANDROID_SDK_HOME
TEMP
GOOGLE_ANDROID_LOG_DIR
Langkah berikutnya
Untuk menggunakan project Anda sendiri dengan ekstensi tersebut, Anda harus mengonfigurasinya sesuai dengan
panduan konfigurasi project.
Konten dan contoh kode di halaman ini tunduk kepada lisensi yang dijelaskan dalam Lisensi Konten. Java dan OpenJDK adalah merek dagang atau merek dagang terdaftar dari Oracle dan/atau afiliasinya.
Terakhir diperbarui pada 2025-07-27 UTC.
[[["Mudah dipahami","easyToUnderstand","thumb-up"],["Memecahkan masalah saya","solvedMyProblem","thumb-up"],["Lainnya","otherUp","thumb-up"]],[["Informasi yang saya butuhkan tidak ada","missingTheInformationINeed","thumb-down"],["Terlalu rumit/langkahnya terlalu banyak","tooComplicatedTooManySteps","thumb-down"],["Sudah usang","outOfDate","thumb-down"],["Masalah terjemahan","translationIssue","thumb-down"],["Masalah kode / contoh","samplesCodeIssue","thumb-down"],["Lainnya","otherDown","thumb-down"]],["Terakhir diperbarui pada 2025-07-27 UTC."],[],[],null,["# Quickstart\n\nSet up the Android Game Development Extension on a Windows computer and run a sample Visual\nStudio C++ project on an Android device or emulator.\n\nPrerequisites\n-------------\n\nFollow the steps in this section to prepare your Windows computer for\ninstallation of the extension:\n\n1. Download and install one of the supported versions of Visual Studio:\n\n - [Visual Studio 2017 Version 15.4.0 (October 9th, 2017) or higher](https://docs.microsoft.com/en-us/visualstudio/install/update-visual-studio?view=vs-2017).\n - [Visual Studio 2019 Version 16.0.0 or higher](https://docs.microsoft.com/en-us/visualstudio/install/update-visual-studio?view=vs-2019).\n - [Visual Studio 2022 Version 17.0.0 or higher](https://docs.microsoft.com/en-us/visualstudio/install/update-visual-studio?view=vs-2022).\n2. [Download and install .NET Core SDK 2.2](https://dotnet.microsoft.com/download/thank-you/dotnet-sdk-2.2.107-windows-x64-installer).\n\n3. [Android Studio 3.5 or higher](/studio) is optional, but can be used\n instead of the Android Game Development Extension to install the\n [Android SDK and NDK](#install-sdk-ndk).\n\n4. Download and install [JDK 17](https://jdk.java.net/archive/) for AGDE\n 23.1.82 or newer, or [JDK 11](https://jdk.java.net/archive/) for up to AGDE\n 22.2.71, and set your `JAVA_HOME` environment variable.\n\nInstall the extension\n---------------------\n\nFollow the steps in this section to download and install the\nAndroid Game Development Extension:\n\n1. Close all instances of Visual Studio.\n\n2. Download the latest extension installer and samples from the\n [Downloads](/games/agde#downloads) page.\n\n3. From your download location, double-click the installer. The installer takes\n several minutes to complete.\n\n4. If you have more than one version of Visual Studio installed, select the\n versions that you would like the extension to be installed for.\n\n5. Click **Finish** to complete the installation.\n\nInstall the Android SDK and NDK\n-------------------------------\n\nYou can install the Android SDK and the Android\n[Native Development Kit (NDK)](/studio/projects/install-ndk#specific-version)\nwith Android Studio or the Android Game Development Extension. To install the SDK and NDK from\nthe extension, use the **SDK Manager**, which is located in the\nextension toolbar of Visual Studio.\n\nWhen installing the NDK, make sure to use the **NDK (Side by side)** checkbox so\nthat the extension can locate it. You must install an NDK version\nthat is supported by the extension\n(see [NDK revision history](/ndk/downloads/revision_history)).\n\nTo install the SDK to a different location than the default, set the\n`ANDROID_SDK_ROOT` environment variable on your computer:\n\n1. Ensure that Visual Studio is closed.\n2. In Windows Search, search for `Environment Variables`.\n3. Select **Edit the system environment variables**.\n4. Click **Environment Variables**.\n5. Under **User Variables** , click **New**.\n6. In the **Variable Name** box, type `ANDROID_SDK_ROOT`.\n7. In the **Variable Value** box, enter the path to the Android SDK.\n8. Reboot your computer.\n\nThe location of the SDK cannot be modified using the SDK Manager window as this\nenvironment variable is the only source-of-truth for the SDK location.\n\nRun the sample\n--------------\n\nFollow the steps in this section to run a provided sample on an\nemulator and then on a physical Android device.\n\n### Configure the platform\n\n1. Unzip the samples zip file into a directory of your choice. The following\n samples are included:\n\n - endless-tunnel\n - HelloJNI\n - Teapot\n2. Start Visual Studio if it is not already running.\n\n3. Open the samples directory. Select **File \\\u003e Open \\\u003e Project/Solution** and\n navigate to the `.sln` file.\n\n4. Select an Android platform:\n\n 1. Select **Build \\\u003e Configuration Manager**.\n 2. Under **Active solution platform** , select **Android-x86_64**.\n\n Android platforms are already configured in the samples (see [add\n more Android platforms](#add-platform) for adding platforms).\n | **Note:** Typical emulator images use x86 or x86_64 ABIs.\n5. Make sure the sample project has the Android SDK and NDK properties\n configured:\n\n **Figure\n 1.** Android platform properties\n - In the **Solution Explorer** , right-click the project and select\n **Properties**.\n\n - Select the **General** properties tab and find the **Platform**\n properties for Android.\n\n | **Note:** Make sure you select an NDK that is installed.\n6. Select the **Android Packaging** properties tab.\n\n **Figure\n 2.** Android packaging properties\n\n You can change the output APK name and directory from this tab. Note that\n some of the Android configuration properties are defined in the property\n pages and are passed to Gradle. For example, the APK name property\n `MSBUILD_ANDROID_OUTPUT_APK_NAME` passes this name to the app `build.gradle`\n file.\n\n### Set up the emulator\n\n1. Start AVD Manager from the extension toolbar in Visual Studio.\n Configure a virtual device and then\n [run it in the Android emulator](/studio/run/emulator).\n\n 1. In the Android Virtual Device Manager, click **Create Virtual Device**.\n 2. Choose a device definition (for example, Pixel 2).\n 3. Select a system image. You should select an x86_64 ABI because this architecture performs faster in the emulator.\n 4. Verify the configuration and click **Finish**.\n2. Start the virtual device by clicking the **Run**\n button in the Android\n Virtual Device Manager.\n\n3. In Visual Studio, the virtual device should appear next to the\n **Start Debugging** toolbar button. Click **Start Debugging** to launch the\n sample app on the device. It may take a few moments for the debugger\n to attach to the app. If you are running the Teapot sample, you can rotate\n the teapot by dragging your mouse cursor across it.\n\n \u003cbr /\u003e\n\n\n **Figure\n 3**. Teapot sample running on an Android emulator\n\n### Set up the device\n\n1. To run the sample on a physical Android device, you may need to create a\n new Android platform in the project. This platform must match the architecture\n of the device. To create a new platform, do the following in Visual Studio:\n\n 1. Select **Build \\\u003e Configuration Manager**.\n 2. Under **Active solution platform** , select **\\\u003cNew\\\u003e**.\n 3. Type one of the following for the new platform:\n\n - **Android-armeabi-v7a**\n - **Android-arm64-v8a**\n - **Android-x86**\n - **Android-x86_64**\n 4. In the **Copy settings from** box, select another existing Android\n platform (or **None** if you do not have any Android platforms yet).\n Make sure you enabled **Create new project platforms**.\n\n2. Connect an Android device to your computer using a USB cable. The device\n type should be shown next to the **Start Debugging** toolbar button.\n\n \u003cbr /\u003e\n\n\n **Figure\n 4** . Connected Android device shown next to the **Start Debugging** toolbar button\n\n If the device is not shown, check the following:\n - The platform selection matches the ABI of your device.\n - [Developer options and USB debugging](/studio/debug/dev-options) are enabled on the device.\n - The USB cable is connected from the device to the computer.\n - The USB cable supports a data connection (and not just power).\n3. Click the **Start Debugging** toolbar button to launch the sample app on the\n device. It may take a few moments for the debugger to attach to the app.\n Once it is attached, you can interact with the app on your device.\n\nFAQ\n---\n\nThe following are some frequently asked questions about the Android Game Development Extension.\n\n### Where are the logs for the plugin located?\n\nYou can open the log file for the plugin using the **Open Logs** icon in the\n**Android Game Development Extension** toolbar.\n\n### What environment variables does the plugin use?\n\nThe plugin uses the following environment variables:\n\n- `ANDROID_SDK_ROOT`\n- `ANDROID_SDK_HOME`\n- `TEMP`\n- `GOOGLE_ANDROID_LOG_DIR`\n\nWhat's next\n-----------\n\nTo use your own project with the extension, you must configure it according to\nthe [project configuration](/games/agde/adapt-existing-project) guide."]]