Tetap teratur dengan koleksi
Simpan dan kategorikan konten berdasarkan preferensi Anda.
Untuk mengompilasi dan men-debug kode native aplikasi Anda, siapkan komponen berikut:
Android Native Development Kit (NDK): kumpulan alat yang memungkinkan Anda
menggunakan kode C dan C++ dengan Android.
CMake: alat build eksternal yang bekerja bersama Gradle untuk membuat library
native. Anda tidak memerlukan komponen ini jika hanya berencana menggunakan ndk-build.
LLDB: debugger yang digunakan Android Studio untuk men-debug kode native. Secara default, LLDB
akan diinstal bersama Android Studio.
Halaman ini menjelaskan cara menginstal komponen tersebut secara otomatis, atau dengan menggunakan
Android Studio atau alat sdkmanager untuk mendownload dan menginstalnya secara manual.
Menginstal NDK dan CMake secara otomatis
Plugin Android Gradle 4.2.0+ dapat otomatis menginstal NDK dan CMake yang diperlukan
saat pertama kali Anda membuat project jika lisensinya telah diterima terlebih dahulu.
Jika telah membaca dan menyetujui persyaratan lisensi, Anda dapat menerima lisensi di awal
dalam skrip dengan perintah berikut:
Saat Anda menginstal NDK, Android Studio akan memilih NDK terbaru yang tersedia. Untuk
sebagian besar project, menginstal NDK versi default ini saja sudah cukup.
Namun, jika project Anda memerlukan satu atau beberapa versi tertentu dari NDK ini, Anda dapat
mendownload dan mengonfigurasi versi tertentu. Dengan begitu, Anda
dapat memastikan build yang dapat dibuat ulang di berbagai project yang masing-masing bergantung pada versi
tertentu dari NDK tersebut. Android Studio menginstal versi NDK di
direktori android-sdk/ndk/.
Untuk menginstal CMake dan NDK default di Android Studio, ikuti langkah berikut:
Saat project terbuka, klik Tools > SDK Manager.
Klik tab SDK Tools.
Centang kotak NDK (Side by side) dan CMake.
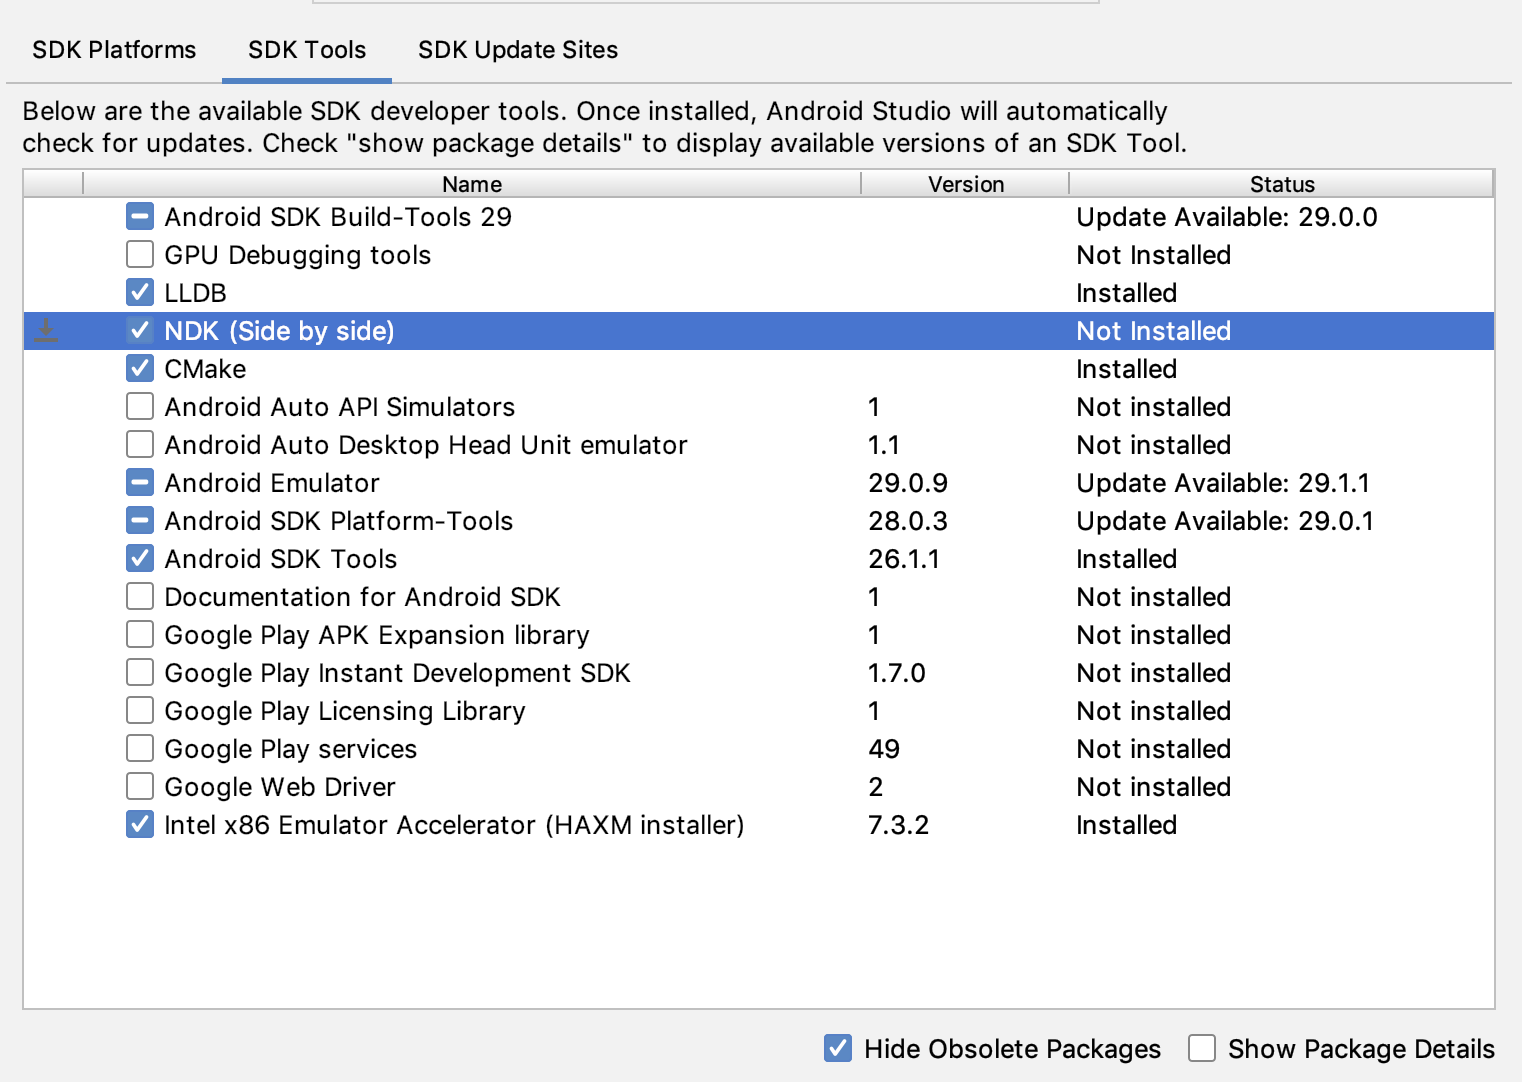
Gambar 1. Jendela SDK Tools yang menampilkan opsi NDK (Side by side)
Klik OK.
Kotak dialog menunjukkan banyaknya ruang disk yang digunakan paket NDK.
Klik OK.
Setelah penginstalan selesai, klik Finish.
Project Anda akan otomatis menyinkronkan file build dan menjalankan build.
Atasi error apa pun yang terjadi.
Mengonfigurasi versi CMake tertentu
SDK Manager menyertakan CMake versi fork 3.6.0
dan versi 3.10.2. Project yang tidak menetapkan
versi CMake tertentu akan dibuat dengan CMake 3.10.2. Untuk
menyetel versi CMake, tambahkan hal berikut ke file build.gradle modul Anda:
Tetapkan versi CMake yang akan digunakan oleh Gradle dalam
file build.gradle modul Anda.
Tambahkan jalur ke penginstalan CMake ke
variabel lingkungan PATH atau sertakan dalam
file local.properties project Anda, seperti yang ditunjukkan. Jika Gradle tidak dapat menemukan versi CMake yang Anda tetapkan dalam
file build.gradle, error build akan terjadi.
# If you set this property, Gradle no longer uses PATH to find CMake.
cmake.dir = "path-to-cmake"</pre>
Jika Anda belum menginstal sistem build Ninja di workstation
Anda, buka situs resmi Ninja,
lalu download dan instal versi terbaru Ninja yang tersedia untuk OS Anda.
Pastikan juga untuk menambahkan lokasi penginstalan Ninja ke variabel lingkungan
PATH Anda.
Menginstal NDK versi tertentu
Untuk menginstal NDK versi tertentu, lakukan langkah berikut:
Saat project terbuka, klik Tools > SDK Manager.
Klik tab SDK Tools.
Centang kotak Show Package Details.
Centang kotak NDK (Side by side) dan kotak centang di bawahnya yang
terkait dengan versi NDK yang ingin Anda instal. Android Studio akan menginstal
semua versi NDK di direktori android-sdk/ndk/
.
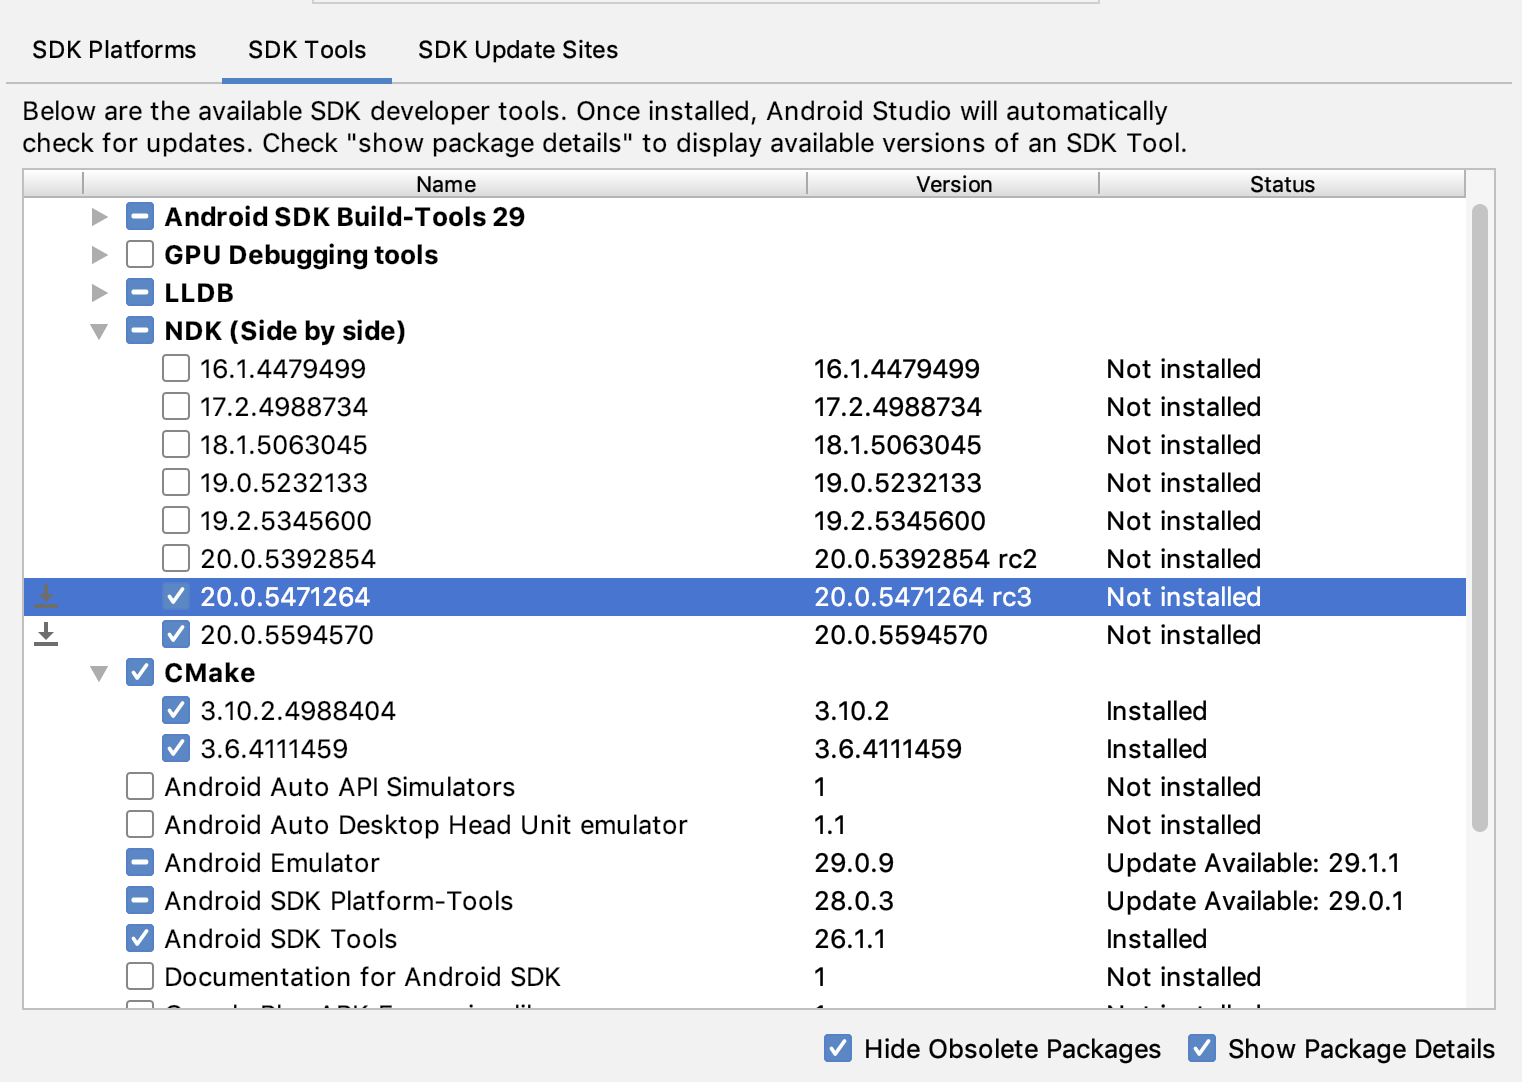
Gambar 2. Jendela SDK Tools yang menampilkan opsi NDK (Side by side)
Klik OK.
Kotak dialog menunjukkan banyaknya ruang disk yang digunakan paket NDK.
Klik OK.
Setelah penginstalan selesai, klik Finish.
Project Anda akan otomatis menyinkronkan file build dan menjalankan build.
Atasi error apa pun yang terjadi.
Konfigurasi setiap modul dengan versi NDK
yang ingin Anda gunakan. Saat menggunakan Android Studio 3.6 atau yang lebih tinggi, plugin Android Gradle
akan memilih versi yang biasanya kompatibel
jika Anda tidak menentukan versinya.
Mengonfigurasi NDK versi tertentu dalam project Anda
Anda mungkin perlu mengonfigurasi versi NDK dalam project, jika salah satu dari hal
berikut benar:
Project Anda diwariskan dan Anda perlu menggunakan versi NDK tertentu
serta plugin Android Gradle (AGP). Untuk informasi selengkapnya, lihat
Mengonfigurasi NDK untuk plugin Android Gradle.
Anda memiliki beberapa versi NDK yang diinstal dan ingin menggunakan versi
tertentu. Dalam hal ini, tetapkan versi menggunakan properti android.ndkVersion
dalam file build.gradle modul, seperti yang ditunjukkan dalam contoh kode
berikut.
Sebelum rilis, tiap versi AGP diuji secara menyeluruh dengan rilis NDK stabil terbaru pada saat itu. Versi NDK ini digunakan untuk membangun project Anda jika Anda
tidak menentukan versi NDK dalam file build.gradle. Versi NDK default
untuk berbagai versi AGP didokumentasikan dalam
catatan rilis AGP dan
catatan rilis AGP sebelumnya.
Konten dan contoh kode di halaman ini tunduk kepada lisensi yang dijelaskan dalam Lisensi Konten. Java dan OpenJDK adalah merek dagang atau merek dagang terdaftar dari Oracle dan/atau afiliasinya.
Terakhir diperbarui pada 2025-08-21 UTC.
[[["Mudah dipahami","easyToUnderstand","thumb-up"],["Memecahkan masalah saya","solvedMyProblem","thumb-up"],["Lainnya","otherUp","thumb-up"]],[["Informasi yang saya butuhkan tidak ada","missingTheInformationINeed","thumb-down"],["Terlalu rumit/langkahnya terlalu banyak","tooComplicatedTooManySteps","thumb-down"],["Sudah usang","outOfDate","thumb-down"],["Masalah terjemahan","translationIssue","thumb-down"],["Masalah kode / contoh","samplesCodeIssue","thumb-down"],["Lainnya","otherDown","thumb-down"]],["Terakhir diperbarui pada 2025-08-21 UTC."],[],[],null,["To compile and debug native code for your app, you need the following components:\n\n- The Android Native Development Kit (NDK): a set of tools that allows you to use C and C++ code with Android.\n- CMake: an external build tool that works alongside Gradle to build your native library. You do not need this component if you only plan to use ndk-build.\n- LLDB: the debugger Android Studio uses to debug native code. By default, LLDB will be installed alongside Android Studio.\n\nThis page describes how to install these components automatically, or by using\nAndroid Studio or the `sdkmanager` tool to download and install them manually.\n\nInstall NDK and CMake automatically\n\nAndroid Gradle Plugin 4.2.0+ can automatically install the required NDK and CMake\nthe first time you build your project if their licenses have been accepted in advance.\nIf you've already read and agree to the license terms, then you can pre-accept\nthe licenses in scripts with the following command: \n\n yes | ${sdk}/cmdline-tools/latest/bin/sdkmanager --licenses\n\nInstall the NDK and CMake\n\nWhen you install the NDK, Android Studio selects the latest available NDK. For\nmost projects, installing this default version of the NDK is sufficient.\nIf your project needs one or more specific versions of the NDK, though, you can\n[download and configure specific versions](#specific-version). Doing so helps\nyou ensure reproducible builds across projects that each depend on a specific\nversion of the NDK. Android Studio installs all versions of the NDK in the\n\u003cvar translate=\"no\"\u003eandroid-sdk\u003c/var\u003e`/ndk/` directory.\n\nTo install CMake and the default NDK in Android Studio, do the following:\n\n1. With a project open, click **Tools \\\u003e SDK Manager**.\n\n2. Click the **SDK Tools** tab.\n\n3. Select the **NDK (Side by side)** and **CMake** checkboxes.\n\n\n **Figure 1.** The **SDK Tools** window showing the **NDK (Side by side)**\n option\n | **Note:** If you have an NDK installed in the `ndk-bundle` folder, it appears in the list with the label **NDK** . If you are using Android Gradle plugin 3.5.0 or later, you can select this checkbox or clear it. Clearing the checkbox uninstalls the NDK, freeing up disk space, and causes the checkbox to disappear from the list. If you uninstall the legacy NDK, remove the `ndk.dir` value, which is now deprecated, from your projects' `local.properties` files.\n4. Click **OK**.\n\n A dialog box tells you how much space the NDK package consumes on disk.\n5. Click **OK**.\n\n6. When the installation is complete, click **Finish**.\n\n7. Your project automatically syncs the build file and performs a build.\n Resolve any errors that occur.\n\nConfigure a specific version of CMake\n\nThe SDK Manager includes the 3.6.0 forked version of\nCMake and version 3.10.2. Projects that don't set a\nspecific CMake version are built with CMake 3.10.2. To\nset the CMake version, add the following to your module's `build.gradle` file: \n\nGroovy \n\n```groovy\nandroid {\n ...\n externalNativeBuild {\n cmake {\n ...\n version \"\u003cvar translate=\"no\"\u003ecmake-version\u003c/var\u003e\"\n }\n }\n}\n```\n\nKotlin \n\n```kotlin\nandroid {\n ...\n externalNativeBuild {\n cmake {\n ...\n version = \"\u003cvar translate=\"no\"\u003ecmake-version\u003c/var\u003e\"\n }\n }\n}\n```\n\nIf you want to use a CMake version that is not included by the\nSDK Manager, follow these steps:\n\n1. Download and install [CMake](https://cmake.org/download/) from the official CMake website.\n2. Specify the CMake version you want Gradle to use in your module's `build.gradle` file.\n3. Either add the path to the CMake installation to your `PATH` environment\n variable or include it in your project's `local.properties` file, as\n shown. If Gradle is unable to find the version of CMake you specified in\n your `build.gradle` file, you get a build error.\n\n # If you set this property, Gradle no longer uses PATH to find CMake.\n cmake.dir = \"\u003cvar translate=\"no\"\u003epath-to-cmake\u003c/var\u003e\"\u003c/pre\u003e\n\n4. If you don't already have the Ninja build system installed on your\n workstation, go to the [official Ninja website](https://ninja-build.org/),\n and download and install the latest version of Ninja available for your OS.\n Make sure to also add the path to the Ninja installation to your\n `PATH` environment variable.\n\nInstall a specific version of the NDK\n\nTo install a specific version of the NDK, do the following:\n\n1. With a project open, click **Tools \\\u003e SDK Manager**.\n\n2. Click the **SDK Tools** tab.\n\n3. Select the **Show Package Details** checkbox.\n\n4. Select the **NDK (Side by side)** checkbox and the checkboxes below it that\n correspond to the NDK versions you want to install. Android Studio installs\n all versions of the NDK in the \u003cvar translate=\"no\"\u003eandroid-sdk\u003c/var\u003e`/ndk/`\n directory.\n\n | **Note:** Preview releases (for example, canary and beta) of the NDK do not show up in this list unless you [change the update channel](/studio/preview/install-preview#change_your_update_channel) for Android Studio. You can [install an Android Studio preview](/studio/preview/install-preview) side-by-side with the stable version.\n\n\n **Figure 2.** The **SDK Tools** window showing the **NDK (Side by side)**\n options\n | **Note:** If you have an NDK installed in the `ndk-bundle` folder, it appears in the list with the label **NDK** . If you are using Gradle version 3.5 or later, you can select this checkbox or clear it. Clearing it uninstalls the NDK installed, freeing up disk space, and cause the checkbox to disappear from the list. If you uninstall the legacy NDK, remove the `ndk.dir` value, which is now deprecated, from your projects' `local.properties` files.\n5. Click **OK**.\n\n A dialog box tells you how much space the NDK package(s) consumes.\n6. Click **OK**.\n\n7. When the installation is complete, click **Finish**.\n\n8. Your project automatically syncs the build file and performs a build.\n Resolve any errors that occur.\n\n9. [Configure each module](#apply-specific-version) with the version of the NDK\n you want it to use. When using Android Studio 3.6 or higher, if you do not\n specify the version, the Android Gradle plugin chooses a version that it is\n known to be compatible with.\n\nConfigure specific versions of the NDK in your project\n\nYou may need to configure the version of the NDK in your project if one of the\nfollowing is true:\n\n- Your project is inherited and you need to use specific versions of the NDK and the Android Gradle plugin (AGP). For more information, see [Configure the NDK for the Android Gradle plugin](/studio/projects/configure-agp-ndk).\n- You have multiple versions of the NDK installed and you want to use a specific\n one. In this case, specify the version using the `android.ndkVersion`\n property in the module's `build.gradle` file, as shown in the following code\n sample.\n\n Groovy \n\n ```groovy\n android {\n ndkVersion \"\u003cvar translate=\"no\"\u003emajor\u003c/var\u003e.\u003cvar translate=\"no\"\u003eminor\u003c/var\u003e.\u003cvar translate=\"no\"\u003ebuild\u003c/var\u003e\" // e.g., ndkVersion \"21.3.6528147\"\n }\n ```\n\n Kotlin \n\n ```kotlin\n android {\n ndkVersion = \"\u003cvar translate=\"no\"\u003emajor\u003c/var\u003e.\u003cvar translate=\"no\"\u003eminor\u003c/var\u003e.\u003cvar translate=\"no\"\u003ebuild\u003c/var\u003e\" // e.g., ndkVersion \"21.3.6528147\"\n }\n ```\n\nDefault NDK version per AGP version\n\nBefore release, each AGP version is thoroughly tested with the latest stable NDK\nrelease at that time. This NDK version is used to build your projects if you\ndon't specify an NDK version in the `build.gradle` file. The default NDK version\nfor different versions of AGP are documented in the\n[AGP release notes](/build/releases/gradle-plugin#compatibility) and\n[AGP past release notes](/build/releases/past-releases)."]]