
App resources, such as app icons, localized strings, and bitmaps, are organized
into type-specific directories inside each module's res/ directory. You can
also add alternative versions of each file that are optimized for different
device configurations, such as a high-res version of a bitmap for high-density
screens.
Android Studio helps you add new resources and alternative resources in several ways, depending on the type of resource you want to add. This page describes how to add basic resource files, how to change the location of your resources, and how resource merging works.
In Jetpack Compose, you define your UI in Kotlin rather than XML layouts.
However, you still use the res/ directory to store app-level static assets
like icons, fonts, and translations. To learn how to access these resources in
your composable functions, see Resources in Compose.
See the following pages for details about how to create specific resource types:
- To add string files, see Localize the UI with Translations Editor.
- To add bitmaps, see Create app icons.
- To add SVG files, see Add multi-density vector graphics.
For information about how to reference the resources from your app code, see App resources overview.
Add an XML resource file
Although the preceding page links describe workflows that are customized to each type of resource, you can add any XML resource file by following these steps:
- Click the target app module in the Project window in either the Android or Project view.
- Select File > New > Android resource file.
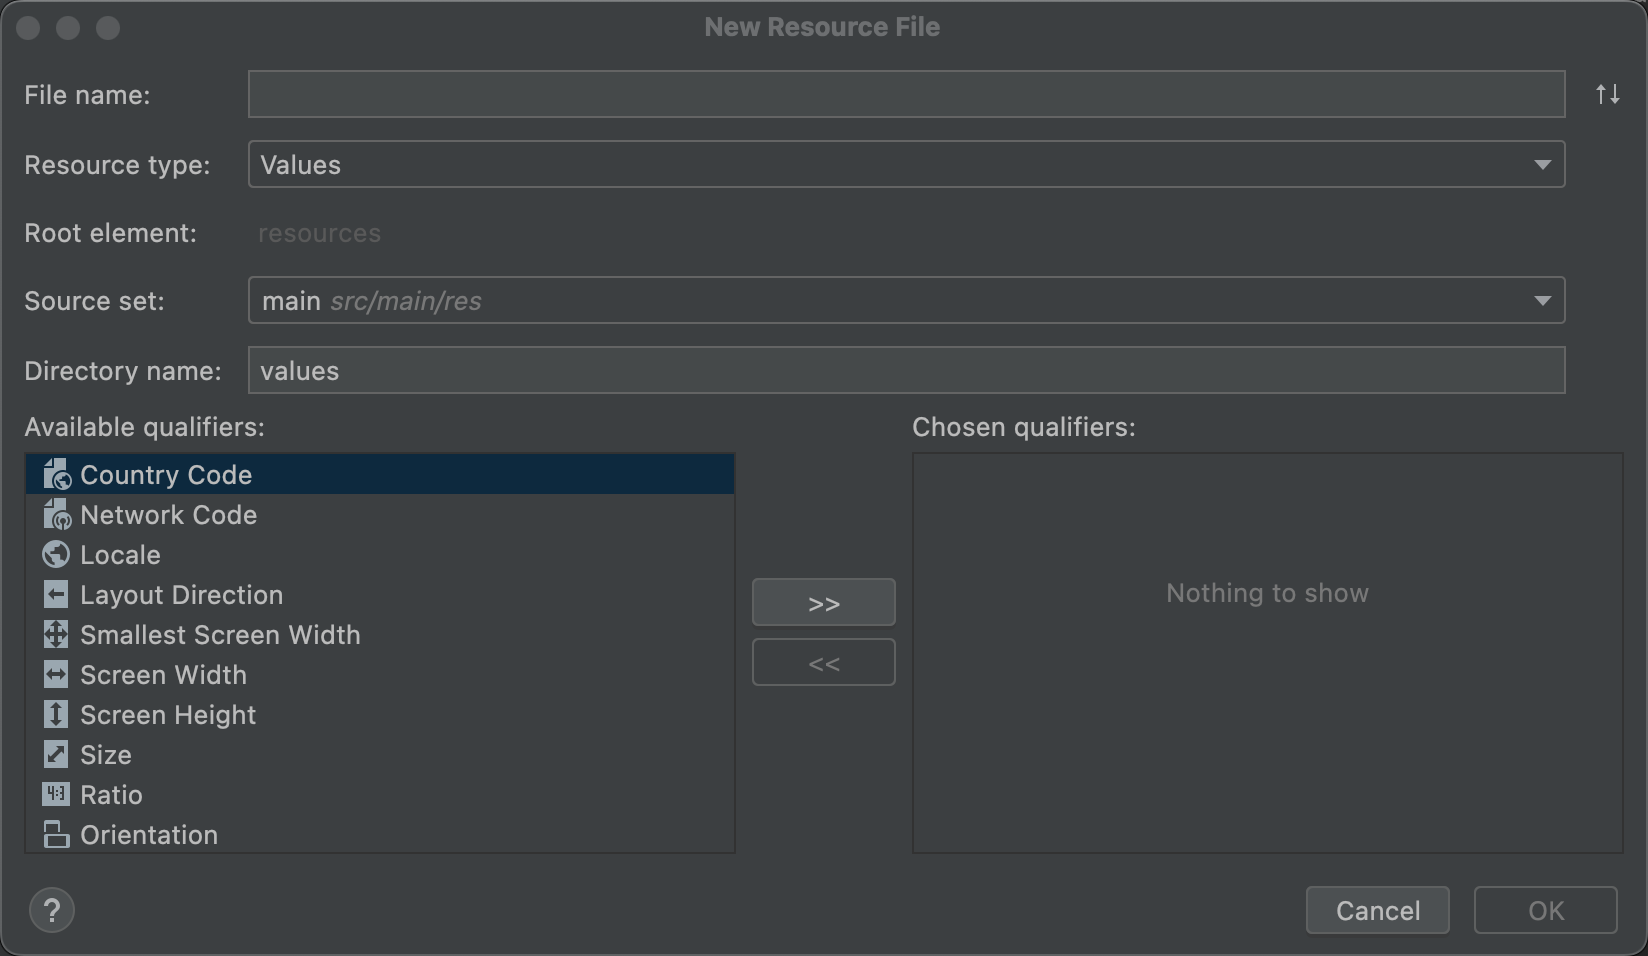
Figure 1. New Resource File dialog.
- Fill out the details in the dialog:
- File name: Enter the name for the XML file (this doesn't require the
.xmlsuffix). - Resource type: Select the type of resource you want to create.
- Root element: If applicable, select the root XML element for the file. Some resource types support only one type of root element. Depending on the resource type selected, this might not be editable.
- Source set: Select the source set where you want to save the file.
- Directory name: The directory must be named in a way that's specific to the resource type and configuration qualifiers. Don't edit this unless you want to add configuration qualifiers to the directory name manually (use Available qualifiers instead).
- Available qualifiers: Instead of manually including configuration
qualifiers in your directory name, you can add them by selecting a
qualifier from the list and clicking Add
 .
.
- File name: Enter the name for the XML file (this doesn't require the
- Once you've added all the qualifiers you want, click OK.
Inline complex XML resources
Some complex resources require multiple XML resource files. For example, while Compose has robust animation APIs, you might need to use an animated vector drawable, which has a vector drawable object and an animation object and requires at least three XML files.
In this example, you can create and keep the three separate XML files if you need to reuse one or more of them. But if the XML files are used only for this animated vector drawable, you can instead use the inline resource format provided in the Android Asset Packaging Tool (AAPT). With AAPT, you can define all three resources in one XML file. For more information, see Inline complex XML resources.
Add a resource directory
To add a new resource directory, follow these steps:
- Click the target app module in the Project window.
- Select File > New > Android resource directory.

Figure 2. New Resource Directory dialog.
- Fill in the details in the dialog:
- Directory name: The directory must be named in a way that's specific to the resource type and combination of configuration qualifiers. Don't edit this unless you want to add configuration qualifiers to the directory name manually (use Available qualifiers instead).
- Resource type: Select the type of resource you want the directory to contain.
- Source set: Select the source set where you want the directory.
- Available qualifiers: Instead of manually including configuration
qualifiers in your directory name, you can add them by selecting a
qualifier from the list and clicking Add .
- Once you've added all the qualifiers you want, click OK.
Change your resource directory
By default, your resources are located in
module-name/src/source-set-name/res/.
For example, resources for your module's main source set are in src/main/res/,
and resources for the debug source set are in src/debug/res/.
However, you can change these paths to any other
location (relative to the build.gradle file) with the res.srcDirs property
in the sourceSets block. For example:
Groovy
android {
    sourceSets {
        main {
            res.srcDirs = ['resources/main']
        }
        debug {
            res.srcDirs = ['resources/debug']
        }
    }
}
Kotlin
android {
    sourceSets {
        getByName("main") {
            res.srcDirs("resources/main")
        }
        getByName("debug") {
            res.srcDirs("resources/debug")
        }
    }
}
You can also specify multiple resource directories for one source set, and then the build tools merge them together. For example:
Groovy
android {
    sourceSets {
        main {
            res.srcDirs = ['res1', 'res2']
        }
    }
}
Kotlin
android {
    sourceSets {
        main {
            res.srcDirs("res1", "res2")
        }
    }
}
For more information, read about source sets.
Resource merging
Resources in your final app file can come from three sources:
- The main source set (generally located in
src/main/res/) - Build variant source sets
- Android libraries (AARs)
When all resources from each source set or library are unique, they're all added into the final app. A resource is considered unique if its filename is unique within both its resource type directory and the resource qualifier (if defined).
If there are two or more matching versions of the same resource, then only one version is included in the final app. The build tools select which version to keep based on the following priority order (highest priority on the left):
build variant > build type > product flavor > main source set > library dependencies
For example, if the main source set contains:
res/values/strings.xmlres/values-es/strings.xml
And the debug build type contains:
res/values/strings.xml
Then the final app includes res/values/strings.xml from the debug build type
and res/values-es/strings.xml from the main source set.
However, if your build configuration specifies multiple resource folders for a given source set and there are conflicts between those sources, an error occurs and the merge fails because each resource directory has the same priority.