
Add C and C++ code to your Android project by placing the code into a
cpp directory in your project module. When you build your project, this
code is compiled into a native library that Gradle can package with your app.
Your Java or Kotlin code can then call functions in your native library
through the Java Native Interface (JNI). To learn more about using the JNI
framework, read JNI tips for
Android.
Android Studio supports CMake, which is useful for cross-platform projects.
Android Studio also supports ndk-build, which
can be faster than CMake but only supports Android. Using both CMake and
ndk-build in the same module is not currently supported.
To import an existing ndk-build library into your Android Studio
project, learn how to
link Gradle to your native library project.
This page shows you how to set up Android Studio with the necessary build tools, create a new project with C/C++ support, and add new C/C++ files to your project.
If instead you want to add native code to an existing project, follow these steps:
-
Create new native source files and add the
files to your Android Studio project.
- Skip this step if you already have native code or want to import a prebuilt native library.
-
Configure CMake to
build your native source code into a library. This build script is required
if you are importing and linking against prebuilt or platform
libraries.
- If you have an existing native library that already has a
CMakeLists.txtbuild script or usesndk-buildand includes anAndroid.mkbuild script, skip this step.
- If you have an existing native library that already has a
-
Configure
Gradle by providing a path to your CMake or
ndk-buildscript file. Gradle uses the build script to import source code into your Android Studio project and package your native library into the app.
Once you configure your project, access your native functions from
Java or Kotlin code using the JNI framework. To build and run your app,
click Run  .
.
Note: If your existing project uses the deprecated
ndkCompile tool, migrate to using either CMake or
ndk-build.
Download the NDK and build tools
To compile and debug native code for your app, you need the following components:
- The Android Native Development Kit (NDK): a toolset that lets you use C and C++ code with Android. NDK provides platform libraries that let you manage native activities and access physical device components, such as sensors and touch input.
-
CMake: an
external build tool that works alongside Gradle to build your native
library. You don't need this component if you only plan to use
ndk-build. - LLDB: the debugger in Android Studio that debugs native code.
For information on installing these components, see Install and configure the NDK and CMake.
Create a new project with C/C++ support
To create a new project with support for native code, the process is similar to creating any other Android Studio project, but with an additional step:
- In the Choose your project section of the wizard, select the Native C++ project type.
- Click Next.
- Complete all other fields in the next section of the wizard.
- Click Next.
-
In the Customize C++ Support section of the wizard, you can customize
your project with the C++ Standard field.
- Use the drop-down list to select which standardization of C++ you want to use. Selecting Toolchain Default uses the default CMake setting.
- Click Finish.
After Android Studio finishes creating your new project, open the Project pane from the left side of the IDE and select the Android view from the menu. As shown in figure 1, Android Studio adds the cpp group:
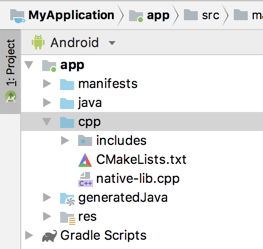
Figure 1. Android view groups for your native sources and external build scripts.
Note: This view does not reflect the actual file hierarchy on disk, but groups similar files to simplify navigating your project.
The cpp group is where you can find all the native
source files, headers, build scripts for CMake or ndk-build, and prebuilt
libraries that are a part of your project. For new projects, Android Studio
creates a sample C++ source file, native-lib.cpp, and places it
in the src/main/cpp/ directory of your app module. This sample
code provides a simple C++ function, stringFromJNI(), that
returns the string "Hello from C++". Learn how to add additional
source files to your project in the section about how to
create new native source files.
Similar to how build.gradle files instruct Gradle how to build
your app, CMake and ndk-build require a build script to know how to build
your native library. For new projects, Android Studio creates a CMake build
script,CMakeLists.txt, and places it in your module’s root directory.
To learn more about the contents of this build script, read
Configure CMake.
Build and run the sample app
When you click Run , Android Studio
builds and launches an app that displays the text "Hello from C++" on your
Android device or emulator. The following overview describes the events that
occur to build and run the sample app:
- Gradle calls on your external build script,
CMakeLists.txt. - CMake follows commands in the build script to compile a C++ source
file,
native-lib.cpp, into a shared object library and names itlibnative-lib.so. Gradle then packages it into the app. - During runtime, the app's
MainActivityloads the native library usingSystem.loadLibrary(). The library’s native function,stringFromJNI(), is now available to the app. -
MainActivity.onCreate()callsstringFromJNI(), which returns"Hello from C++"and uses it to update theTextView.
To verify that Gradle packages the native library in the app, use the APK Analyzer:
- Select Build > Build Bundles(s) / APK(s) > Build APK(s).
- Select Build > Analyze APK.
- Select the APK or AAB from the
app/build/outputs/directory and click OK. - As shown in figure 2, you can see
libnative-lib.soin the APK Analyzer window underlib/<ABI>/.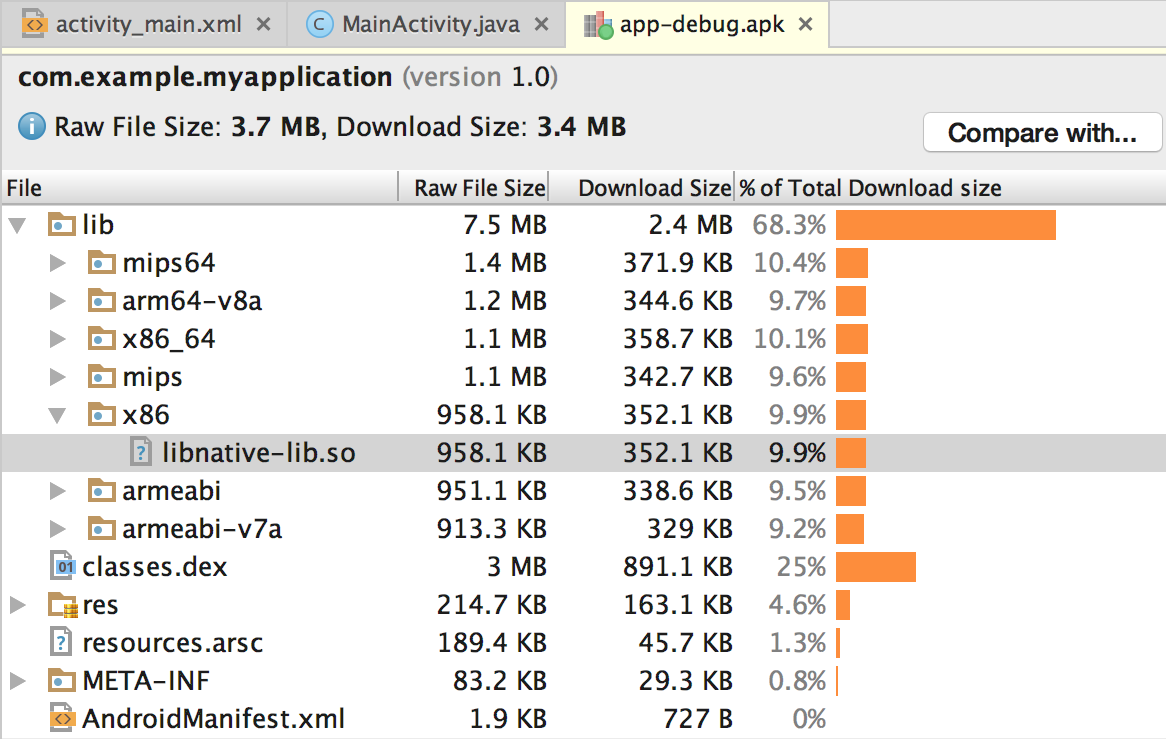
Figure 2. Locate a native library using the APK Analyzer.
Tip: If you want to experiment with other Android apps that use native code, click File > New > Import Sample and select a sample project from the Ndk list.
Create new C/C++ source files
To add new C/C++ source files to an existing project, proceed as follows:
- If you don't already have a
cpp/directory in the main source set of your app, create one as follows: - Open the Project pane in the left side of the IDE and select the Project view from the menu.
- Navigate to your-module > src.
- Right-click on the main directory and select New > Directory.
- Enter
cppas the directory name and click OK. - Right-click the
cpp/directory and select New > C/C++ Source File. - Enter a name for your source file, such as
native-lib. - From the Type menu, select the file extension
for your source file, such as
.cpp.- Click Edit File Types
 to add other file types to the menu, such as
.cxxor.hxx. In the New File Extensions dialog box that pops up, select another file extension from the Source Extension and Header Extension menus and click OK.
- Click Edit File Types
- To create a header file, select the Create an associated header checkbox.
- Click OK.
After you add new C/C++ files to you project, you still need to configure CMake to include the files in your native library.
Additional resources
To learn more about supporting C/C++ code in your app, try the following resource.
Codelabs
- Create Hello-CMake with Android Studio This codelab shows you how to use the Android Studio CMake template to start Android NDK project development.