The emulator runs best if it can use your machine’s hardware, such as the CPU, GPU, and modem, rather than running as pure software. The ability to use your machine’s hardware to improve performance is called hardware acceleration.
The emulator can use hardware acceleration to improve your experience in two main ways:
- Graphics acceleration for improved screen rendering
- Virtual machine (VM) acceleration for improved execution speed
Hardware acceleration is enabled by default on most machines. If it isn't enabled on your machine, this page describes how you can configure graphics and virtual machine (VM) acceleration to get higher performance from the emulator.
Configure graphics acceleration
Android devices use OpenGL for Embedded Systems (OpenGL ES or GLES) and Vulkan APIs for rendering graphics on the screen. Graphics acceleration enables using your computer's hardware (typically the GPU) to make rendering faster. While hardware acceleration is recommended for performance, you might need to use software mode if your computer is not compatible due to graphics driver support or missing system image requirements.
When you create an Android Virtual Device (AVD) in the AVD Manager, you can specify whether the emulator uses hardware or software rendering. In the automatic mode, the emulator decides whether to use hardware or software graphics acceleration based on your computer. You can also override the setting if you start the emulator from the command line.
Configure graphics acceleration in the AVD Manager
To configure graphics acceleration for an AVD, follow these steps:
- Open the Device Manager.
- Create a new AVD or edit an existing AVD.
- In the Configuration window, find the Emulated Performance section under the Additional Settings tab.
- Select a value for the Graphics acceleration option.
- Click Finish.
Configure graphics acceleration from the command line
To specify a graphics acceleration type when you run an AVD from the command
line, include the -gpu option, as shown in the following example:
emulator -avd avd_name -gpu mode [{-option [value]} ... ]
The value of mode can be set to one of the following
options:
auto: Let the emulator choose between hardware or software graphics acceleration based on the AVD, computer setup and quality metrics. This is the recommended mode for most users.host: Use the GPU on your computer for hardware acceleration. This option typically provides the highest graphics quality and performance for the emulator and can enable MoltenVK on macOS for accelerated Vulkan rendering. However, if you experience issues with graphics emulation, you might need to switch to software rendering.software: Use the most suitable software rendering backend for the AVD, requested emulation features, and quality metrics. This option is recommended if you experience issues withautoorhostmodes.lavapipe: Use software rendering with Mesa 3D drivers.swiftshader: Use software rendering with SwiftShader for GLES and Vulkan workloads.swangle: Use SwiftShader software drivers with ANGLE backend.
The following mode options are deprecated:
mesa: Deprecated in version 25.3.0.angle: Deprecated in version 27.0.2.angle_indirect: Deprecated in version 34.2.14.guest: Deprecated in version 36.4.9.swiftshader_indirect: Deprecated in version 36.4.9.swangle_indirect: Deprecated in version 36.4.9.
Configure VM acceleration
VM acceleration uses your computer's processor to significantly improve the execution speed of the emulator. A tool called a hypervisor manages this interaction using virtualization extensions that your computer's processor provides. This section outlines the requirements for using VM acceleration and describes how to set up VM acceleration on each operating system.
General requirements
To use VM acceleration with the emulator, your computer must meet the general requirements in this section. Your computer also needs to meet other requirements that are specific to your operating system.
Development environment requirements
To use VM acceleration, your development environment must meet the following requirements:
- SDK Tools: Minimum version 17; recommended version 26.1.1 or later
AVD: Required Android version is described in the table that follows.
CPU Architecture System Image Requirement X86_64 x86 or x86_64 system images for Android 2.3.3 (API level 10) and higher ARM64 arm64-v8a system images for Android 5.0 (API level 21) and higher
Virtualization extension requirements
In addition to the development environment requirements, your computer's processor must support virtualization extensions. Supported processors are:
- Intel Processors with Intel Virtualization Technology (VT-x, vmx), such as Intel Core iX and Intel Core Ultra processors
- AMD Processors with AMD-V (SVM), such as AMD Ryzen processors
- Apple silicon
Additional Requirements for Intel and AMD processors:
Second-level address translation (Intel EPT or AMD RVI) is required for Intel and AMD processors. Most modern Intel and AMD processors support second-level address translation. Only the first-generation Intel or AMD processors offering virtualization extensions may not have second-level page translations.
If you're unsure whether your processor supports the required extensions, check the specifications for your processor on the manufacturer's site. If your processor doesn't support these extensions, then you can't use VM acceleration.
Restrictions
VM acceleration has the following restrictions:
- You can't run a VM-accelerated emulator inside another VM, such as a VM hosted by VirtualBox, VMWare, or Docker. You must run a VM-accelerated emulator directly on your host computer.
- Depending on your operating system and hypervisor, you may not run software that uses another virtualization technology at the same time that you run a VM-accelerated emulator. Examples of the such software include but are not limited to virtual machine solutions, certain antivirus programs and a few anti-cheat solutions. The situation is mostly observed on Windows with Hyper-V off. Most of such software can coexist with the android emulator without any problems. But when conflicts occur, it is recommended not to run the VM-accelerated emulator at the same time with such software.
About hypervisors
VM acceleration requires a hypervisor, a tool that uses virtualization extensions provided by your computer's processor.
Without a hypervisor and VM acceleration, the emulator must translate the machine code from the VM block by block to conform to the architecture of the host computer. This process can be quite slow. With a hypervisor, when the VM and the architecture of the host computer match, the emulator can run code directly on the host processor using the hypervisor. This improvement drastically increases both the speed and performance of the emulator.
The hypervisor that works best for you depends on your computer's operating system and configuration. For more information, see one of the following sections:
- Configure VM acceleration on Windows
- Configure VM acceleration on macOS
- Configure VM acceleration on Linux
Check whether a hypervisor is installed
You can use the emulator -accel-check command-line option to check whether
a hypervisor is currently installed on your computer.
The following examples show how to use the emulator accel-check option. In
each example, Sdk is the location of the Android SDK:
Windows:
c:\Users\janedoe\AppData\Local\Android> Sdk\emulator\emulator -accel-check
accel:
0
WHPX(10.0.22631) is installed and usable.
accel
macOS:
janedoe-macbookpro:Android janedoe$ ./Sdk/emulator/emulator -accel-check
accel:
0
Hypervisor.Framework OS X Version 13.2
accel
Linux:
janedoe:~/Android$ ./Sdk/emulator/emulator -accel-check
accel:
0
KVM (version 12) is installed and usable.
Configure VM acceleration on Windows
On Windows, we recommend using the Microsoft-supplied Windows Hypervisor Platform (WHPX), which requires Windows 10 version 1803 or higher. However, Android Studio may require higher version for the Windows. In such cases, follow the Android Studio system requirements.
Windows Hypervisor Platform might not be turned on by default. In such cases, follow Configure VM acceleration using Windows Hypervisor Platform to enable it. A reboot may be required after enabling it.
Configure VM acceleration using Windows Hypervisor Platform
Before you can enable WHPX, your computer must meet the following requirements:
- Intel processors: Support for Virtualization Technology (VT-x), Extended Page Tables (EPT), and Unrestricted Guest (UG) features. VT-x must be enabled in your computer's BIOS settings.
- AMD processors: AMD Ryzen processor recommended. Virtualization or SVM must be enabled in your computer's BIOS settings.
- Android Studio 3.2 Beta 1 or higher
- Android Emulator version 27.3.8 or higher
- Windows 10 or higher
To install WHPX on Windows, follow these steps:
- From the Windows desktop, click the Windows icon to open the Start Menu.
Using the search bar, type in Turn Windows features on or off.
The Turn Windows features on or off control panel should appear, and be selected.
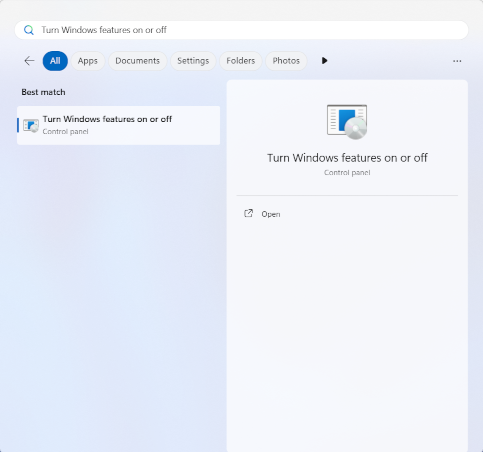
Press the Enter key, or click Turns Windows Features on or off, to launch the control panel.
Check the box next to Windows Hypervisor Platform.
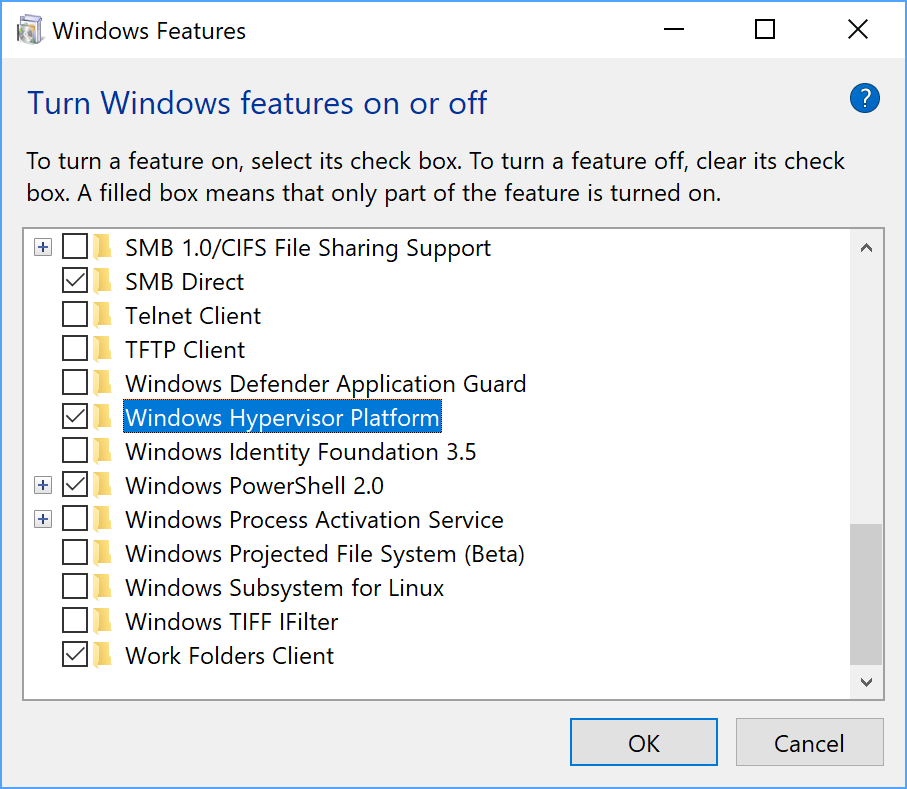
Click OK.
Once the installation has finished, restart your computer.
Configure VM acceleration using Android Emulator hypervisor driver (AEHD) on Windows
Before you can install and use the Android Emulator hypervisor driver, your computer must meet the following requirements:
- Intel or AMD processors with virtualization extension.
64-bit Windows 11 or Windows 10 (32-bit Windows is not supported)
Windows 8.1, Windows 8 and Windows 7 users can continue using AEHD 1.7 or lower. However, there will be no support provided for such scenarios.
Features which also use the Windows Hyper-V Hypervisor must be disabled in the Windows Features Dialog.
Certain Windows components also activate and use the Windows Hyper-V Hypervisor, even when the Windows Hypervisor Platform is not selected in the Windows Features Dialog. These include security features such as Hyper-V, Core Isolation, and others. (Note that the Hyper-V feature is NOT the same as the Hyper-V Hypervisor.) If you need these features, use WHPX instead.
On AMD Processors, the Android Emulator hypervisor driver can be installed via the SDK Manager in Android Studio 4.0 Canary 5 or later.
On Intel Processors, the Android Emulator hypervisor driver can be installed via the SDK Manager in Android Studio Flamingo or later.
To install from the SDK Manager, follow these steps:
- Select Tools > SDK Manager.
- Click the SDK Tools tab and select Android Emulator hypervisor driver.
- Click OK to download and install the Android Emulator hypervisor driver.
After installation, confirm that the driver is operating correctly using the following command-line command:
AEHD 2.1 and higher
sc query aehdA status message includes the following information:
SERVICE_NAME: aehd
       ...
       STATE              : 4  RUNNING
       ...
The following error message means either that virtualization extension is not enabled in your BIOS or that Hyper-V is not disabled:
SERVICE_NAME: aehd
       ...
       STATE              : 1  STOPPED
       WIN32_EXIT_CODE    : 4294967201 (0xffffffa1)
       ...
AEHD 2.0 and lower
sc query gvmA status message includes the following information:
SERVICE_NAME: gvm
       ...
       STATE              : 4  RUNNING
       ...
The following error message means either that virtualization extension is not enabled in your BIOS or that Hyper-V is not disabled:
SERVICE_NAME: gvm
       ...
       STATE              : 1  STOPPED
       WIN32_EXIT_CODE    : 4294967201 (0xffffffa1)
       ...
The Android Emulator hypervisor driver can also be downloaded and installed from
GitHub.
After unpacking the driver package, run silent_install.bat at a command line
with administrator privileges.
Uninstall Android Emulator hypervisor driver using the following commands at a command line with administrator privileges:
AEHD 2.1 and higher
   sc stop aehd
   sc delete aehd
AEHD 2.0 and lower
   sc stop gvm
   sc delete gvm
Configure VM acceleration on macOS
On macOS, the Android Emulator uses the built-in Hypervisor.Framework, which requires the macOS v10.10 (Yosemite) and higher. However, Android Studio may require higher version for the macOS. In such cases, follow the Android Studio system requirements.
Configure VM acceleration on Linux
Linux-based systems support VM acceleration through the KVM software package. Follow the instructions for installing KVM on your Linux system, and then verify that KVM is enabled. For Ubuntu systems, see Ubuntu KVM Installation.
Requirements
Running KVM requires specific user permissions. Make sure that you have sufficient permissions as specified in the KVM installation instructions.
To use VM acceleration on Linux, your computer must also meet these requirements:
- For Intel processors: Support for Virtualization Technology (VT-x), Intel EM64T (Intel 64) features, and Execute Disable (XD) Bit functionality enabled.
- For AMD processors: Support for AMD Virtualization (AMD-V).
Check whether KVM is installed on Linux
You can use the emulator -accel-check
command-line option to check whether you have KVM installed. Alternatively,
you can install the cpu-checker package containing the kvm-ok command.
The following example shows how to use the kvm-ok command:
Install the
cpu-checkerpackage:sudo apt-get install cpu-checker egrep -c '(vmx|svm)' /proc/cpuinfo
An output of 1 or greater means that virtualization is supported. An output of 0 means that your CPU doesn't support hardware virtualization.
Run the
kvm-okcommand:sudo kvm-ok
Expected output:
INFO: /dev/kvm exists
KVM acceleration can be used
If you get the following error, it means that you can still run virtual machines. However, your virtual machine is slower without the KVM extensions.
INFO: Your CPU does not support KVM extensions
KVM acceleration can NOT be used
Install KVM on Linux
Use the following command to install KVM:
Cosmic (18.10) or later:
sudo apt-get install qemu-kvm libvirt-daemon-system libvirt-clients bridge-utils
Lucid (10.04) or later:
sudo apt-get install qemu-kvm libvirt-bin ubuntu-vm-builder bridge-utils
Karmic (9.10) or earlier:
sudo aptitude install kvm libvirt-bin ubuntu-vm-builder bridge-utils
Guide for Intel HAXM Uninstallation
HAXM is deprecated for quite some time (01/2023) as Intel discontinues development of HAXM.
Starting from emulator 36.2.x.x, the Android Emulator won't use HAXM anymore, and in case you were using it before, we will need to install a new hypervisor driver. We would recommend using the Windows Hypervisor Platform (WHPX) from Microsoft.
It is recommended to remove Intel HAXM completely from your Windows system, unless you have other software installed that depends on HAXM and you choose to keep Intel HAXM and manage it on your own.
To uninstall Intel HAXM, follow these steps:
Check whether Intel HAXM is installed
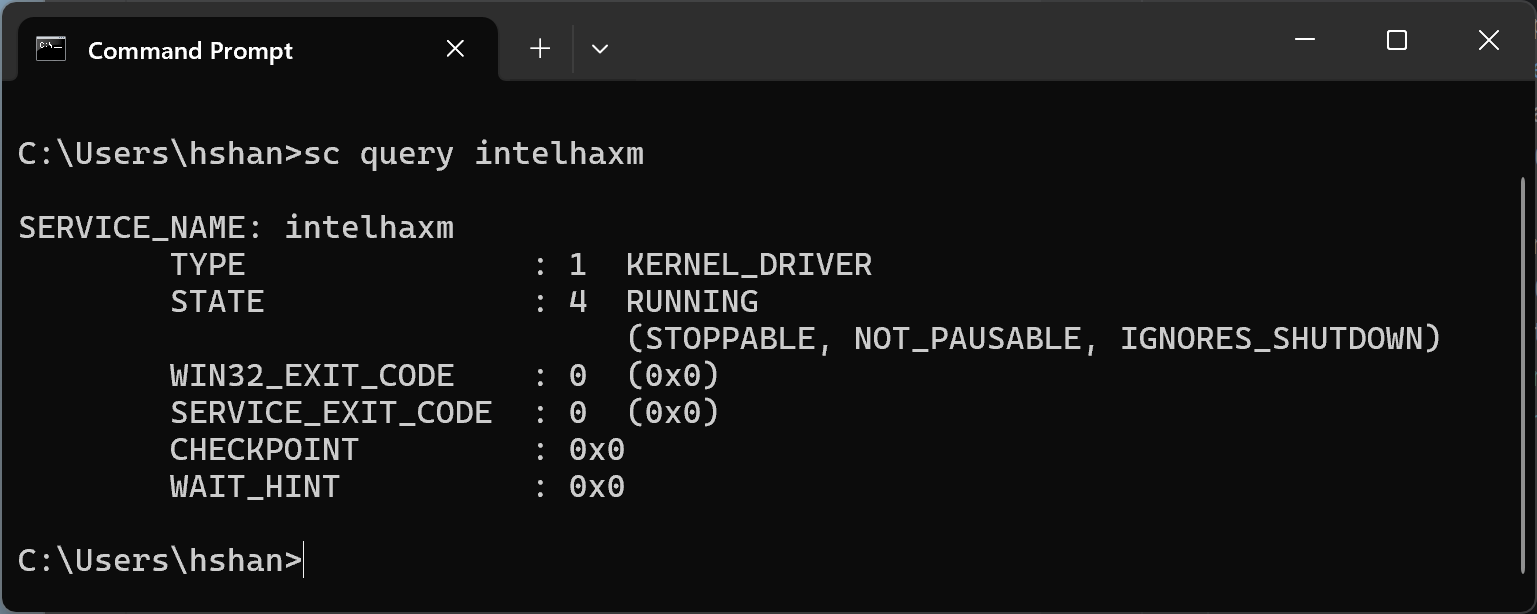
To determine whether Intel HAXM is installed on your Windows system, open a Windows command console and run the following command:
sc query intelhaxm
If Intel HAXM is installed and running, you should see the following message
in the command output.
If Intel HAXM is installed but disabled, you should see the following message
in the command output.
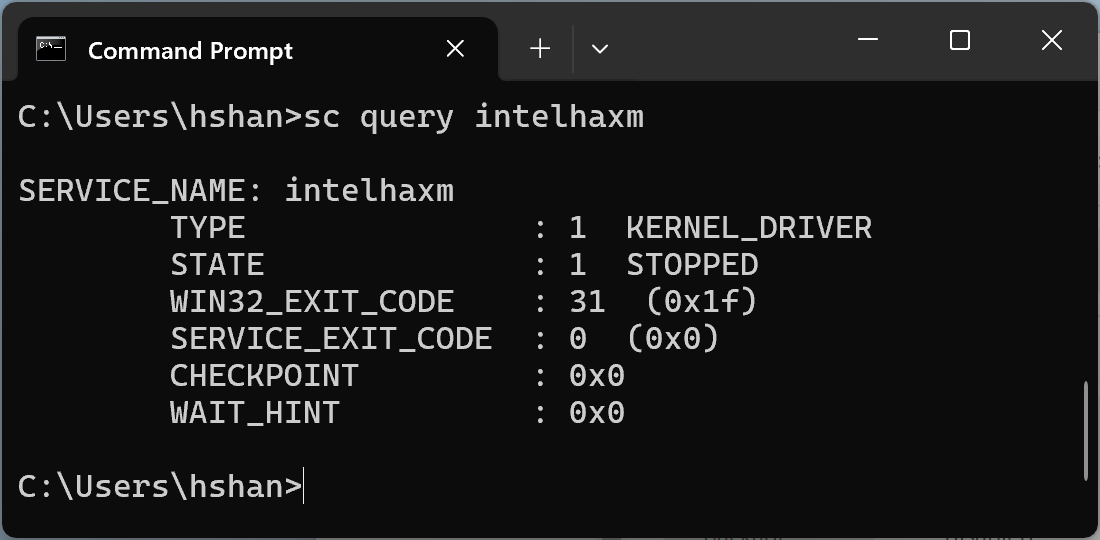
In both cases, regardless whether Intel HAXM is running or disabled, it is installed. You need to go to the next step to continue to uninstall Intel HAXM.
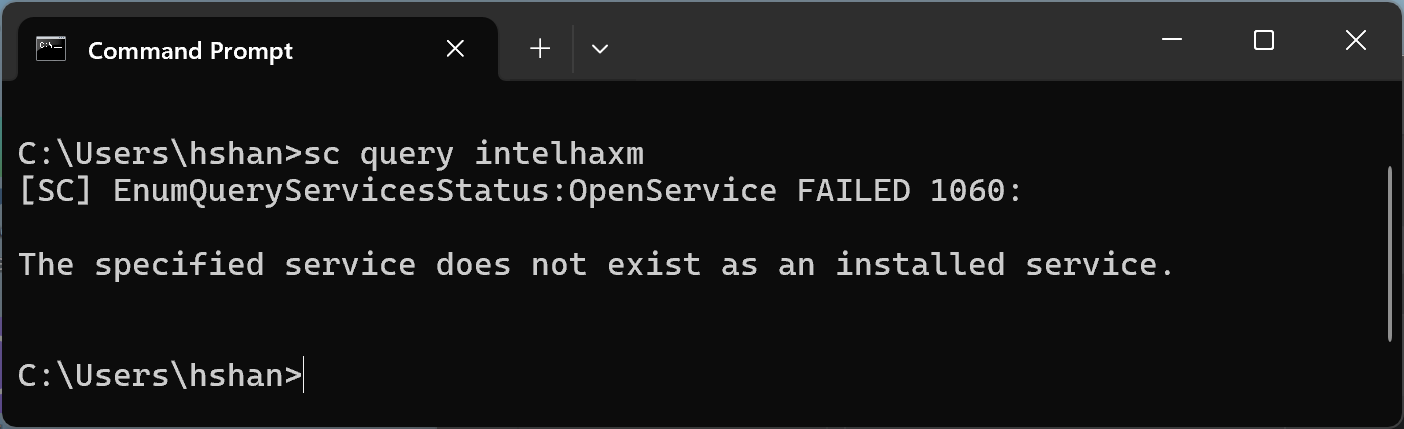
If Intel HAXM is not installed, you should see the following message.
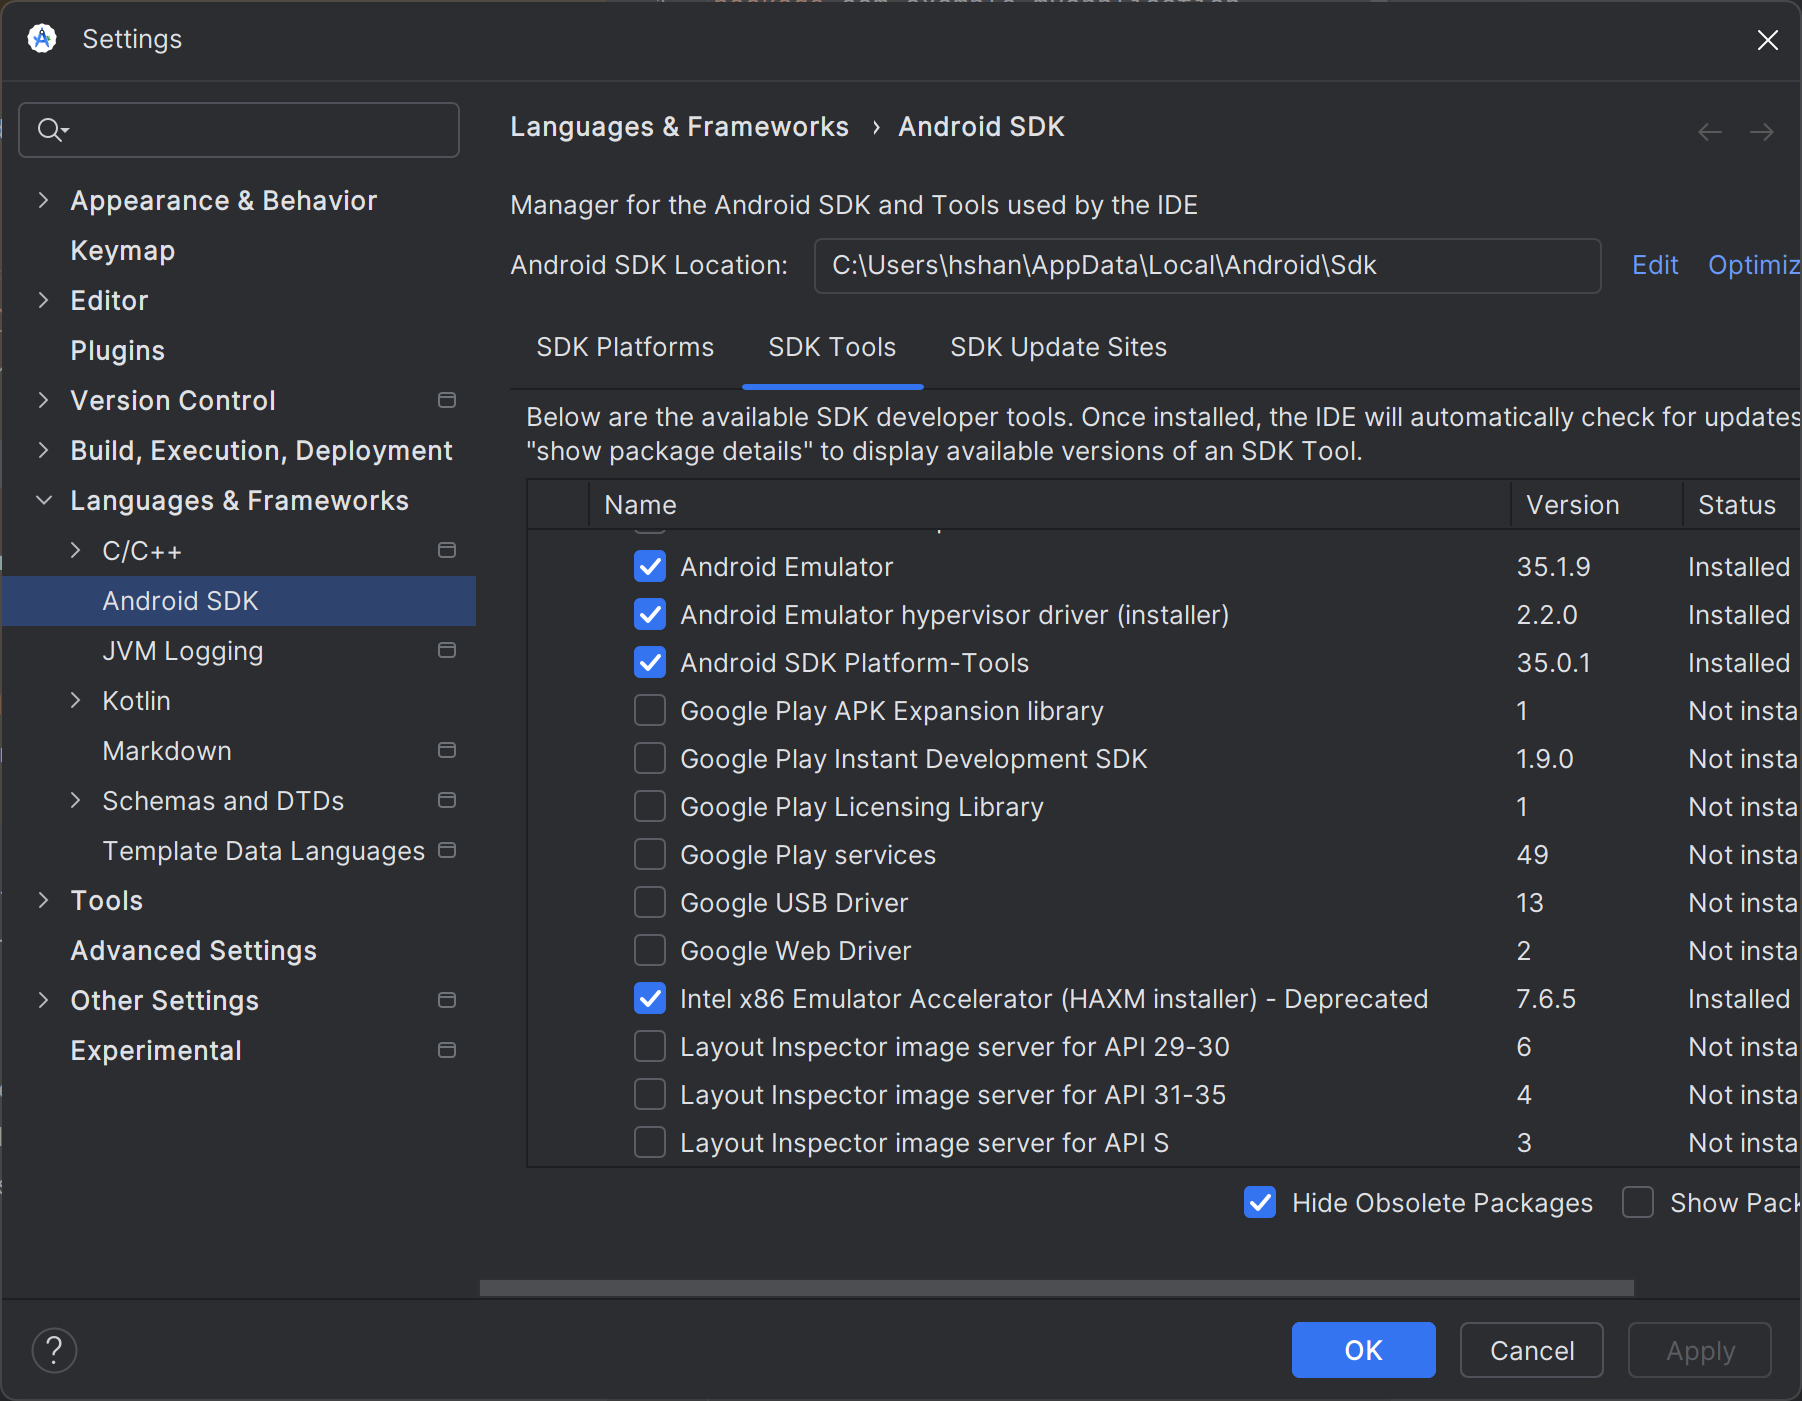
Uninstall Intel HAXM using SDK manager from the Android Studio
If you had installed in the past HAXM with the SDK Manager, you should still see
the module listed in the "SDK Tools" tab.
Open the SDK manager from the Android Studio, get to the "SDK Tools" tab, then
navigate to the "Intel x86 Emulator Accelerator (HAXM installer) - Deprecated"
line. It should look like the following screenshot.
Clear the checkbox as shown in the following screenshot.
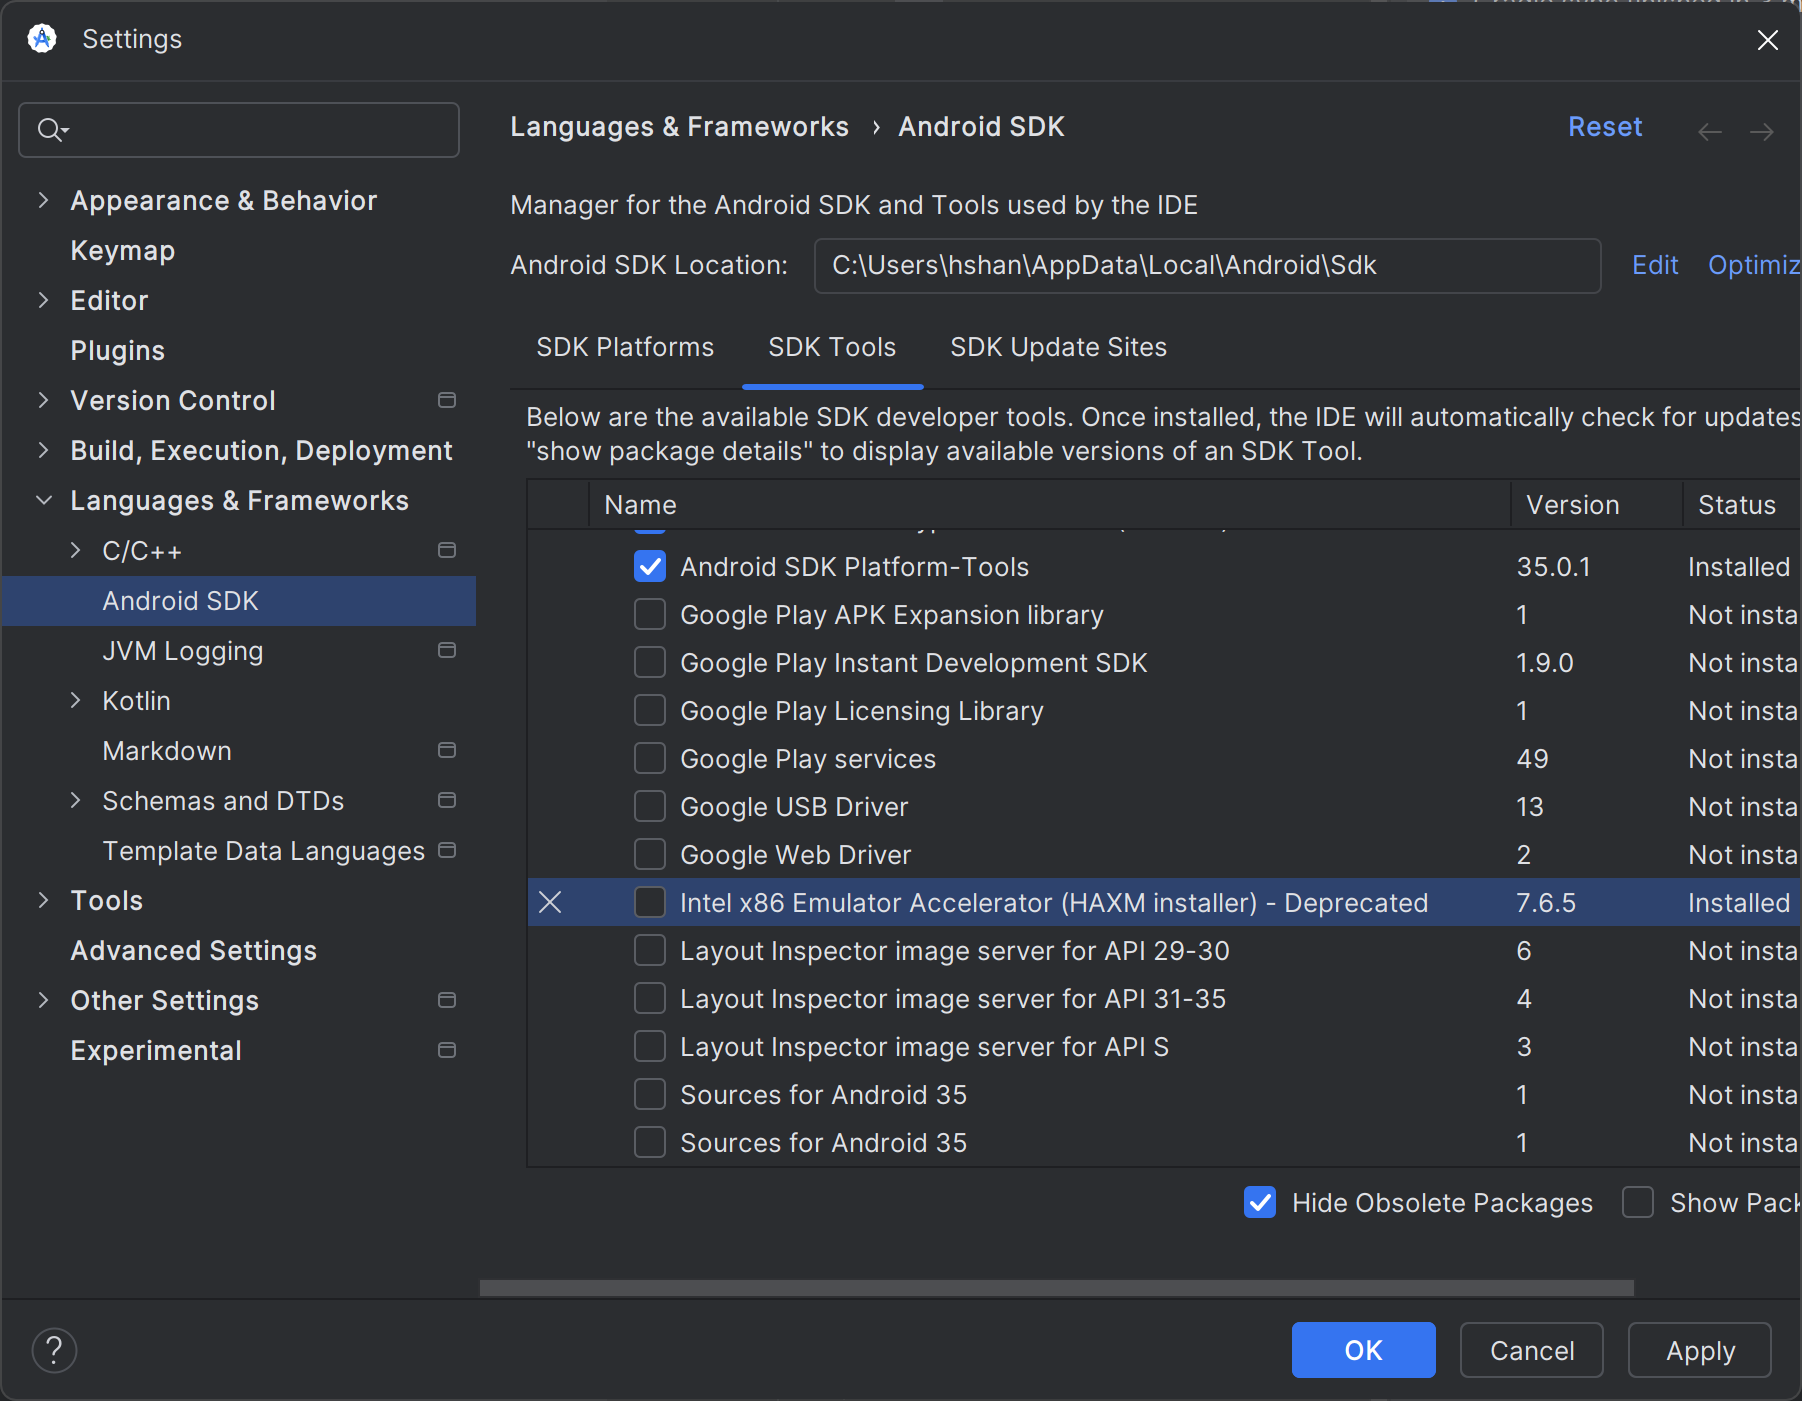
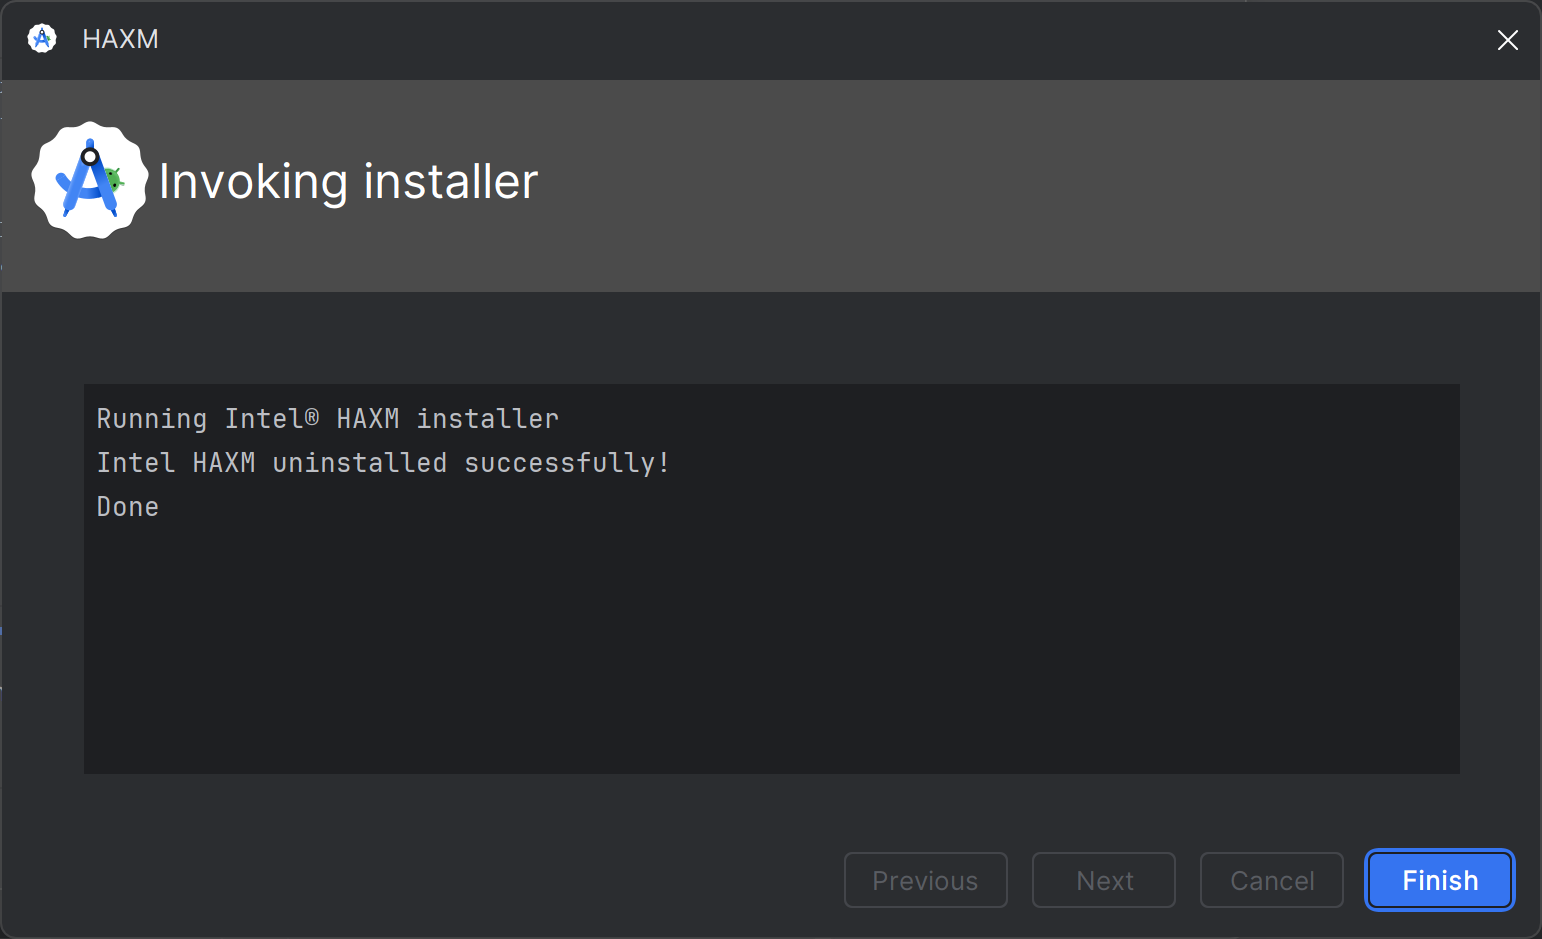
Click "Apply" button and the following dialog should pop up.
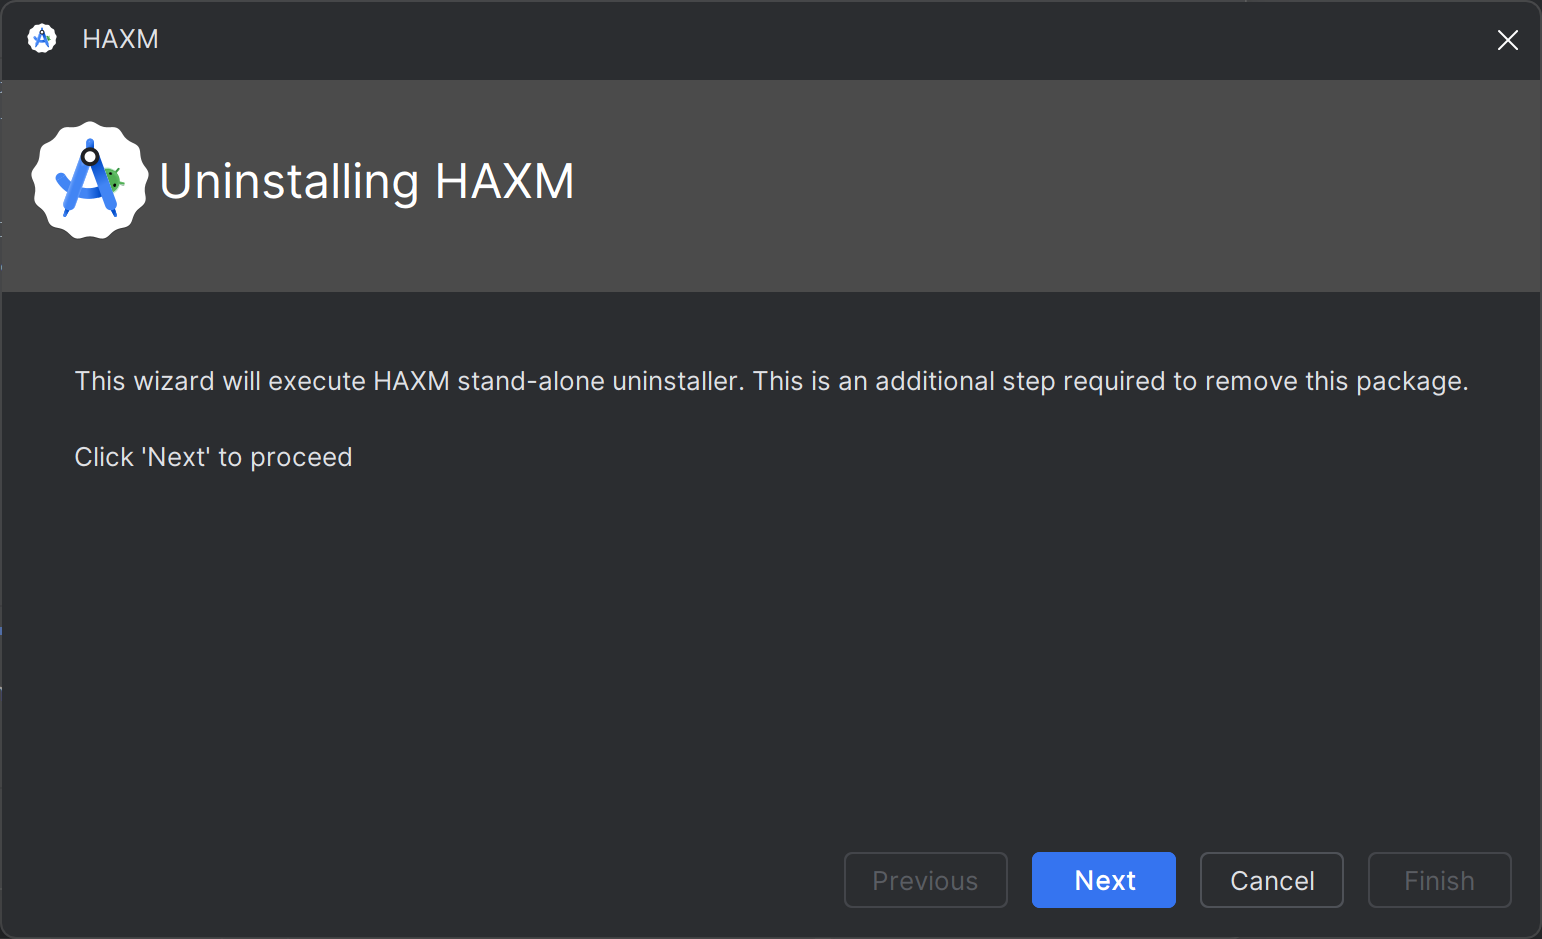
When Intel HAXM is successfully uninstalled, you should see the following.
Uninstallation is done and you can stop here.
In case of any errors, continue to the next step.
Uninstall Intel HAXM using Windows "settings".
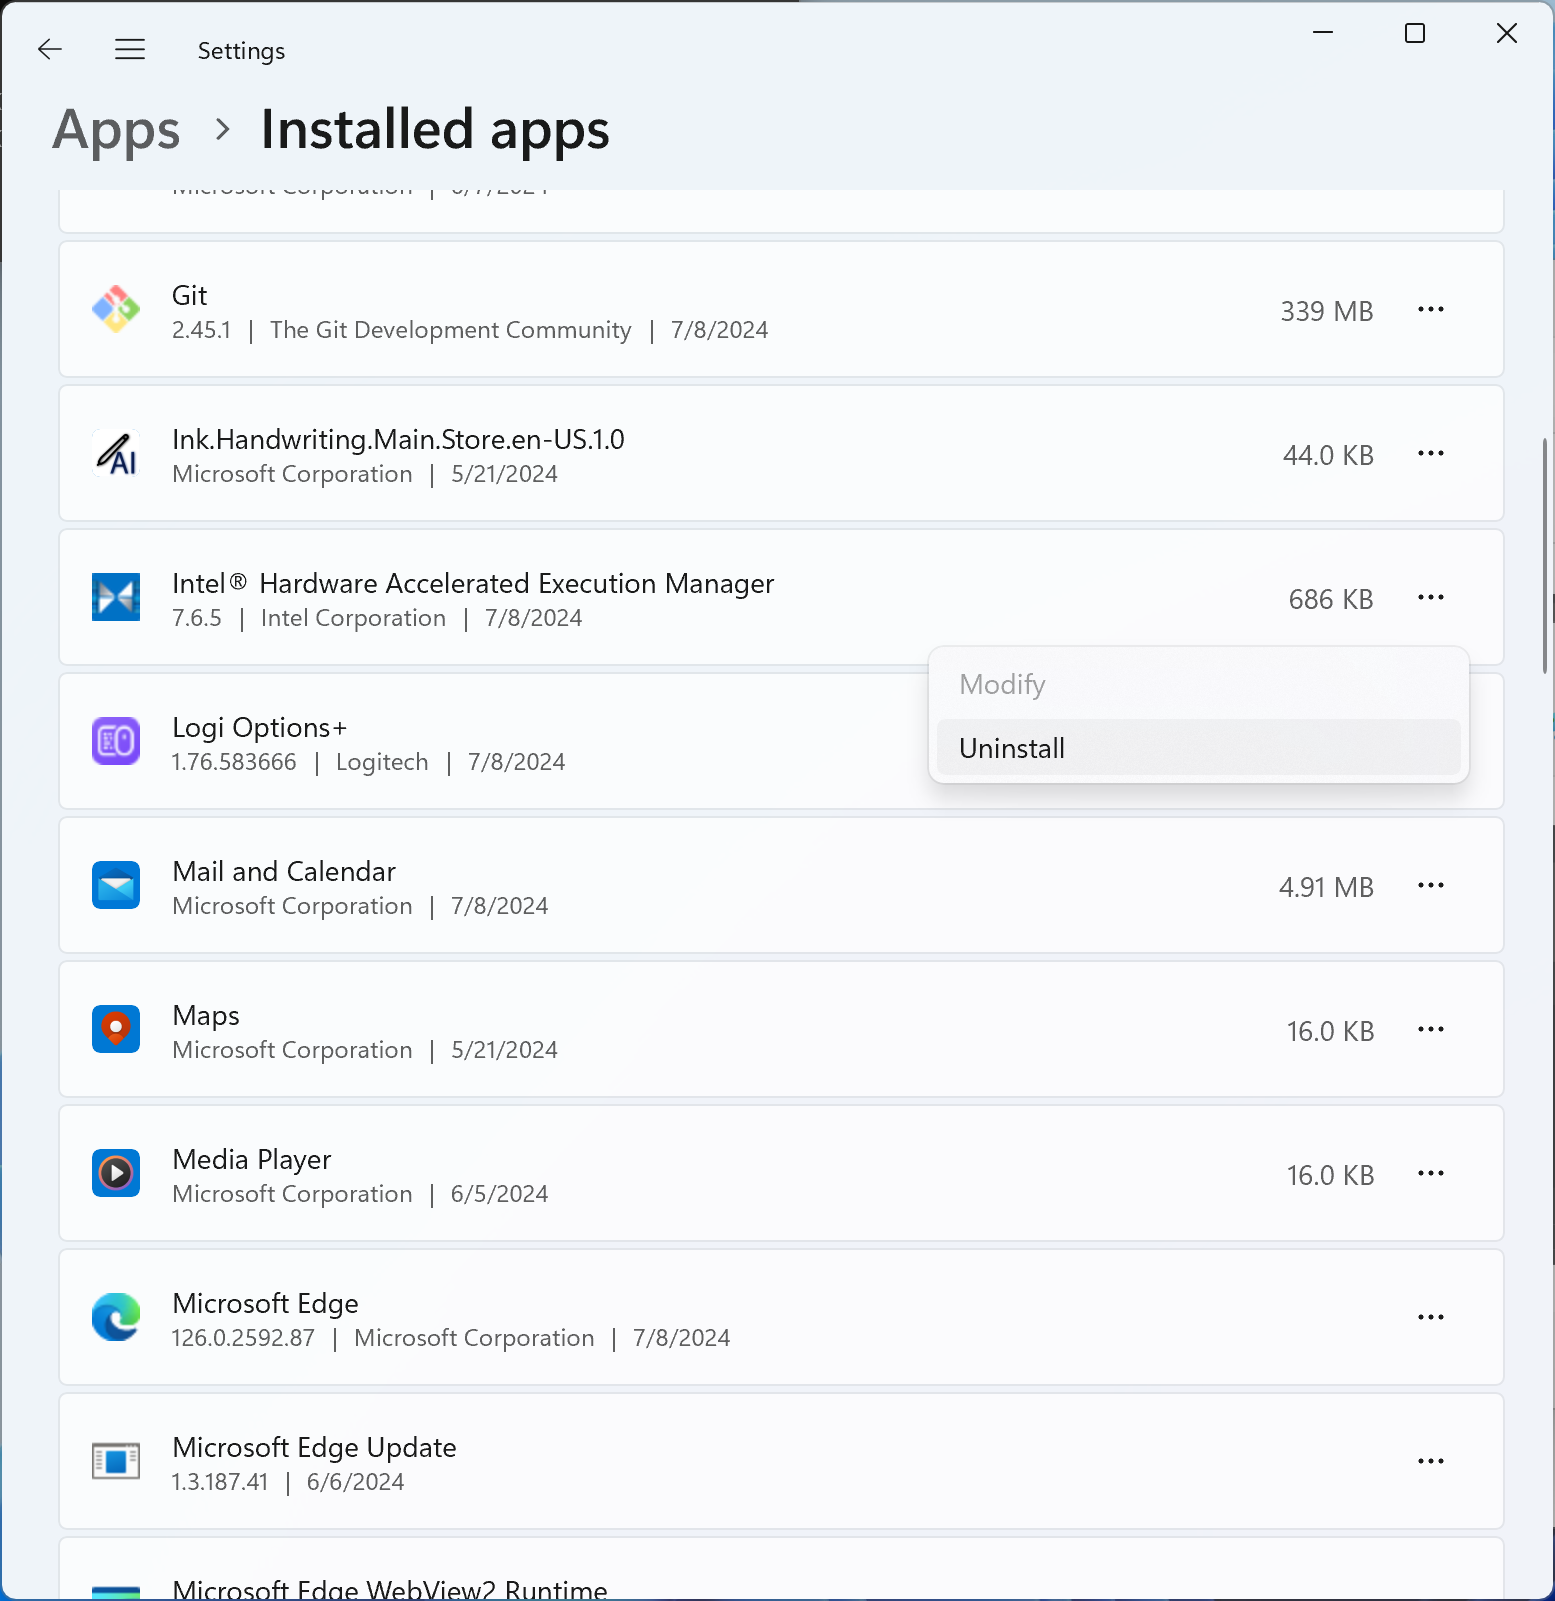
Open Windows "settings" and navigate to "Apps > Installed apps".
Locate the "Intel Hardware Accelerated Execution Manager" entry and click
"Uninstall", as shown in the following screenshot.
The Intel HAXM uninstaller should run and report the result. If the uninstallation is successful, go to Delete Intel HAXM installer package. Otherwise, continue to the next step.
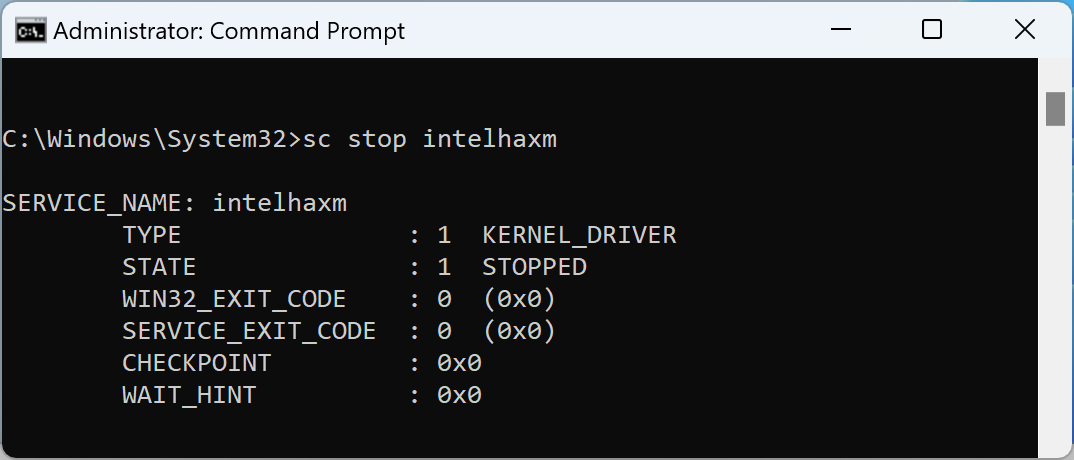
Uninstall using command line
Stop Intel HAXM service by running 'sc stop intelhaxm'. You should see the following output.
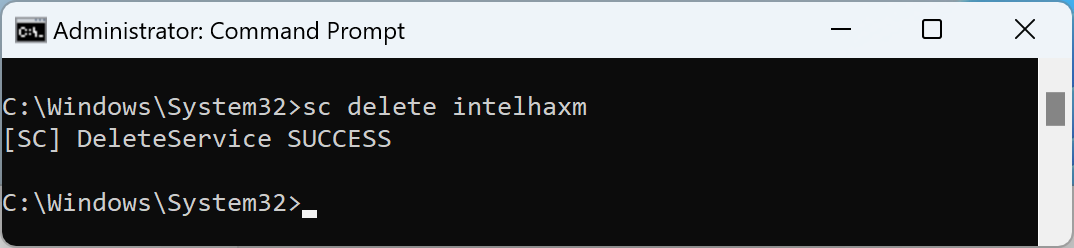
Delete Intel HAXM service by running 'sc delete intelhaxm'. You should see the following output.
Go to Delete Intel HAXM installer package.
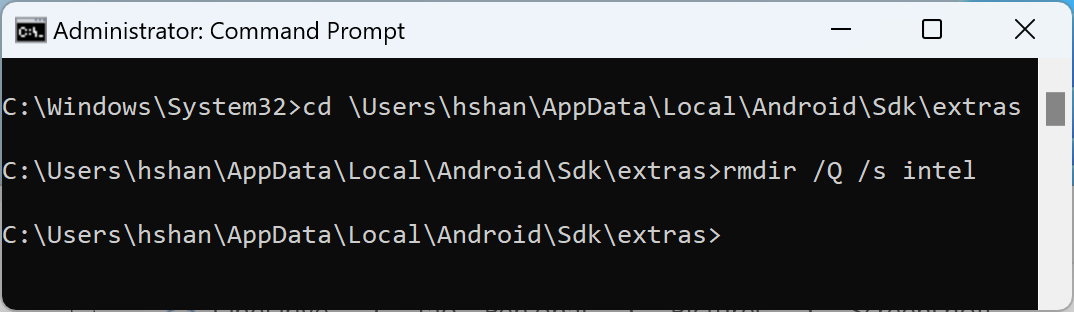
Delete Intel HAXM installer package.
This step is only required when uninstalling Intel HAXM using Windows "settings" or command line. Without this step, the SDK manager of the Android Studio may continue listing Intel HAXM as "Installed".
The installer package is located at<Your Android SDK folder>\extras\intel.
By default, Android SDK will be installed at "C:\Users\<Your Windows User ID
>\AppData\Local\Android\Sdk". See example in the following screenshot.