
This page describes how to download, import, and configure the Unity plugin for Android Performance Tuner.
Requirements
To use the plugin in your game, use a supported version of Unity:
- Unity version 2017.4 or later and .NET version 4.6
- To use APK Expansion files, Unity 2018.2 is required
- For improved frame pacing and GPU measurements, Unity version 2019.3.14 or later is required
- For Addressables scenes support, Unity 2019.3 or later and Addressables package 1.19.4 or later are required.
Download the plugin
Download the plugin from the
GitHub repository. Select the
.unitypackage file download.
Import the plugin
Before importing the plugin, make sure your project is using .NET version 4.6. This applies to Unity version 2018.4 and earlier (later versions of Unity contain .NET version 4.6 only).
- Select File > Build Settings. Make sure Android is selected as the current platform.
- Click the Player Settings button.
- Under Other Settings, find Scripting Runtime Version and select .NET 4.6.
The plugin is provided as a Unity Package that you can import in your project.
Select Assets > Import Package > Custom Package and select the
.unitypackage file you downloaded.
Android Performance Tuner version 1.5.1 or higher with Unity 2017
Using Android Performance Tuner version 1.5.1 or higher with Unity 2017 requires the following additional steps when importing the plugin:
- Go to the Assets/AndroidPerformanceTuner/Editor folder.
- Click the Google.Android.PerformanceTuner.Editor file to open it in the Inspector.
- Click the missing assembly reference and then click - to remove it.
Click the Apply button.
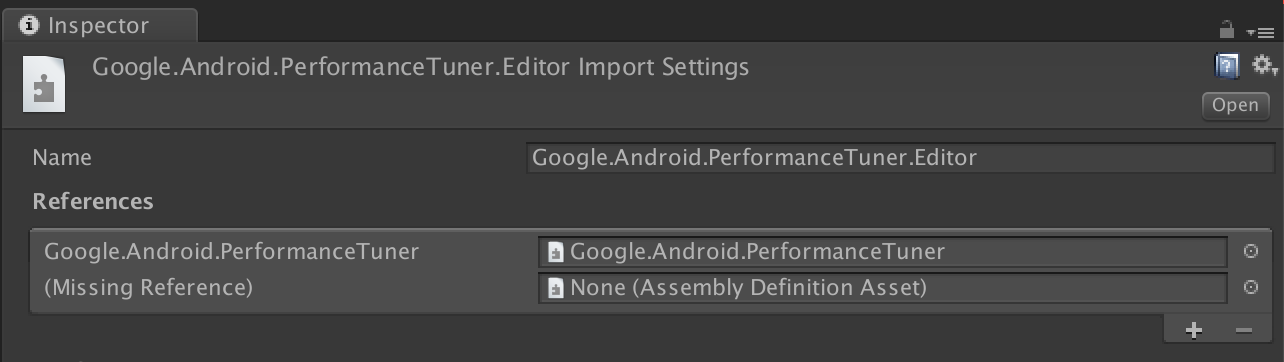 Figure 1. Missing assembly reference.
Go to the Assets/AndroidPerformanceTuner/Runtime folder.
Click the Google.Android.PerformanceTuner file to open it in the Inspector.
Repeat step 3 to remove the two missing assembly references.
Restart Unity.
Go to Window > AndroidPerformanceTuner > Setup and verify that no errors are displayed.
Re-importing the plugin after deletion
If you're re-importing the plugin after removing it from the project, remove
ANDROID_PERFORMANCE_TUNER_UTILITIES from
Player Settings > Scripting Define Symbols first.
Configure the plugin
To configure the plugin, do the following:
For Unity version 2019.3.14 or later:
Enable the Android Frame Pacing library. Android Performance Tuner will use this library to measure the performance of your game, including more in-depth measures than what Unity alone reports.
Select File > Build Settings and click the Player Settings button. Under Resolution and Presentation, select the Optimized Frame Pacing checkbox.
Synchronize the frame rendering with vertical blanks.
From the Player Settings, select the Quality tab and find the VSync Count menu. Use any selection (except Don't Sync). Selections other than Don't Sync enable more precise measurements in conjunction with the Android Frame Pacing library.
(For versions of Unity prior to 2019) Set the build system to Gradle. Select File > Build Settings. Find Build System and select Gradle.
Add the internet access permission. Under Other Settings, find Internet Access and select Require.
Enter your API key. Once the plugin is installed, you can enter it from the Window > Android Performance Tuner > Setup menu. On this dialog, select the Settings tab and enter the API key from your Google Cloud project into the API key field.
 Figure 2. Settings tab in the plugin