
ممکن است مواردی وجود داشته باشد که بخواهید پروژه خدمات بازیهای Play خود را مستقیماً در Google Cloud مشاهده و ویرایش کنید.
سناریوهای معمول عبارتند از:
- فعال کردن API های اضافی برای پروژه شما (مانند Google Drive).
- ویرایش اطلاعات برندسازی برای بازی شما در پنجرهی OAuth 2.0.
- مشاهده سهمیه API شما و درخواست بیشتر (در صورت لزوم).
- ویرایش URI های مجاز یا ریشههای جاوا اسکریپت در شناسههای کلاینت که قبلاً ایجاد کردهاید.
پروژه خود را مشاهده کنید
برای مشاهده پروژه خود در Google Cloud:
- در صفحه پیکربندی ( افزایش کاربران > خدمات بازیهای پلی > راهاندازی و مدیریت > پیکربندی ) یک اعتبارنامه برای بازی خود انتخاب کنید.
- به بخش احراز هویت بروید و روی «مشاهده در Google Cloud» کلیک کنید.
سهمیه استفاده از API را تنظیم کنید
در گوگل کلود، میتوانید محدودیتهای استفاده از API که برای بازی شما تنظیم شده و میزان سهمیه استفاده شده را مشاهده کنید. همچنین میتوانید برای هر کاربر محدودیتهایی تعیین کنید تا از مصرف سهمیه توسط یک کاربر سوءاستفادهگر (یا یک کلاینت بازی دارای باگ) جلوگیری کنید.
برای مشاهده یا تغییر محدودیتهای استفاده برای پروژه خود یا درخواست افزایش سهمیه خود، موارد زیر را انجام دهید:
- اگر هنوز برای پروژه خود حساب کاربری ندارید، یکی ایجاد کنید.
- به صفحه APIهای فعالشده در کتابخانه API در کنسول API مراجعه کنید و یک API را از لیست انتخاب کنید.
- برای مشاهده و تغییر تنظیمات مربوط به سهمیه، گزینه سهمیهها (Quotas) را انتخاب کنید. برای مشاهده آمار استفاده، گزینه استفاده (Usage) را انتخاب کنید.
توجه داشته باشید که "کاربران" بر اساس آدرس IP کلاینتی که درخواست سهمیه را انجام میدهد، تعیین میشوند. برای مثال، اگر همه درخواستهای شما از یک سرور واحد ارسال شوند، ممکن است آن سرور به اشتباه به عنوان یک کاربر اسپم برچسبگذاری شود. برای جلوگیری از این امر، میتوانید آرگومان userIp=xxxx را به درخواستهای نقطه پایانی API خود پیوست کنید.
برای کسب اطلاعات بیشتر در مورد تنظیم سهمیه هر کاربر، به بخش «محدود کردن استفاده از API» مراجعه کنید.
علاوه بر محدودیت به ازای هر کاربر، یک محدودیت در هر روز برای کل برنامه برای API خدمات بازیهای گوگل پلی وجود دارد. معمولاً نیازی به تغییر محدودیت از پیش تعیینشده ندارید. با این حال، اگر پیشبینی میکنید که حجم بازی به شدت افزایش یابد (مثلاً برای یک رویداد رونمایی قریبالوقوع)، میتوانید با کلیک روی لینک «درخواست بیشتر» درخواست سهمیه اضافی کنید.
مشاهده محدودیتهای نرخ OAuth و سقفهای کاربر جدید
برای مشاهده سهمیههای مربوط به نرخهای اعطای مجوز کاربر OAuth و سقفهای کاربر جدید:
- به کنسول ابری گوگل بروید.
- مطمئن شوید که پروژه صحیحی را انتخاب کردهاید.
- به APIها و خدمات > صفحه رضایت OAuth بروید.
- در این صفحه، میتوانید نرخ فعلی اعطای مجوز کاربر (یا نرخ اعطای توکن) و کل سقف مجاز برای کاربر جدید را مشاهده کنید.
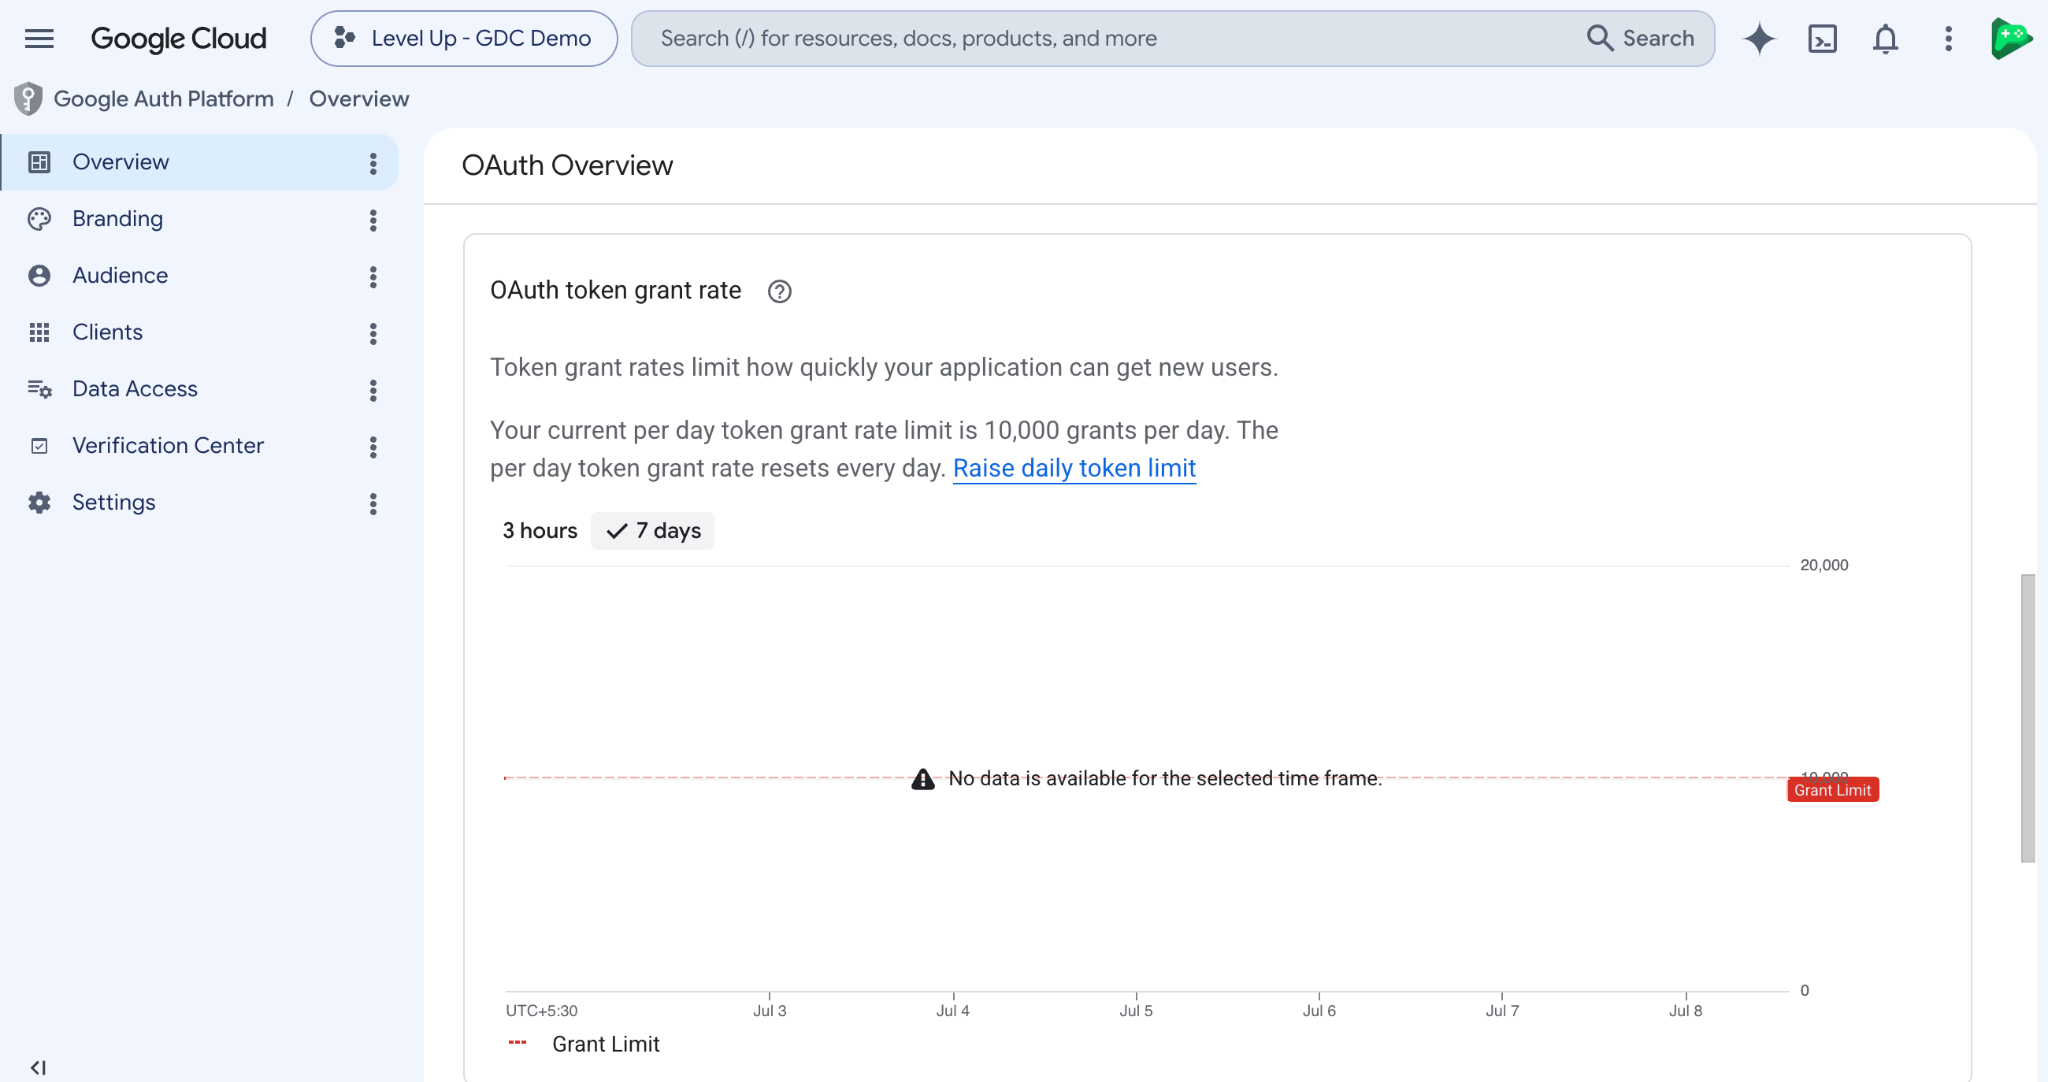
اگر متوجه شدید که بازی شما به زودی به سقف نرخ خود میرسد، باید با درخواست افزایش سهمیه سقف نرخ ، برای جلوگیری از هرگونه اختلال در روند بازی توسط بازیکنان اقدام کنید.
برای اطلاعات بیشتر، به محدودیتهای نرخ درخواست OAuth مراجعه کنید.
فعال کردن API های دیگر
وقتی شناسه کلاینت خود را در کنسول Play ایجاد میکنید، API خدمات بازیهای Google Play به طور خودکار برای پروژه شما فعال میشود. میتوانید سایر APIهای Google را از Google Cloud فعال کنید.
برای فعال کردن API برای پروژه خود، مراحل زیر را انجام دهید:
کتابخانه API را در کنسول API گوگل باز کنید . در صورت درخواست، یک پروژه را انتخاب کنید یا یک پروژه جدید ایجاد کنید. کتابخانه API تمام API های موجود را که بر اساس خانواده محصول و محبوبیت گروه بندی شده اند، فهرست می کند.
اگر API مورد نظر برای فعالسازی در لیست قابل مشاهده نیست، از جستجو برای یافتن آن استفاده کنید.
API مورد نظر خود را انتخاب کنید و سپس روی دکمهی فعالسازی کلیک کنید.
در صورت درخواست، صورتحساب را فعال کنید.
در صورت درخواست، شرایط خدمات API را بپذیرید.
اصلاح اطلاعات برند
برای تغییر اطلاعات برند (عنوان، لوگو و غیره) بازی خود که در کادر محاورهای OAuth 2.0 نمایش داده میشود، ویژگیها را در صفحه رضایتنامه Google Cloud تنظیم کنید.
برای تنظیم صفحه رضایت پروژه خود، موارد زیر را انجام دهید:
- صفحه «صفحه رضایت» را در کنسول Play باز کنید. در صورت درخواست، یک پروژه را انتخاب کنید یا یک پروژه جدید ایجاد کنید.
- فرم را پر کنید و روی ذخیره کلیک کنید.
نوع کاربر OAuth را تغییر دهید
اگر در مسیر تست تولید (تست و انتشار > تولید) با استفاده از یک حساب تست شخصی در حال آزمایش هستید، باید تنظیمات مخاطب OAuth خود را در Google Cloud به عنوان External نیز پیکربندی کرده باشید. برای اطلاعات بیشتر، به مدیریت مخاطبان برنامه مراجعه کنید.
اصلاح ویژگیهای مرتبط با شناسه کلاینت
برای تغییر ویژگیهای مربوط به شناسه کلاینت OAuth 2.0 خود (وب سایتهای مبدا و URL های ریدایرکت برای یک برنامه وب و غیره):
- کنسول Play را باز کنید و به بازی خود بروید.
- در صفحه پیکربندی ( افزایش کاربران > خدمات بازیهای پلی > راهاندازی و مدیریت > پیکربندی ) یک اعتبارنامه برای بازی خود انتخاب کنید.
- به پایین بخش احراز هویت بروید و روی «مشاهده در Google Cloud» کلیک کنید.
- در گوگل کلود، پروژه خود را انتخاب کنید.
- در نوار کناری سمت چپ، APIs & auth را انتخاب کنید. مطمئن شوید که وضعیت API مربوط به سرویسهای بازیهای گوگل پلی در لیست APIهای نمایش داده شده روشن (ON) است.
- در نوار کناری سمت چپ، برنامههای ثبتشده (Registered apps) را انتخاب کنید.
- بخش OAuth 2.0 Client ID را باز کنید و ویژگی مورد نظر برای ویرایش را پیدا کنید.
انتقال کلاینتهای OAuth از یک پروژه ابری موجود
برای مشاهده پروژه خود در Google Cloud، مراحل موجود در «مشاهده پروژه» را دنبال کنید.
برای راهاندازی سرویسهای بازیهای Play (PGS)، یک پروژه Google Cloud منحصر به فرد مورد نیاز است. اگر چندین بازی یک پروژه Cloud را به اشتراک میگذارند، برای اطمینان از پیکربندی مناسب، باید کلاینتهای Android OAuth آنها را به پروژههای مستقل منتقل کنید.
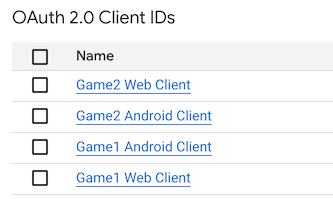
در مثال قبلی، بازی ۱ و بازی ۲ کلاینتهای وب و اندروید خود را در یک پروژه Google Cloud واحد برای ورود با Google ایجاد کردهاند. ما باید کلاینتهای وب و اندروید بازی ۲ را از پروژه فعلی Google Cloud به یک پروژه Google Cloud جدید منتقل کنیم.
مرحله ۱: آمادهسازی بکاند
قبل از انجام این تغییر، باید backend و کلاینتهای خود را برای مدیریت همزمان شناسههای کلاینت وب قدیمی و جدید تطبیق دهید.
- پیکربندی سمت سرور : اگر سرور شما شناسه کلاینت وب را در داخل توکن شناسه تأیید کند، باید منطق سمت سرور خود را بهروزرسانی کنید تا بهطور همزمان از توکنهای شناسه صادر شده توسط کلاینتهای قدیمی در پروژه ابری قدیمی و کلاینتهای جدیدی که باید در پروژه ابری هدف ایجاد کنید، پشتیبانی کند.
- پیکربندی سمت کلاینت : برنامه کلاینت شما باید از چندین شناسه کلاینت وب پشتیبانی کند تا بتواند هنگام تغییر با استفاده از شناسه کلاینت وب جدید وارد سیستم شود. میتوانید از هر یک از روشهای زیر استفاده کنید:
- دو شناسه کلاینت وب داخلی در برنامه کلاینت، که با منقضی شدن شناسه کلاینت قدیمی، به شناسه کلاینت وب جدید تغییر میکند.
- برای تکمیل سوئیچ، جدیدترین شناسه کلاینت وب را به صورت پویا از سرور دریافت کنید.
- پیشساخت کلاینتهای وب : در پروژه هدف خود، باید از قبل یک کلاینت وب جدید ایجاد کنید تا از تأخیرهای احتمالی در طول سوئیچ اتمی جلوگیری شود.
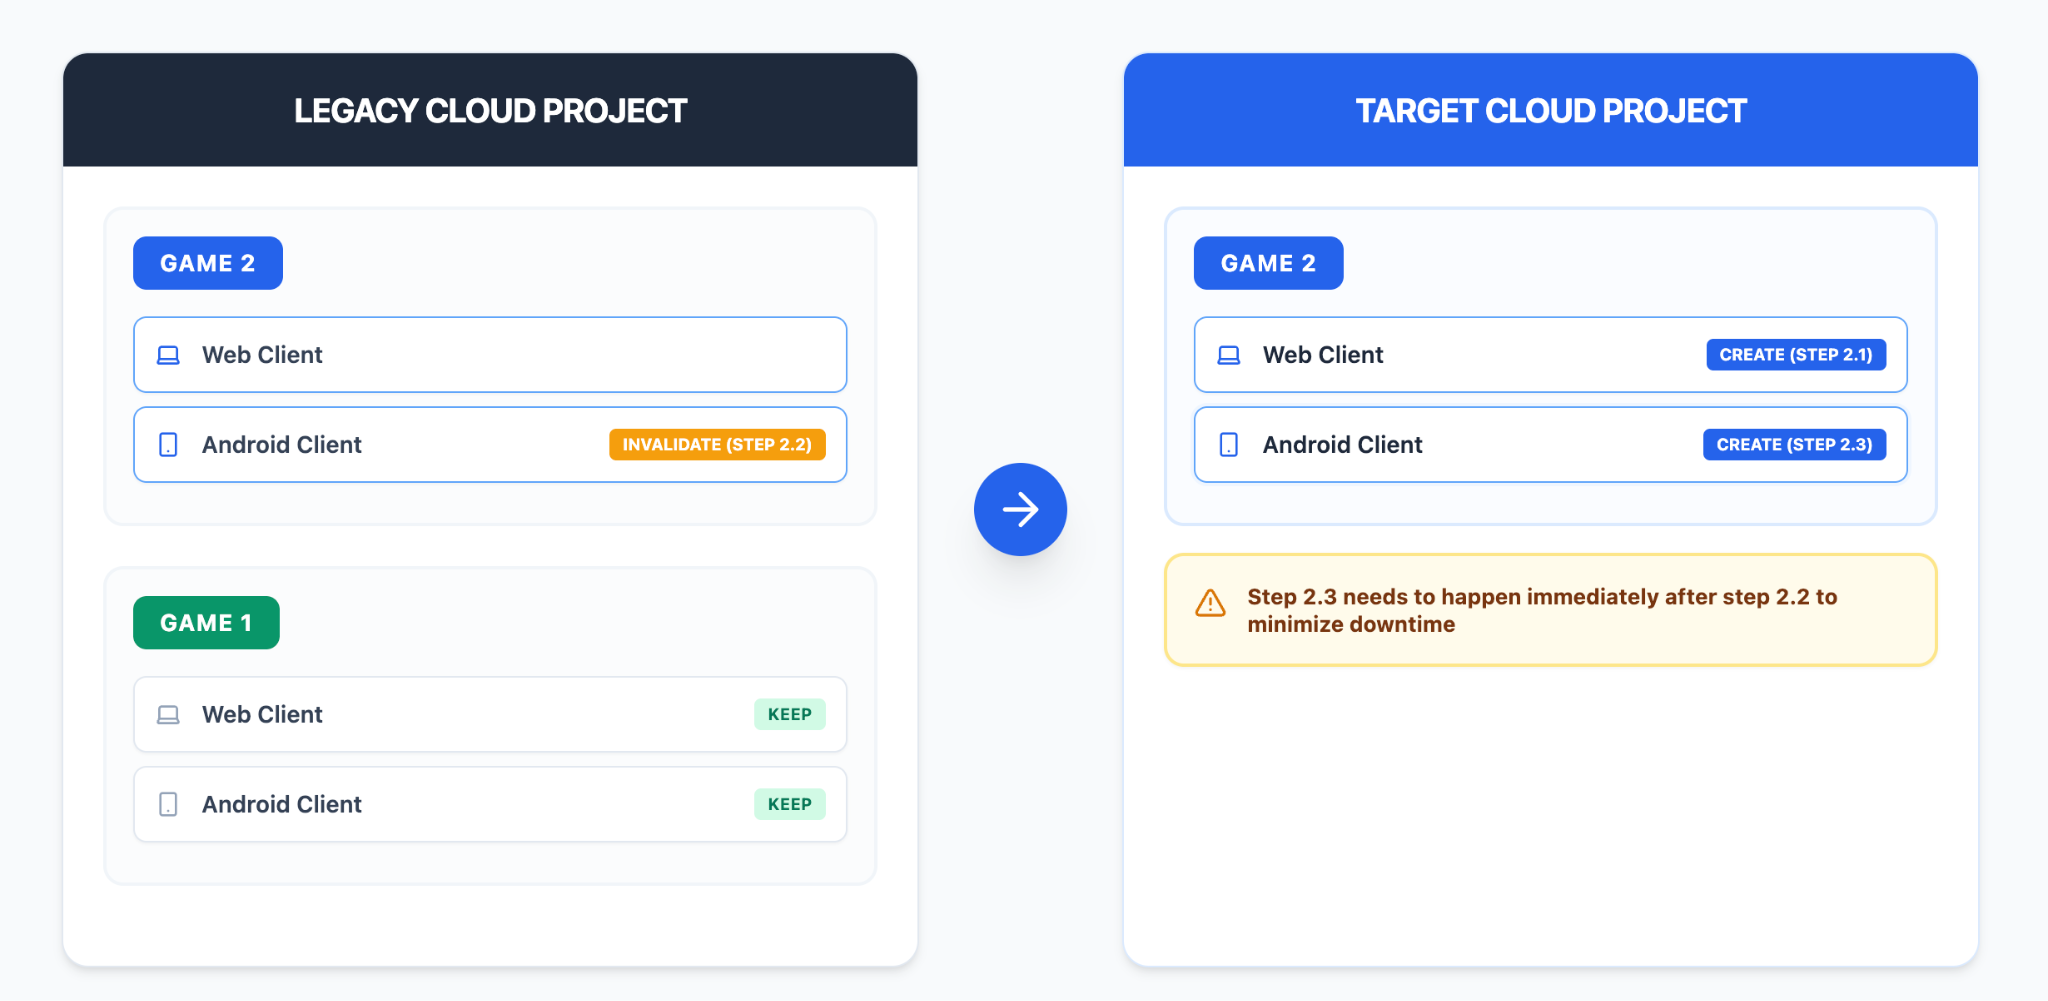
مرحله ۲: پیکربندی کلاینتهای جدید وب و اندروید OAuth در فضای ابری گوگل صحیح
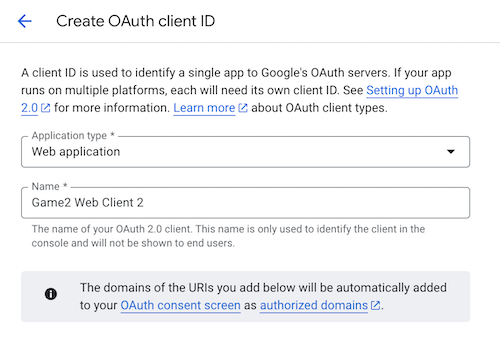
مرحله ۲.۱: یک کلاینت OAuth وب جدید برای بازی ۲ در پروژه Google Cloud هدف ایجاد کنید:
مرحله ۲.۲: هشدار: تغییر کلاینت اندروید مانع از ورود کاربران بازی شما به بازی با استفاده از ورود با گوگل میشود، بنابراین باید مطمئن شوید که مرحله ۲.۳ را بلافاصله پس از مرحله ۲.۲ انجام میدهید. توصیه میشود برای به حداقل رساندن فاصله زمانی بین تغییر و راهاندازی مجدد، دو صفحه وب را همزمان برای عملیات باز کنید.
نام بستهی کلاینت اندروید بازی ۲ را در پروژهی قدیمی گوگل کلود به یک مقدار نامعتبر، مانند com.noexist.none ، تغییر دهید.

مرحله ۲.۳: بلافاصله یک کلاینت اندروید جدید برای بازی ۲ با همان اثر انگشت SHA-1 و نام بسته بازی ۲ در پروژه Google Cloud هدف ایجاد کنید:

مرحله ۳: استقرار پیکربندی در زمان واقعی
پس از ایجاد موفقیتآمیز کلاینت اندروید جدید در پروژه هدف ، بلافاصله موارد زیر را انجام دهید:
- تغییر مسیر کلاینتها : از مکانیزم پیکربندی پویای خود (مانند Remote Config) برای تغییر فوری برنامه کلاینت به گونهای که شروع به استفاده از شناسه کلاینت وب جدید کند، استفاده کنید.
- کلاینتهای قدیمی را نگه دارید : کلاینتهای قدیمی OAuth را به عنوان یک گزینه جایگزین برای بازگشت به ورود به کلاینت OAuth قبلی در صورت بروز هرگونه مشکل، نگه دارید.