
This topic describes how to export a Godot project as an Android app. Godot can generate both APK files for local device testing and Android App Bundles for submission to the Google Play Store.
Install an Android build template
Godot uses a build template as a starting point to generate Gradle files and other data necessary to create and build an Android app. A build template must be imported into a Godot project prior to exporting an Android build. Each version of Godot has its own template. To install an Android build template into a project, perform the following steps:
- Open the project in the Godot editor.
- In the menu bar, select Project -> Install Android Build Template…
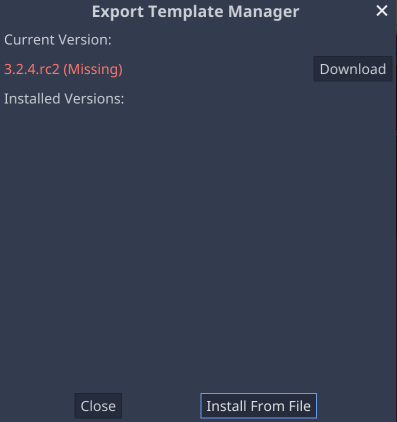
- Click the Manage Templates… button.
- In the Export Template Manager window, click the Download button for the Godot version being used (Current Version).
- Select a mirror location to download the file.
- After the download completes, click the Close button in the Export Template Manager window.
- From the editor menubar, select Project -> Install Android Build Template…
- A confirmation dialog will appear. Click the Install button.
The build template files will be stored in an android/build subdirectory that
is relative to the project root directory. Due to the size of this subdirectory,
you may wish to omit it from the version control scope of your project.
Add an Android export preset
An export preset for Android must be created for the project. To create a preset, perform the following steps:
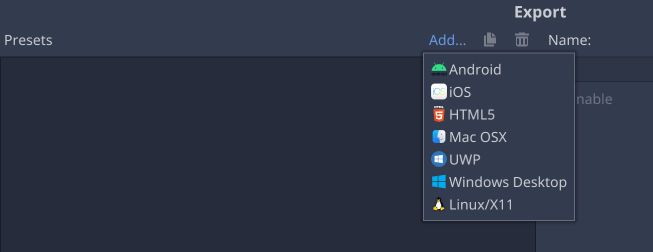
- From the editor menu bar, select Project -> Export…
- From the Export window, select the Add… dropdown menu, and then select the Android option as follows:
Customize Android export options
After creating an Android export preset for your project, you can configure export options by selecting the new preset in the Export window. Export options are grouped into categories to the right of the Export window. Common options to adjust include:
Export Format and Use Custom Build
The Export Format option indicates whether to export as an APK file or an
Android App Bundle (.AAB). For testing on a local device during development, an
APK file is more convenient, as it can be directly installed using adb. For
builds that you intend to upload to Google Play, use an Android App Bundle.
The Use Custom Build option controls whether Godot uses its own internal build process, or a traditional Gradle build process. If Use Custom Build is checked, Godot will perform a Gradle build. Use Custom Build must be checked if any of the follow conditions apply:
- The Export Format is set to Android App Bundle
- The project is using the Godot Android plugin system

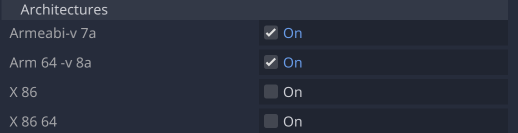
Architectures
The Architectures section specifies the CPU architectures to include in the build. Exporting a build with multiple architectures will increase the size of the exported APK or AAB file, which increases the iteration time when exporting and deploying to a device. During development you can reduce the iteration time by only selecting the architecture of the test device. When submitting to Google Play, you should export with all available architectures supported by your project.
Keystore
The Keystore section is where debug and release keystore files are configured. These are used when digitally signing the exported app. The Debug and Release fields should be paths to the respective keystore files. The Debug User and Release User fields should be set to the alias names in the keystore.
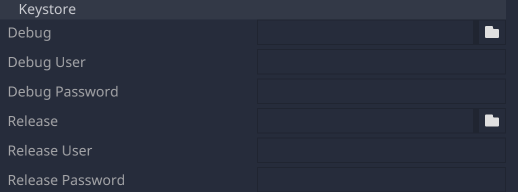
If a debug keystore file has been configured in the global Editor Settings -> Export -> Android section, the Debug keystore fields in the project Export options may be left blank, and the global debug keystore file will be used as default.
To create a build for upload to the Google Play Store, you can use Android Studio to create a release keystore file.
To create a release keystore file for your app:
- Launch Android Studio.
- In the Welcome to Android Studio window, select Create New Project.
- Select the No Activity template, and click Next.
- In the Configure Your Project screen, click Finish to create the project.
- Create a keystore file using the instructions at Generate an upload key and keystore.
- After creating the keystore file, quit Android Studio and return to the Godot editor.
- Add the keystore file to the Release field and enter the Release User and Release Password values into their respective fields.
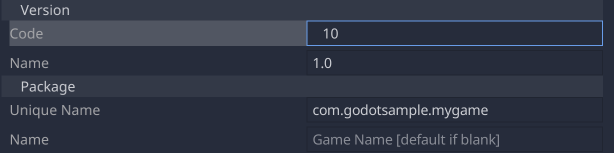
Version and Package
The Version and Package sections specify the version code, version string, package identifier, and package name for your app. The Unique Name field should be set to the package identifier used by your app in Google Play Console.
Launcher icons
The launcher icons section specifies the .png files to use as icons for your app. If icons files are not specified, Godot will use a default icon file. Godot supports specifying both legacy application icons, and the adaptive icons available in Android 8 and later. For tips on creating adaptive icons, see the adaptive icons guide.
Export a build
To export a build, follow these steps:
- Select Project -> Export… from the Godot menu bar.
- Select an Android export preset from the preset list.
- Click the Export Project button at the bottom of the Export window.
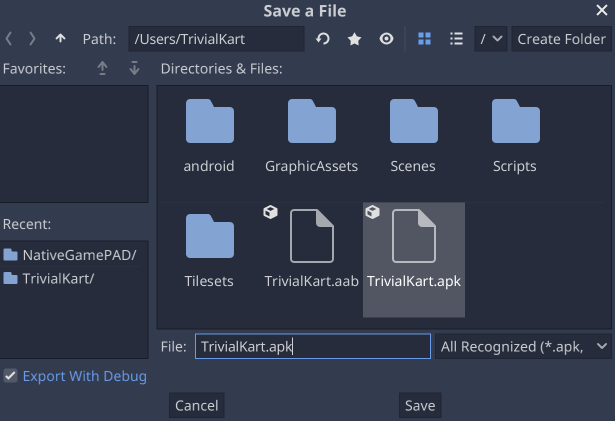
- In the Save a File dialog box, choose a name for the exported file.
- Uncheck the Export With Debug checkbox to create a Release build.
- Click Save to export the build.
The export progress window will look different if the Use Custom Build option is checked in the export preset. Custom builds display the output of the Gradle build process.