Zainstaluj Godot i skonfiguruj projekty na Androidzie
Zadbaj o dobrą organizację dzięki kolekcji
Zapisuj i kategoryzuj treści zgodnie ze swoimi preferencjami.
Tematy w tym przewodniku:
wybór wersji i wydania Godota,
Pobieranie i instalowanie Godota.
Konfigurowanie aplikacji Godot na potrzeby programowania na Androida.
Konfigurowanie systemu pod kątem programowania i eksportowania C# (tylko wersja mono)
Wybierz wersję
W miarę możliwości używaj najnowszej stabilnej wersji Godot. Do programowania aplikacji na Androida
użyj wersji 3.3 lub nowszej.
Pobierz i uruchom Godot
Otwórz stronę pobierania Godot, aby pobrać silnik gry dostosowany do preferowanego środowiska.
Na stronie pobierania Godot dostępne są 2 wersje: standardowa i Mono. Można ich używać
do tworzenia aplikacji na Androida. Wersja mono jest wymagana do programowania w języku C#.
Godot jest rozpowszechniany jako samodzielna aplikacja. Nie wymaga żadnej instalacji. Po wyodrębnieniu pobranych plików możesz je uruchomić w niezmienionej postaci.
Skonfiguruj obsługę Androida
Konfigurowanie ustawień pakietu Android Studio SDK
Pobierz i zainstaluj najnowszą stabilną wersję Androida Studio, jeśli jeszcze jej nie masz.
Uruchom Android Studio.
W oknie Witamy w Android Studio otwórz menu Skonfiguruj i wybierz Menedżer pakietów SDK.
Zanotuj lokalizację pakietu Android SDK na komputerze u góry okna. Musisz podać tę lokalizację w edytorze Godot.
Na karcie Platformy SDK znajdź pozycję Android 11.0 R.
Zaznacz element, jeśli nie jest odznaczony.
Na karcie Narzędzia pakietu SDK znajdź elementy listy dla NDK (w układzie porównawczym), narzędzi wiersza poleceń pakietu Android SDK i CMake. Sprawdź je, jeśli nie są zaznaczone.
Jeśli stan elementów listy to Dostępna aktualizacja, zaznacz ich pole wyboru, aby zaktualizować je do najnowszej wersji.
Kliknij przycisk OK. Aby ukończyć instalację, potwierdź pobranie i zaakceptuj umowy licencyjne.
Tworzenie magazynu kluczy debugowania
Aplikacje na Androida muszą być podpisane cyfrowo,
aby mogły działać na urządzeniu. W przypadku testów lokalnych do podpisywania aplikacji można używać pliku magazynu kluczy debugowania. Android Studio automatycznie utworzy domyślny magazyn kluczy debugowania. Jeśli masz już aplikacje utworzone z użyciem konfiguracji debugowania w Android Studio, plik debug.keystore powinien znajdować się w tym katalogu:
Microsoft Windows:C:\Users\$username\.android\debug.keystore
Linux/macOS: ~\.android\debug.keystore
Jeśli plik debug.keystore nie istnieje, utwórz go, wykonując te czynności:
Uruchom Android Studio.
W oknie Witamy w Android Studio wybierz opcję Import an Android Code Sample (Importuj przykładowy kod na Androida).
Wybierz z listy przykładowy Ndk -> Hello GL2 i kliknij przycisk Dalej.
Wybierz lokalizację projektu i kliknij przycisk Zakończ.
Poczekaj na wczytanie projektu i zsynchronizowanie go z Gradle, a potem na pasku menu Android Studio wybierz Kompilacja -> Utwórz projekt.
Poczekaj na zakończenie kompilacji, a potem sprawdź, czy w odpowiednim katalogu utworzono plik debug.keystore.
Ustaw pakiet Android SDK i debuguj lokalizację magazynu kluczy w edytorze Godot
Uruchom edytor Godot.
Utwórz lub otwórz projekt.
Na pasku menu Edytor kliknij kolejno Edytor -> Ustawienia edytora....
W oknie Ustawienia edytora wybierz w panelu po lewej stronie element Eksportuj -> Android.
W panelu po prawej stronie w polu tekstowym Android SDK Path (Ścieżka do pakietu Android SDK) wpisz ścieżkę do pakietu Android SDK.
W polu tekstowym magazyn kluczy debugowania wpisz ścieżkę do pliku debug.keystore.
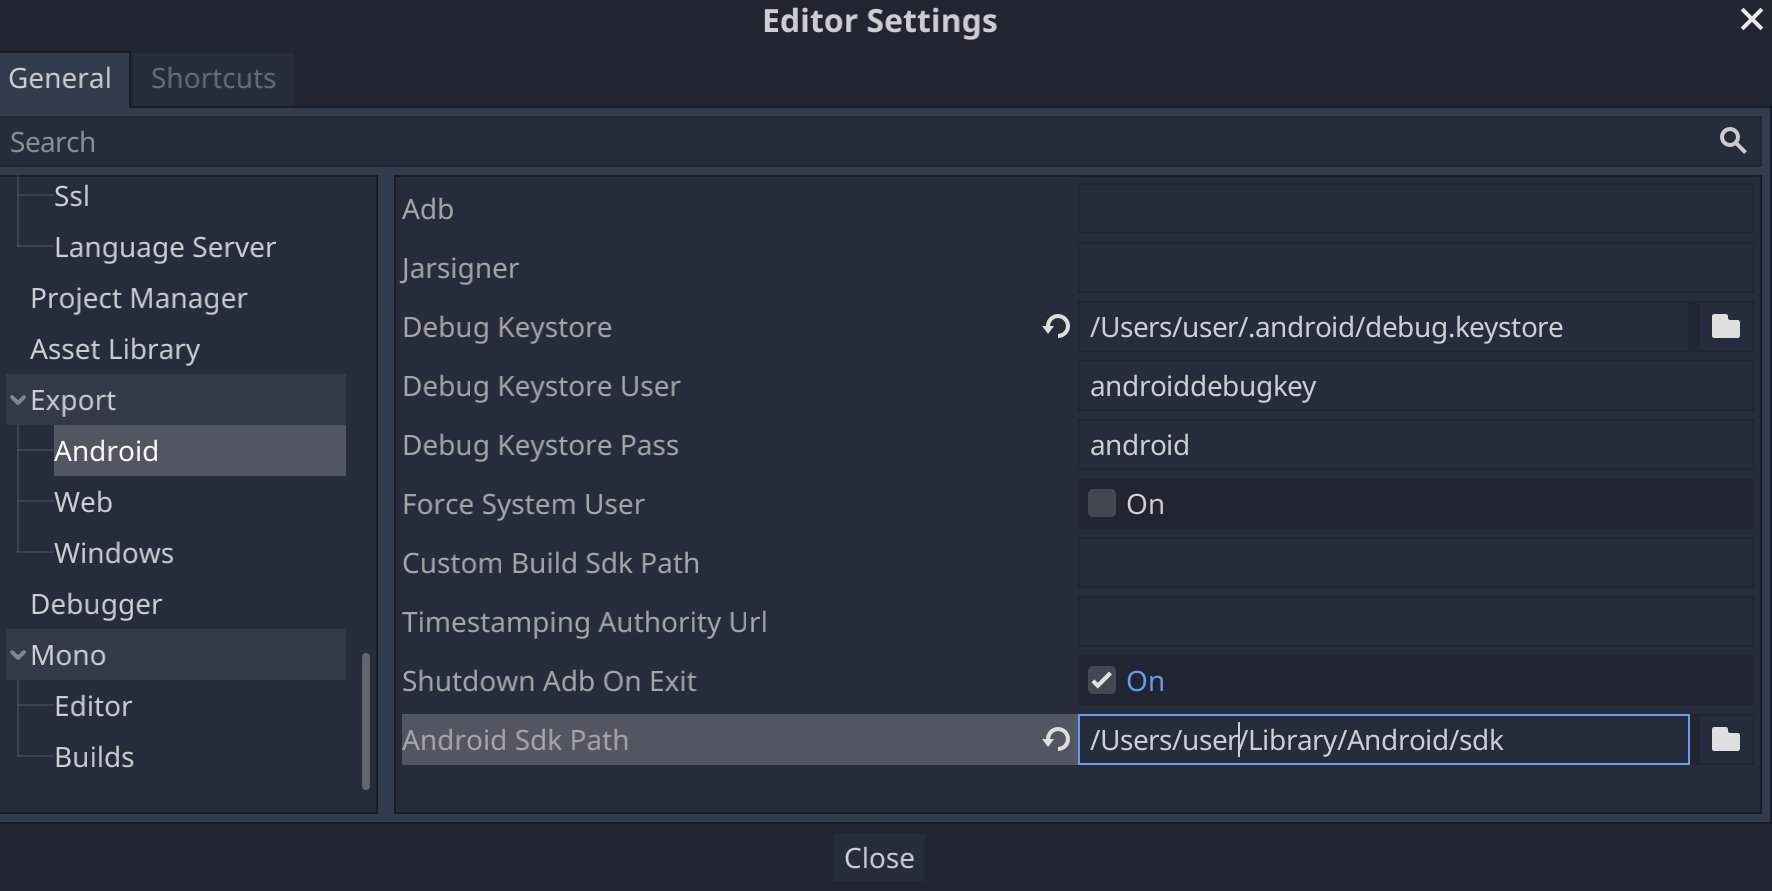
Rysunek 1. W polu Android SDK Path (Ścieżka do pakietu Android SDK) w Ustawieniach edytora
Skonfiguruj mono
Zainstaluj MSBuild
Wersja Godota w wersji mono wymaga MSBuild do tworzenia i eksportowania projektów, które używają C#. Aby zainstalować MSBuild:
Godot obsługuje edycję kodu w języku C# w ograniczonym zakresie. Zdecydowanie zalecamy używanie zewnętrznego edytora plików C#. Godot obsługuje te edytory C#:
Microsoft Visual Studio/Visual Studio na Maca
Kod Microsoft Visual Studio
JetBrains Rider
Programowanie mono
Aby skonfigurować zewnętrzny edytor C#, otwórz projekt w edytorze Godot i wykonaj te czynności:
Na pasku menu edytora kliknij Edytor -> Ustawienia edytora....
W oknie Ustawienia edytora wybierz w panelu po lewej stronie element Mono -> Edytor.
Wybierz odpowiedni edytor z menu Zewnętrzny edytor.
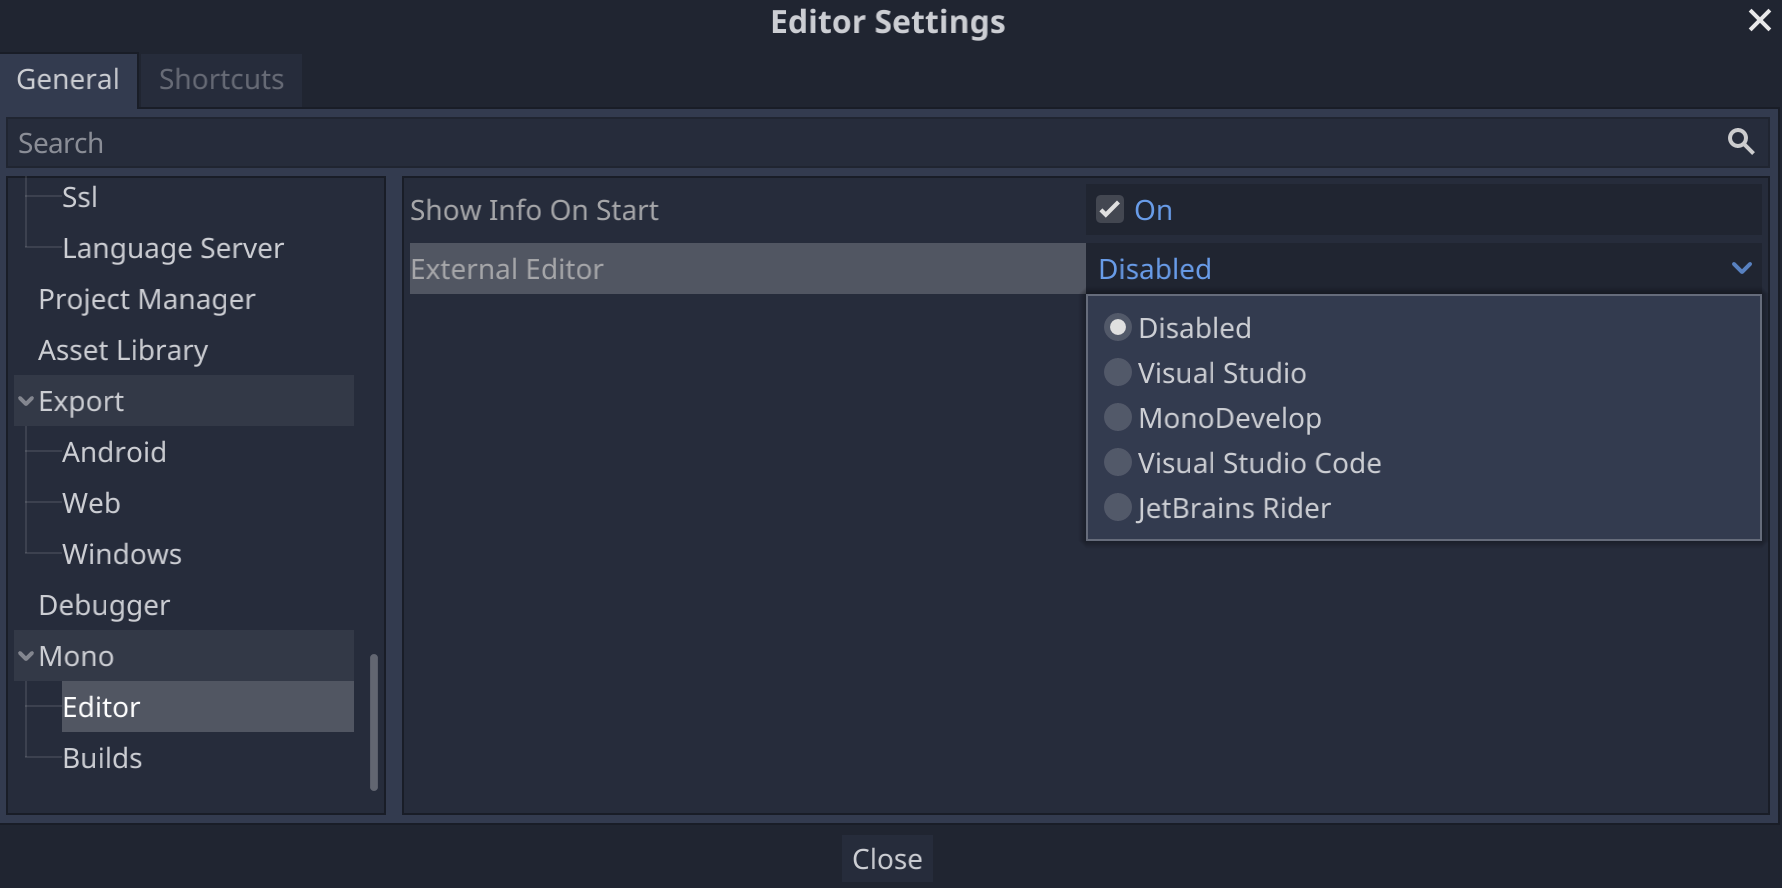
Rys. 2. Pole Edytor zewnętrzny w Ustawieniach edytora
Wtyczki edytora C# dla Godota
C# Tools for Godot: wtyczka do Microsoft Visual Studio Code, która dodaje obsługę debugowania C# i funkcje uzupełniania kodu.
Treść strony i umieszczone na niej fragmenty kodu podlegają licencjom opisanym w Licencji na treści. Java i OpenJDK są znakami towarowymi lub zastrzeżonymi znakami towarowymi należącymi do firmy Oracle lub jej podmiotów stowarzyszonych.
Ostatnia aktualizacja: 2025-07-27 UTC.
[[["Łatwo zrozumieć","easyToUnderstand","thumb-up"],["Rozwiązało to mój problem","solvedMyProblem","thumb-up"],["Inne","otherUp","thumb-up"]],[["Brak potrzebnych mi informacji","missingTheInformationINeed","thumb-down"],["Zbyt skomplikowane / zbyt wiele czynności do wykonania","tooComplicatedTooManySteps","thumb-down"],["Nieaktualne treści","outOfDate","thumb-down"],["Problem z tłumaczeniem","translationIssue","thumb-down"],["Problem z przykładami/kodem","samplesCodeIssue","thumb-down"],["Inne","otherDown","thumb-down"]],["Ostatnia aktualizacja: 2025-07-27 UTC."],[],[],null,["# Install Godot and configure projects for Android\n\nThis guide will cover the following steps:\n\n- Selecting a version and release of Godot.\n- Downloading and installing Godot.\n- Configuring Godot for Android development.\n- Configuring your system for C# development and export (Mono release of Godot only).\n\nSelect a version\n----------------\n\nUse the latest stable release of Godot when possible. For Android development,\nuse version 3.3 or higher.\n| **Note:** Starting in August 2021, Google Play will require all Android apps to be submitted as Android App Bundles. Versions of Godot lower than 3.3 don't meet this requirement. For more information, see the [Target API Level](/distribute/best-practices/develop/target-sdk) page.\n\nDownload and run Godot\n----------------------\n\nVisit the\n[Godot download page](https://godotengine.org/download)\nto download the game engine for your preferred environment.\n\nGodot offers two releases on its download page: standard and Mono. Either may be\nused to develop for Android. The Mono release is required for C# development.\n\nGodot is distributed as a standalone application. It does not require an\ninstallation process; after extracting the download archive, you can run it as-is.\n\nConfigure Android support\n-------------------------\n\n### Configure the Android Studio SDK settings\n\n1. If you haven't already done so, [download](/studio) and [install](/studio/install) the latest stable release of Android Studio.\n2. Launch Android Studio.\n3. In the Welcome to Android Studio window, open the **Configure** dropdown menu and select **SDK Manager**.\n4. At the top of the window, make a note of the **Android SDK Location** on your computer. You will need to specify that location in Godot editor.\n5. In the **SDK Platforms** tab, find the list entry for **Android 11.0 R**. Check the item if it is unchecked.\n6. In the **SDK Tools** tab, find the list items for **NDK (Side by side)** , **Android SDK Command-line Tools** , and **CMake**. Check them if they are unchecked.\n7. If any list items have their status set to **Update Available**, enable their check box to update to the latest version.\n8. Click the **OK** button. Confirm the download and accept the license agreements to complete the installation.\n\n### Create a debug keystore\n\nAndroid apps must be [digitally signed](/studio/publish/app-signing#certificates-keystores)\nto run on a device. For local testing, a debug keystore file may be used to sign\napps. Android Studio will automatically create a default debug keystore. If you\nhave previously built apps using a debug configuration with Android Studio, a\n`debug.keystore` file should be located in the following directory:\n\n- **Microsoft Windows** : `C:\\Users\\$username\\.android\\debug.keystore`\n- **Linux/macOS** : `~\\.android\\debug.keystore`\n\nIf the `debug.keystore` file does not exist, create one by performing the\nfollowing steps:\n\n1. Launch Android Studio.\n2. In the Welcome to Android Studio window, select the **Import an Android Code Sample** option.\n3. Select the **Ndk -\\\u003e Hello GL2** sample from the list and click the **Next** button.\n4. Choose a location for the project and click the **Finish** button.\n5. Wait for the project to load and sync with Gradle, then select **Build -\\\u003e Make Project** from the Android Studio menu bar.\n6. Wait for the build to finish, then verify a `debug.keystore` file was created in the appropriate directory.\n\n### Set the Android SDK and debug keystore location in Godot editor\n\n1. Launch the Godot editor.\n2. Create or open a project.\n3. Select **Editor -\\\u003e Editor Settings...** from the **Editor** menu bar.\n4. In the **Editor Settings** window, select the **Export -\\\u003e Android** item in the left panel.\n5. In the right panel, go to the text box for **Android Sdk Path** and enter the path to the Android SDK.\n6. In the text box for **Debug Keystore** enter the path to the `debug.keystore` file.\n\n**Figure 1.** The **Android Sdk Path** field in **Editor Settings**\n\nSet up Mono\n-----------\n\n### Install MSBuild\n\nThe Mono release of Godot requires MSBuild to build and export projects that use\nC#. To install MSBuild:\n\n**Linux and macOS**\n\n- [Download](https://www.mono-project.com/download/stable/) and [install](https://www.mono-project.com/docs/) the latest version of the Mono SDK.\n\n**Microsoft Windows**\n\n- Install [Microsoft Visual Studio](https://visualstudio.microsoft.com/downloads/) or [Microsoft Visual Studio Build Tools](https://visualstudio.microsoft.com/thank-you-downloading-visual-studio/?sku=BuildTools&rel=15). When you run the installer, ensure you have the **.NET Framework 4.5** targeting pack selected for installation.\n\n### Configure a C# editor\n\nGodot has very limited support for editing C# code. Using an external editor for\nC# files is strongly recommended. Godot supports the following C# editors:\n\n- Microsoft Visual Studio/Visual Studio for Mac\n- Microsoft Visual Studio Code\n- JetBrains Rider\n- MonoDevelop\n\nTo configure an external C# editor, open a project in the Godot editor and\nperform the following steps:\n\n1. Select **Editor -\\\u003e Editor Settings...** from the editor menu bar.\n2. In the **Editor Settings** window, select the **Mono -\\\u003e Editor** item in the left panel.\n3. Choose the desired editor from the **External Editor** dropdown menu.\n\n**Figure 2:** The **External Editor** field in **Editor Settings**\n\n### C# editor plugins for Godot\n\n- [C# Tools for Godot](https://marketplace.visualstudio.com/items?itemName=neikeq.godot-csharp-vscode): A plugin for Microsoft Visual Studio Code that adds C# debugging support and partial code completion features.\n- [JetBrains Rider plugin](https://plugins.jetbrains.com/plugin/13882-godot-support): Adds C# debugging support."]]