Zadbaj o dobrą organizację dzięki kolekcji
Zapisuj i kategoryzuj treści zgodnie ze swoimi preferencjami.
Skonfiguruj rozszerzenie do tworzenia gier na Androida na komputerze z systemem Windows i uruchom przykładowy projekt Visual Studio C++ na urządzeniu z Androidem lub w emulatorze.
Wymagania wstępne
Aby przygotować komputer z systemem Windows do instalacji rozszerzenia, wykonaj czynności opisane w tej sekcji:
Pobierz i zainstaluj jedną z obsługiwanych wersji Visual Studio:
Pobierz i zainstaluj JDK 17 w przypadku AGDE w wersji 23.1.82 lub nowszej albo JDK 11 w przypadku AGDE w wersji 22.2.71 lub starszej i ustaw zmienną środowiskową JAVA_HOME.
Instalowanie rozszerzenia
Aby pobrać i zainstalować rozszerzenie Android Game Development Extension:
Zamknij wszystkie instancje programu Visual Studio.
Pobierz najnowszy instalator rozszerzenia i przykłady ze strony Pobieranie.
W miejscu pobierania kliknij dwukrotnie instalator. Instalatorowi zajmie to kilka minut.
Jeśli masz zainstalowanych więcej wersji Visual Studio, wybierz te, w których chcesz zainstalować rozszerzenie.
Aby zakończyć instalację, kliknij Zakończ.
Instalowanie pakietów SDK i NDK na Androida
Pakiet Android SDK i pakiet Native Development Kit (NDK)
na Androida możesz zainstalować za pomocą Android Studio lub rozszerzenia Android Game Development Extension. Aby zainstalować pakiet SDK i NDK z poziomu rozszerzenia, użyj Menedżera SDK, który znajduje się na pasku narzędzi rozszerzenia w Visual Studio.
Podczas instalowania NDK zaznacz pole wyboru NDK (obok siebie), aby rozszerzenie mogło go znaleźć. Musisz zainstalować wersję NDK
obsługiwaną przez rozszerzenie
(patrz Historia wersji NDK).
Aby zainstalować pakiet SDK w innym miejscu niż domyślne, ustaw zmienną środowiskową ANDROID_SDK_ROOT na komputerze:
Upewnij się, że program Visual Studio jest zamknięty.
W wyszukiwarce Windows wyszukaj Environment Variables.
Kliknij Edytuj systemowe zmienne środowiskowe.
Kliknij Zmienne środowiskowe.
W sekcji Zmienne użytkownika kliknij Nowa.
W polu Nazwa zmiennej wpisz ANDROID_SDK_ROOT.
W polu Wartość zmiennej wpisz ścieżkę do pakietu Android SDK.
Uruchom ponownie komputer.
Lokalizacji pakietu SDK nie można modyfikować w oknie Menedżera SDK, ponieważ ta zmienna środowiskowa jest jedynym źródłem informacji o lokalizacji pakietu SDK.
Uruchamianie przykładu
Aby uruchomić podany przykład na emulatorze, a potem na fizycznym urządzeniu z Androidem, wykonaj czynności opisane w tej sekcji.
Konfigurowanie platformy
Rozpakuj plik ZIP z przykładowymi plikami do wybranego katalogu. Obejmuje to te przykłady:
endless-tunnel
HelloJNI
Czajniczek
Uruchom Visual Studio, jeśli nie jest jeszcze uruchomione.
Otwórz katalog z przykładami. Wybierz Plik > Otwórz > Projekt/Rozwiązanie i przejdź do pliku .sln.
W sekcji Aktywna platforma rozwiązania wybierz Android-x86_64.
Platformy Androida są już skonfigurowane w przykładach (informacje o dodawaniu platform znajdziesz w artykule Dodawanie kolejnych platform Androida).
Sprawdź, czy w przykładzie projektu skonfigurowano właściwości pakietów Android SDK i NDK:
Rysunek 1. Właściwości platformy Android
W Eksploratorze rozwiązań kliknij projekt prawym przyciskiem myszy i wybierz Właściwości.
Wybierz kartę właściwości Ogólne i znajdź właściwości Platforma
dla Androida.
Wybierz kartę właściwości Pakowanie na Androida.
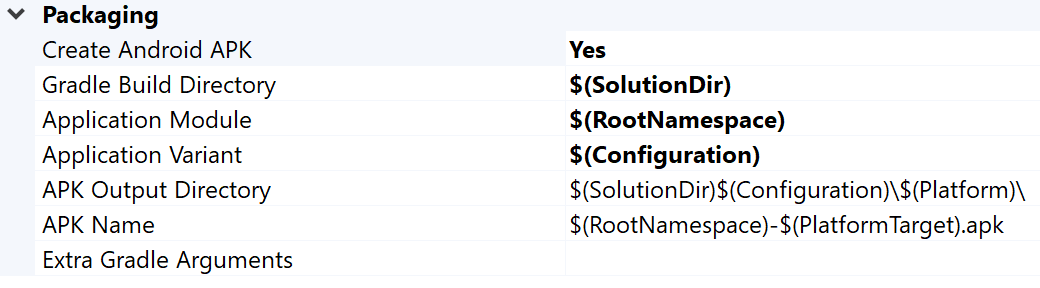
Rysunek 2. Właściwości pakowania na Androida
Na tej karcie możesz zmienić nazwę i katalog wyjściowego pliku APK. Pamiętaj, że niektóre właściwości konfiguracji Androida są zdefiniowane na stronach właściwości i przekazywane do Gradle. Na przykład właściwość nazwy pliku APK MSBUILD_ANDROID_OUTPUT_APK_NAME przekazuje tę nazwę do pliku aplikacji build.gradle.
Konfigurowanie emulatora
Uruchom AVD Manager z paska narzędzi rozszerzenia w Visual Studio.
Skonfiguruj urządzenie wirtualne, a następnie uruchom je w emulatorze Androida.
W Menedżerze urządzeń wirtualnych z Androidem kliknij Create Virtual Device (Utwórz urządzenie wirtualne).
Wybierz definicję urządzenia (np. Pixel 2).
Wybierz obraz systemu. Wybierz interfejs ABI x86_64, ponieważ ta architektura działa szybciej w emulatorze.
Sprawdź konfigurację i kliknij Zakończ.
Uruchom wirtualne urządzenie, klikając przycisk Uruchom w Menedżerze wirtualnych urządzeń z Androidem.
W Visual Studio urządzenie wirtualne powinno pojawić się obok przycisku na pasku narzędzi Rozpocznij debugowanie. Kliknij Start Debugging (Rozpocznij debugowanie), aby uruchomić aplikację przykładową na urządzeniu. Podłączenie debugera do aplikacji może zająć kilka sekund. Jeśli uruchomisz przykład Teapot, możesz obracać czajnik, przeciągając po nim kursor myszy.
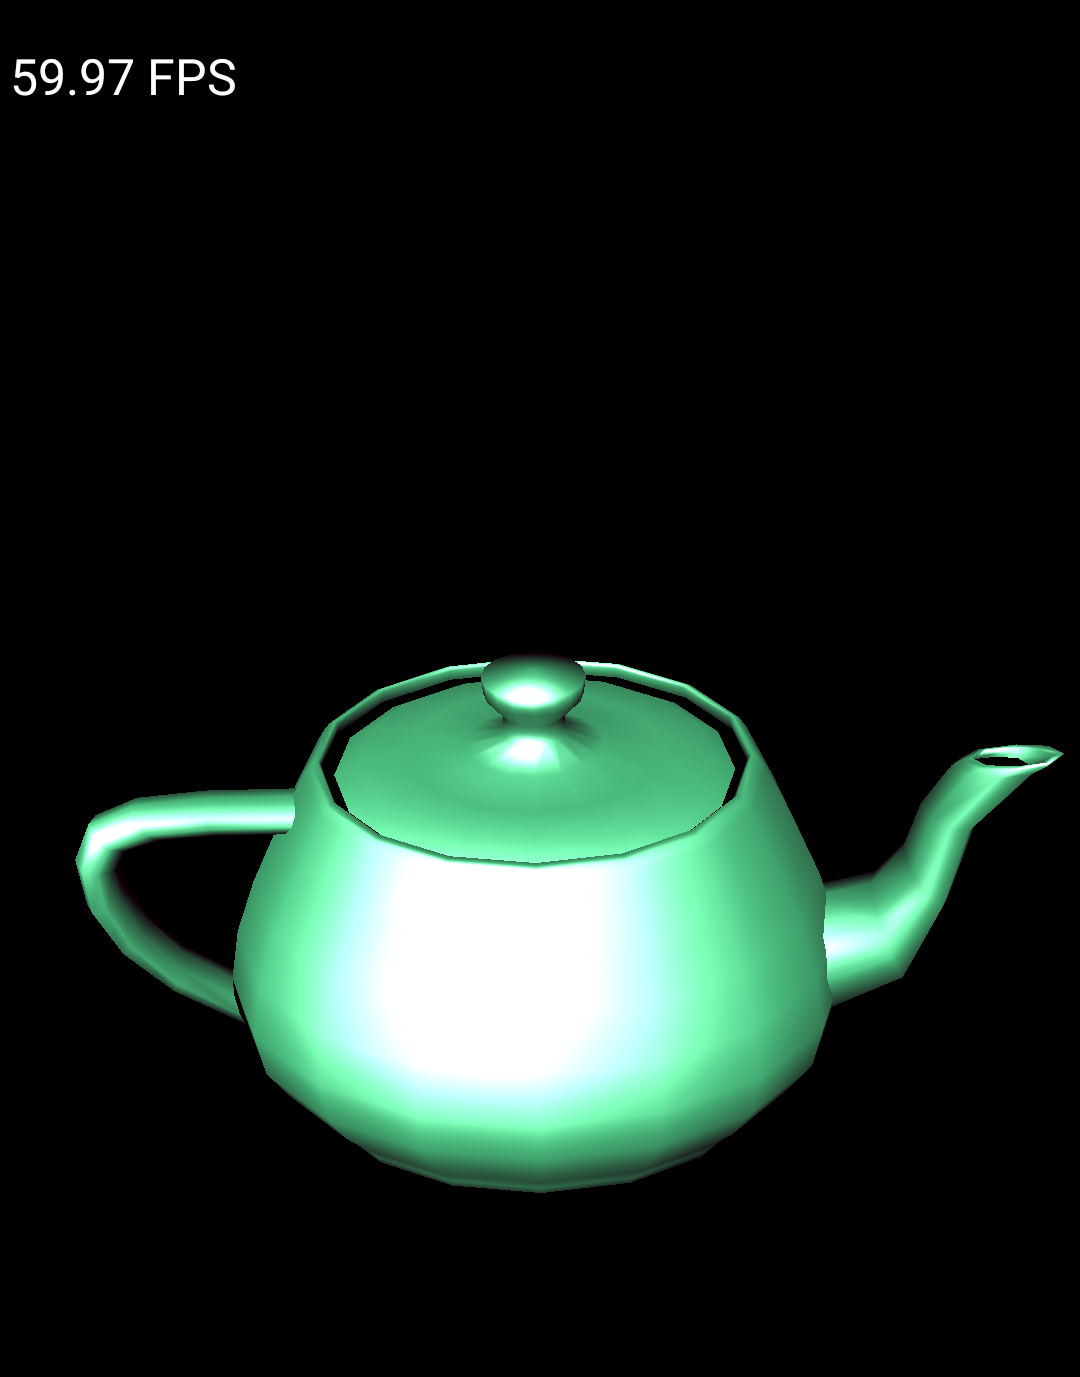
Rysunek 3. Przykładowa aplikacja Teapot uruchomiona w emulatorze Androida
Konfigurowanie urządzenia
Aby uruchomić przykład na fizycznym urządzeniu z Androidem, może być konieczne utworzenie w projekcie nowej platformy Androida. Ta platforma musi być zgodna z architekturą urządzenia. Aby utworzyć nową platformę w Visual Studio:
W sekcji Aktywna platforma rozwiązania kliknij <Nowa>.
Wpisz jedną z tych wartości dla nowej platformy:
Android-armeabi-v7a
Android-arm64-v8a
Android-x86
Android-x86_64
W polu Skopiuj ustawienia z wybierz inną istniejącą platformę Android (lub Brak, jeśli nie masz jeszcze żadnych platform Android).
Sprawdź, czy masz włączoną opcję Twórz nowe platformy projektu.
Podłącz urządzenie z Androidem do komputera za pomocą kabla USB. Typ urządzenia powinien być widoczny obok przycisku paska narzędzi Rozpocznij debugowanie.
Rysunek 4. Połączone urządzenie z Androidem widoczne obok przycisku na pasku narzędzi Rozpocznij debugowanie
Jeśli urządzenia nie widać, sprawdź, czy:
Wybrana platforma jest zgodna z interfejsem ABI urządzenia.
Kabel USB jest podłączony do urządzenia i komputera.
Kabel USB obsługuje połączenie do transmisji danych (a nie tylko zasilanie).
Kliknij przycisk Rozpocznij debugowanie na pasku narzędzi, aby uruchomić przykładową aplikację na urządzeniu. Podłączenie debugera do aplikacji może potrwać kilka chwil.
Po podłączeniu debugera możesz korzystać z aplikacji na urządzeniu.
Najczęstsze pytania
Poniżej znajdziesz odpowiedzi na najczęstsze pytania dotyczące rozszerzenia do tworzenia gier na Androida.
Gdzie znajdują się dzienniki wtyczki?
Plik dziennika wtyczki możesz otworzyć za pomocą ikony Open Logs (Otwórz dzienniki) na pasku narzędzi Android Game Development Extension.
Jakich zmiennych środowiskowych używa wtyczka?
Wtyczka korzysta z tych zmiennych środowiskowych:
ANDROID_SDK_ROOT
ANDROID_SDK_HOME
TEMP
GOOGLE_ANDROID_LOG_DIR
Co dalej
Aby używać własnego projektu z rozszerzeniem, musisz go skonfigurować zgodnie z przewodnikiem konfiguracji projektu.
Treść strony i umieszczone na niej fragmenty kodu podlegają licencjom opisanym w Licencji na treści. Java i OpenJDK są znakami towarowymi lub zastrzeżonymi znakami towarowymi należącymi do firmy Oracle lub jej podmiotów stowarzyszonych.
Ostatnia aktualizacja: 2025-07-27 UTC.
[[["Łatwo zrozumieć","easyToUnderstand","thumb-up"],["Rozwiązało to mój problem","solvedMyProblem","thumb-up"],["Inne","otherUp","thumb-up"]],[["Brak potrzebnych mi informacji","missingTheInformationINeed","thumb-down"],["Zbyt skomplikowane / zbyt wiele czynności do wykonania","tooComplicatedTooManySteps","thumb-down"],["Nieaktualne treści","outOfDate","thumb-down"],["Problem z tłumaczeniem","translationIssue","thumb-down"],["Problem z przykładami/kodem","samplesCodeIssue","thumb-down"],["Inne","otherDown","thumb-down"]],["Ostatnia aktualizacja: 2025-07-27 UTC."],[],[],null,["# Quickstart\n\nSet up the Android Game Development Extension on a Windows computer and run a sample Visual\nStudio C++ project on an Android device or emulator.\n\nPrerequisites\n-------------\n\nFollow the steps in this section to prepare your Windows computer for\ninstallation of the extension:\n\n1. Download and install one of the supported versions of Visual Studio:\n\n - [Visual Studio 2017 Version 15.4.0 (October 9th, 2017) or higher](https://docs.microsoft.com/en-us/visualstudio/install/update-visual-studio?view=vs-2017).\n - [Visual Studio 2019 Version 16.0.0 or higher](https://docs.microsoft.com/en-us/visualstudio/install/update-visual-studio?view=vs-2019).\n - [Visual Studio 2022 Version 17.0.0 or higher](https://docs.microsoft.com/en-us/visualstudio/install/update-visual-studio?view=vs-2022).\n2. [Download and install .NET Core SDK 2.2](https://dotnet.microsoft.com/download/thank-you/dotnet-sdk-2.2.107-windows-x64-installer).\n\n3. [Android Studio 3.5 or higher](/studio) is optional, but can be used\n instead of the Android Game Development Extension to install the\n [Android SDK and NDK](#install-sdk-ndk).\n\n4. Download and install [JDK 17](https://jdk.java.net/archive/) for AGDE\n 23.1.82 or newer, or [JDK 11](https://jdk.java.net/archive/) for up to AGDE\n 22.2.71, and set your `JAVA_HOME` environment variable.\n\nInstall the extension\n---------------------\n\nFollow the steps in this section to download and install the\nAndroid Game Development Extension:\n\n1. Close all instances of Visual Studio.\n\n2. Download the latest extension installer and samples from the\n [Downloads](/games/agde#downloads) page.\n\n3. From your download location, double-click the installer. The installer takes\n several minutes to complete.\n\n4. If you have more than one version of Visual Studio installed, select the\n versions that you would like the extension to be installed for.\n\n5. Click **Finish** to complete the installation.\n\nInstall the Android SDK and NDK\n-------------------------------\n\nYou can install the Android SDK and the Android\n[Native Development Kit (NDK)](/studio/projects/install-ndk#specific-version)\nwith Android Studio or the Android Game Development Extension. To install the SDK and NDK from\nthe extension, use the **SDK Manager**, which is located in the\nextension toolbar of Visual Studio.\n\nWhen installing the NDK, make sure to use the **NDK (Side by side)** checkbox so\nthat the extension can locate it. You must install an NDK version\nthat is supported by the extension\n(see [NDK revision history](/ndk/downloads/revision_history)).\n\nTo install the SDK to a different location than the default, set the\n`ANDROID_SDK_ROOT` environment variable on your computer:\n\n1. Ensure that Visual Studio is closed.\n2. In Windows Search, search for `Environment Variables`.\n3. Select **Edit the system environment variables**.\n4. Click **Environment Variables**.\n5. Under **User Variables** , click **New**.\n6. In the **Variable Name** box, type `ANDROID_SDK_ROOT`.\n7. In the **Variable Value** box, enter the path to the Android SDK.\n8. Reboot your computer.\n\nThe location of the SDK cannot be modified using the SDK Manager window as this\nenvironment variable is the only source-of-truth for the SDK location.\n\nRun the sample\n--------------\n\nFollow the steps in this section to run a provided sample on an\nemulator and then on a physical Android device.\n\n### Configure the platform\n\n1. Unzip the samples zip file into a directory of your choice. The following\n samples are included:\n\n - endless-tunnel\n - HelloJNI\n - Teapot\n2. Start Visual Studio if it is not already running.\n\n3. Open the samples directory. Select **File \\\u003e Open \\\u003e Project/Solution** and\n navigate to the `.sln` file.\n\n4. Select an Android platform:\n\n 1. Select **Build \\\u003e Configuration Manager**.\n 2. Under **Active solution platform** , select **Android-x86_64**.\n\n Android platforms are already configured in the samples (see [add\n more Android platforms](#add-platform) for adding platforms).\n | **Note:** Typical emulator images use x86 or x86_64 ABIs.\n5. Make sure the sample project has the Android SDK and NDK properties\n configured:\n\n **Figure\n 1.** Android platform properties\n - In the **Solution Explorer** , right-click the project and select\n **Properties**.\n\n - Select the **General** properties tab and find the **Platform**\n properties for Android.\n\n | **Note:** Make sure you select an NDK that is installed.\n6. Select the **Android Packaging** properties tab.\n\n **Figure\n 2.** Android packaging properties\n\n You can change the output APK name and directory from this tab. Note that\n some of the Android configuration properties are defined in the property\n pages and are passed to Gradle. For example, the APK name property\n `MSBUILD_ANDROID_OUTPUT_APK_NAME` passes this name to the app `build.gradle`\n file.\n\n### Set up the emulator\n\n1. Start AVD Manager from the extension toolbar in Visual Studio.\n Configure a virtual device and then\n [run it in the Android emulator](/studio/run/emulator).\n\n 1. In the Android Virtual Device Manager, click **Create Virtual Device**.\n 2. Choose a device definition (for example, Pixel 2).\n 3. Select a system image. You should select an x86_64 ABI because this architecture performs faster in the emulator.\n 4. Verify the configuration and click **Finish**.\n2. Start the virtual device by clicking the **Run**\n button in the Android\n Virtual Device Manager.\n\n3. In Visual Studio, the virtual device should appear next to the\n **Start Debugging** toolbar button. Click **Start Debugging** to launch the\n sample app on the device. It may take a few moments for the debugger\n to attach to the app. If you are running the Teapot sample, you can rotate\n the teapot by dragging your mouse cursor across it.\n\n \u003cbr /\u003e\n\n\n **Figure\n 3**. Teapot sample running on an Android emulator\n\n### Set up the device\n\n1. To run the sample on a physical Android device, you may need to create a\n new Android platform in the project. This platform must match the architecture\n of the device. To create a new platform, do the following in Visual Studio:\n\n 1. Select **Build \\\u003e Configuration Manager**.\n 2. Under **Active solution platform** , select **\\\u003cNew\\\u003e**.\n 3. Type one of the following for the new platform:\n\n - **Android-armeabi-v7a**\n - **Android-arm64-v8a**\n - **Android-x86**\n - **Android-x86_64**\n 4. In the **Copy settings from** box, select another existing Android\n platform (or **None** if you do not have any Android platforms yet).\n Make sure you enabled **Create new project platforms**.\n\n2. Connect an Android device to your computer using a USB cable. The device\n type should be shown next to the **Start Debugging** toolbar button.\n\n \u003cbr /\u003e\n\n\n **Figure\n 4** . Connected Android device shown next to the **Start Debugging** toolbar button\n\n If the device is not shown, check the following:\n - The platform selection matches the ABI of your device.\n - [Developer options and USB debugging](/studio/debug/dev-options) are enabled on the device.\n - The USB cable is connected from the device to the computer.\n - The USB cable supports a data connection (and not just power).\n3. Click the **Start Debugging** toolbar button to launch the sample app on the\n device. It may take a few moments for the debugger to attach to the app.\n Once it is attached, you can interact with the app on your device.\n\nFAQ\n---\n\nThe following are some frequently asked questions about the Android Game Development Extension.\n\n### Where are the logs for the plugin located?\n\nYou can open the log file for the plugin using the **Open Logs** icon in the\n**Android Game Development Extension** toolbar.\n\n### What environment variables does the plugin use?\n\nThe plugin uses the following environment variables:\n\n- `ANDROID_SDK_ROOT`\n- `ANDROID_SDK_HOME`\n- `TEMP`\n- `GOOGLE_ANDROID_LOG_DIR`\n\nWhat's next\n-----------\n\nTo use your own project with the extension, you must configure it according to\nthe [project configuration](/games/agde/adapt-existing-project) guide."]]