تنظيم صفحاتك في مجموعات
يمكنك حفظ المحتوى وتصنيفه حسب إعداداتك المفضّلة.
اضبط مشروعًا لاستخدام "إضافة تطوير ألعاب Android".
تستدعي إضافة تطوير الألعاب على Android أداة MSBuild لإنشاء رمز مصدر C/C++ في مكتبات
مشترَكة (.so) ومكتبات ثابتة (.a). وكجزء من عملية الإنشاء، تستدعي مهمة MSBuild مخصّصة أداة Gradle لتجميع رمز مصدر Java وKotlin،
وتعبئة مواد العرض، وإنشاء ملف APK للنشر. عند ضبط
مشروعك، يجب التأكّد من أنّ MSBuild يتضمّن المعلومات التي يحتاجها لإنشاء
نظام التشغيل Android.
إنشاء تطبيقات C/C++ باستخدام MSBuild
يتم إنشاء مشروع Android نموذجي باستخدام Gradle، حيث يتم إنشاء الرمز البرمجي الأصلي داخل
المشروع من خلال عملية Gradle التي تعمل على تشغيل CMake أو
ndk-build. باستخدام إضافة تطوير ألعاب Android في Visual Studio، يتم عكس عملية التصميم. أصبح MSBuild الآن نقطة البداية في عملية
الإنشاء. يتم أولاً إنشاء جميع الرموز المصدر C/C++ بواسطة MSBuild لأنظمة Android الأساسية الجديدة المثبَّتة على نظامك كجزء من الإضافة (مثل "Android-x86_64"). بعد ذلك، يستدعي MSBuild Gradle لحزمة ملف مكتبة
المشترَكة التي تحتوي على منطق C/C++ في حزمة APK.
يجب أولاً تكرار منطق الإنشاء الحالي لمشروعك في CMake أو
ndk-build في MSBuild. اضبط المنصّات المستهدَفة على ما يلي:
Android-x86
Android-x86_64
Android-armeabi-v7a
Android-arm64-v8a
توفّر إضافة Android Game Development Extension جميع هذه الأنظمة الأساسية.
ضبط خيارات الربط والتجميع
يستخدم AGDE حزمة NDK التي تختارها لتحديد خيارات الترجمة والربط التلقائية عند إنشاء جزء C/C++ من تطبيقك.
إذا كنت بحاجة إلى تخصيص خيارات الربط أو الترجمة هذه، يمكنك ضبطها باستخدام
خصائص المشروع. يمكنك العثور على الخيارات الأكثر شيوعًا في مجموعات C/C++
(للتجميع) وLibrarian (لأرشفة المكتبة الثابتة) وLinker (لتجميع
المكتبة الديناميكية). إذا كنت بحاجة إلى تمرير أي خيارات مخصّصة أخرى، يمكنك إضافتها إلى قسم "سطر الأوامر". على سبيل المثال،
إذا كنت تستخدم إصدارًا أقدم من NDK r28، ننصحك بضبط علامة الربط
لجعل تطبيقك يتوافق مع أحجام الصفحات التي تبلغ 16 كيلوبايت.
إضافة نظام Android الأساسي
على الرغم من أنّ نموذج المشروع الذي يعرض إبريق الشاي يتضمّن منصات Android، عليك يدوياً
إضافة منصة Android إلى مشروع حالي. لإضافة نظام أساسي جديد، اتّبِع الخطوات التالية في Visual Studio:
اختَر الإصدار > أداة إدارة التكوين.
ضمن منصّة الحلّ النشطة، اختَر <جديد>.
اكتب أحد الخيارات التالية للنظام الأساسي الجديد:
Android-armeabi-v7a
Android-arm64-v8a
Android-x86
Android-x86_64
في المربّع نسخ الإعدادات من، اختَر منصة Android
حالية أخرى أو <فارغ> إذا لم يكن لديك أي منصات Android حتى الآن.
تأكَّد من تفعيل إنشاء منصات مشاريع جديدة.
إضافة عنصر حزمة APK لنظام التشغيل Android
اختَر إضافة > عنصر جديد > Visual C++ > Android > حزمة APK لنظام التشغيل Android وانقر على
إضافة. اضبط تطبيق Android في مربّع الحوار التالي.
الموقع في "مستكشف الحلول": الموقع الجغرافي للمجلد الافتراضي الذي يحتوي علىملفّات دعم حِزم Android المُضافة. يتم أيضًا تلقائيًا
تضمين هذه الملفات في المشروع ضمن مجلد يحمل الاسم نفسه. يمكنك تخصيص
الموقع من خلال وضع علامة في مربّع الاختيار وضع ملفات الدعم في موقع مخصّص
وحدّد موقعًا مخصّصًا. سيظل المجلد الافتراضي
ضمن المشروع الحالي في "مستكشف الحلول".
جعل MSBuild يستدعي Gradle لإنشاء حزمة APK
لا يمكن لأداة MSBuild استدعاء Gradle ما لم تكن تعرف موقع مشروع Gradle.
اضبط هذا الموقع باستخدام سمة Gradle Build Directory، كما هو موضح في الشكل 1.
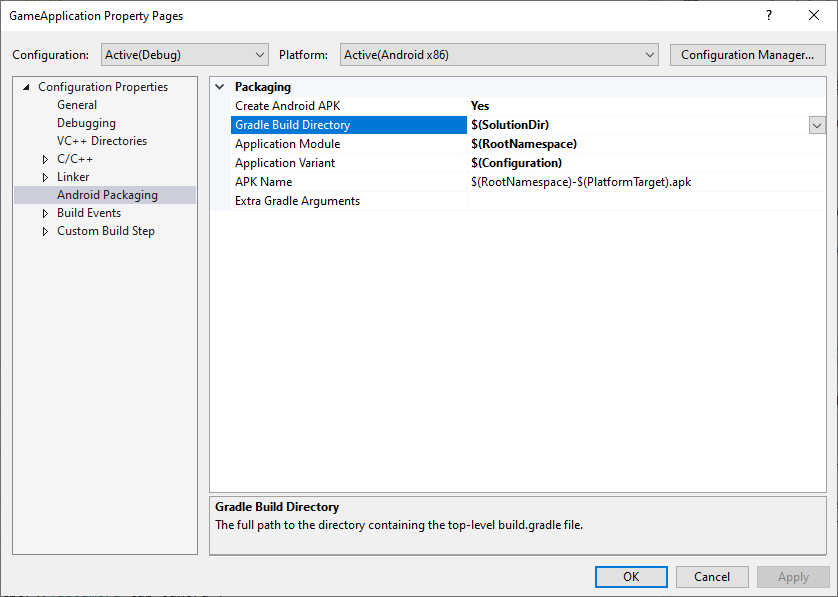
الشكل 1: سمة دليل إنشاء Gradle
بالإضافة إلى ذلك، اضبط سمات وحدة التطبيق وخيار التطبيق واسم APK
(كما هو موضّح في الصورة السابقة) لكي تعرف أداة MSBuild
ما الذي يجب إنشاؤه.
وحدة التطبيق: اسم المشروع الفرعي في Gradle. هذا هو
المشروع الرئيسي الذي تم ضبطه في ملف settings.gradle. ويُشار إليه عادةً باسم app لمشاريع
التي تم إنشاؤها مباشرةً باستخدام "استوديو Android".
صيغة التطبيق: هي نوع Android المطلوب إنشاؤه. يجب
ضبط هذه القيمة وفقًا لإعدادات MSBuild. على سبيل المثال، يجب ضبط قيمة على الصيغة المخصّصة لتصحيح الأخطاء في الإصدار المخصّص لتصحيح الأخطاء. إذا كان اسم ملف MSBuild
الخاص بمشروعك يتطابق مع أسماء الصيغ في Gradle، ما عليك سوى استخدام القيمة
التلقائية $(Configuration).
اسم حزمة APK: اسم ملف APK الذي تم إنشاؤه والمستخدَم لتصحيح الأخطاء وتحليل الأداء على جهاز الكمبيوتر المخصّص للتطوير. يتم تمرير هذا الاسم إلى Gradle ويجب أن يراعي ملف Gradle النصي للإنشاء ذلك (اطّلِع على السمة
MSBUILD_ANDROID_OUTPUT_APK_NAME في القسم التالي).
تعديل نصوص إنشاء Gradle البرمجية
أثناء عملية التصميم، يُرسِل MSBuild المعلومات التالية كخصائص للمشروع
إلى نص Gradle البرمجي. غيِّر نصوص إنشاء مشروعك الحالية (التي يُطلق عليها عادةً اسم build.gradle) لقراءة هذه السمات.
MSBUILD_MIN_SDK_VERSION: الحد الأدنى لإصدار حزمة تطوير البرامج (SDK) لإنشاء حزمة APK، على هيئة
سلسلة. اضبط هذه القيمة في مربّع الحد الأدنى لإصدار حزمة تطوير البرامج (SDK) لنظام التشغيل Android في
صفحة سمات المشروع الموضّحة في الشكل 2.
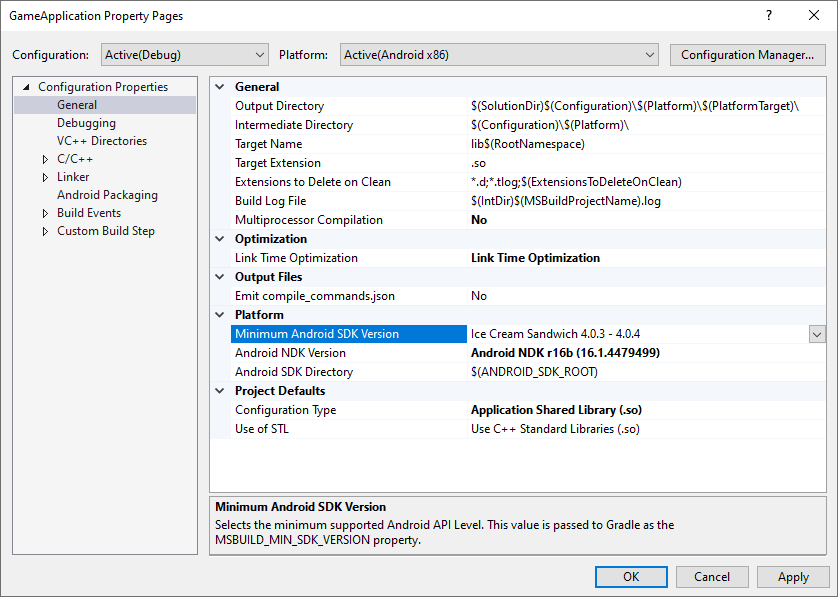
الشكل 2: سمة الحد الأدنى لإصدار حزمة تطوير البرامج (SDK) لنظام التشغيل Android
من المفترض أن يضبط نص إنشاء Gradle القيمة minSdkVersion أو minSdk على قيمة السلسلة هذه، مع تحويل النوع toInteger() عند الضرورة.
MSBUILD_ANDROID_OUTPUT_APK_NAME: الاسم المتوقّع لحزمة APK التي ينشئها Gradle. ستبحث إضافة Android Game Development Extension عن حزمة APK تتطابق مع هذا الاسم، ثم ستعرضها على الأجهزة المتصلة (لتصحيح الأخطاء وإنشاء ملف تعريف الأداء). اضبط هذه القيمة في مربّع اسم حزمة APK في صفحة خاصية المشروع الموضّحة في الشكل 3.
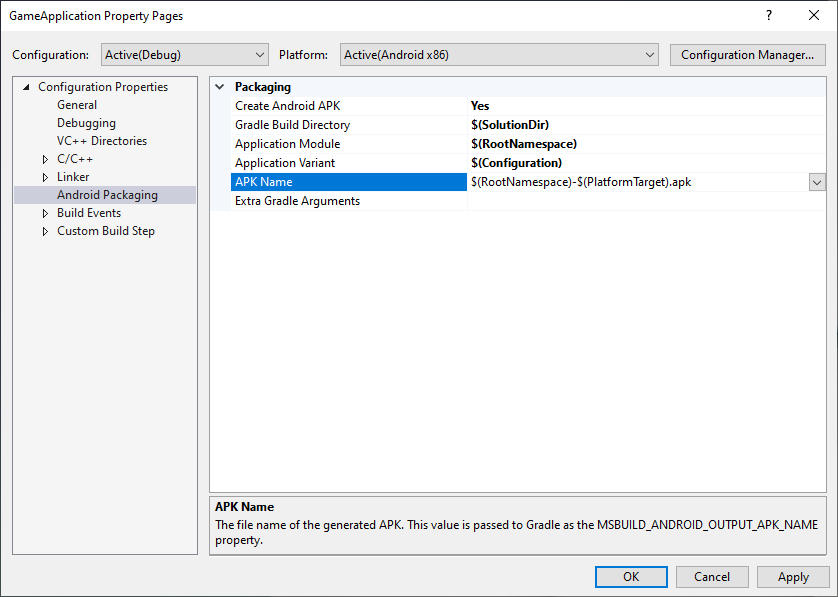
الشكل 3: سمة اسم حزمة APK
يجب أن يراعي نص إنشاء Gradle هذه السمة. على سبيل المثال، يضبط المثال التالي اسم حزمة APK الناتجة لجميع الصيغ على الاسم الذي يختاره MSBuild.
MSBUILD_JNI_LIBS_SRC_DIR: الدليل الذي يحتوي على المكتبات المشترَكة
(ملفات .so) التي أنشأها MSBuild اضبط هذه القيمة في مربّع دليل الإخراج
في صفحة موقع المشروع الموضّحة أدناه. تكون هذه القيمة تلقائيًا هي
خاصية دليل الإخراج لمشروع Visual Studio، كما هو موضّح في الشكل 4.
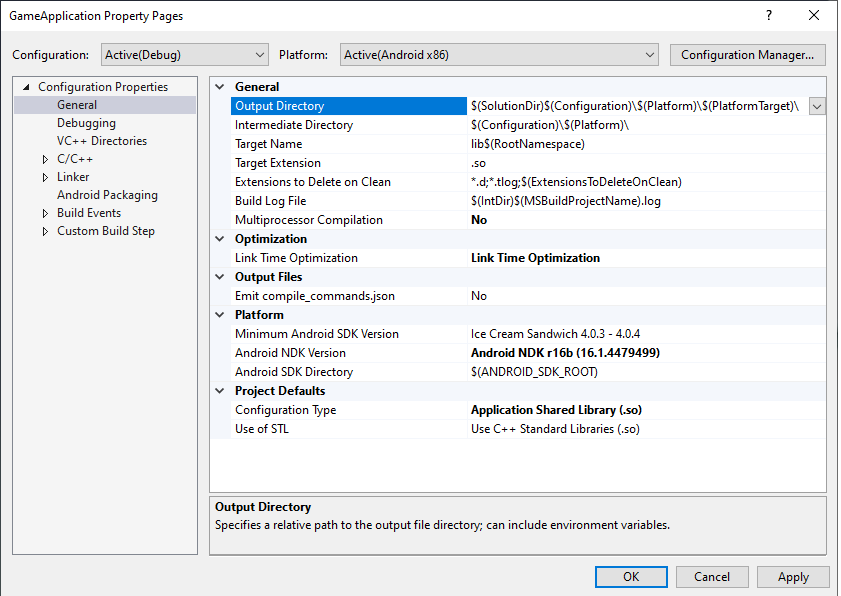
الشكل 4: سمة دليل الإخراج
من المفترض أن يحزم Gradle ملفات المكتبة المشتركة في هذا المجلد داخل حزمة APK
لكي يتم تحميلها من خلال تطبيق Android أثناء التشغيل.
بالإضافة إلى ذلك، بما أنّ أي رمز C/C++ يتم إنشاؤه الآن بواسطة MSBuild، عليك إزالة أقسام
externalNativeBuild في نصوص Gradle البرمجية لإنشاء الحِزم. كانت هذه الأقسام
تُستخدَم لتشغيل CMake أو ndk-build لتجميع رمز C/C++، ولكن
لم تعُد مطلوبة.
MSBUILD_NDK_VERSION: إصدار حِزم NDK المطلوب استخدامه لإنشاء
مشروعك. اضبط هذه القيمة في مربّع إصدار Android NDK في
صفحة موقع المشروع الموضّحة في الشكل 5.
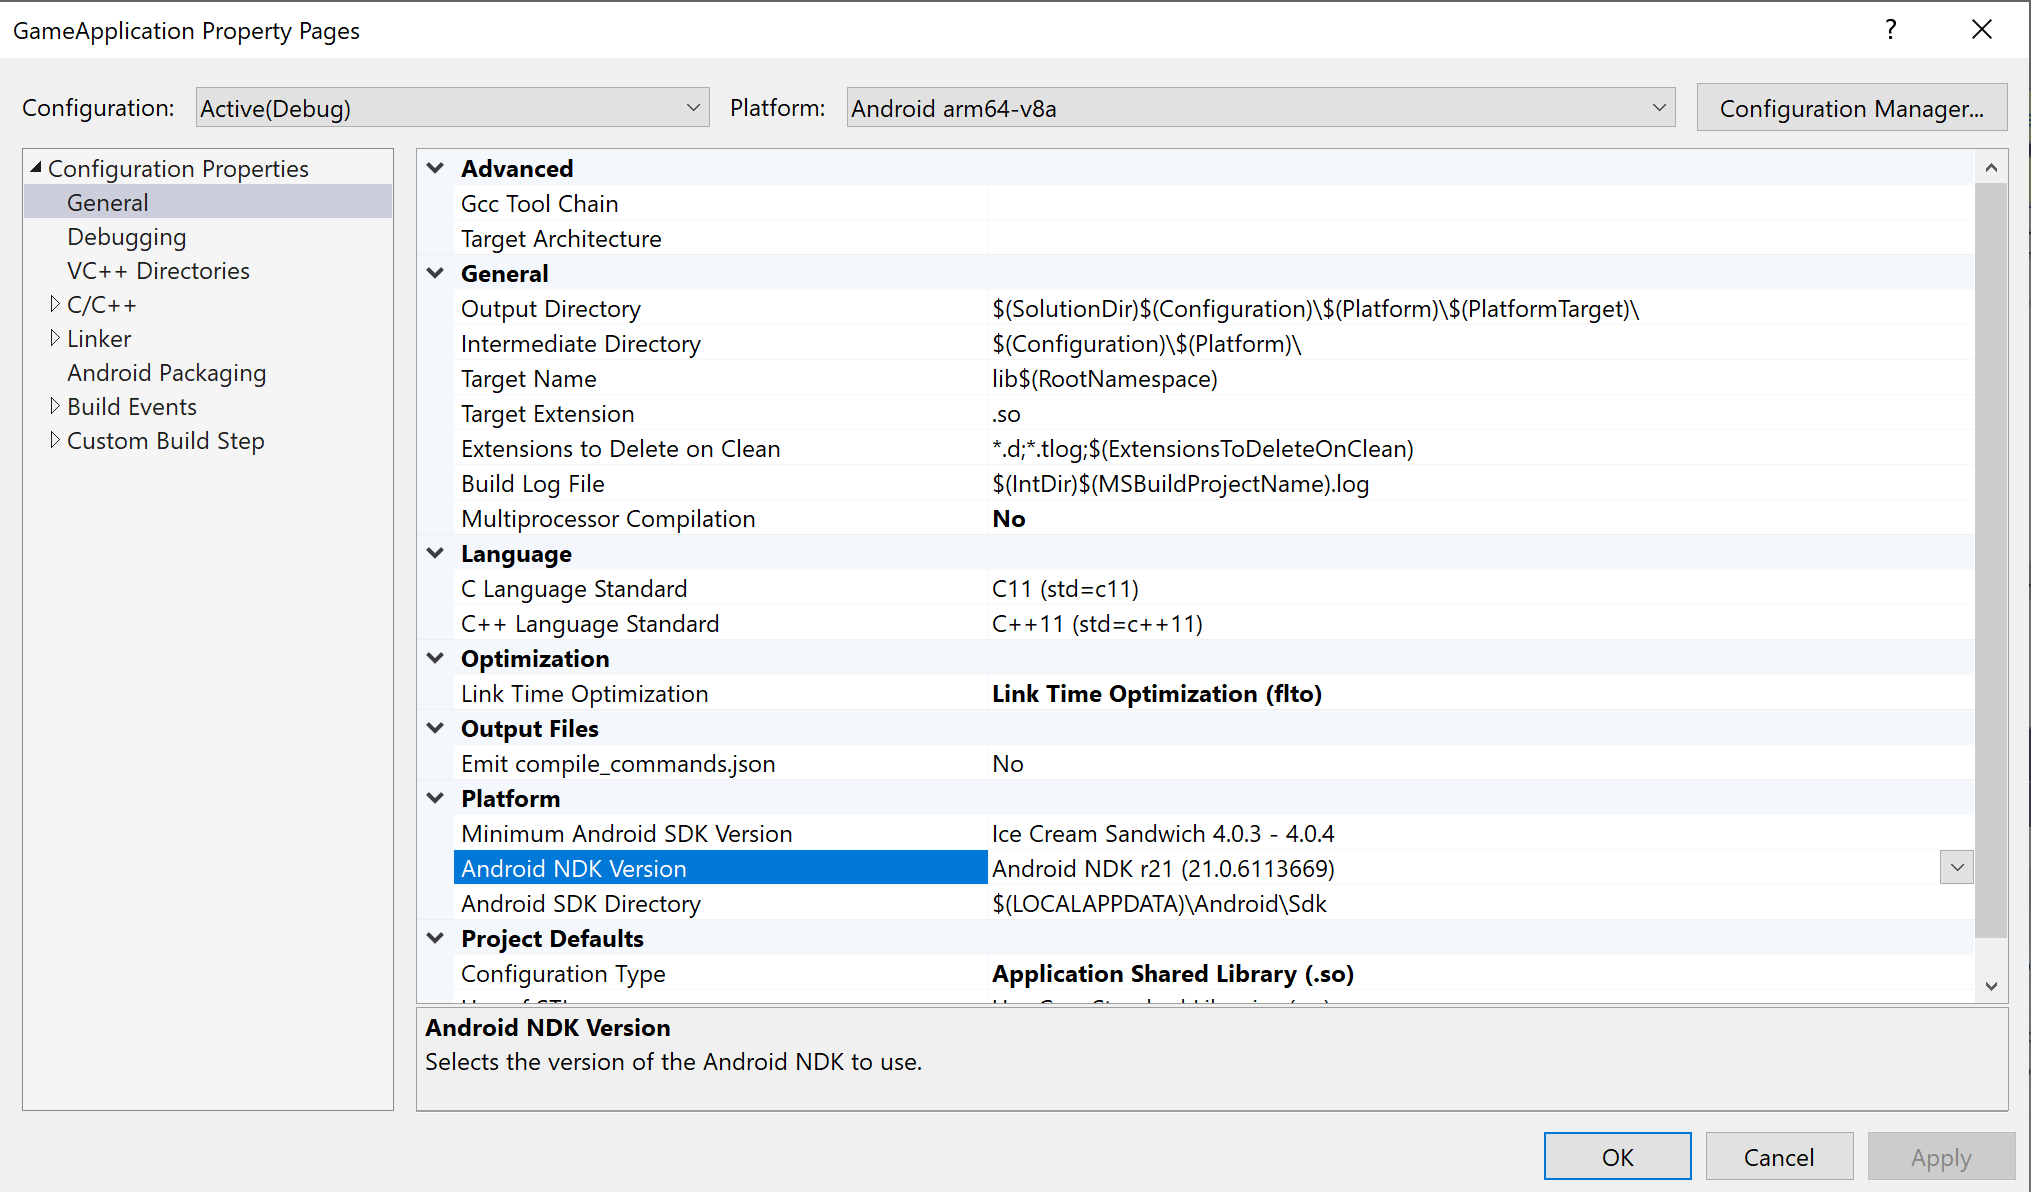
الشكل 5 سمة إصدار Android NDK
من المفترض أن يضبط نص إنشاء Gradle القيمة ndkVersion على هذه القيمة، كما هو موضّح:
يخضع كل من المحتوى وعيّنات التعليمات البرمجية في هذه الصفحة للتراخيص الموضحّة في ترخيص استخدام المحتوى. إنّ Java وOpenJDK هما علامتان تجاريتان مسجَّلتان لشركة Oracle و/أو الشركات التابعة لها.
تاريخ التعديل الأخير: 2025-07-27 (حسب التوقيت العالمي المتفَّق عليه)
[[["يسهُل فهم المحتوى.","easyToUnderstand","thumb-up"],["ساعَدني المحتوى في حلّ مشكلتي.","solvedMyProblem","thumb-up"],["غير ذلك","otherUp","thumb-up"]],[["لا يحتوي على المعلومات التي أحتاج إليها.","missingTheInformationINeed","thumb-down"],["الخطوات معقدة للغاية / كثيرة جدًا.","tooComplicatedTooManySteps","thumb-down"],["المحتوى قديم.","outOfDate","thumb-down"],["ثمة مشكلة في الترجمة.","translationIssue","thumb-down"],["مشكلة في العيّنات / التعليمات البرمجية","samplesCodeIssue","thumb-down"],["غير ذلك","otherDown","thumb-down"]],["تاريخ التعديل الأخير: 2025-07-27 (حسب التوقيت العالمي المتفَّق عليه)"],[],[],null,["# Configure a project to use the Android Game Development Extension.\n\nThe Android Game Development Extension invokes MSBuild to build C/C++ source code into shared\nlibraries (`.so`) and static libraries (`.a`). As part of the build process, a\ncustom MSBuild task invokes Gradle to compile Java and Kotlin source code,\npackage assets, and generate an APK file for deployment. When you configure your\nproject, you must ensure that MSBuild has the information it needs to build for\nthe Android platform.\n\nBuild C/C++ with MSBuild\n------------------------\n\nA typical Android project is built with Gradle, where the native code inside the\nproject is built by a Gradle pass that runs either [CMake](/ndk/guides/cmake) or\n[ndk-build](/ndk/guides/ndk-build). With the Android Game Development Extension for Visual\nStudio, the build process is inverted. Now MSBuild is the starting point of the\nbuild process. All C/C++ source code is built first by MSBuild for the new\nAndroid platforms installed on your system as part of the extension (for\nexample, \"Android-x86_64\"). MSBuild then invokes Gradle to package the shared\nlibrary files that contain your C/C++ logic into an APK.\n\nYou should first replicate your project's existing build logic in CMake or\nndk-build in MSBuild. Set the target platforms to the following:\n\n- Android-x86\n- Android-x86_64\n- Android-armeabi-v7a\n- Android-arm64-v8a\n\nThese platforms are all provided by the Android Game Development Extension.\n\n### Set your compile and link options\n\nAGDE uses the NDK you select to determine the default compile and link options\nwhen building the C/C++ part of your app.\n\nIf you need to customize these compile or link options, you can set them using\nProject Properties. You can find the most common options in the C/C++\n(for compilation), Librarian (for static library archiving) and Linker (for\ndynamic library linking) groups. If you need to pass any other custom\noptions, you can add them to the Command Line section. For example,\nif you are using an NDK older than r28, you might want to set the linker flag\nto make your app [support 16 KB page sizes](/guide/practices/page-sizes#compile-16-kb-alignment).\n\n### Add an Android Platform\n\nWhile the teapot sample project includes Android platforms, you must manually\nadd an Android platform to an existing project. To add a new platform, do the\nfollowing in Visual Studio:\n\n1. Select **Build \\\u003e Configuration Manager**.\n2. Under **Active solution platform** , select **\\\u003cNew\\\u003e**.\n3. Type one of the following for the new platform:\n\n - **Android-armeabi-v7a**\n - **Android-arm64-v8a**\n - **Android-x86**\n - **Android-x86_64**\n4. In the **Copy settings from** box, select another existing Android\n platform, or **\\\u003cEmpty\\\u003e** if you do not have any Android platforms yet.\n Make sure you enabled **Create new project platforms**.\n\n### Add an Android APK item\n\nSelect **Add \\\u003e New Item \\\u003e Visual C++ \\\u003e Android \\\u003e Android APK** and click\n**Add**. Configure the Android application on the following dialog.\n\n- **Application Name**: The human-readable name of your Android application.\n- **Application ID** : The [unique identifier](/studio/build/configure-app-module#set_the_application_id) for your Android application.\n- **Solution Explorer Location** : Location of the virtual folder that contains the added Android packaging support files. By default, these files are also located in the project in a folder with the same name. You can customize the location by selecting the **Put support files in a custom location** checkbox and specifying a custom location. The virtual folder will still be under the current project in the Solution Explorer.\n\nMake MSBuild invoke Gradle to build an APK\n------------------------------------------\n\nMSBuild cannot invoke Gradle unless it knows the location of the Gradle project.\nSet this location using the **Gradle Build Directory** property, as\nshown in figure 1.\n\n\u003cbr /\u003e\n\n\n**Figure 1** . **Gradle Build Directory** property\n\nIn addition, set the **Application Module** , **Application Variant** , and **APK\nName** properties (as shown in the previous image) in order for MSBuild to know\nwhat to build.\n\n- **Application Module** : The name of the Gradle subproject. This is the main project set in the `settings.gradle` file. It is usually called `app` for projects directly created using Android Studio.\n- **Application Variant** : The Android variant to build. This value should be set according to the MSBuild configurations. For example, a debug build should have a value set to the debug variant. If your project's MSBuild configuration name matches the Gradle variant names, then just use the default value of `$(Configuration)`.\n- **APK Name** : The name of the generated APK file used for debugging and profiling on your development computer. This name is passed to Gradle and your Gradle build script should respect this (see the property `MSBUILD_ANDROID_OUTPUT_APK_NAME` in the following section).\n\n### Modify your Gradle build scripts\n\nDuring the build, MSBuild passes the following information as project properties\nto the Gradle script. Change your project's existing build scripts (typically\nnamed `build.gradle`) to read these properties.\n\n- `MSBUILD_MIN_SDK_VERSION`: The minimum SDK version for building the APK, as a\n string. Set this value in the **Minimum Android SDK Version** box on the\n project property page shown in figure 2.\n\n \u003cbr /\u003e\n\n\n **Figure 2** . **Minimum Android SDK Version** property\n\n The Gradle build script should set `minSdkVersion` or `minSdk` to this\n string value, with a `toInteger()` type conversion when necessary. \n\n ### Groovy\n\n ```groovy\n android {\n // ...\n\n defaultConfig {\n applicationId \"com.yourcompany.yourapp\"\n minSdkVersion MSBUILD_MIN_SDK_VERSION\n // Or: minSdk MSBUILD_MIN_SDK_VERSION.toInteger()\n // ...\n }\n\n // ...\n }\n ```\n\n ### Kotlin\n\n ```kotlin\n android {\n // ...\n\n defaultConfig {\n applicationId = \"com.yourcompany.yourapp\"\n minSdkVersion(MSBUILD_MIN_SDK_VERSION)\n // Or: minSdk = MSBUILD_MIN_SDK_VERSION.toInteger()\n // ...\n }\n\n // ...\n }\n ```\n- `MSBUILD_ANDROID_OUTPUT_APK_NAME`: The expected name of the APK that Gradle\n builds. The Android Game Development Extension will look for an APK matching this name and\n then deploy it to connected devices (for debugging and profiling). Set this\n value in the **APK Name** box on the project property page shown in figure 3.\n\n \u003cbr /\u003e\n\n\n **Figure 3** . **APK Name** property\n\n The Gradle build script must respect this property. For example, the\n following example sets the output APK name for all variants to the name\n chosen by MSBuild. \n\n ### Groovy\n\n ```groovy\n android {\n // ...\n\n applicationVariants.all { variant -\u003e\n variant.outputs.all {\n outputFileName = MSBUILD_ANDROID_OUTPUT_APK_NAME\n }\n }\n\n // ...\n }\n ```\n\n ### Kotlin\n\n ```kotlin\n android {\n // ...\n\n applicationVariants.all { variant -\u003e\n variant.outputs.all {\n outputFileName = MSBUILD_ANDROID_OUTPUT_APK_NAME\n }\n }\n\n // ...\n }\n ```\n- `MSBUILD_JNI_LIBS_SRC_DIR`: The directory containing the shared libraries\n (`.so` files) built by MSBuild. Set this value in the **Output Directory**\n box on the project property page shown below. By default, this value is the\n output directory property for the Visual Studio project, as shown in figure 4.\n\n \u003cbr /\u003e\n\n\n **Figure 4** . **Output Directory** property\n\n Gradle should package the shared library files in this folder inside the APK\n in order for the Android application to load them at runtime. \n\n ### Groovy\n\n ```groovy\n android {\n // ...\n\n sourceSets {\n main {\n jniLibs.srcDirs += [MSBUILD_JNI_LIBS_SRC_DIR]\n }\n }\n\n // ...\n }\n ```\n\n ### Kotlin\n\n ```kotlin\n android {\n // ...\n\n sourceSets.getByName(\"main\") {\n jniLibs.srcDir(MSBUILD_JNI_LIBS_SRC_DIR)\n }\n\n // ...\n }\n ```\n\n In addition, since any C/C++ code is now built by MSBuild, remove the\n `externalNativeBuild` sections in your Gradle build scripts. These sections\n were used to invoke CMake or ndk-build to compile your C/C++ code, but are\n no longer needed.\n- `MSBUILD_NDK_VERSION`: The version of the NDK to use to build your\n project. Set this value in the **Android NDK Version** box on the\n project property page shown in figure 5.\n\n \u003cbr /\u003e\n\n\n **Figure 5** . **Android NDK Version** property\n\n The Gradle build script should set `ndkVersion` to this value, as shown: \n\n ### Groovy\n\n ```groovy\n android {\n // ...\n\n ndkVersion MSBUILD_NDK_VERSION\n\n // ...\n }\n ```\n\n ### Kotlin\n\n ```kotlin\n android {\n // ...\n\n ndkVersion = MSBUILD_NDK_VERSION\n\n // ...\n }\n ```\n\n For more information, see the Android Studio topic\n [Install and configure the NDK and CMake](/studio/projects/install-ndk)."]]