تنظيم صفحاتك في مجموعات
يمكنك حفظ المحتوى وتصنيفه حسب إعداداتك المفضّلة.
لتجميع الرمز البرمجي الأصلي وتصحيحه في تطبيقك، يجب توفُّر المكوّنات التالية:
حزمة تطوير البرامج الأصلية (NDK) لنظام التشغيل Android: هي مجموعة من الأدوات التي تتيح لك استخدام رموز C وC++ مع Android.
CMake: هي أداة إنشاء خارجية تعمل جنبًا إلى جنب مع Gradle لإنشاء المكتبة المجمّعة من رموز برمجية أصلية. لست بحاجة إلى هذا المكوّن إذا كنت تخطّط لاستخدام ndk-build فقط.
LLDB: هو برنامج تصحيح الأخطاء الذي يستخدمه "استوديو Android" لتصحيح أخطاء الرمز البرمجي الأصلي. سيتم تثبيت LLDB تلقائيًا مع "استوديو Android".
توضّح هذه الصفحة كيفية تثبيت هذه المكوّنات تلقائيًا أو باستخدام Android Studio أو أداة sdkmanager لتنزيلها وتثبيتها يدويًا.
تثبيت NDK وCMake تلقائيًا
يمكن للإصدار 4.2.0 من "المكوّن الإضافي لنظام Gradle المتوافق مع Android" والإصدارات الأحدث تثبيت NDK وCMake المطلوبَين تلقائيًا عند إنشاء مشروعك لأول مرة، وذلك في حال الموافقة على تراخيصها مسبقًا.
إذا سبق لك قراءة بنود الترخيص والموافقة عليها، يمكنك قبول التراخيص مسبقًا في النصوص البرمجية باستخدام الأمر التالي:
عند تثبيت NDK، يختار Android Studio أحدث إصدار متاح من NDK. بالنسبة إلى معظم المشاريع، يكون تثبيت هذا الإصدار التلقائي من NDK كافيًا.
إذا كان مشروعك يحتاج إلى إصدار واحد أو أكثر من NDK، يمكنك تنزيل إصدارات محدّدة وضبطها. ويساعدك ذلك في ضمان إنشاء إصدارات قابلة للتكرار في جميع المشاريع التي يعتمد كل منها على إصدار معيّن من NDK. يُثبِّت "استوديو Android" جميع إصدارات NDK في الدليل android-sdk/ndk/.
لتثبيت CMake وNDK التلقائي في Android Studio، اتّبِع الخطوات التالية:
بعد فتح مشروع، انقر على الأدوات > مدير حزمة تطوير البرامج (SDK).
انقر على علامة التبويب أدوات حزمة تطوير البرامج (SDK).
ضَع علامة في مربّعات الاختيار NDK (جنبًا إلى جنب) وCMake.
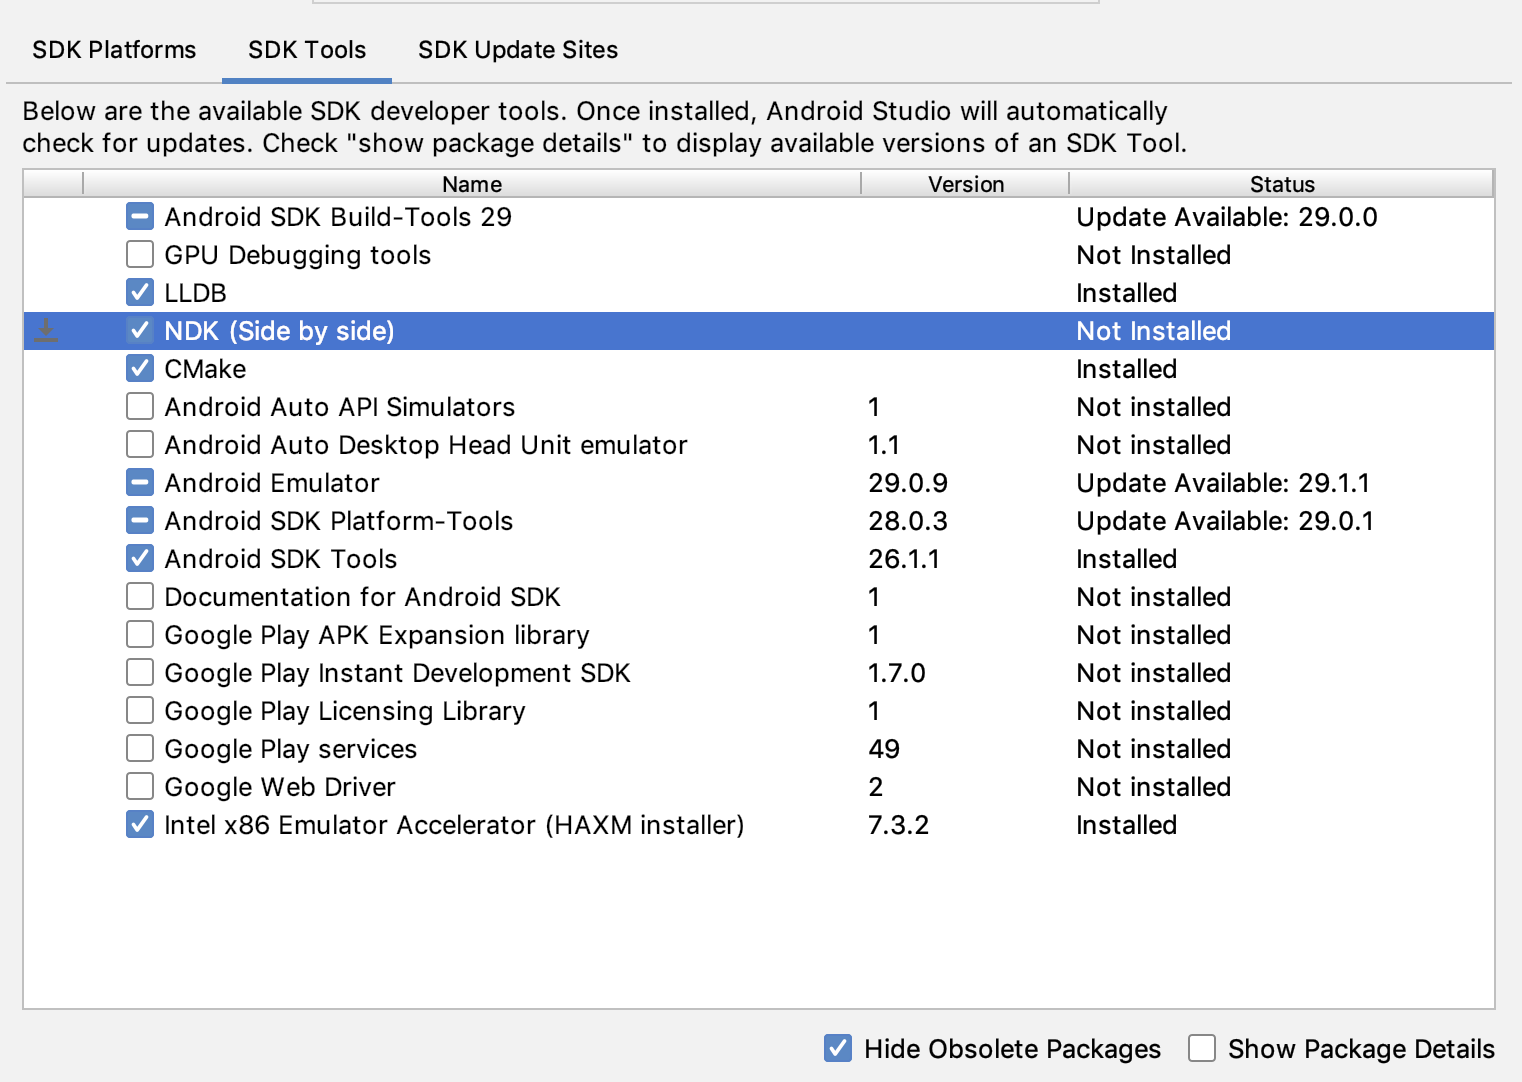
الشكل 1. نافذة أدوات حزمة تطوير البرامج (SDK) التي تعرض الخيار NDK (جنبًا إلى جنب)
انقر على موافق.
يخبرك مربّع حوار بمقدار المساحة التي تستهلكها حزمة NDK على القرص.
انقر على موافق.
عند اكتمال التثبيت، انقر على إنهاء.
تتم مزامنة ملف الإصدار تلقائيًا في مشروعك ويتم تنفيذ عملية إنشاء.
أصلِح أي أخطاء تحدث.
ضبط إصدار معيّن من CMake
يتضمّن "مدير حزمة تطوير البرامج" (SDK Manager) الإصدار المتفرّع 3.6.0 من CMake والإصدار 3.10.2. يتم إنشاء المشاريع التي لا تحدّد إصدارًا معيّنًا من CMake باستخدام CMake 3.10.2. لضبط إصدار CMake، أضِف ما يلي إلى ملف build.gradle الخاص بالوحدة:
إذا أردت استخدام إصدار CMake غير مضمّن في
SDK Manager، اتّبِع الخطوات التالية:
نزِّل CMake وثبِّته
من موقع CMake الإلكتروني الرسمي.
حدِّد إصدار CMake الذي تريد أن يستخدمه Gradle في ملف build.gradle الخاص بالوحدة.
يمكنك إضافة مسار تثبيت CMake إلى متغير بيئة PATH أو تضمينه في ملف local.properties الخاص بمشروعك، كما هو موضّح. إذا تعذّر على Gradle العثور على إصدار CMake الذي حدّدته في ملف build.gradle، سيظهر لك خطأ في الإنشاء.
# If you set this property, Gradle no longer uses PATH to find CMake.
cmake.dir = "path-to-cmake"</pre>
إذا لم يكن نظام إنشاء Ninja مثبَّتًا على محطة العمل، انتقِل إلى موقع Ninja الإلكتروني الرسمي، ثم نزِّل أحدث إصدار من Ninja متاح لنظام التشغيل وثبِّته.
احرص أيضًا على إضافة مسار تثبيت Ninja إلى متغيّر البيئة PATH.
تثبيت إصدار معيّن من NDK
لتثبيت إصدار معيّن من NDK، اتّبِع الخطوات التالية:
بعد فتح مشروع، انقر على الأدوات > مدير حزمة تطوير البرامج (SDK).
انقر على علامة التبويب أدوات حزمة تطوير البرامج (SDK).
ضَع علامة في مربّع الاختيار عرض تفاصيل الحزمة.
ضَع علامة في مربّع الاختيار NDK (تثبيت إصدارين جنبًا إلى جنب) ومربّعات الاختيار أدناه التي تتوافق مع إصدارات NDK التي تريد تثبيتها. يثبِّت "استوديو Android" جميع إصدارات NDK في الدليل android-sdk/ndk/.
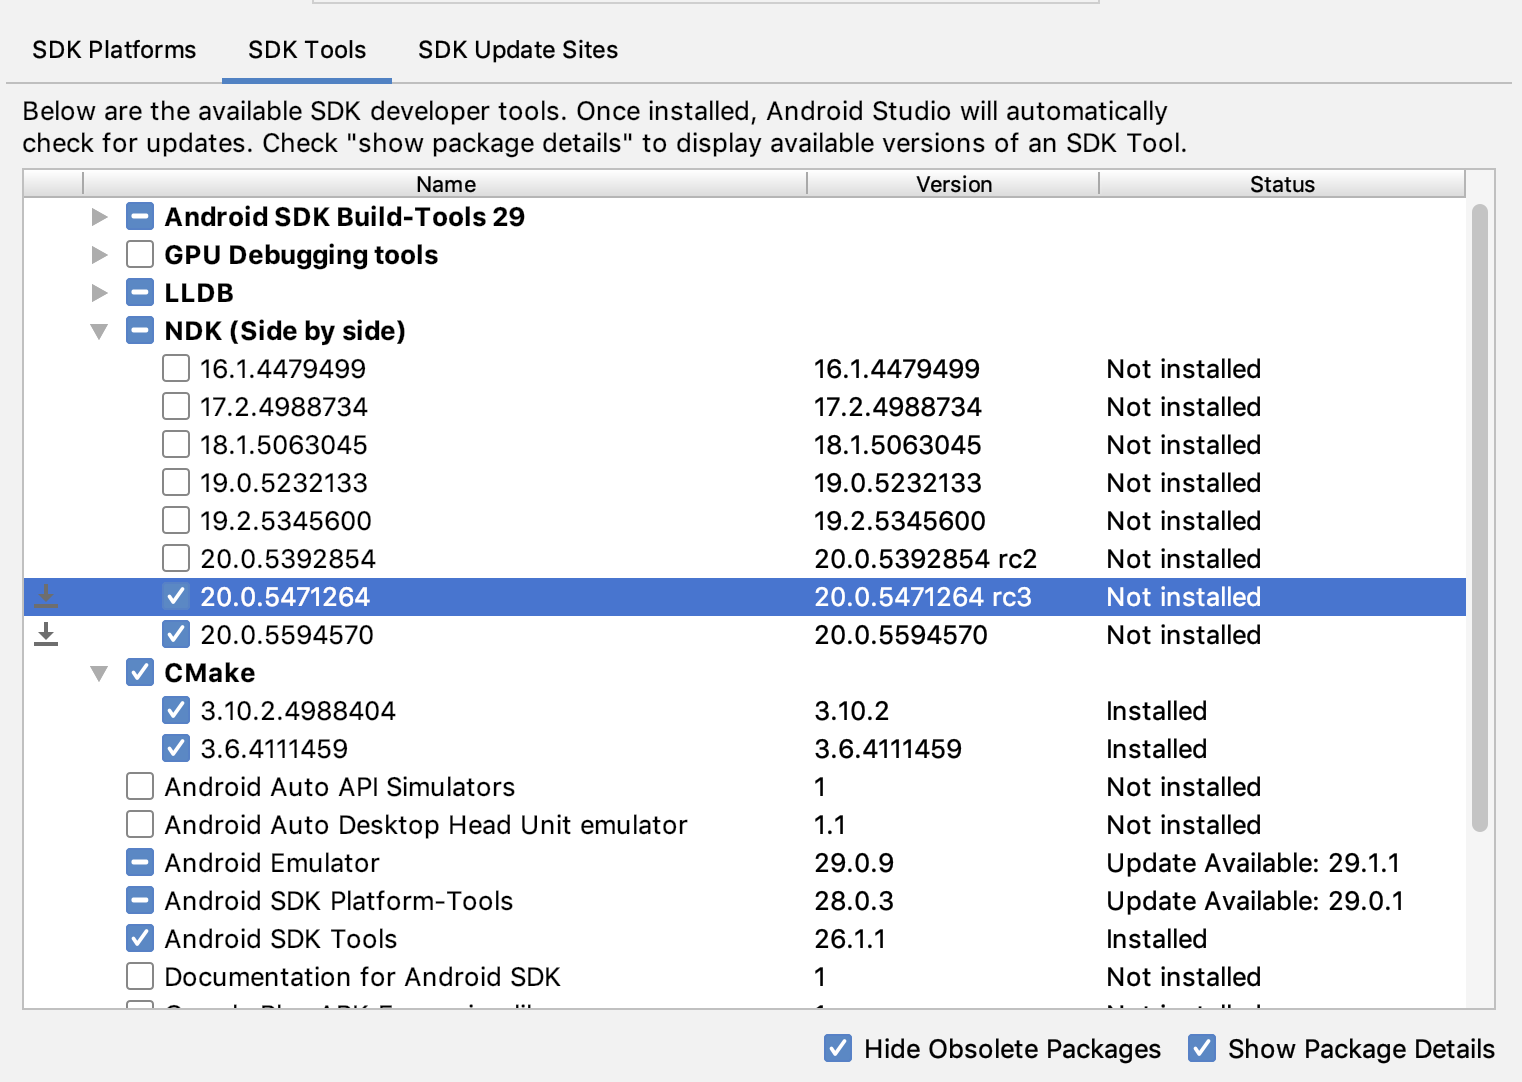
الشكل 2. نافذة أدوات حزمة تطوير البرامج (SDK) التي تعرض خيارات NDK (جنبًا إلى جنب)
انقر على موافق.
يخبرك مربّع حوار بمقدار المساحة التي تستهلكها حِزم NDK.
انقر على موافق.
عند اكتمال التثبيت، انقر على إنهاء.
تتم مزامنة ملف الإصدار تلقائيًا في مشروعك ويتم تنفيذ عملية إنشاء.
أصلِح أي أخطاء تحدث.
اضبط كل وحدة باستخدام إصدار NDK الذي تريد أن تستخدمه. عند استخدام الإصدار 3.6 من Android Studio أو إصدار أحدث، إذا لم تحدّد الإصدار، سيختار المكوّن الإضافي Android Gradle إصدارًا معروفًا بتوافقه مع الإصدارات الأخرى.
ضبط إصدارات معيّنة من NDK في مشروعك
قد تحتاج إلى ضبط إصدار NDK في مشروعك إذا كان أي مما يلي صحيحًا:
لديك إصدارات متعددة من NDK مثبَّتة وتريد استخدام إصدار محدّد. في هذه الحالة، حدِّد الإصدار باستخدام السمة android.ndkVersion
في ملف build.gradle الخاص بالوحدة، كما هو موضّح في نموذج الرمز التالي.
يخضع كل من المحتوى وعيّنات التعليمات البرمجية في هذه الصفحة للتراخيص الموضحّة في ترخيص استخدام المحتوى. إنّ Java وOpenJDK هما علامتان تجاريتان مسجَّلتان لشركة Oracle و/أو الشركات التابعة لها.
تاريخ التعديل الأخير: 2025-08-21 (حسب التوقيت العالمي المتفَّق عليه)
[[["يسهُل فهم المحتوى.","easyToUnderstand","thumb-up"],["ساعَدني المحتوى في حلّ مشكلتي.","solvedMyProblem","thumb-up"],["غير ذلك","otherUp","thumb-up"]],[["لا يحتوي على المعلومات التي أحتاج إليها.","missingTheInformationINeed","thumb-down"],["الخطوات معقدة للغاية / كثيرة جدًا.","tooComplicatedTooManySteps","thumb-down"],["المحتوى قديم.","outOfDate","thumb-down"],["ثمة مشكلة في الترجمة.","translationIssue","thumb-down"],["مشكلة في العيّنات / التعليمات البرمجية","samplesCodeIssue","thumb-down"],["غير ذلك","otherDown","thumb-down"]],["تاريخ التعديل الأخير: 2025-08-21 (حسب التوقيت العالمي المتفَّق عليه)"],[],[],null,["To compile and debug native code for your app, you need the following components:\n\n- The Android Native Development Kit (NDK): a set of tools that allows you to use C and C++ code with Android.\n- CMake: an external build tool that works alongside Gradle to build your native library. You do not need this component if you only plan to use ndk-build.\n- LLDB: the debugger Android Studio uses to debug native code. By default, LLDB will be installed alongside Android Studio.\n\nThis page describes how to install these components automatically, or by using\nAndroid Studio or the `sdkmanager` tool to download and install them manually.\n\nInstall NDK and CMake automatically\n\nAndroid Gradle Plugin 4.2.0+ can automatically install the required NDK and CMake\nthe first time you build your project if their licenses have been accepted in advance.\nIf you've already read and agree to the license terms, then you can pre-accept\nthe licenses in scripts with the following command: \n\n yes | ${sdk}/cmdline-tools/latest/bin/sdkmanager --licenses\n\nInstall the NDK and CMake\n\nWhen you install the NDK, Android Studio selects the latest available NDK. For\nmost projects, installing this default version of the NDK is sufficient.\nIf your project needs one or more specific versions of the NDK, though, you can\n[download and configure specific versions](#specific-version). Doing so helps\nyou ensure reproducible builds across projects that each depend on a specific\nversion of the NDK. Android Studio installs all versions of the NDK in the\n\u003cvar translate=\"no\"\u003eandroid-sdk\u003c/var\u003e`/ndk/` directory.\n\nTo install CMake and the default NDK in Android Studio, do the following:\n\n1. With a project open, click **Tools \\\u003e SDK Manager**.\n\n2. Click the **SDK Tools** tab.\n\n3. Select the **NDK (Side by side)** and **CMake** checkboxes.\n\n\n **Figure 1.** The **SDK Tools** window showing the **NDK (Side by side)**\n option\n | **Note:** If you have an NDK installed in the `ndk-bundle` folder, it appears in the list with the label **NDK** . If you are using Android Gradle plugin 3.5.0 or later, you can select this checkbox or clear it. Clearing the checkbox uninstalls the NDK, freeing up disk space, and causes the checkbox to disappear from the list. If you uninstall the legacy NDK, remove the `ndk.dir` value, which is now deprecated, from your projects' `local.properties` files.\n4. Click **OK**.\n\n A dialog box tells you how much space the NDK package consumes on disk.\n5. Click **OK**.\n\n6. When the installation is complete, click **Finish**.\n\n7. Your project automatically syncs the build file and performs a build.\n Resolve any errors that occur.\n\nConfigure a specific version of CMake\n\nThe SDK Manager includes the 3.6.0 forked version of\nCMake and version 3.10.2. Projects that don't set a\nspecific CMake version are built with CMake 3.10.2. To\nset the CMake version, add the following to your module's `build.gradle` file: \n\nGroovy \n\n```groovy\nandroid {\n ...\n externalNativeBuild {\n cmake {\n ...\n version \"\u003cvar translate=\"no\"\u003ecmake-version\u003c/var\u003e\"\n }\n }\n}\n```\n\nKotlin \n\n```kotlin\nandroid {\n ...\n externalNativeBuild {\n cmake {\n ...\n version = \"\u003cvar translate=\"no\"\u003ecmake-version\u003c/var\u003e\"\n }\n }\n}\n```\n\nIf you want to use a CMake version that is not included by the\nSDK Manager, follow these steps:\n\n1. Download and install [CMake](https://cmake.org/download/) from the official CMake website.\n2. Specify the CMake version you want Gradle to use in your module's `build.gradle` file.\n3. Either add the path to the CMake installation to your `PATH` environment\n variable or include it in your project's `local.properties` file, as\n shown. If Gradle is unable to find the version of CMake you specified in\n your `build.gradle` file, you get a build error.\n\n # If you set this property, Gradle no longer uses PATH to find CMake.\n cmake.dir = \"\u003cvar translate=\"no\"\u003epath-to-cmake\u003c/var\u003e\"\u003c/pre\u003e\n\n4. If you don't already have the Ninja build system installed on your\n workstation, go to the [official Ninja website](https://ninja-build.org/),\n and download and install the latest version of Ninja available for your OS.\n Make sure to also add the path to the Ninja installation to your\n `PATH` environment variable.\n\nInstall a specific version of the NDK\n\nTo install a specific version of the NDK, do the following:\n\n1. With a project open, click **Tools \\\u003e SDK Manager**.\n\n2. Click the **SDK Tools** tab.\n\n3. Select the **Show Package Details** checkbox.\n\n4. Select the **NDK (Side by side)** checkbox and the checkboxes below it that\n correspond to the NDK versions you want to install. Android Studio installs\n all versions of the NDK in the \u003cvar translate=\"no\"\u003eandroid-sdk\u003c/var\u003e`/ndk/`\n directory.\n\n | **Note:** Preview releases (for example, canary and beta) of the NDK do not show up in this list unless you [change the update channel](/studio/preview/install-preview#change_your_update_channel) for Android Studio. You can [install an Android Studio preview](/studio/preview/install-preview) side-by-side with the stable version.\n\n\n **Figure 2.** The **SDK Tools** window showing the **NDK (Side by side)**\n options\n | **Note:** If you have an NDK installed in the `ndk-bundle` folder, it appears in the list with the label **NDK** . If you are using Gradle version 3.5 or later, you can select this checkbox or clear it. Clearing it uninstalls the NDK installed, freeing up disk space, and cause the checkbox to disappear from the list. If you uninstall the legacy NDK, remove the `ndk.dir` value, which is now deprecated, from your projects' `local.properties` files.\n5. Click **OK**.\n\n A dialog box tells you how much space the NDK package(s) consumes.\n6. Click **OK**.\n\n7. When the installation is complete, click **Finish**.\n\n8. Your project automatically syncs the build file and performs a build.\n Resolve any errors that occur.\n\n9. [Configure each module](#apply-specific-version) with the version of the NDK\n you want it to use. When using Android Studio 3.6 or higher, if you do not\n specify the version, the Android Gradle plugin chooses a version that it is\n known to be compatible with.\n\nConfigure specific versions of the NDK in your project\n\nYou may need to configure the version of the NDK in your project if one of the\nfollowing is true:\n\n- Your project is inherited and you need to use specific versions of the NDK and the Android Gradle plugin (AGP). For more information, see [Configure the NDK for the Android Gradle plugin](/studio/projects/configure-agp-ndk).\n- You have multiple versions of the NDK installed and you want to use a specific\n one. In this case, specify the version using the `android.ndkVersion`\n property in the module's `build.gradle` file, as shown in the following code\n sample.\n\n Groovy \n\n ```groovy\n android {\n ndkVersion \"\u003cvar translate=\"no\"\u003emajor\u003c/var\u003e.\u003cvar translate=\"no\"\u003eminor\u003c/var\u003e.\u003cvar translate=\"no\"\u003ebuild\u003c/var\u003e\" // e.g., ndkVersion \"21.3.6528147\"\n }\n ```\n\n Kotlin \n\n ```kotlin\n android {\n ndkVersion = \"\u003cvar translate=\"no\"\u003emajor\u003c/var\u003e.\u003cvar translate=\"no\"\u003eminor\u003c/var\u003e.\u003cvar translate=\"no\"\u003ebuild\u003c/var\u003e\" // e.g., ndkVersion \"21.3.6528147\"\n }\n ```\n\nDefault NDK version per AGP version\n\nBefore release, each AGP version is thoroughly tested with the latest stable NDK\nrelease at that time. This NDK version is used to build your projects if you\ndon't specify an NDK version in the `build.gradle` file. The default NDK version\nfor different versions of AGP are documented in the\n[AGP release notes](/build/releases/gradle-plugin#compatibility) and\n[AGP past release notes](/build/releases/past-releases)."]]