Installer Godot et configurer des projets pour Android
Restez organisé à l'aide des collections
Enregistrez et classez les contenus selon vos préférences.
Ce guide décrit les opérations suivantes :
Sélectionner une version de Godot
Télécharger et installer Godot
Configurer Godot pour le développement Android
Configurer votre système pour le développement et l'exportation C# (version Mono de Godot)
Sélectionner une version
Si possible, utilisez la dernière version stable de Godot. Pour le développement Android, utilisez la version 3.3 ou une version ultérieure.
Télécharger et exécuter Godot
Accédez à la page de téléchargement de Godot afin de télécharger le moteur de jeu correspondant à l'environnement de votre choix.
Godot propose deux versions sur sa page de téléchargement : Standard et Mono. Les deux peuvent être utilisées pour le développement Android. La version Mono est requise pour le développement en C#.
Godot est distribué en tant qu'application autonome. Aucun processus d'installation n'est nécessaire. Après avoir extrait l'archive de téléchargement, vous pouvez l'exécuter telle quelle.
Configurer la compatibilité avec Android
Configurer les paramètres du SDK Android Studio
Si vous ne l'avez pas déjà fait, téléchargez et installez la dernière version stable d'Android Studio.
Lancez Android Studio.
Dans la fenêtre de bienvenue, ouvrez le menu déroulant Configure, puis sélectionnez SDK Manager.
En haut de la fenêtre, notez l'emplacement du SDK Android sur votre ordinateur. Vous devrez spécifier cet emplacement dans l'éditeur Godot.
Dans l'onglet SDK Platforms, recherchez l'entrée de liste pour Android 11.0 R.
Cochez l'élément s'il n'est pas déjà coché.
Dans l'onglet SDK Tools, recherchez les éléments de liste suivants : NDK (Side by side) (NDK (Côte à côte)), Command-line Tools (Outils de ligne de commande du SDK Android) et CMake. Cochez-les s'ils ne sont pas déjà cochés.
Si l'état de certains éléments de la liste est défini sur Update Available (Mise à jour disponible), cochez leur case pour obtenir la dernière version.
Cliquez sur le bouton OK. Confirmez le téléchargement et acceptez les contrats de licence pour terminer l'installation.
Créer un keystore de débogage
Les applications Android doivent être signées numériquement pour fonctionner sur un appareil. Pour les tests locaux, un fichier de keystore de débogage peut être utilisé pour signer des applications. Android Studio crée automatiquement un keystore de débogage par défaut. Si vous avez déjà créé des applications à l'aide d'une configuration de débogage avec Android Studio, un fichier debug.keystore doit se trouver dans le répertoire suivant :
Microsoft Windows : C:\Users\$username\.android\debug.keystore
Linux/macOS : ~\.android\debug.keystore
Si le fichier debug.keystore n'existe pas, créez-en un en procédant comme suit :
Lancez Android Studio.
Dans la fenêtre de bienvenue, sélectionnez l'option Import an Android Code Sample (Importer un exemple de code Android).
Dans la liste, sélectionnez Ndk > Hello GL2, puis cliquez sur le bouton Next (Suivant).
Choisissez un emplacement pour le projet, puis cliquez sur le bouton Finish (Terminer).
Attendez que le projet soit chargé et synchronisé avec Gradle, puis sélectionnez Build > Make Project (Build > Créer un projet) dans la barre de menu d'Android Studio.
Attendez la fin de la compilation, puis vérifiez qu'un fichier debug.keystore a été créé dans le répertoire approprié.
Définir le SDK Android et l'emplacement du keystore de débogage dans l'éditeur Godot
Lancez l'éditeur Godot.
Créez ou ouvrez un projet.
Sélectionnez Editor > Editor Settings… (Éditeur > Paramètres de l'éditeur) dans la barre de menu de l'éditeur.
Dans la fenêtre Editor Settings, sélectionnez l'élément Export > Android dans le panneau de gauche.
Dans le panneau de droite, accédez à la zone de texte Android Sdk Path (Chemin d'accès du SDK Android), puis saisissez le chemin d'accès au SDK Android.
Dans la zone de texte du keystore de débogage, saisissez le chemin d'accès au fichier debug.keystore.
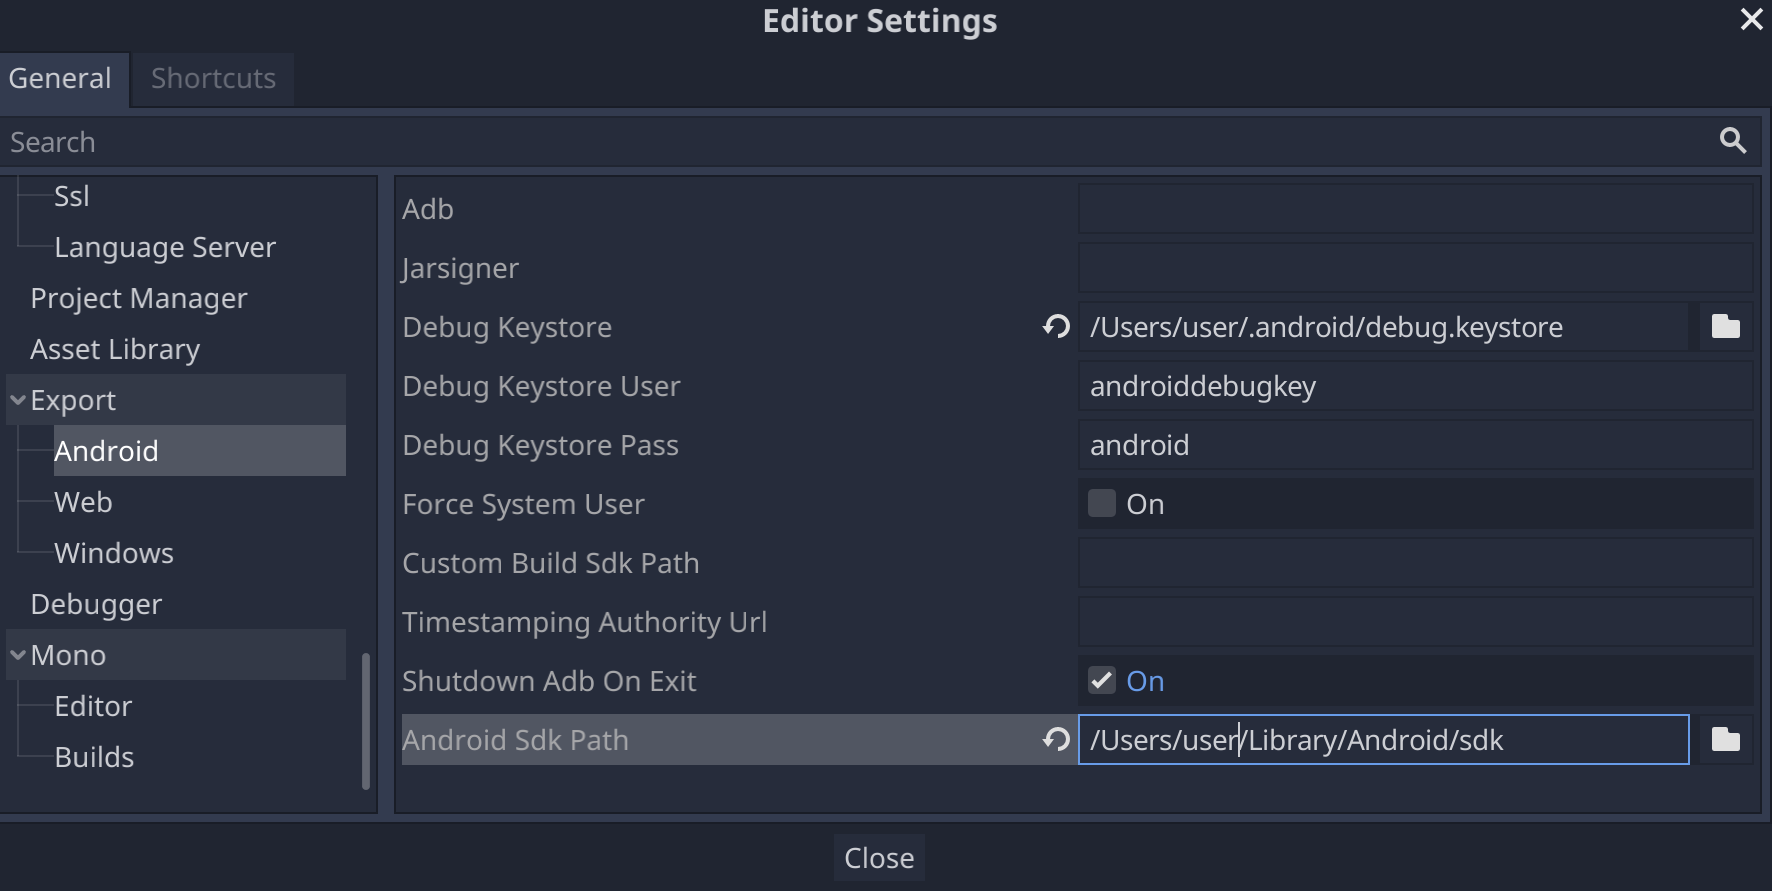
Figure 1 : Champ Android Sdk Path (Chemin d'accès du SDK Android) dans les paramètres de l'éditeur
Configurer Mono
Installer MSBuild
La version Mono de Godot nécessite MSBuild pour créer et exporter des projets qui utilisent C#. Voici comment installer MSBuild :
Godot ne permet de modifier du code C# que de façon très limitée. Il est vivement recommandé d'utiliser un éditeur externe pour les fichiers C#. Godot est compatible avec les éditeurs C# suivants :
Microsoft Visual Studio/Visual Studio pour Mac
Microsoft Visual Studio Code
JetBrains Rider
MonoDevelop
Pour configurer un éditeur C# externe, ouvrez un projet dans l'éditeur Godot, puis procédez comme suit :
Sélectionnez Editor > Editor Settings… (Éditeur > Paramètres de l'éditeur) dans la barre de menu de l'éditeur.
Dans la fenêtre Editor Settings, sélectionnez l'élément Mono > Editor dans le panneau de gauche.
Sélectionnez l'éditeur souhaité dans le menu déroulant Éditeur externe.
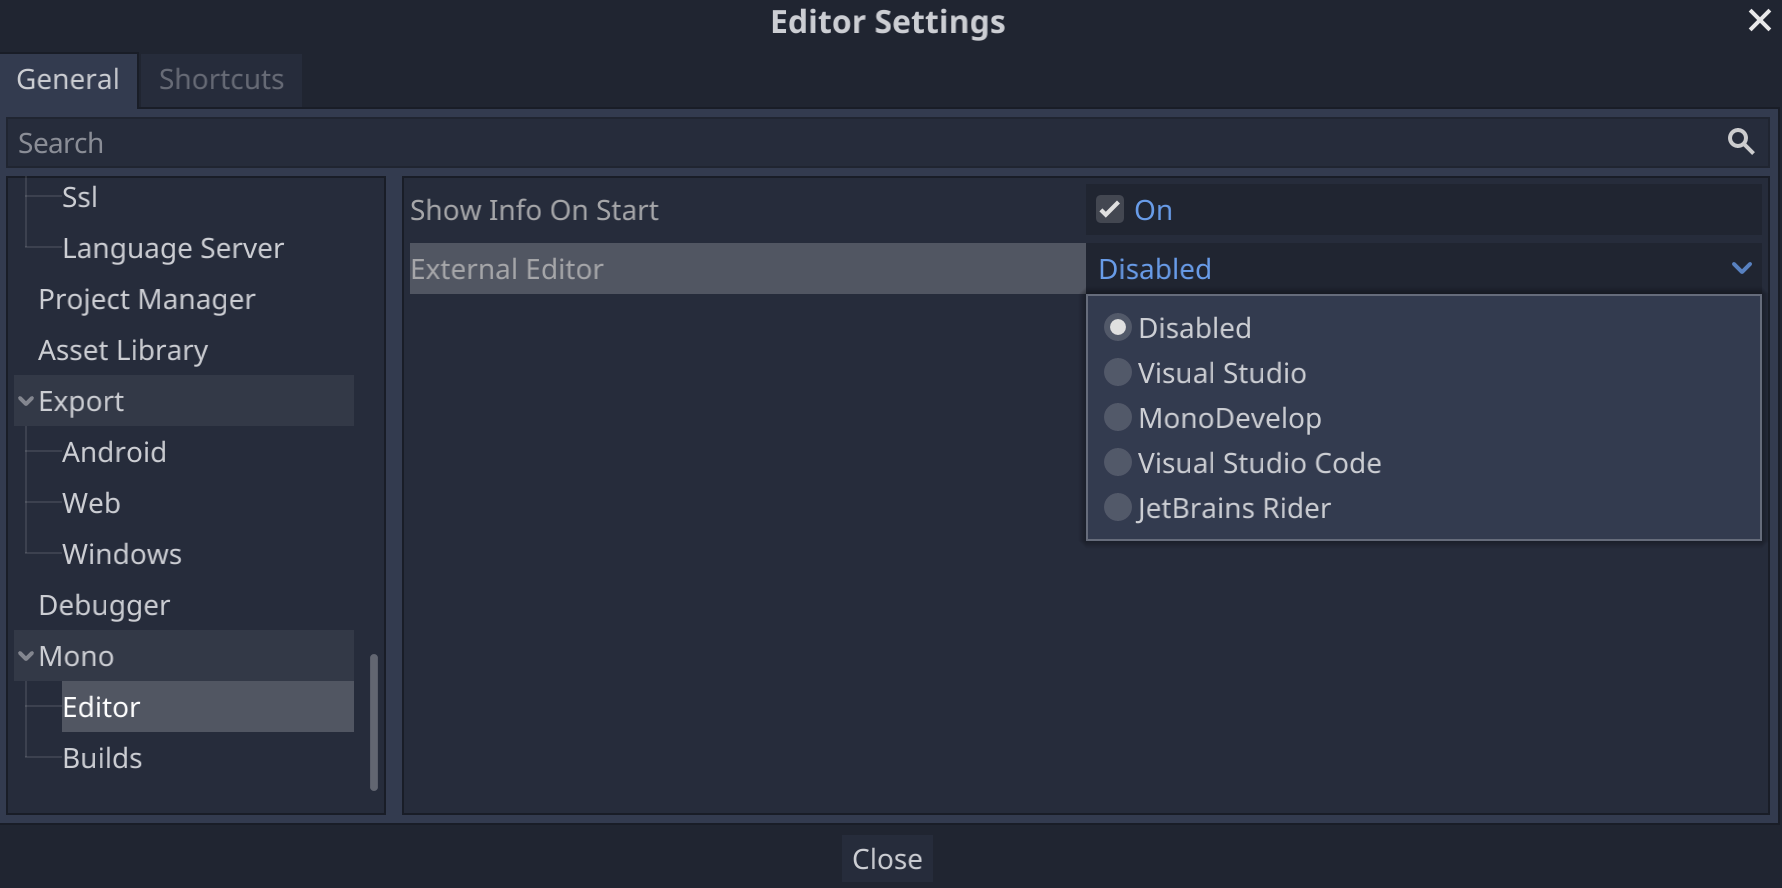
Figure 2 : Le champÉditeur externe dans Paramètres de l'éditeur
Plug-ins d'éditeur C# pour Godot
Outils C# pour Godot : plug-in pour Microsoft Visual Studio Code qui dispose d'une assistance au débogage C# et d'une fonctionnalité de remplissage partiel de code.
Le contenu et les exemples de code de cette page sont soumis aux licences décrites dans la Licence de contenu. Java et OpenJDK sont des marques ou des marques déposées d'Oracle et/ou de ses sociétés affiliées.
Dernière mise à jour le 2025/07/27 (UTC).
[[["Facile à comprendre","easyToUnderstand","thumb-up"],["J'ai pu résoudre mon problème","solvedMyProblem","thumb-up"],["Autre","otherUp","thumb-up"]],[["Il n'y a pas l'information dont j'ai besoin","missingTheInformationINeed","thumb-down"],["Trop compliqué/Trop d'étapes","tooComplicatedTooManySteps","thumb-down"],["Obsolète","outOfDate","thumb-down"],["Problème de traduction","translationIssue","thumb-down"],["Mauvais exemple/Erreur de code","samplesCodeIssue","thumb-down"],["Autre","otherDown","thumb-down"]],["Dernière mise à jour le 2025/07/27 (UTC)."],[],[],null,["# Install Godot and configure projects for Android\n\nThis guide will cover the following steps:\n\n- Selecting a version and release of Godot.\n- Downloading and installing Godot.\n- Configuring Godot for Android development.\n- Configuring your system for C# development and export (Mono release of Godot only).\n\nSelect a version\n----------------\n\nUse the latest stable release of Godot when possible. For Android development,\nuse version 3.3 or higher.\n| **Note:** Starting in August 2021, Google Play will require all Android apps to be submitted as Android App Bundles. Versions of Godot lower than 3.3 don't meet this requirement. For more information, see the [Target API Level](/distribute/best-practices/develop/target-sdk) page.\n\nDownload and run Godot\n----------------------\n\nVisit the\n[Godot download page](https://godotengine.org/download)\nto download the game engine for your preferred environment.\n\nGodot offers two releases on its download page: standard and Mono. Either may be\nused to develop for Android. The Mono release is required for C# development.\n\nGodot is distributed as a standalone application. It does not require an\ninstallation process; after extracting the download archive, you can run it as-is.\n\nConfigure Android support\n-------------------------\n\n### Configure the Android Studio SDK settings\n\n1. If you haven't already done so, [download](/studio) and [install](/studio/install) the latest stable release of Android Studio.\n2. Launch Android Studio.\n3. In the Welcome to Android Studio window, open the **Configure** dropdown menu and select **SDK Manager**.\n4. At the top of the window, make a note of the **Android SDK Location** on your computer. You will need to specify that location in Godot editor.\n5. In the **SDK Platforms** tab, find the list entry for **Android 11.0 R**. Check the item if it is unchecked.\n6. In the **SDK Tools** tab, find the list items for **NDK (Side by side)** , **Android SDK Command-line Tools** , and **CMake**. Check them if they are unchecked.\n7. If any list items have their status set to **Update Available**, enable their check box to update to the latest version.\n8. Click the **OK** button. Confirm the download and accept the license agreements to complete the installation.\n\n### Create a debug keystore\n\nAndroid apps must be [digitally signed](/studio/publish/app-signing#certificates-keystores)\nto run on a device. For local testing, a debug keystore file may be used to sign\napps. Android Studio will automatically create a default debug keystore. If you\nhave previously built apps using a debug configuration with Android Studio, a\n`debug.keystore` file should be located in the following directory:\n\n- **Microsoft Windows** : `C:\\Users\\$username\\.android\\debug.keystore`\n- **Linux/macOS** : `~\\.android\\debug.keystore`\n\nIf the `debug.keystore` file does not exist, create one by performing the\nfollowing steps:\n\n1. Launch Android Studio.\n2. In the Welcome to Android Studio window, select the **Import an Android Code Sample** option.\n3. Select the **Ndk -\\\u003e Hello GL2** sample from the list and click the **Next** button.\n4. Choose a location for the project and click the **Finish** button.\n5. Wait for the project to load and sync with Gradle, then select **Build -\\\u003e Make Project** from the Android Studio menu bar.\n6. Wait for the build to finish, then verify a `debug.keystore` file was created in the appropriate directory.\n\n### Set the Android SDK and debug keystore location in Godot editor\n\n1. Launch the Godot editor.\n2. Create or open a project.\n3. Select **Editor -\\\u003e Editor Settings...** from the **Editor** menu bar.\n4. In the **Editor Settings** window, select the **Export -\\\u003e Android** item in the left panel.\n5. In the right panel, go to the text box for **Android Sdk Path** and enter the path to the Android SDK.\n6. In the text box for **Debug Keystore** enter the path to the `debug.keystore` file.\n\n**Figure 1.** The **Android Sdk Path** field in **Editor Settings**\n\nSet up Mono\n-----------\n\n### Install MSBuild\n\nThe Mono release of Godot requires MSBuild to build and export projects that use\nC#. To install MSBuild:\n\n**Linux and macOS**\n\n- [Download](https://www.mono-project.com/download/stable/) and [install](https://www.mono-project.com/docs/) the latest version of the Mono SDK.\n\n**Microsoft Windows**\n\n- Install [Microsoft Visual Studio](https://visualstudio.microsoft.com/downloads/) or [Microsoft Visual Studio Build Tools](https://visualstudio.microsoft.com/thank-you-downloading-visual-studio/?sku=BuildTools&rel=15). When you run the installer, ensure you have the **.NET Framework 4.5** targeting pack selected for installation.\n\n### Configure a C# editor\n\nGodot has very limited support for editing C# code. Using an external editor for\nC# files is strongly recommended. Godot supports the following C# editors:\n\n- Microsoft Visual Studio/Visual Studio for Mac\n- Microsoft Visual Studio Code\n- JetBrains Rider\n- MonoDevelop\n\nTo configure an external C# editor, open a project in the Godot editor and\nperform the following steps:\n\n1. Select **Editor -\\\u003e Editor Settings...** from the editor menu bar.\n2. In the **Editor Settings** window, select the **Mono -\\\u003e Editor** item in the left panel.\n3. Choose the desired editor from the **External Editor** dropdown menu.\n\n**Figure 2:** The **External Editor** field in **Editor Settings**\n\n### C# editor plugins for Godot\n\n- [C# Tools for Godot](https://marketplace.visualstudio.com/items?itemName=neikeq.godot-csharp-vscode): A plugin for Microsoft Visual Studio Code that adds C# debugging support and partial code completion features.\n- [JetBrains Rider plugin](https://plugins.jetbrains.com/plugin/13882-godot-support): Adds C# debugging support."]]