Android 게임 개발 확장 프로그램은 MSBuild를 호출하여 공유 라이브러리(.so)와 정적 라이브러리(.a)에 C/C++ 소스 코드를 빌드합니다. 빌드 프로세스의 일부로 맞춤 MSBuild 작업에서는 Gradle을 호출하여 자바 및 Kotlin 소스 코드를 컴파일하고 애셋을 패키징하며 배포용 APK 파일을 생성합니다. 프로젝트를 구성할 때 MSBuild에 Android 플랫폼용으로 빌드하는 정보가 있는지 확인해야 합니다.
MSBuild로 C/C++ 빌드
일반적인 Android 프로젝트는 Gradle로 빌드됩니다. Gradle에서는 프로젝트 내부의 네이티브 코드가 CMake 또는 ndk-build를 실행하는 Gradle 패스를 통해 빌드됩니다. Visual Studio용 Android 게임 개발 확장 프로그램을 사용하면 빌드 프로세스는 반대가 됩니다. 이제는 MSBuild가 빌드 프로세스의 시작점이 됩니다. 먼저 MSBuild가 확장 프로그램의 일부로 시스템에 설치된 새 Android 플랫폼 (예: 'Android-x86_64')의 모든 C/C++ 소스 코드를 빌드합니다. 그런 다음 MSBuild가 Gradle을 호출하여 C/C++ 로직이 포함된 공유 라이브러리 파일을 APK에 패키징합니다.
먼저 개발자는 프로젝트의 기존 빌드 로직을 MSBuild의 CMake 또는 ndk-build에 복제해야 합니다. 타겟 플랫폼을 다음으로 설정합니다.
Android-x86
Android-x86_64
Android-armeabi-v7a
Android-arm64-v8a
이러한 플랫폼은 모두 Android 게임 개발 확장 프로그램에서 제공됩니다.
컴파일 및 연결 옵션 설정
AGDE는 선택한 NDK를 사용하여 앱의 C/C++ 부분을 빌드할 때 기본 컴파일 및 링크 옵션을 결정합니다.
이러한 컴파일 또는 링크 옵션을 맞춤설정해야 하는 경우 프로젝트 속성을 사용하여 설정할 수 있습니다. 가장 일반적인 옵션은 C/C++(컴파일용), 라이브러리 (정적 라이브러리 보관용) 및 링커 (동적 라이브러리 연결용) 그룹에서 찾을 수 있습니다. 다른 맞춤 옵션을 전달해야 하는 경우 명령줄 섹션에 추가하면 됩니다. 예를 들어 r28보다 오래된 NDK를 사용하는 경우 앱이 16KB 페이지 크기를 지원하도록 링커 플래그를 설정할 수 있습니다.
Android 플랫폼 추가
teapot 샘플 프로젝트에는 Android 플랫폼이 포함되어 있지만 기존 프로젝트에 Android 플랫폼을 수동으로 추가해야 합니다. 새 플랫폼을 추가하려면 Visual Studio에서 다음 작업을 수행하세요.
Build > Configuration Manager를 선택합니다.
Active solution platform에서 <New>를 선택합니다.
새 플랫폼과 관련해 다음 중 하나를 입력합니다.
Android-armeabi-v7a
Android-arm64-v8a
Android-x86
Android-x86_64
Copy settings from 상자에서 다른 기존 Android 플랫폼을 선택하거나 아직 Android 플랫폼이 없는 경우 <Empty>를 선택합니다.
Create new project platforms를 사용 설정했는지 확인합니다.
Android APK 항목 추가
Add > New Item > Visual C++ > Android > Android APK를 선택하고 Add를 클릭합니다. 다음 대화상자에서 Android 애플리케이션을 구성합니다.
Application Name: 사람이 읽을 수 있는 Android 애플리케이션 이름입니다.
Solution Explorer Location: 추가된 Android 패키징 지원 파일이 포함된 가상 폴더의 위치입니다. 기본적으로 이러한 파일은 이름이 동일한 폴더의 프로젝트에도 있습니다. Put support files in a custom location 체크박스를 선택하고 맞춤 위치를 지정하여 위치를 맞춤설정할 수 있습니다. 가상 폴더는 계속해서 Solution Explorer의 현재 프로젝트 아래에 배치됩니다.
APK를 빌드할 Gradle을 호출하도록 MSBuild 설정
MSBuild는 Gradle 프로젝트의 위치를 모를 경우 Gradle을 호출할 수 없습니다.
그림 1에 나와 있는 것처럼, Gradle Build Directory 속성을 사용하여 이 위치를 설정합니다.
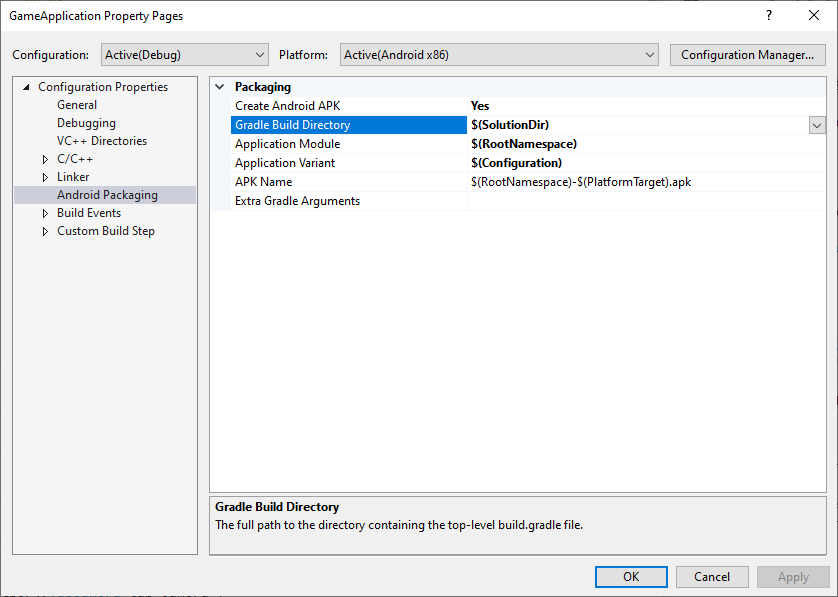
그림 1. Gradle Build Directory 속성
또한 MSBuild에서 빌드할 대상을 인식할 수 있도록, 이전 이미지에 나와 있는 것처럼 Application Module, Application Variant 및 APK Name 속성을 설정합니다.
Application Module: Gradle 하위 프로젝트의 이름. 이는 settings.gradle 파일에 설정된 기본 프로젝트입니다. Android 스튜디오를 사용하여 직접 만든 프로젝트에서는 대개 app이라고 합니다.
Application Variant: 빌드할 Android 변형. 이 값은 MSBuild 구성에 따라 설정해야 합니다. 예를 들어 디버그 빌드의 값은 디버그 변형에 설정된 값이어야 합니다. 프로젝트의 MSBuild 구성 이름이 Gradle 변형 이름과 일치할 경우 $(Configuration)의 기본값을 사용하면 됩니다.
APK Name: 개발 컴퓨터에서 디버깅 및 프로파일링에 사용되는 생성된 APK 파일의 이름. 이 이름은 Gradle에 전달되며 Gradle 빌드 스크립트는 이를 준수해야 합니다(다음 섹션에서 MSBUILD_ANDROID_OUTPUT_APK_NAME 속성 참고).
Gradle 빌드 스크립트 수정
빌드 중에 MSBuild가 다음 정보를 Gradle 스크립트에 프로젝트 속성으로 전달합니다. 이러한 속성을 읽어오도록 프로젝트의 기존 빌드 스크립트(일반적으로 build.gradle)를 변경합니다.
MSBUILD_MIN_SDK_VERSION: APK 빌드를 위한 최소 SDK 버전(문자열) 그림 2에 표시된 프로젝트 속성 페이지의 Minimum Android SDK Version 상자에 이 값을 설정합니다.
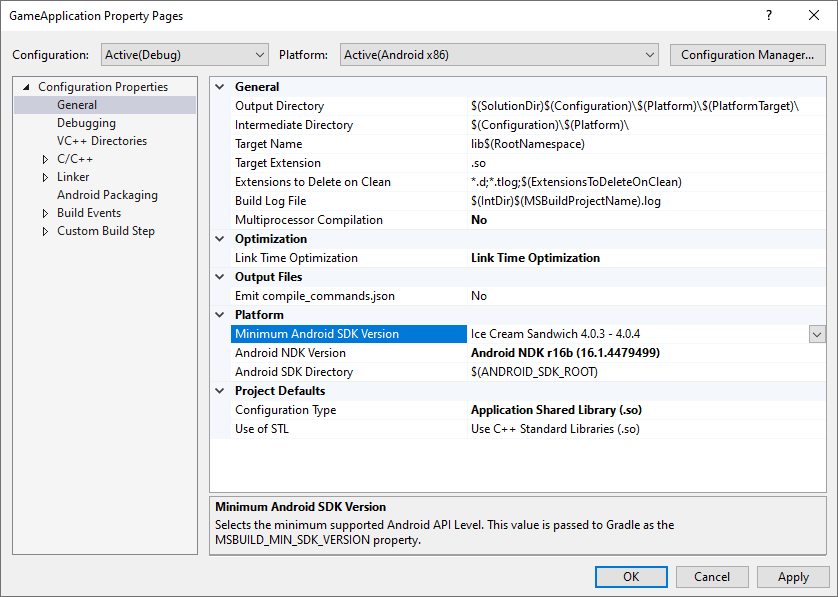
그림 2. Minimum Android SDK Version 속성
Gradle 빌드 스크립트는 필요한 경우 toInteger() 유형 변환을 사용하여 minSdkVersion 또는 minSdk을 이 문자열 값으로 설정해야 합니다.
MSBUILD_ANDROID_OUTPUT_APK_NAME: Gradle이 빌드하는 APK의 예상 이름. Android 게임 개발 확장 프로그램이 이 이름과 일치하는 APK를 찾아 연결된 기기에 배포합니다(디버깅 및 프로파일링 목적). 그림 3에 표시된 프로젝트 속성 페이지의 APK Name 상자에 이 값을 설정합니다.
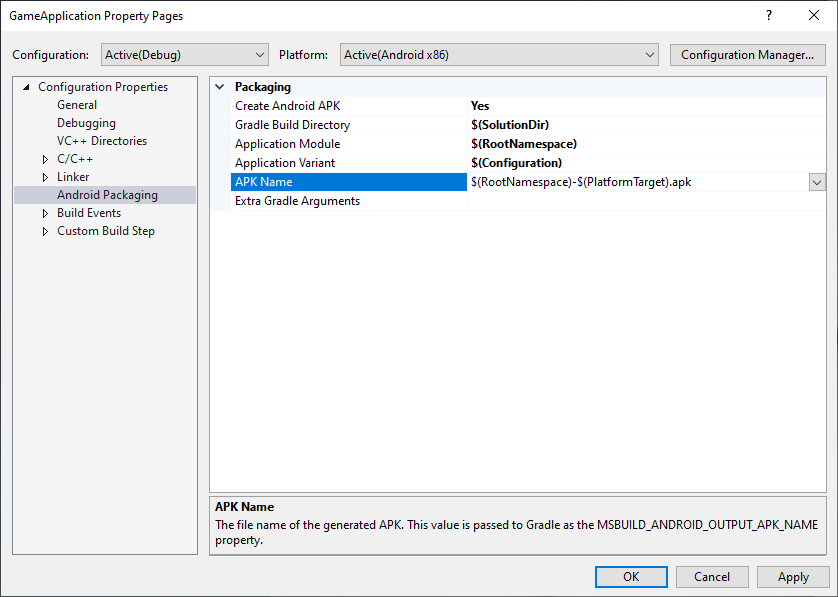
그림 3. APK Name 속성
Gradle 빌드 스크립트는 이 속성을 준수해야 합니다. 예를 들어 다음 예제에서는 모든 변형의 출력 APK 이름이 MSBuild에서 선택한 이름으로 설정됩니다.
MSBUILD_JNI_LIBS_SRC_DIR: MSBuild에 의해 빌드된 공유 라이브러리(.so 파일)가 포함된 디렉터리. 아래 표시된 프로젝트 속성 페이지의 Output Directory 상자에 이 값을 설정합니다. 그림 4에 표시된 것처럼 기본적으로 이 값은 Visual Studio 프로젝트의 출력 디렉터리 속성입니다.
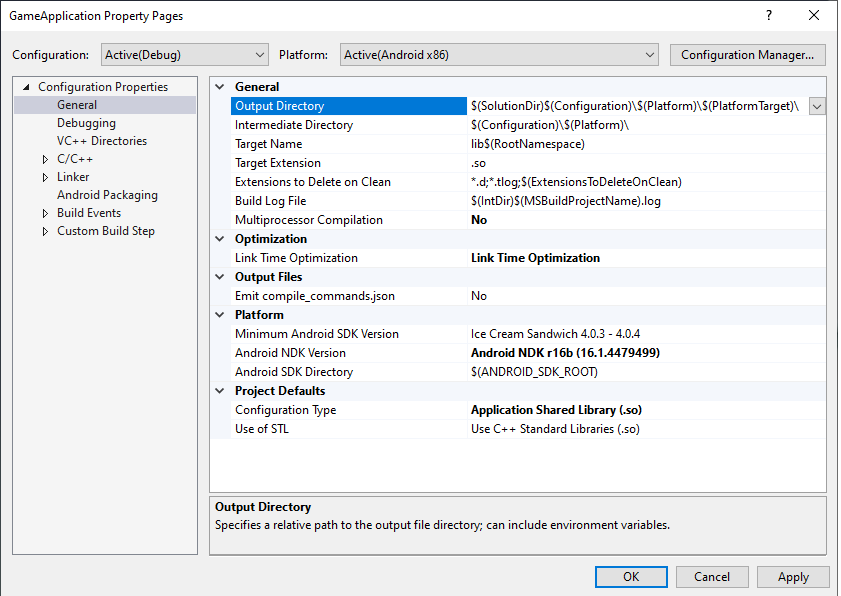
그림 4. Output Directory 속성
Gradle에서 이 폴더의 공유 라이브러리 파일을 APK 내에 패키징해야 합니다. 그러면 Android 애플리케이션이 런타임 시 그 파일을 로드할 수 있습니다.
또한 이제 모든 C/C++ 코드가 MSBuild에 의해 빌드되었으므로 Gradle 빌드 스크립트에서 externalNativeBuild 섹션을 삭제합니다. 이러한 섹션은 CMake 또는 ndk-build를 호출하여 C/C++ 코드를 컴파일하는 데 사용되었지만 더 이상 필요하지 않습니다.
MSBUILD_NDK_VERSION: 프로젝트를 빌드하는 데 사용할 NDK 버전. 그림 5에 표시된 프로젝트 속성 페이지의 Android NDK Version 상자에 이 값을 설정합니다.
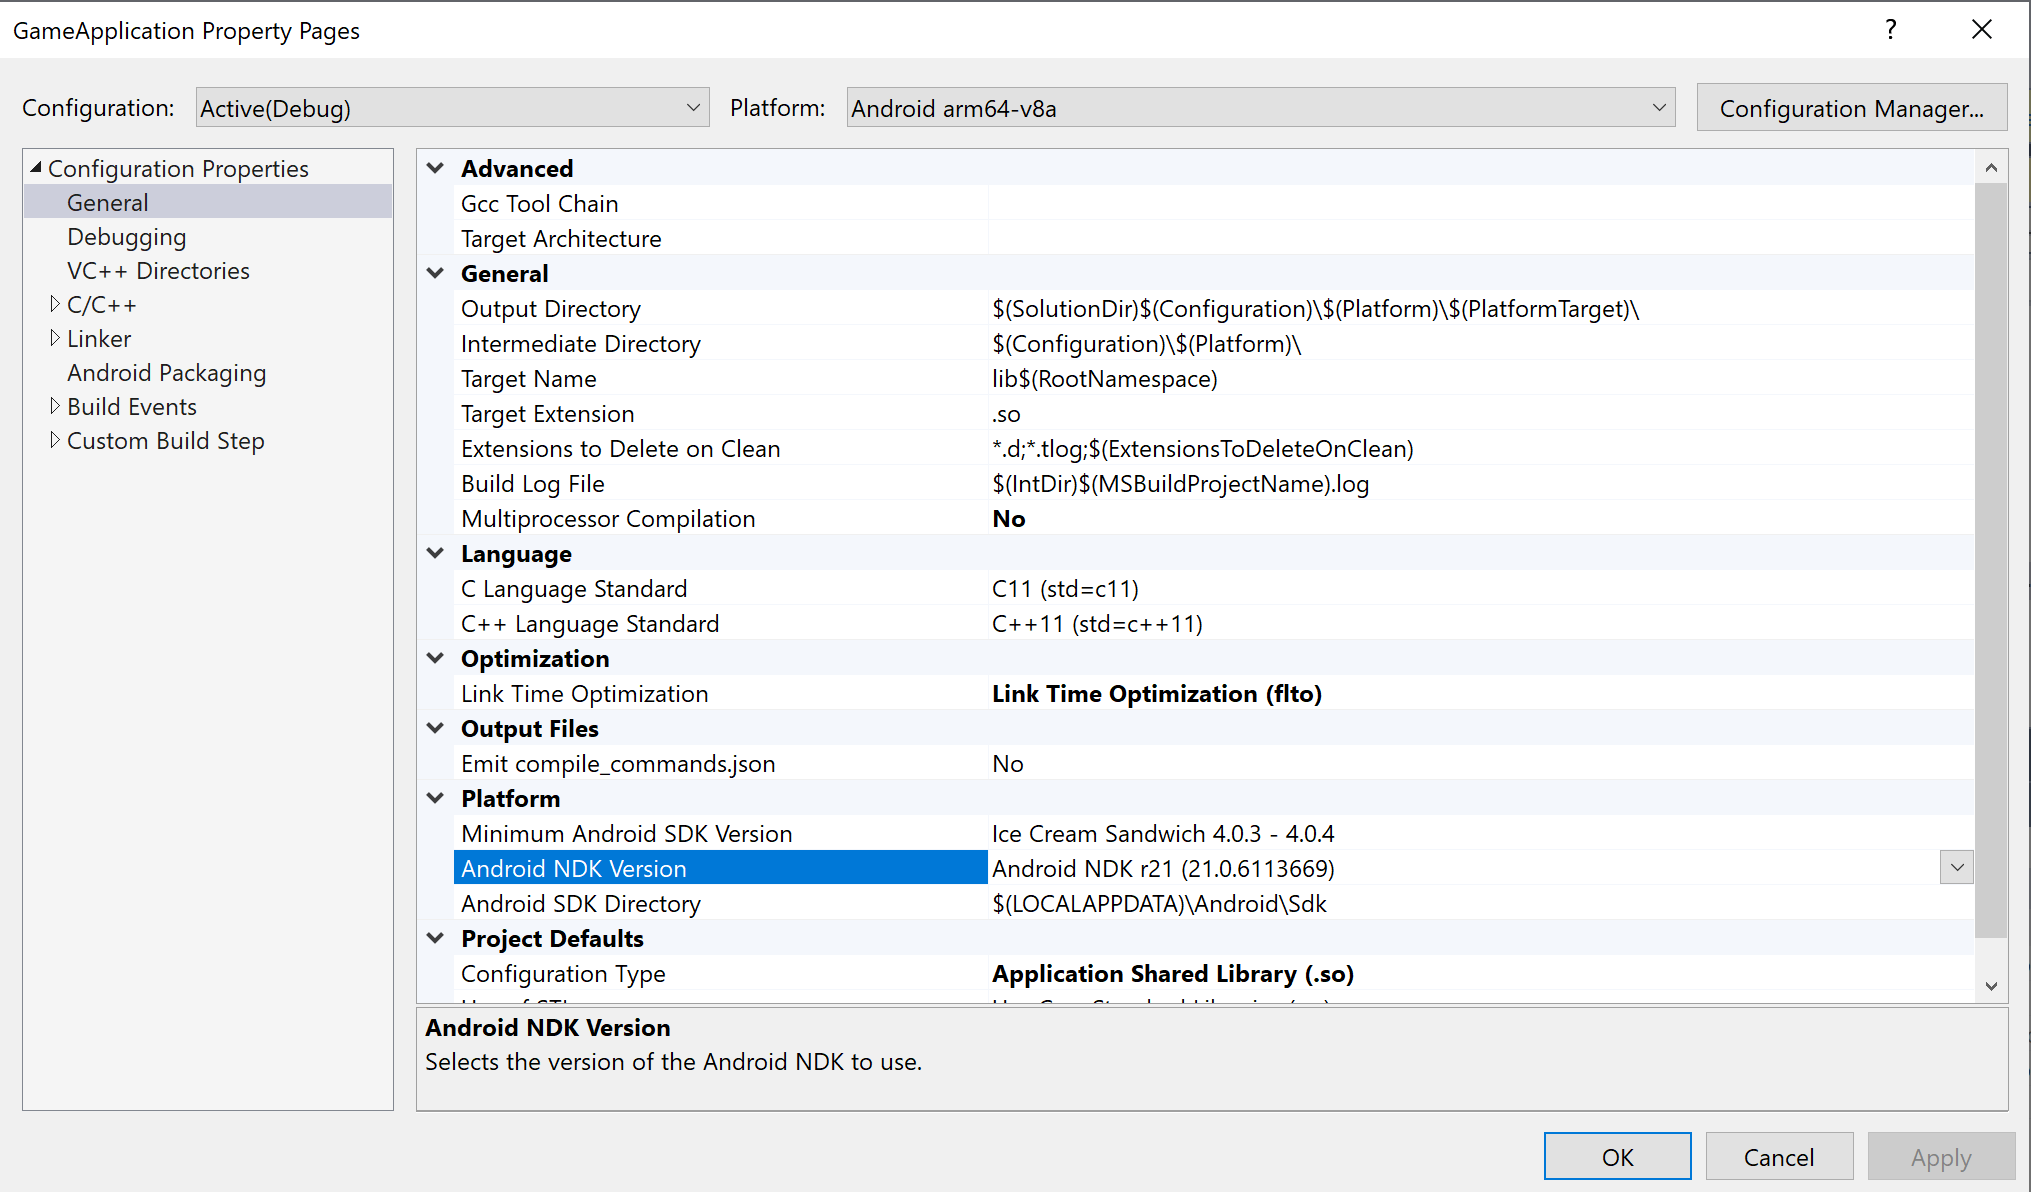
그림 5. Android NDK Version 속성
Gradle 빌드 스크립트는 다음과 같이 ndkVersion을 이 값으로 설정해야 합니다.
이 페이지에 나와 있는 콘텐츠와 코드 샘플에는 콘텐츠 라이선스에서 설명하는 라이선스가 적용됩니다. 자바 및 OpenJDK는 Oracle 및 Oracle 계열사의 상표 또는 등록 상표입니다.
최종 업데이트: 2025-07-27(UTC)
[[["이해하기 쉬움","easyToUnderstand","thumb-up"],["문제가 해결됨","solvedMyProblem","thumb-up"],["기타","otherUp","thumb-up"]],[["필요한 정보가 없음","missingTheInformationINeed","thumb-down"],["너무 복잡함/단계 수가 너무 많음","tooComplicatedTooManySteps","thumb-down"],["오래됨","outOfDate","thumb-down"],["번역 문제","translationIssue","thumb-down"],["샘플/코드 문제","samplesCodeIssue","thumb-down"],["기타","otherDown","thumb-down"]],["최종 업데이트: 2025-07-27(UTC)"],[],[],null,["# Configure a project to use the Android Game Development Extension.\n\nThe Android Game Development Extension invokes MSBuild to build C/C++ source code into shared\nlibraries (`.so`) and static libraries (`.a`). As part of the build process, a\ncustom MSBuild task invokes Gradle to compile Java and Kotlin source code,\npackage assets, and generate an APK file for deployment. When you configure your\nproject, you must ensure that MSBuild has the information it needs to build for\nthe Android platform.\n\nBuild C/C++ with MSBuild\n------------------------\n\nA typical Android project is built with Gradle, where the native code inside the\nproject is built by a Gradle pass that runs either [CMake](/ndk/guides/cmake) or\n[ndk-build](/ndk/guides/ndk-build). With the Android Game Development Extension for Visual\nStudio, the build process is inverted. Now MSBuild is the starting point of the\nbuild process. All C/C++ source code is built first by MSBuild for the new\nAndroid platforms installed on your system as part of the extension (for\nexample, \"Android-x86_64\"). MSBuild then invokes Gradle to package the shared\nlibrary files that contain your C/C++ logic into an APK.\n\nYou should first replicate your project's existing build logic in CMake or\nndk-build in MSBuild. Set the target platforms to the following:\n\n- Android-x86\n- Android-x86_64\n- Android-armeabi-v7a\n- Android-arm64-v8a\n\nThese platforms are all provided by the Android Game Development Extension.\n\n### Set your compile and link options\n\nAGDE uses the NDK you select to determine the default compile and link options\nwhen building the C/C++ part of your app.\n\nIf you need to customize these compile or link options, you can set them using\nProject Properties. You can find the most common options in the C/C++\n(for compilation), Librarian (for static library archiving) and Linker (for\ndynamic library linking) groups. If you need to pass any other custom\noptions, you can add them to the Command Line section. For example,\nif you are using an NDK older than r28, you might want to set the linker flag\nto make your app [support 16 KB page sizes](/guide/practices/page-sizes#compile-16-kb-alignment).\n\n### Add an Android Platform\n\nWhile the teapot sample project includes Android platforms, you must manually\nadd an Android platform to an existing project. To add a new platform, do the\nfollowing in Visual Studio:\n\n1. Select **Build \\\u003e Configuration Manager**.\n2. Under **Active solution platform** , select **\\\u003cNew\\\u003e**.\n3. Type one of the following for the new platform:\n\n - **Android-armeabi-v7a**\n - **Android-arm64-v8a**\n - **Android-x86**\n - **Android-x86_64**\n4. In the **Copy settings from** box, select another existing Android\n platform, or **\\\u003cEmpty\\\u003e** if you do not have any Android platforms yet.\n Make sure you enabled **Create new project platforms**.\n\n### Add an Android APK item\n\nSelect **Add \\\u003e New Item \\\u003e Visual C++ \\\u003e Android \\\u003e Android APK** and click\n**Add**. Configure the Android application on the following dialog.\n\n- **Application Name**: The human-readable name of your Android application.\n- **Application ID** : The [unique identifier](/studio/build/configure-app-module#set_the_application_id) for your Android application.\n- **Solution Explorer Location** : Location of the virtual folder that contains the added Android packaging support files. By default, these files are also located in the project in a folder with the same name. You can customize the location by selecting the **Put support files in a custom location** checkbox and specifying a custom location. The virtual folder will still be under the current project in the Solution Explorer.\n\nMake MSBuild invoke Gradle to build an APK\n------------------------------------------\n\nMSBuild cannot invoke Gradle unless it knows the location of the Gradle project.\nSet this location using the **Gradle Build Directory** property, as\nshown in figure 1.\n\n\u003cbr /\u003e\n\n\n**Figure 1** . **Gradle Build Directory** property\n\nIn addition, set the **Application Module** , **Application Variant** , and **APK\nName** properties (as shown in the previous image) in order for MSBuild to know\nwhat to build.\n\n- **Application Module** : The name of the Gradle subproject. This is the main project set in the `settings.gradle` file. It is usually called `app` for projects directly created using Android Studio.\n- **Application Variant** : The Android variant to build. This value should be set according to the MSBuild configurations. For example, a debug build should have a value set to the debug variant. If your project's MSBuild configuration name matches the Gradle variant names, then just use the default value of `$(Configuration)`.\n- **APK Name** : The name of the generated APK file used for debugging and profiling on your development computer. This name is passed to Gradle and your Gradle build script should respect this (see the property `MSBUILD_ANDROID_OUTPUT_APK_NAME` in the following section).\n\n### Modify your Gradle build scripts\n\nDuring the build, MSBuild passes the following information as project properties\nto the Gradle script. Change your project's existing build scripts (typically\nnamed `build.gradle`) to read these properties.\n\n- `MSBUILD_MIN_SDK_VERSION`: The minimum SDK version for building the APK, as a\n string. Set this value in the **Minimum Android SDK Version** box on the\n project property page shown in figure 2.\n\n \u003cbr /\u003e\n\n\n **Figure 2** . **Minimum Android SDK Version** property\n\n The Gradle build script should set `minSdkVersion` or `minSdk` to this\n string value, with a `toInteger()` type conversion when necessary. \n\n ### Groovy\n\n ```groovy\n android {\n // ...\n\n defaultConfig {\n applicationId \"com.yourcompany.yourapp\"\n minSdkVersion MSBUILD_MIN_SDK_VERSION\n // Or: minSdk MSBUILD_MIN_SDK_VERSION.toInteger()\n // ...\n }\n\n // ...\n }\n ```\n\n ### Kotlin\n\n ```kotlin\n android {\n // ...\n\n defaultConfig {\n applicationId = \"com.yourcompany.yourapp\"\n minSdkVersion(MSBUILD_MIN_SDK_VERSION)\n // Or: minSdk = MSBUILD_MIN_SDK_VERSION.toInteger()\n // ...\n }\n\n // ...\n }\n ```\n- `MSBUILD_ANDROID_OUTPUT_APK_NAME`: The expected name of the APK that Gradle\n builds. The Android Game Development Extension will look for an APK matching this name and\n then deploy it to connected devices (for debugging and profiling). Set this\n value in the **APK Name** box on the project property page shown in figure 3.\n\n \u003cbr /\u003e\n\n\n **Figure 3** . **APK Name** property\n\n The Gradle build script must respect this property. For example, the\n following example sets the output APK name for all variants to the name\n chosen by MSBuild. \n\n ### Groovy\n\n ```groovy\n android {\n // ...\n\n applicationVariants.all { variant -\u003e\n variant.outputs.all {\n outputFileName = MSBUILD_ANDROID_OUTPUT_APK_NAME\n }\n }\n\n // ...\n }\n ```\n\n ### Kotlin\n\n ```kotlin\n android {\n // ...\n\n applicationVariants.all { variant -\u003e\n variant.outputs.all {\n outputFileName = MSBUILD_ANDROID_OUTPUT_APK_NAME\n }\n }\n\n // ...\n }\n ```\n- `MSBUILD_JNI_LIBS_SRC_DIR`: The directory containing the shared libraries\n (`.so` files) built by MSBuild. Set this value in the **Output Directory**\n box on the project property page shown below. By default, this value is the\n output directory property for the Visual Studio project, as shown in figure 4.\n\n \u003cbr /\u003e\n\n\n **Figure 4** . **Output Directory** property\n\n Gradle should package the shared library files in this folder inside the APK\n in order for the Android application to load them at runtime. \n\n ### Groovy\n\n ```groovy\n android {\n // ...\n\n sourceSets {\n main {\n jniLibs.srcDirs += [MSBUILD_JNI_LIBS_SRC_DIR]\n }\n }\n\n // ...\n }\n ```\n\n ### Kotlin\n\n ```kotlin\n android {\n // ...\n\n sourceSets.getByName(\"main\") {\n jniLibs.srcDir(MSBUILD_JNI_LIBS_SRC_DIR)\n }\n\n // ...\n }\n ```\n\n In addition, since any C/C++ code is now built by MSBuild, remove the\n `externalNativeBuild` sections in your Gradle build scripts. These sections\n were used to invoke CMake or ndk-build to compile your C/C++ code, but are\n no longer needed.\n- `MSBUILD_NDK_VERSION`: The version of the NDK to use to build your\n project. Set this value in the **Android NDK Version** box on the\n project property page shown in figure 5.\n\n \u003cbr /\u003e\n\n\n **Figure 5** . **Android NDK Version** property\n\n The Gradle build script should set `ndkVersion` to this value, as shown: \n\n ### Groovy\n\n ```groovy\n android {\n // ...\n\n ndkVersion MSBUILD_NDK_VERSION\n\n // ...\n }\n ```\n\n ### Kotlin\n\n ```kotlin\n android {\n // ...\n\n ndkVersion = MSBUILD_NDK_VERSION\n\n // ...\n }\n ```\n\n For more information, see the Android Studio topic\n [Install and configure the NDK and CMake](/studio/projects/install-ndk)."]]