Godot offre due release nella sua pagina di download: standard e Mono. Entrambi possono essere utilizzati
per lo sviluppo per Android. La release Mono è obbligatoria per lo sviluppo C#.
Godot è distribuito come applicazione autonoma. Non richiede un processo di installazione; dopo aver estratto l'archivio di download, puoi eseguirlo così com'è.
Configurare il supporto di Android
Configurare le impostazioni dell'SDK Android Studio
Se non l'hai ancora fatto, scarica e installa l'ultima versione stabile di Android Studio.
Avvia Android Studio.
Nella finestra Ti diamo il benvenuto in Android Studio, apri il menu a discesa Configura e seleziona SDK Manager.
Nella parte superiore della finestra, prendi nota della posizione dell'SDK Android sul computer. Dovrai specificare la posizione nell'editor Godot.
Nella scheda Piattaforme SDK, individua la voce dell'elenco relativa ad Android 11.0 R.
Seleziona l'elemento se è deselezionato.
Nella scheda Strumenti SDK, individua gli elementi dell'elenco per NDK (Side by side), Strumenti a riga di comando dell'SDK Android e CMake. Selezionale se sono deselezionate.
Se lo stato di alcune voci dell'elenco è impostato su Aggiornamento disponibile, abilita la casella di controllo corrispondente per eseguire l'aggiornamento alla versione più recente.
Fai clic sul pulsante OK. Conferma il download e accetta i contratti di licenza per completare l'installazione.
Creazione di un archivio chiavi di debug
Le app Android devono essere con firma digitale per poter essere eseguite su un dispositivo. Per i test locali, è possibile usare un file di archivio chiavi di debug per firmare le app. Android Studio creerà automaticamente un archivio chiavi di debug predefinito. Se in precedenza hai creato app utilizzando una configurazione di debug con Android Studio, un file debug.keystore dovrebbe trovarsi nella seguente directory:
Microsoft Windows: C:\Users\$username\.android\debug.keystore
Linux/macOS: ~\.android\debug.keystore
Se il file debug.keystore non esiste, creane uno seguendo questi passaggi:
Avvia Android Studio.
Nella finestra Ti diamo il benvenuto in Android Studio, seleziona l'opzione Importa un esempio di codice Android.
Seleziona l'esempio Ndk -> Hello GL2 dall'elenco e fai clic sul pulsante Avanti.
Scegli una località per il progetto e fai clic sul pulsante Finish (Fine).
Attendi che il progetto venga caricato e sincronizzato con Gradle, quindi seleziona Crea -> Crea progetto dalla barra dei menu di Android Studio.
Attendi il completamento della build, quindi verifica che sia stato creato un file debug.keystore nella directory appropriata.
Imposta l'SDK Android ed esegui il debug della posizione dell'archivio chiavi nell'editor Godot
Avvia l'editor Godot.
Crea o apri un progetto.
Seleziona Editor -> Impostazioni editor... dalla barra dei menu Editor.
Nella finestra Impostazioni editor, seleziona l'elemento Esporta -> Android nel riquadro a sinistra.
Nel riquadro a destra, vai alla casella di testo Percorso SDK Android e inserisci il percorso dell'SDK Android.
Nella casella di testo Debug Keystore, inserisci il percorso del file debug.keystore.
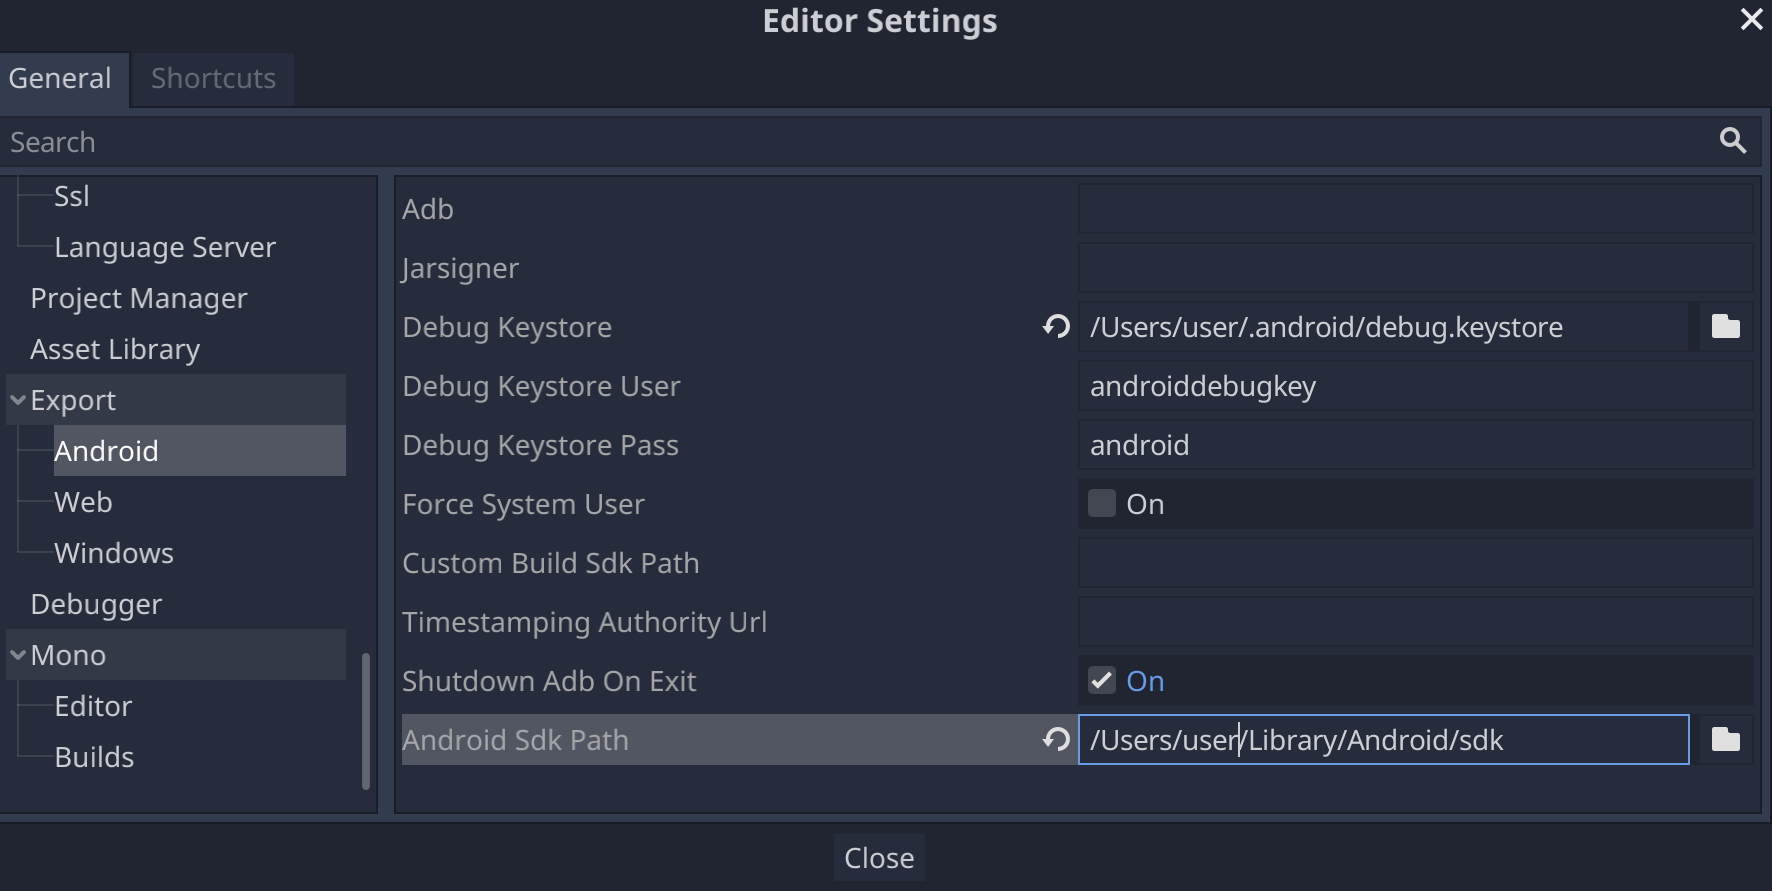
Figura 1. Il campo Percorso SDK Android nelle Impostazioni Editor
Configura Mono
Installa MSBuild
La versione Mono di Godot richiede MSBuild per creare ed esportare progetti che utilizzano C#. Per installare MSBuild:
Godot ha un supporto molto limitato per la modifica del codice C#. Si consiglia vivamente di utilizzare un editor esterno
per i file C#. Godot supporta i seguenti editor C#:
Microsoft Visual Studio/Visual Studio per Mac
Codice di Microsoft Visual Studio
Cavaliere JetBrains
MonoSviluppo
Per configurare un editor C# esterno, apri un progetto nell'editor Godot ed esegui questi passaggi:
Seleziona Editor -> Impostazioni editor... dalla barra dei menu dell'editor.
Nella finestra Impostazioni Editor, seleziona l'elemento Mono -> Editor nel riquadro a sinistra.
Scegli l'editor che ti interessa dal menu a discesa Editor esterno.
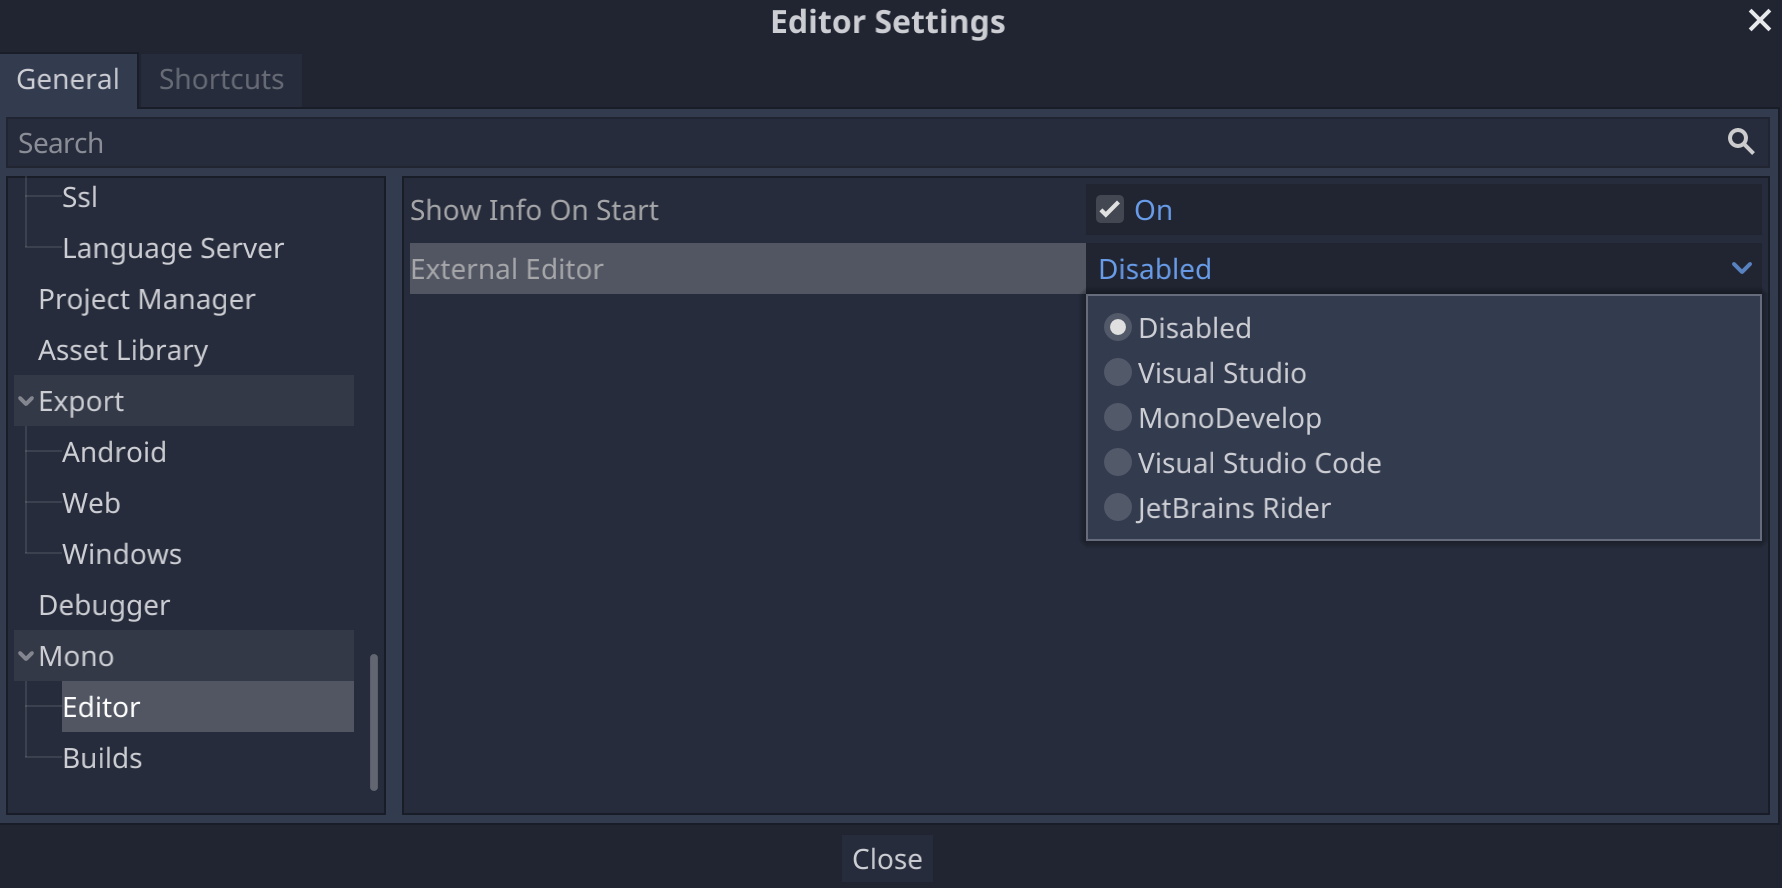
Figura 2: il campo Editor esterno in Impostazioni Editor
Plug-in dell'editor C# per Godot
C# Tools for Godot:
un plug-in per Microsoft Visual Studio Code che aggiunge il supporto per il debug C# e
funzionalità di completamento parziale del codice.
I campioni di contenuti e codice in questa pagina sono soggetti alle licenze descritte nella Licenza per i contenuti. Java e OpenJDK sono marchi o marchi registrati di Oracle e/o delle sue società consociate.
Ultimo aggiornamento 2025-07-27 UTC.
[[["Facile da capire","easyToUnderstand","thumb-up"],["Il problema è stato risolto","solvedMyProblem","thumb-up"],["Altra","otherUp","thumb-up"]],[["Mancano le informazioni di cui ho bisogno","missingTheInformationINeed","thumb-down"],["Troppo complicato/troppi passaggi","tooComplicatedTooManySteps","thumb-down"],["Obsoleti","outOfDate","thumb-down"],["Problema di traduzione","translationIssue","thumb-down"],["Problema relativo a esempi/codice","samplesCodeIssue","thumb-down"],["Altra","otherDown","thumb-down"]],["Ultimo aggiornamento 2025-07-27 UTC."],[],[],null,["# Install Godot and configure projects for Android\n\nThis guide will cover the following steps:\n\n- Selecting a version and release of Godot.\n- Downloading and installing Godot.\n- Configuring Godot for Android development.\n- Configuring your system for C# development and export (Mono release of Godot only).\n\nSelect a version\n----------------\n\nUse the latest stable release of Godot when possible. For Android development,\nuse version 3.3 or higher.\n| **Note:** Starting in August 2021, Google Play will require all Android apps to be submitted as Android App Bundles. Versions of Godot lower than 3.3 don't meet this requirement. For more information, see the [Target API Level](/distribute/best-practices/develop/target-sdk) page.\n\nDownload and run Godot\n----------------------\n\nVisit the\n[Godot download page](https://godotengine.org/download)\nto download the game engine for your preferred environment.\n\nGodot offers two releases on its download page: standard and Mono. Either may be\nused to develop for Android. The Mono release is required for C# development.\n\nGodot is distributed as a standalone application. It does not require an\ninstallation process; after extracting the download archive, you can run it as-is.\n\nConfigure Android support\n-------------------------\n\n### Configure the Android Studio SDK settings\n\n1. If you haven't already done so, [download](/studio) and [install](/studio/install) the latest stable release of Android Studio.\n2. Launch Android Studio.\n3. In the Welcome to Android Studio window, open the **Configure** dropdown menu and select **SDK Manager**.\n4. At the top of the window, make a note of the **Android SDK Location** on your computer. You will need to specify that location in Godot editor.\n5. In the **SDK Platforms** tab, find the list entry for **Android 11.0 R**. Check the item if it is unchecked.\n6. In the **SDK Tools** tab, find the list items for **NDK (Side by side)** , **Android SDK Command-line Tools** , and **CMake**. Check them if they are unchecked.\n7. If any list items have their status set to **Update Available**, enable their check box to update to the latest version.\n8. Click the **OK** button. Confirm the download and accept the license agreements to complete the installation.\n\n### Create a debug keystore\n\nAndroid apps must be [digitally signed](/studio/publish/app-signing#certificates-keystores)\nto run on a device. For local testing, a debug keystore file may be used to sign\napps. Android Studio will automatically create a default debug keystore. If you\nhave previously built apps using a debug configuration with Android Studio, a\n`debug.keystore` file should be located in the following directory:\n\n- **Microsoft Windows** : `C:\\Users\\$username\\.android\\debug.keystore`\n- **Linux/macOS** : `~\\.android\\debug.keystore`\n\nIf the `debug.keystore` file does not exist, create one by performing the\nfollowing steps:\n\n1. Launch Android Studio.\n2. In the Welcome to Android Studio window, select the **Import an Android Code Sample** option.\n3. Select the **Ndk -\\\u003e Hello GL2** sample from the list and click the **Next** button.\n4. Choose a location for the project and click the **Finish** button.\n5. Wait for the project to load and sync with Gradle, then select **Build -\\\u003e Make Project** from the Android Studio menu bar.\n6. Wait for the build to finish, then verify a `debug.keystore` file was created in the appropriate directory.\n\n### Set the Android SDK and debug keystore location in Godot editor\n\n1. Launch the Godot editor.\n2. Create or open a project.\n3. Select **Editor -\\\u003e Editor Settings...** from the **Editor** menu bar.\n4. In the **Editor Settings** window, select the **Export -\\\u003e Android** item in the left panel.\n5. In the right panel, go to the text box for **Android Sdk Path** and enter the path to the Android SDK.\n6. In the text box for **Debug Keystore** enter the path to the `debug.keystore` file.\n\n**Figure 1.** The **Android Sdk Path** field in **Editor Settings**\n\nSet up Mono\n-----------\n\n### Install MSBuild\n\nThe Mono release of Godot requires MSBuild to build and export projects that use\nC#. To install MSBuild:\n\n**Linux and macOS**\n\n- [Download](https://www.mono-project.com/download/stable/) and [install](https://www.mono-project.com/docs/) the latest version of the Mono SDK.\n\n**Microsoft Windows**\n\n- Install [Microsoft Visual Studio](https://visualstudio.microsoft.com/downloads/) or [Microsoft Visual Studio Build Tools](https://visualstudio.microsoft.com/thank-you-downloading-visual-studio/?sku=BuildTools&rel=15). When you run the installer, ensure you have the **.NET Framework 4.5** targeting pack selected for installation.\n\n### Configure a C# editor\n\nGodot has very limited support for editing C# code. Using an external editor for\nC# files is strongly recommended. Godot supports the following C# editors:\n\n- Microsoft Visual Studio/Visual Studio for Mac\n- Microsoft Visual Studio Code\n- JetBrains Rider\n- MonoDevelop\n\nTo configure an external C# editor, open a project in the Godot editor and\nperform the following steps:\n\n1. Select **Editor -\\\u003e Editor Settings...** from the editor menu bar.\n2. In the **Editor Settings** window, select the **Mono -\\\u003e Editor** item in the left panel.\n3. Choose the desired editor from the **External Editor** dropdown menu.\n\n**Figure 2:** The **External Editor** field in **Editor Settings**\n\n### C# editor plugins for Godot\n\n- [C# Tools for Godot](https://marketplace.visualstudio.com/items?itemName=neikeq.godot-csharp-vscode): A plugin for Microsoft Visual Studio Code that adds C# debugging support and partial code completion features.\n- [JetBrains Rider plugin](https://plugins.jetbrains.com/plugin/13882-godot-support): Adds C# debugging support."]]