מורידים ומתקינים את JDK 17 ל-AGDE 23.1.82 ואילך, או את JDK 11 לגרסאות עד AGDE 22.2.71, ומגדירים את משתנה הסביבה JAVA_HOME.
התקנת התוסף
כדי להוריד ולהתקין את Android Game Development Extension, פועלים לפי השלבים שמפורטים בקטע הזה:
סוגרים את כל המופעים של Visual Studio.
מורידים את הגרסה האחרונה של קובץ ההתקנה של התוסף ואת הדוגמאות מהדף הורדות.
במיקום ההורדה, לוחצים לחיצה כפולה על קובץ ההתקנה. השלמת ההתקנה נמשכת כמה דקות.
אם מותקנות כמה גרסאות של Visual Studio, בוחרים את הגרסאות שרוצים להתקין עבורן את התוסף.
לוחצים על סיום כדי להשלים את ההתקנה.
התקנה של Android SDK ו-NDK
אפשר להתקין את Android SDK ואת Android Native Development Kit (NDK) באמצעות Android Studio או Android Game Development Extension. כדי להתקין את ה-SDK ואת ה-NDK מהתוסף, משתמשים בSDK Manager, שנמצא בסרגל הכלים של התוסף ב-Visual Studio.
כשמתקינים את NDK, חשוב לסמן את התיבה NDK (Side by side) כדי שהתוסף יוכל לאתר אותו. צריך להתקין גרסת NDK שנתמכת על ידי התוסף (ראו היסטוריית הגרסאות של NDK).
כדי להתקין את ה-SDK במיקום שונה מברירת המחדל, מגדירים את משתנה הסביבה ANDROID_SDK_ROOT במחשב:
מוודאים ש-Visual Studio סגור.
בחיפוש של Windows, מחפשים את Environment Variables.
בוחרים באפשרות עריכת משתני הסביבה של המערכת.
לוחצים על משתני סביבה.
בקטע משתני משתמש, לוחצים על חדש.
בתיבה שם המשתנה, מקלידים ANDROID_SDK_ROOT.
בתיבה ערך משתנה, מזינים את הנתיב אל Android SDK.
מפעילים מחדש את המחשב.
אי אפשר לשנות את המיקום של ה-SDK באמצעות חלון SDK Manager, כי משתנה הסביבה הזה הוא המקור היחיד של האמת לגבי המיקום של ה-SDK.
הרצת הדוגמה
כדי להריץ דוגמה שסופקה באמולטור ולאחר מכן במכשיר Android פיזי, פועלים לפי השלבים בקטע הזה.
הגדרת הפלטפורמה
מבטלים את הדחיסה של קובץ ה-ZIP של הדוגמאות לתוך ספרייה לבחירתכם. הדוגמאות הבאות כלולות:
endless-tunnel
HelloJNI
Teapot
מפעילים את Visual Studio אם הוא עדיין לא פועל.
פותחים את ספריית הדוגמאות. בוחרים באפשרות File > Open > Project/Solution (קובץ > פתיחה > פרויקט/פתרון) ועוברים לקובץ .sln.
מוודאים שהמאפיינים של Android SDK ו-NDK מוגדרים בפרויקט לדוגמה:
איור
1. מאפיינים של פלטפורמת Android
ב-Solution Explorer, לוחצים לחיצה ימנית על הפרויקט ובוחרים באפשרות Properties.
בוחרים בכרטיסיית המאפיינים כללי ומחפשים את מאפייני הפלטפורמה ל-Android.
בוחרים בכרטיסייה 'מאפיינים' של Android Packaging.
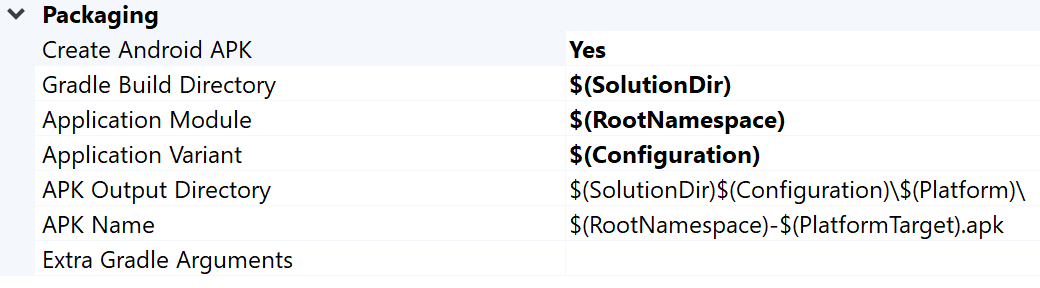
איור
2. מאפייני אריזה של Android
בכרטיסייה הזו אפשר לשנות את שם ה-APK של הפלט ואת הספרייה. שימו לב: חלק מהמאפיינים של הגדרות Android מוגדרים בדפי המאפיינים ומועברים אל Gradle. לדוגמה, מאפיין שם ה-APK MSBUILD_ANDROID_OUTPUT_APK_NAME מעביר את השם הזה לקובץ האפליקציה build.gradle.
ב-Android Virtual Device Manager, לוחצים על Create Virtual Device (יצירת מכשיר וירטואלי).
בוחרים הגדרת מכשיר (לדוגמה, Pixel 2).
בוחרים תמונת מערכת. מומלץ לבחור x86_64 ABI כי הארכיטקטורה הזו פועלת מהר יותר באמולטור.
בודקים את ההגדרה ולוחצים על סיום.
מפעילים את המכשיר הווירטואלי על ידי לחיצה על הלחצן Run ב-Android
Virtual Device Manager.
ב-Visual Studio, המכשיר הווירטואלי אמור להופיע לצד לחצן סרגל הכלים התחלת ניפוי באגים. לוחצים על Start Debugging (התחלת ניפוי הבאגים) כדי להפעיל את אפליקציית הדוגמה במכשיר. יכול להיות שיידרשו כמה רגעים עד שהבאגים יצורפו לאפליקציה. אם מריצים את הדוגמה של קומקום התה, אפשר לסובב את קומקום התה על ידי גרירת סמן העכבר מעליו.
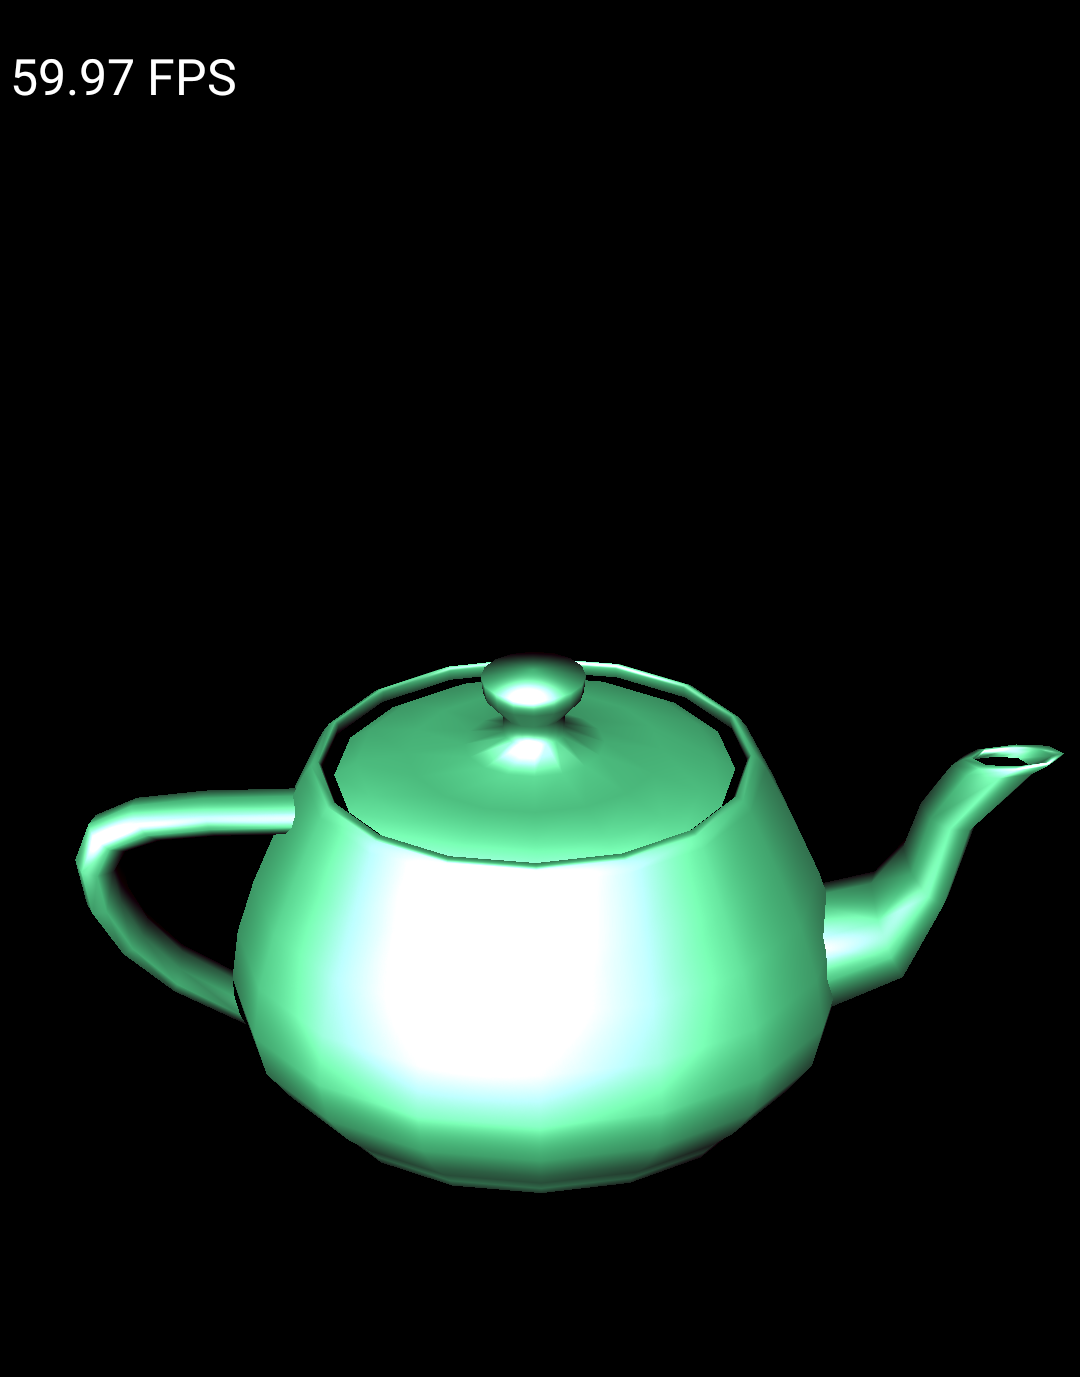
איור
3. דוגמה של קומקום שפועל באמולטור Android
הגדרת המכשיר
כדי להריץ את הדוגמה במכשיר Android פיזי, יכול להיות שתצטרכו ליצור פלטפורמת Android חדשה בפרויקט. הפלטפורמה הזו צריכה להתאים לארכיטקטורה של המכשיר. כדי ליצור פלטפורמה חדשה, מבצעים את הפעולות הבאות ב-Visual Studio:
מקלידים אחת מהאפשרויות הבאות עבור הפלטפורמה החדשה:
Android-armeabi-v7a
Android-arm64-v8a
Android-x86
Android-x86_64
בתיבה Copy settings from (העתקת הגדרות מ), בוחרים פלטפורמת Android קיימת אחרת (או None (ללא) אם עדיין אין לכם פלטפורמות Android).
מוודאים שהפעלתם את האפשרות יצירת פלטפורמות חדשות לפרויקט.
מחברים מכשיר Android למחשב באמצעות כבל USB. סוג המכשיר צריך להופיע לצד לחצן סרגל הכלים התחלת ניפוי באגים.
איור
4. מכשיר Android מחובר מוצג לצד לחצן סרגל הכלים התחלת ניפוי הבאגים
כבל ה-USB תומך בחיבור נתונים (ולא רק בהעברת חשמל).
לוחצים על לחצן התחלת ניפוי הבאגים בסרגל הכלים כדי להפעיל את אפליקציית הדוגמה במכשיר. יכול להיות שיחלפו כמה רגעים עד שהבאג יצורף לאפליקציה.
אחרי שהוא יצורף, תוכלו לבצע פעולות באפליקציה במכשיר.
שאלות נפוצות
ריכזנו כאן כמה שאלות נפוצות בנושא Android Game Development Extension.
איפה נמצאים היומנים של הפלאגין?
אפשר לפתוח את קובץ היומן של הפלאגין באמצעות הסמל Open Logs בסרגל הכלים של Android Game Development Extension.
באילו משתני סביבה הפלאגין משתמש?
התוסף משתמש במשתני הסביבה הבאים:
ANDROID_SDK_ROOT
ANDROID_SDK_HOME
TEMP
GOOGLE_ANDROID_LOG_DIR
השלבים הבאים
כדי להשתמש בפרויקט שלכם עם התוסף, אתם צריכים להגדיר אותו בהתאם למדריך הגדרת הפרויקט.
דוגמאות התוכן והקוד שבדף הזה כפופות לרישיונות המפורטים בקטע רישיון לתוכן. Java ו-OpenJDK הם סימנים מסחריים או סימנים מסחריים רשומים של חברת Oracle ו/או של השותפים העצמאיים שלה.
עדכון אחרון: 2025-07-27 (שעון UTC).
[[["התוכן קל להבנה","easyToUnderstand","thumb-up"],["התוכן עזר לי לפתור בעיה","solvedMyProblem","thumb-up"],["סיבה אחרת","otherUp","thumb-up"]],[["חסרים לי מידע או פרטים","missingTheInformationINeed","thumb-down"],["התוכן מורכב מדי או עם יותר מדי שלבים","tooComplicatedTooManySteps","thumb-down"],["התוכן לא עדכני","outOfDate","thumb-down"],["בעיה בתרגום","translationIssue","thumb-down"],["בעיה בדוגמאות/בקוד","samplesCodeIssue","thumb-down"],["סיבה אחרת","otherDown","thumb-down"]],["עדכון אחרון: 2025-07-27 (שעון UTC)."],[],[],null,["# Quickstart\n\nSet up the Android Game Development Extension on a Windows computer and run a sample Visual\nStudio C++ project on an Android device or emulator.\n\nPrerequisites\n-------------\n\nFollow the steps in this section to prepare your Windows computer for\ninstallation of the extension:\n\n1. Download and install one of the supported versions of Visual Studio:\n\n - [Visual Studio 2017 Version 15.4.0 (October 9th, 2017) or higher](https://docs.microsoft.com/en-us/visualstudio/install/update-visual-studio?view=vs-2017).\n - [Visual Studio 2019 Version 16.0.0 or higher](https://docs.microsoft.com/en-us/visualstudio/install/update-visual-studio?view=vs-2019).\n - [Visual Studio 2022 Version 17.0.0 or higher](https://docs.microsoft.com/en-us/visualstudio/install/update-visual-studio?view=vs-2022).\n2. [Download and install .NET Core SDK 2.2](https://dotnet.microsoft.com/download/thank-you/dotnet-sdk-2.2.107-windows-x64-installer).\n\n3. [Android Studio 3.5 or higher](/studio) is optional, but can be used\n instead of the Android Game Development Extension to install the\n [Android SDK and NDK](#install-sdk-ndk).\n\n4. Download and install [JDK 17](https://jdk.java.net/archive/) for AGDE\n 23.1.82 or newer, or [JDK 11](https://jdk.java.net/archive/) for up to AGDE\n 22.2.71, and set your `JAVA_HOME` environment variable.\n\nInstall the extension\n---------------------\n\nFollow the steps in this section to download and install the\nAndroid Game Development Extension:\n\n1. Close all instances of Visual Studio.\n\n2. Download the latest extension installer and samples from the\n [Downloads](/games/agde#downloads) page.\n\n3. From your download location, double-click the installer. The installer takes\n several minutes to complete.\n\n4. If you have more than one version of Visual Studio installed, select the\n versions that you would like the extension to be installed for.\n\n5. Click **Finish** to complete the installation.\n\nInstall the Android SDK and NDK\n-------------------------------\n\nYou can install the Android SDK and the Android\n[Native Development Kit (NDK)](/studio/projects/install-ndk#specific-version)\nwith Android Studio or the Android Game Development Extension. To install the SDK and NDK from\nthe extension, use the **SDK Manager**, which is located in the\nextension toolbar of Visual Studio.\n\nWhen installing the NDK, make sure to use the **NDK (Side by side)** checkbox so\nthat the extension can locate it. You must install an NDK version\nthat is supported by the extension\n(see [NDK revision history](/ndk/downloads/revision_history)).\n\nTo install the SDK to a different location than the default, set the\n`ANDROID_SDK_ROOT` environment variable on your computer:\n\n1. Ensure that Visual Studio is closed.\n2. In Windows Search, search for `Environment Variables`.\n3. Select **Edit the system environment variables**.\n4. Click **Environment Variables**.\n5. Under **User Variables** , click **New**.\n6. In the **Variable Name** box, type `ANDROID_SDK_ROOT`.\n7. In the **Variable Value** box, enter the path to the Android SDK.\n8. Reboot your computer.\n\nThe location of the SDK cannot be modified using the SDK Manager window as this\nenvironment variable is the only source-of-truth for the SDK location.\n\nRun the sample\n--------------\n\nFollow the steps in this section to run a provided sample on an\nemulator and then on a physical Android device.\n\n### Configure the platform\n\n1. Unzip the samples zip file into a directory of your choice. The following\n samples are included:\n\n - endless-tunnel\n - HelloJNI\n - Teapot\n2. Start Visual Studio if it is not already running.\n\n3. Open the samples directory. Select **File \\\u003e Open \\\u003e Project/Solution** and\n navigate to the `.sln` file.\n\n4. Select an Android platform:\n\n 1. Select **Build \\\u003e Configuration Manager**.\n 2. Under **Active solution platform** , select **Android-x86_64**.\n\n Android platforms are already configured in the samples (see [add\n more Android platforms](#add-platform) for adding platforms).\n | **Note:** Typical emulator images use x86 or x86_64 ABIs.\n5. Make sure the sample project has the Android SDK and NDK properties\n configured:\n\n **Figure\n 1.** Android platform properties\n - In the **Solution Explorer** , right-click the project and select\n **Properties**.\n\n - Select the **General** properties tab and find the **Platform**\n properties for Android.\n\n | **Note:** Make sure you select an NDK that is installed.\n6. Select the **Android Packaging** properties tab.\n\n **Figure\n 2.** Android packaging properties\n\n You can change the output APK name and directory from this tab. Note that\n some of the Android configuration properties are defined in the property\n pages and are passed to Gradle. For example, the APK name property\n `MSBUILD_ANDROID_OUTPUT_APK_NAME` passes this name to the app `build.gradle`\n file.\n\n### Set up the emulator\n\n1. Start AVD Manager from the extension toolbar in Visual Studio.\n Configure a virtual device and then\n [run it in the Android emulator](/studio/run/emulator).\n\n 1. In the Android Virtual Device Manager, click **Create Virtual Device**.\n 2. Choose a device definition (for example, Pixel 2).\n 3. Select a system image. You should select an x86_64 ABI because this architecture performs faster in the emulator.\n 4. Verify the configuration and click **Finish**.\n2. Start the virtual device by clicking the **Run**\n button in the Android\n Virtual Device Manager.\n\n3. In Visual Studio, the virtual device should appear next to the\n **Start Debugging** toolbar button. Click **Start Debugging** to launch the\n sample app on the device. It may take a few moments for the debugger\n to attach to the app. If you are running the Teapot sample, you can rotate\n the teapot by dragging your mouse cursor across it.\n\n \u003cbr /\u003e\n\n\n **Figure\n 3**. Teapot sample running on an Android emulator\n\n### Set up the device\n\n1. To run the sample on a physical Android device, you may need to create a\n new Android platform in the project. This platform must match the architecture\n of the device. To create a new platform, do the following in Visual Studio:\n\n 1. Select **Build \\\u003e Configuration Manager**.\n 2. Under **Active solution platform** , select **\\\u003cNew\\\u003e**.\n 3. Type one of the following for the new platform:\n\n - **Android-armeabi-v7a**\n - **Android-arm64-v8a**\n - **Android-x86**\n - **Android-x86_64**\n 4. In the **Copy settings from** box, select another existing Android\n platform (or **None** if you do not have any Android platforms yet).\n Make sure you enabled **Create new project platforms**.\n\n2. Connect an Android device to your computer using a USB cable. The device\n type should be shown next to the **Start Debugging** toolbar button.\n\n \u003cbr /\u003e\n\n\n **Figure\n 4** . Connected Android device shown next to the **Start Debugging** toolbar button\n\n If the device is not shown, check the following:\n - The platform selection matches the ABI of your device.\n - [Developer options and USB debugging](/studio/debug/dev-options) are enabled on the device.\n - The USB cable is connected from the device to the computer.\n - The USB cable supports a data connection (and not just power).\n3. Click the **Start Debugging** toolbar button to launch the sample app on the\n device. It may take a few moments for the debugger to attach to the app.\n Once it is attached, you can interact with the app on your device.\n\nFAQ\n---\n\nThe following are some frequently asked questions about the Android Game Development Extension.\n\n### Where are the logs for the plugin located?\n\nYou can open the log file for the plugin using the **Open Logs** icon in the\n**Android Game Development Extension** toolbar.\n\n### What environment variables does the plugin use?\n\nThe plugin uses the following environment variables:\n\n- `ANDROID_SDK_ROOT`\n- `ANDROID_SDK_HOME`\n- `TEMP`\n- `GOOGLE_ANDROID_LOG_DIR`\n\nWhat's next\n-----------\n\nTo use your own project with the extension, you must configure it according to\nthe [project configuration](/games/agde/adapt-existing-project) guide."]]