
หัวข้อนี้ครอบคลุมวิธีใช้การป้อนข้อมูลจากเมาส์สำหรับ Google Play Games บน PC ในเกมที่โหมดการแปลอินพุตไม่ได้มอบประสบการณ์การเล่นที่เหมาะสม
โดยปกติแล้วผู้เล่นบน PC จะใช้แป้นพิมพ์และเมาส์แทนหน้าจอสัมผัส ดังนั้นจึงควรพิจารณาว่าเกมของคุณรองรับอินพุตจากเมาส์หรือไม่ โดยค่าเริ่มต้น Google Play Games บน PC จะแปลงเหตุการณ์คลิกซ้ายของเมาส์เป็นเหตุการณ์แตะเสมือนครั้งเดียว ซึ่งเรียกว่า "โหมดการแปลอินพุต"
แม้ว่าโหมดนี้จะทำให้เกมของคุณทำงานได้โดยมีการเปลี่ยนแปลงเพียงเล็กน้อย แต่ก็ไม่ได้มอบประสบการณ์การเล่นที่ผู้เล่นบน PC คุ้นเคย ดังนั้นเราจึงขอแนะนำให้คุณใช้สิ่งต่อไปนี้
- สถานะเมื่อวางเมาส์เหนือเมนูตามบริบทแทนการกดค้าง
- คลิกขวาเพื่อดำเนินการทางเลือกที่เกิดขึ้นเมื่อกดค้างหรือในเมนูตามบริบท
- การมองด้วยเมาส์สำหรับเกมแอ็กชันมุมมองบุคคลที่หนึ่งหรือบุคคลที่สามแทนเหตุการณ์การลาก
คุณต้องปิดใช้โหมดการแปลอินพุตเพื่อรองรับรูปแบบ UI ที่ใช้กันทั่วไปใน PC
การจัดการอินพุตสำหรับ Google Play Games บน PC จะเหมือนกับของ ChromeOS การเปลี่ยนแปลงที่รองรับ PC ยังช่วยปรับปรุงเกมสำหรับผู้เล่น Android ทุกคนด้วย
ปิดใช้โหมดการแปลอินพุต
ประกาศฟีเจอร์ ในไฟล์ AndroidManifest.xml
android.hardware.type.pc
ซึ่งจะระบุว่าเกมของคุณใช้ฮาร์ดแวร์ PC และปิดใช้โหมดการแปลอินพุต นอกจากนี้ การเพิ่ม required="false" จะช่วยให้มั่นใจว่ายังสามารถติดตั้งเกมบนโทรศัพท์และแท็บเล็ตที่ไม่มีเมาส์ได้
เช่น
<manifest ...>
  <uses-feature
      android:name="android.hardware.type.pc"
      android:required="false" />
  ...
</manifest>
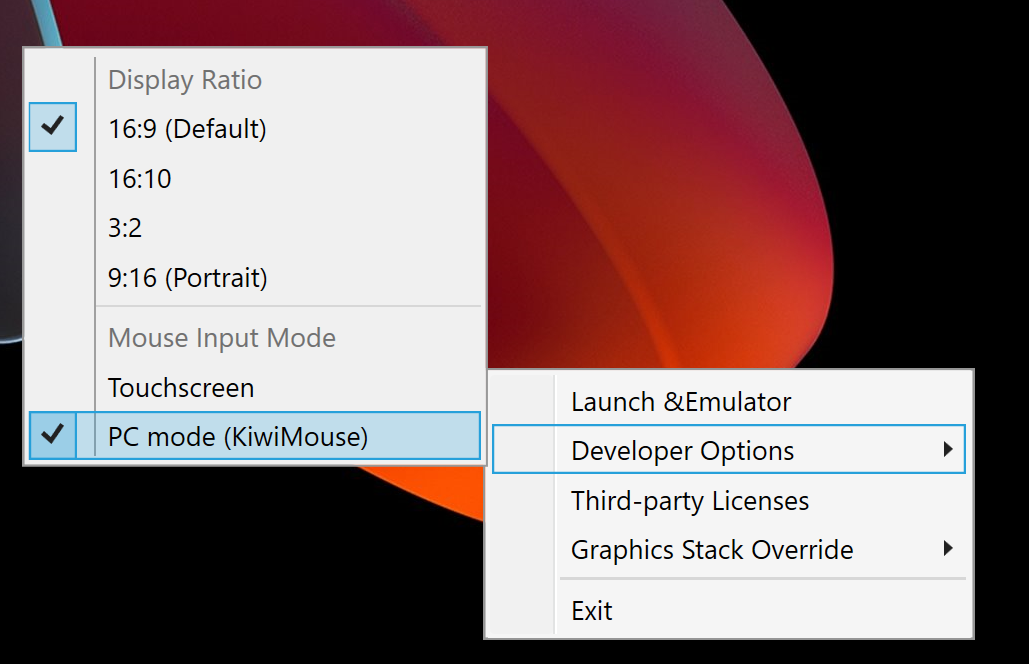
Google Play Games บน PC เวอร์ชันที่ใช้งานจริงจะเปลี่ยนเป็นโหมดที่ถูกต้องเมื่อเปิดเกม เมื่อทำงานในโปรแกรมจำลองสำหรับนักพัฒนาแอป คุณต้อง คลิกขวาที่ไอคอนแถบงาน เลือก ตัวเลือกสำหรับนักพัฒนาแอป แล้วเลือก PC mode(KiwiMouse) เพื่อรับอินพุตจากเมาส์โดยตรง
หลังจากทำเช่นนี้แล้ว ระบบจะรายงานการเคลื่อนไหวของเมาส์โดย View.onGenericMotionEvent ที่มีแหล่งที่มา SOURCE_MOUSE
ซึ่งระบุว่าเป็นเหตุการณ์ของเมาส์
Kotlin
gameView.setOnGenericMotionListener { _, motionEvent ->
    var handled = false
    if (motionEvent.isFromSource(InputDevice.SOURCE_CLASS_POINTER)) {
        // handle the mouse event here
        handled = true
    }
    handled
}
Java
gameView.setOnGenericMotionListener((view, motionEvent) -> {
    if (motionEvent.isFromSource(InputDevice.SOURCE_CLASS_POINTER)) {
        // handle the mouse event here
        return true;
    }
    return false;
});
โปรดดูรายละเอียดเกี่ยวกับการจัดการอินพุตจากเมาส์ใน เอกสารประกอบของ ChromeOS
การจัดการการเคลื่อนไหวของเมาส์
หากต้องการตรวจหาการเคลื่อนไหวของเมาส์ ให้ฟังเหตุการณ์ ACTION_HOVER_ENTER, ACTION_HOVER_EXIT และ
ACTION_HOVER_MOVE
วิธีนี้เหมาะที่สุดสำหรับการตรวจหาว่าผู้ใช้วางเมาส์เหนือปุ่มหรือออบเจ็กต์ในเกม ซึ่งจะช่วยให้คุณแสดงกล่องคำแนะนำหรือใช้สถานะเมาส์โอเวอร์เพื่อไฮไลต์สิ่งที่ผู้เล่นกำลังจะเลือก เช่น
Kotlin
gameView.setOnGenericMotionListener { _, motionEvent ->
   var handled = false
   if (motionEvent.isFromSource(InputDevice.SOURCE_CLASS_POINTER)) {
       when(motionEvent.action) {
           MotionEvent.ACTION_HOVER_ENTER -> Log.d("MA", "Mouse entered at ${motionEvent.x}, ${motionEvent.y}")
           MotionEvent.ACTION_HOVER_EXIT -> Log.d("MA", "Mouse exited at ${motionEvent.x}, ${motionEvent.y}")
           MotionEvent.ACTION_HOVER_MOVE -> Log.d("MA", "Mouse hovered at ${motionEvent.x}, ${motionEvent.y}")
       }
       handled = true
   }

   handled
}
Java
gameView.setOnGenericMotionListener((view, motionEvent) -> {
    if (motionEvent.isFromSource(InputDevice.SOURCE_CLASS_POINTER)) {
        switch (motionEvent.getAction()) {
            case MotionEvent.ACTION_HOVER_ENTER:
                Log.d("MA", "Mouse entered at " + motionEvent.getX() + ", " + motionEvent.getY());
                break;
            case MotionEvent.ACTION_HOVER_EXIT:
                Log.d("MA", "Mouse exited at " + motionEvent.getX() + ", " + motionEvent.getY());
                break;
            case MotionEvent.ACTION_HOVER_MOVE:
                Log.d("MA", "Mouse hovered at " + motionEvent.getX() + ", " + motionEvent.getY());
                break;
        }
        return true;
    }
    return false;
});
การจัดการปุ่มเมาส์
PC มีทั้งปุ่มเมาส์ซ้ายและขวามานานแล้ว ซึ่งทำให้องค์ประกอบแบบอินเทอร์แอกทีฟมีการดำเนินการหลักและการดำเนินการรอง ในเกม การดำเนินการแตะ เช่น การแตะปุ่ม ควรแมปกับการคลิกซ้าย ส่วนการดำเนินการแตะค้างไว้ควรแมปกับการคลิกขวาเพื่อให้รู้สึกเป็นธรรมชาติที่สุด ในเกมกลยุทธ์แบบเรียลไทม์ คุณอาจใช้คลิกซ้ายเพื่อเลือกและคลิกขวาเพื่อย้าย เกมยิงมุมมองบุคคลที่หนึ่งอาจกำหนดการยิงหลักและการยิงรองเป็นการคลิกซ้ายและคลิกขวา เกมวิ่งไม่สิ้นสุดอาจใช้คลิกซ้ายเพื่อกระโดดและคลิกขวาเพื่อพุ่งตัว เรายังไม่ได้เพิ่มการรองรับเหตุการณ์คลิกกลาง
หากต้องการจัดการการกดปุ่ม ให้ใช้ ACTION_DOWN และ ACTION_UP จากนั้นใช้ getActionButton เพื่อกำหนดว่าปุ่มใดเป็นตัวกระตุ้นการดำเนินการ หรือใช้ getButtonState เพื่อดูสถานะของปุ่มทั้งหมด
ในตัวอย่างนี้ เราใช้ Enum เพื่อช่วยแสดงผลลัพธ์ของ getActionButton
Kotlin
enum class MouseButton {
   LEFT,
   RIGHT,
   UNKNOWN;
   companion object {
       fun fromMotionEvent(motionEvent: MotionEvent): MouseButton {
           return when (motionEvent.actionButton) {
               MotionEvent.BUTTON_PRIMARY -> LEFT
               MotionEvent.BUTTON_SECONDARY -> RIGHT
               else -> UNKNOWN
           }
       }
   }
}
Java
enum MouseButton {
    LEFT,
    RIGHT,
    MIDDLE,
    UNKNOWN;
    static MouseButton fromMotionEvent(MotionEvent motionEvent) {
        switch (motionEvent.getActionButton()) {
            case MotionEvent.BUTTON_PRIMARY:
                return MouseButton.LEFT;
            case MotionEvent.BUTTON_SECONDARY:
                return MouseButton.RIGHT;
            default:
                return MouseButton.UNKNOWN;
        }
    }
}
ในตัวอย่างนี้ ระบบจะจัดการการดำเนินการในลักษณะเดียวกับเหตุการณ์วางเมาส์เหนือ
Kotlin
// Handle the generic motion event
gameView.setOnGenericMotionListener { _, motionEvent ->
   var handled = false
   if (motionEvent.isFromSource(InputDevice.SOURCE_CLASS_POINTER)) {
       when (motionEvent.action) {
           MotionEvent.ACTION_BUTTON_PRESS -> Log.d(
               "MA",
               "${MouseButton.fromMotionEvent(motionEvent)} pressed at ${motionEvent.x}, ${motionEvent.y}"
           )
           MotionEvent.ACTION_BUTTON_RELEASE -> Log.d(
               "MA",
               "${MouseButton.fromMotionEvent(motionEvent)} released at ${motionEvent.x}, ${motionEvent.y}"
           )
       }
       handled = true
   }

   handled
}
Java
gameView.setOnGenericMotionListener((view, motionEvent) -> {
    if (motionEvent.isFromSource(InputDevice.SOURCE_CLASS_POINTER)) {
        switch (motionEvent.getAction()) {
            case MotionEvent.ACTION_BUTTON_PRESS:
                Log.d("MA", MouseButton.fromMotionEvent(motionEvent) + " pressed at " + motionEvent.getX() + ", " + motionEvent.getY());
                break;
            case MotionEvent.ACTION_BUTTON_RELEASE:
                Log.d("MA", MouseButton.fromMotionEvent(motionEvent) + " released at " + motionEvent.getX() + ", " + motionEvent.getY());
                break;
        }
        return true;
    }
    return false;
});
จัดการการเลื่อนด้วยล้อเลื่อนของเมาส์
เราขอแนะนำให้คุณใช้ล้อเลื่อนของเมาส์แทนท่าทางบีบเพื่อซูมหรือพื้นที่เลื่อนแบบแตะแล้วลากในเกม
หากต้องการอ่านค่าล้อเลื่อน ให้ฟังเหตุการณ์ ACTION_SCROLL คุณสามารถดึงข้อมูล delta ตั้งแต่เฟรมล่าสุดได้โดยใช้ getAxisValue กับ AXIS_VSCROLL สำหรับออฟเซ็ตแนวตั้ง และ AXIS_HSCROLL สำหรับออฟเซ็ตแนวนอน เช่น
Kotlin
gameView.setOnGenericMotionListener { _, motionEvent ->
   var handled = false
   if (motionEvent.isFromSource(InputDevice.SOURCE_CLASS_POINTER)) {
       when (motionEvent.action) {
           MotionEvent.ACTION_SCROLL -> {
               val scrollX = motionEvent.getAxisValue(MotionEvent.AXIS_HSCROLL)
               val scrollY = motionEvent.getAxisValue(MotionEvent.AXIS_VSCROLL)
               Log.d("MA", "Mouse scrolled $scrollX, $scrollY")
           }
       }
       handled = true
   }
   handled
}
Java
gameView.setOnGenericMotionListener((view, motionEvent) -> {
    if (motionEvent.isFromSource(InputDevice.SOURCE_CLASS_POINTER)) {
        switch (motionEvent.getAction()) {
            case MotionEvent.ACTION_SCROLL:
                float scrollX = motionEvent.getAxisValue(MotionEvent.AXIS_HSCROLL);
                float scrollY = motionEvent.getAxisValue(MotionEvent.AXIS_VSCROLL);
                Log.d("MA", "Mouse scrolled " + scrollX + ", " + scrollY);
                break;
        }
        return true;
    }
    return false;
});
จับอินพุตจากเมาส์
บางเกมจำเป็นต้องควบคุมเคอร์เซอร์ของเมาส์อย่างเต็มที่ เช่น เกมแอ็กชันมุมมองบุคคลที่หนึ่งหรือบุคคลที่สามที่แมปการเคลื่อนไหวของเมาส์กับการเคลื่อนไหวของกล้อง หากต้องการควบคุมเมาส์แบบพิเศษ ให้เรียกใช้ View.requestPointerCapture()
requestPointerCapture() จะทำงานได้ก็ต่อเมื่อลำดับชั้นการแสดงผลที่มีมุมมองของคุณมีโฟกัส ด้วยเหตุนี้ คุณจึงไม่สามารถรับการจับตัวชี้ในโค้ดเรียกกลับ onCreate ได้ คุณควรรอให้ผู้เล่นโต้ตอบเพื่อจับ
เคอร์เซอร์เมาส์ เช่น เมื่อโต้ตอบกับเมนูหลัก หรือใช้
onWindowFocusChanged
โค้ดเรียกกลับ เช่น
Kotlin
override fun onWindowFocusChanged(hasFocus: Boolean) {
   super.onWindowFocusChanged(hasFocus)

   if (hasFocus) {
       gameView.requestPointerCapture()
   }
}
Java
@Override
public void onWindowFocusChanged(boolean hasFocus) {
    super.onWindowFocusChanged(hasFocus);

    if (hasFocus) {
        View gameView = findViewById(R.id.game_view);
        gameView.requestPointerCapture();
    }
}
ระบบจะส่งเหตุการณ์ที่จับโดย requestPointerCapture()
ไปยังมุมมองที่โฟกัสได้ซึ่งลงทะเบียน
OnCapturedPointerListener เช่น
Kotlin
gameView.focusable = View.FOCUSABLE
gameView.setOnCapturedPointerListener { _, motionEvent ->
    Log.d("MA", "${motionEvent.x}, ${motionEvent.y}, ${motionEvent.actionButton}")
    true
}
Java
gameView.setFocusable(true);
gameView.setOnCapturedPointerListener((view, motionEvent) -> {
    Log.d("MA", motionEvent.getX() + ", " + motionEvent.getY() + ", " + motionEvent.getActionButton());
    return true;
});
หากต้องการปล่อยการจับเมาส์แบบพิเศษ เช่น เพื่ออนุญาตให้ผู้เล่นโต้ตอบกับเมนูหยุดชั่วคราว ให้เรียกใช้ View.releasePointerCapture()