
เอกสารนี้อธิบายวิธีย้ายข้อมูลเกมที่มีอยู่จาก SDK v1 ของ Games ไปยัง SDK v2 ของ Games ปลั๊กอิน Play Games สำหรับ Unity เวอร์ชัน 10 และก่อนหน้าใช้ SDK v1 ของ Games
ก่อนเริ่มต้น
- ตรวจสอบว่าคุณได้ตั้งค่า Play Console และ ติดตั้ง Unity Editor แล้ว
ดาวน์โหลดปลั๊กอิน Google Play Games สำหรับ Unity
หากต้องการใช้ประโยชน์จากฟีเจอร์ล่าสุดในบริการเกมของ Play ให้ดาวน์โหลดและติดตั้งปลั๊กอินเวอร์ชันล่าสุด ดาวน์โหลดได้จากที่เก็บ GitHub
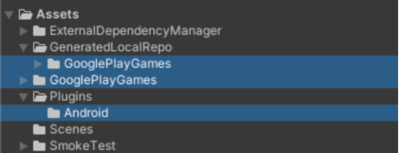
นำปลั๊กอินเก่าออก
ใน Unity Editor ให้นำโฟลเดอร์หรือไฟล์ต่อไปนี้ออก
Assets/GooglePlayGames

Assets/GeneratedLocalRepo/GooglePlayGames

Assets/Plugins/Android/GooglePlayGamesManifest.androidlib

Assets/Plugins/Android
นำเข้าปลั๊กอินใหม่ไปยังโปรเจ็กต์ Unity
หากต้องการนำเข้าปลั๊กอินไปยังโปรเจ็กต์ Unity ให้ทำตามขั้นตอนต่อไปนี้
- เปิดโปรเจ็กต์เกม
- ใน Unity Editor ให้คลิกชิ้นงาน > นำเข้าแพ็กเกจ > แพ็กเกจที่กำหนดเอง
เพื่อนำเข้าไฟล์
unitypackageที่ดาวน์โหลดแล้วไปยังชิ้นงานของโปรเจ็กต์ ตรวจสอบว่าแพลตฟอร์มบิลด์ปัจจุบันตั้งค่าเป็น Android
คลิกไฟล์ > การตั้งค่าการสร้างในเมนูหลัก
เลือก Android แล้วคลิกเปลี่ยนแพลตฟอร์ม
คุณควรเห็นรายการเมนูใหม่ในส่วนหน้าต่าง > Google Play Games หากไม่มี ให้รีเฟรชชิ้นงานโดยคลิกชิ้นงาน > รีเฟรช แล้ว ลองตั้งค่าแพลตฟอร์มบิลด์อีกครั้ง
ใน Unity Editor ให้คลิก File > Build Settings > Player Settings > Other Settings
เลือกเวอร์ชันในช่องระดับ API เป้าหมาย
ในช่องแบ็กเอนด์การเขียนสคริปต์ ให้ป้อน
IL2CPPเลือกค่าในช่องสถาปัตยกรรมเป้าหมาย
จดชื่อแพ็กเกจ package_name คุณสามารถใช้ข้อมูลนี้ ในภายหลังได้
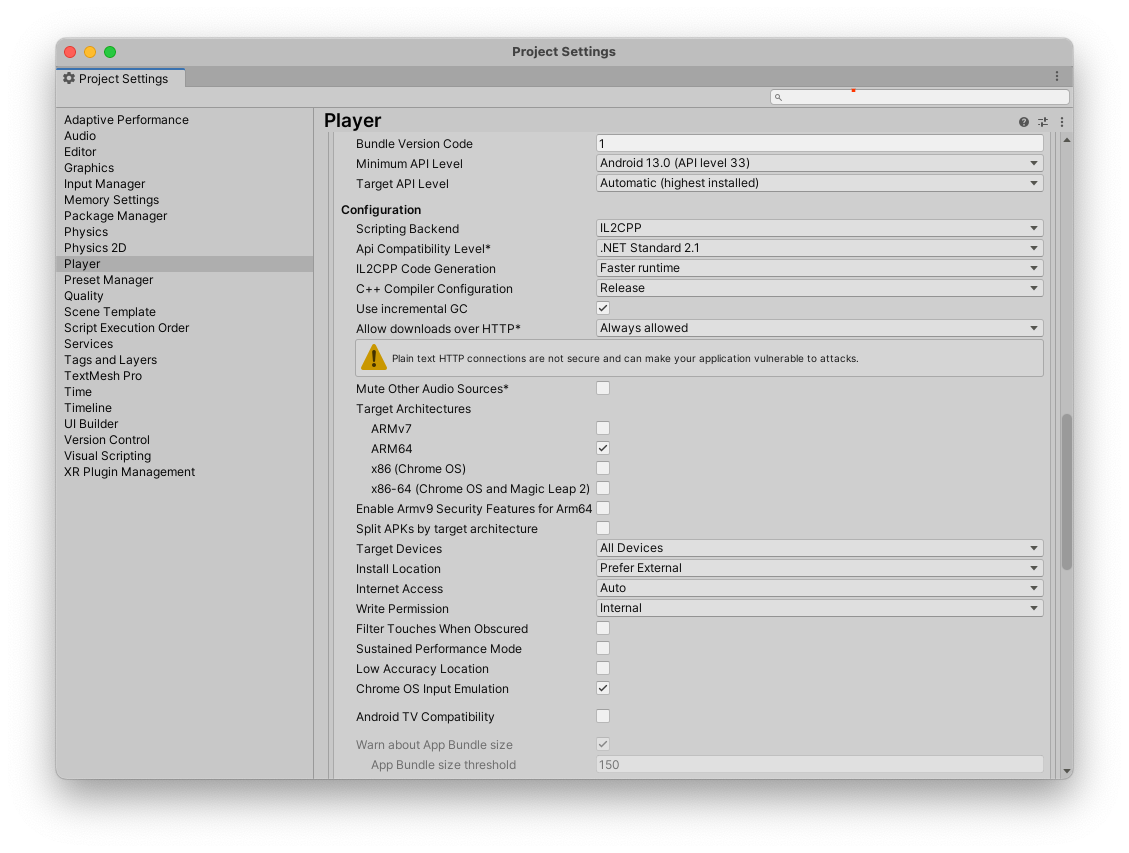
การตั้งค่าเพลเยอร์ในโปรเจ็กต์ Unity
เส้นทางการย้ายข้อมูล
เส้นทางการย้ายข้อมูลที่ถูกต้องสำหรับเกมของคุณจะขึ้นอยู่กับวิธีที่เกมใช้บริการเกมของ Play เวอร์ชัน 1 และ จัดการข้อมูลประจำตัวของผู้เล่น ระบุสถานการณ์ที่ตรงกับการตั้งค่าที่มีอยู่มากที่สุดและทำตามขั้นตอนที่เกี่ยวข้องเพื่อให้การเปลี่ยนผ่านเป็นไปอย่างราบรื่นและป้องกันไม่ให้ข้อมูลผู้เล่นสูญหาย
ตัวเลือกที่ 1: สำหรับเกมที่ IGA เชื่อมโยงกับรหัสผู้เล่นของบริการเกมของ Play
สถานการณ์นี้ใช้กับเกมที่ใช้บริการเกมของ Play Player ID เป็นตัวระบุเพียงอย่างเดียวสำหรับบัญชีในเกม (IGA) ของผู้เล่น และไม่ได้ขอหรือจัดเก็บ OpenID ไว้ก่อนหน้านี้ ความท้าทายหลักคือการลิงก์ IGA ที่มีอยู่
กับตัวระบุหลัก (OpenID) โดยไม่สูญเสียการเชื่อมต่อกับ
ความคืบหน้าของผู้เล่น
ขั้นตอนการย้ายข้อมูลมีดังนี้
- เมื่อเปิดเกม SDK บริการเกมของ Play เวอร์ชัน 2 จะตรวจสอบสิทธิ์แพลตฟอร์มโดยอัตโนมัติและเงียบๆ
เกมจะแสดงหน้าจอเข้าสู่ระบบ หน้าจอนี้ต้องมีปุ่มลงชื่อเข้าใช้ ด้วย Google (SiWG) แทนที่ปุ่ม Google Play วิธีผสานรวม
ดาวน์โหลด CredManBridge.java ไปยังโฟลเดอร์ของคุณ คลาส Java นี้ทำหน้าที่เป็น บริดจ์ระหว่าง Unity กับไลบรารี
androidx.credentialsCredManBridge.java
package com.wickedcube.trivialkart; import android.accounts.Account; import android.content.Context; import android.util.Log; import android.os.CancellationSignal; import androidx.credentials.CredentialManager; import androidx.credentials.GetCredentialRequest; import androidx.credentials.GetCredentialResponse; import androidx.credentials.exceptions.GetCredentialException; import androidx.credentials.exceptions.NoCredentialException; import com.google.android.libraries.identity.googleid.GetGoogleIdOption; import com.google.android.libraries.identity.googleid.GoogleIdTokenCredential; import com.google.android.gms.auth.api.identity.AuthorizationClient; import com.google.android.gms.auth.api.identity.AuthorizationRequest; import com.google.android.gms.auth.api.identity.AuthorizationResult; import com.google.android.gms.common.api.ApiException; import com.google.android.gms.auth.api.identity.Identity; import com.google.android.gms.common.api.Scope; import com.unity3d.player.UnityPlayer; import java.util.Collections; import java.util.List; import java.util.concurrent.Executor; import java.util.concurrent.Executors;public class CredManBridge {
// --- MODE 1: SILENT SIGN-IN (Called on Awake) --- // Tries to auto-select an authorized account. If it fails, it does NOT show UI. public static void signInSilent(Context context, String webClientId) { CredentialManager credentialManager = CredentialManager.create(context); CancellationSignal cancellationSignal = new CancellationSignal(); Executor executor = Executors.newSingleThreadExecutor();
Log.d("CredMan", "Attempting Silent Sign-In...");
GetGoogleIdOption silentOption = new GetGoogleIdOption.Builder() .setFilterByAuthorizedAccounts(true) // Strict: Only authorized accounts .setServerClientId(webClientId) .setAutoSelectEnabled(true) // Auto-select if possible .build();
GetCredentialRequest silentRequest = new GetCredentialRequest.Builder() .addCredentialOption(silentOption) .build();
credentialManager.getCredentialAsync( context, silentRequest, cancellationSignal, executor, new androidx.credentials.CredentialManagerCallback<GetCredentialResponse, GetCredentialException>() { @Override public void onResult(GetCredentialResponse result) { Log.d("CredMan", "Silent Sign-In Successful!"); handleSignInResult(context, result, webClientId); }
@Override public void onError(GetCredentialException e) { // Send a specific error code so Unity knows to just stay on the Start Screen Log.d("CredMan", "Silent sign-in failed. Keeping UI hidden."); UnityPlayer.UnitySendMessage("AuthManager", "OnSignInError", "SilentFailed"); } }); }
// --- MODE 2: INTERACTIVE SIGN-IN (Called on Button Click) --- // Forces the Account Selection / "Add Account" sheet to appear. public static void signInInteractive(Context context, String webClientId) { CredentialManager credentialManager = CredentialManager.create(context); CancellationSignal cancellationSignal = new CancellationSignal(); Executor executor = Executors.newSingleThreadExecutor();
Log.d("CredMan", "Starting Interactive Sign-In...");
GetGoogleIdOption interactiveOption = new GetGoogleIdOption.Builder() .setFilterByAuthorizedAccounts(false) // Show ALL accounts (and "Add Account") .setServerClientId(webClientId) .setAutoSelectEnabled(false) // Force the UI to show .build();
GetCredentialRequest interactiveRequest = new GetCredentialRequest.Builder() .addCredentialOption(interactiveOption) .build();
credentialManager.getCredentialAsync( context, interactiveRequest, cancellationSignal, executor, new androidx.credentials.CredentialManagerCallback<getcredentialresponse, getcredentialexception="">() { @Override public void onResult(GetCredentialResponse result) { Log.d("CredMan", "Interactive Sign-In Successful!"); handleSignInResult(context, result, webClientId); }</getcredentialresponse,>
    @Override
    public void onError(GetCredentialException e) {
        Log.e("CredMan", "Interactive Sign-In Canceled or Failed", e);
        UnityPlayer.UnitySendMessage("AuthManager", "OnSignInError", "Canceled");
    }
}
); }
private static void handleSignInResult(Context context, GetCredentialResponse result, String webClientId) { try { GoogleIdTokenCredential credential = GoogleIdTokenCredential.createFrom(result.getCredential().getData()); String email = credential.getId();
Account account = new Account(email, "com.google");
// Requesting GAMES_LITE scope to check for pre-existing V1 grants
List<Scope> requestedScopes = Collections.singletonList(new Scope("https://www.googleapis.com/auth/games_lite"));

AuthorizationRequest authRequest = new AuthorizationRequest.Builder()
    .setRequestedScopes(requestedScopes)
    .setAccount(account)
    .requestOfflineAccess(webClientId)
    .build();

AuthorizationClient authClient = Identity.getAuthorizationClient(context);

authClient.authorize(authRequest)
    .addOnSuccessListener(authorizationResult -> {
        if (authorizationResult.getServerAuthCode() != null) {
            // CASE 1: RETURNING USER (Success)
            // The user has already granted GAMES_LITE in the past.
            // We got the code directly without showing UI.
            Log.i("CredMan", "PGS v1: Existing grant found. Returning user detected. Auth Code retrieved.");
            UnityPlayer.UnitySendMessage("AuthManager", "OnSignInSuccess", authorizationResult.getServerAuthCode());
        }
        else if (authorizationResult.hasResolution()) {
            // CASE 2: NEW USER (PendingIntent)
            // The user has NOT granted GAMES_LITE before. The API returned a PendingIntent
            // (authorizationResult.getPendingIntent()) to show the consent screen.
            // As per your flow, we DISCARD this intent and do not show UI.
            Log.i("CredMan", "PGS v1: No existing grant (PendingIntent returned). This is a NEW user or they revoked access.");
            Log.i("CredMan", "PGS v1: Discarding PendingIntent. Proceeding as New User.");

            // Notify Unity that this is a "New User" so it can trigger V2 logic instead of failing
            UnityPlayer.UnitySendMessage("AuthManager", "OnSignInError", "NewUser_NoGrant");
        }
        else {
            // Edge Case: No code and no resolution?
            Log.e("CredMan", "PGS v1: Authorization success but no Auth Code or Resolution returned.");
            UnityPlayer.UnitySendMessage("AuthManager", "OnSignInError", "No Auth Code returned");
        }
    })
    .addOnFailureListener(e -> {
        // CASE 3: GENERIC FAILURE
        Log.e("CredMan", "PGS v1: Authorization failed completely.", e);
        UnityPlayer.UnitySendMessage("AuthManager", "OnSignInError", "Authorization Failed: " + e.getMessage());
    });
} catch (Exception e) { UnityPlayer.UnitySendMessage("AuthManager", "OnSignInError", "Parsing Error: " + e.getMessage()); } } }
การผสานรวม Credential Manager:
- ใช้
GetGoogleIdOptionกับsetFilterByAuthorizedAccounts(true)สำหรับการลงชื่อเข้าใช้แบบเงียบเพื่อลงชื่อเข้าใช้เฉพาะผู้ใช้ที่เคย ให้สิทธิ์แอปไว้ก่อนหน้านี้ - ใช้
setFilterByAuthorizedAccounts(false)สำหรับการลงชื่อเข้าใช้แบบอินเทอร์แอกทีฟ เพื่ออนุญาตให้ผู้ใช้เลือกบัญชีหรือเพิ่มบัญชีใหม่
- ใช้
คำขอขอบเขต:
- หลังจากได้รับข้อมูลเข้าสู่ระบบพื้นฐานของ Google แล้ว ระบบจะสร้าง
AuthorizationRequestโดยขอขอบเขตเดิมที่เฉพาะเจาะจง: https://www.googleapis.com/auth/games_lite - ขอบเขตนี้มีความสําคัญอย่างยิ่งเนื่องจากเป็นการให้สิทธิ์เซิร์ฟเวอร์ในการค้นหา PlayerID เดิมของผู้ใช้
- หลังจากได้รับข้อมูลเข้าสู่ระบบพื้นฐานของ Google แล้ว ระบบจะสร้าง
การจัดการผลลัพธ์:
- หากผู้ใช้ให้สิทธิ์ (หรือเคยให้สิทธิ์ไว้ก่อนหน้านี้)
Bridge จะส่ง
ServerAuthCodeกลับไปยัง Unity - หากผู้ใช้ไม่ได้ให้สิทธิ์ (สถานการณ์ผู้ใช้ใหม่) API จะ
แสดงผล
PendingIntentในตัวอย่างนี้ ระบบจะทิ้ง Intent และ ถือว่าผู้ใช้เป็นผู้ใช้ใหม่เพื่อลดความซับซ้อนของโฟลว์
- หากผู้ใช้ให้สิทธิ์ (หรือเคยให้สิทธิ์ไว้ก่อนหน้านี้)
Bridge จะส่ง
หากต้องการรองรับบริการ Credential Manager และ Google Identity ให้ตรวจสอบว่าได้เพิ่มทรัพยากร Dependency ต่อไปนี้ลงในการกำหนดค่า
mainTemplate.gradlegradle แล้วdependencies { // Standard Unity dependencies implementation fileTree(dir: 'libs', include: ['*.jar']) // Credential Manager and Identity Libraries implementation 'androidx.credentials:credentials:1.3.0' implementation 'androidx.credentials:credentials-play-services-auth:1.3.0' implementation 'com.google.android.libraries.identity.googleid:googleid:1.1.1' // Play Services Auth for legacy scope handling implementation 'com.google.android.gms:play-services-auth:21.2.0' }
- เครื่องมือจัดการข้อมูลเข้าสู่ระบบ: จัดการการจัดระเบียบข้อมูลประจำตัวหลักและ UI สำหรับ การเลือกบัญชี
- ไลบรารี GoogleID: มีไว้เพื่อ
เรียกโทเค็น
OpenIDConnect โดยเฉพาะGetGoogleIdOption - การตรวจสอบสิทธิ์บริการ Google Play: ต้องใช้เพื่อรักษาความเข้ากันได้และขอขอบเขต
GAMES_LITEสำหรับการดึงข้อมูลPlayer IDรุ่นเดิม
เมื่อผู้เล่นแตะปุ่ม SiWG และเลือกบัญชี Google เกม ต้องดึงตัวระบุที่แตกต่างกัน 2 รายการ ดังนี้
OpenIDซึ่งเป็นตัวระบุหลักสำหรับการผูก IGAPlayer IDบริการเกมของ PlayGAMES_LITEที่ดึงข้อมูลโดยใช้ขอบเขตGAMES_LITEเพื่อค้นหา IGA ของผู้เล่นในระบบแบ็กเอนด์และทำการเชื่อมโยง
ในการเปิดตัวเกมครั้งต่อๆ ไป ผู้เล่นจะเข้าถึง IGA ได้โดยใช้ขั้นตอน SiWG โดยไม่ต้องให้เกมใช้
Player IDเป็นตัวระบุหลัก
คุณทำขั้นตอนที่ 4 ได้โดยใช้การติดตั้งใช้งานฝั่งไคลเอ็นต์ของเกม
- นักพัฒนาแอปเรียกใช้ Android Credential Manager API เพื่อลงชื่อเข้าใช้ผู้ใช้ ด้วยบัญชี Google
- หลังจากที่ผู้ใช้ทำ SiwG เสร็จสมบูรณ์และเลือกบัญชี Google แล้ว นักพัฒนาแอปจะได้รับออบเจ็กต์ผลลัพธ์ที่มีโทเค็นรหัสและอีเมล
- นักพัฒนาแอปสร้างออบเจ็กต์บัญชีจากอีเมล
- นักพัฒนาแอปเรียก Authorization API ด้วยขอบเขต
GAMES_LITEและ บัญชี - หากบัญชีมีสิทธิ์ที่ได้รับล่วงหน้าใน
GAMES_LITEขอบเขต Authorization API จะแสดงโทเค็นโดยตรงในออบเจ็กต์การตอบกลับ- ใช้โทเค็นการตอบกลับเพื่อเรียกเซิร์ฟเวอร์บริการเกมของ Play และดึงข้อมูล
Player IDของบริการเกมของ Play - นักพัฒนาแอปจะยืนยันว่าบริการเกมของ Play
Player IDเชื่อมโยงกับบัญชีในเกมหรือไม่- นักพัฒนาแอปทราบว่าผู้ใช้รายนี้เป็นผู้ใช้ที่กลับมาจากบริการเกมของ Play v1
- นักพัฒนาแอปสามารถลิงก์รหัส Gaia ใหม่กับบัญชีบริการเกมของ Play v1 ก่อนหน้าได้
- ใช้โทเค็นการตอบกลับเพื่อเรียกเซิร์ฟเวอร์บริการเกมของ Play และดึงข้อมูล
- หรือหากบัญชีไม่มีการให้สิทธิ์ที่มีอยู่ก่อนแล้วใน
GAMES_LITEขอบเขต Authorization API จะแสดง PendingIntent- นักพัฒนาแอปทราบว่าผู้ใช้ไม่มีบัญชีที่มีอยู่ จากบริการเกมของ Play v1
- นักพัฒนาแอปสามารถทิ้ง PendingIntent ได้อย่างปลอดภัยโดยไม่ต้องแสดง UI ใดๆ
ตัวเลือกที่ 2: สำหรับเกมที่ผูก IGA กับ OpenID อยู่แล้ว
นักพัฒนาแอปในกลุ่มนี้มีเส้นทางการย้ายข้อมูลที่ตรงไปตรงมาที่สุด หากบัญชีในเกมของเกมผูกกับ OpenID เป็นหลักอยู่แล้ว คุณเพียงแค่ต้องทำการย้ายข้อมูล SDK ทางเทคนิคมาตรฐานจาก v1 เป็น v2 ตามที่ระบุไว้ในขั้นตอน
อัปเดตรหัสการลงชื่อเข้าใช้โดยอัตโนมัติ
แทนที่คลาสการเริ่มต้น PlayGamesClientConfiguration ด้วยคลาส PlayGamesPlatform.Instance.Authenticate()
คุณไม่จำเป็นต้องเริ่มต้นและเปิดใช้งาน
PlayGamesPlatform
การเรียก PlayGamesPlatform.Instance.Authenticate() จะดึงข้อมูล
ผลลัพธ์ของการลงชื่อเข้าใช้โดยอัตโนมัติ
ดูข้อมูลเพิ่มเติมเกี่ยวกับขั้นตอนการตรวจสอบสิทธิ์ที่แนะนำด้วยการผสานรวมบริการเกมของ Play v2
ได้ที่หลักเกณฑ์ด้านประสบการณ์ของผู้ใช้สำหรับขั้นตอนการตรวจสอบสิทธิ์ที่เหมาะสม
C#
ใน Unity Editor ให้ค้นหาไฟล์ที่มีคลาส PlayGamesClientConfiguration
using GooglePlayGames;
using GooglePlayGames.BasicApi;
using UnityEngine.SocialPlatforms;

public void Start() {
    PlayGamesClientConfiguration config =
        new PlayGamesClientConfiguration.Builder()
    // Enables saving game progress
    .EnableSavedGames()
    // Requests the email address of the player be available
    // will bring up a prompt for consent
    .RequestEmail()
    // Requests a server auth code be generated so it can be passed to an
    // associated backend server application and exchanged for an OAuth token
    .RequestServerAuthCode(false)
    // Requests an ID token be generated. This OAuth token can be used to
    // identify the player to other services such as Firebase.
    .RequestIdToken()
    .Build();

    PlayGamesPlatform.InitializeInstance(config);
    // recommended for debugging:
    PlayGamesPlatform.DebugLogEnabled = true;
    // Activate the Google Play Games platform
    PlayGamesPlatform.Activate();
}
และอัปเดตเป็น
using GooglePlayGames;

public void Start() {
    PlayGamesPlatform.Instance.Authenticate(ProcessAuthentication);
}

internal void ProcessAuthentication(SignInStatus status) {
    if (status == SignInStatus.Success) {
        // Continue with Play Games Services
    } else {
        // Disable your integration with Play Games Services or show a login
        // button to ask users to sign-in. Clicking it should call
        // PlayGamesPlatform.Instance.ManuallyAuthenticate(ProcessAuthentication).
    }
}
เลือกแพลตฟอร์มโซเชียล
หากต้องการเลือกแพลตฟอร์มโซเชียล โปรดดูเลือกแพลตฟอร์มโซเชียล
ดึงรหัสการตรวจสอบสิทธิ์ของเซิร์ฟเวอร์
หากต้องการรับรหัสการเข้าถึงฝั่งเซิร์ฟเวอร์ โปรดดูดึงรหัสการตรวจสอบสิทธิ์ของเซิร์ฟเวอร์
นำรหัสลงชื่อออกออก
นำโค้ดสำหรับการออกจากระบบออก บริการเกมของ Play ไม่จำเป็นต้องมีปุ่มออกจากระบบในเกมอีกต่อไป
นำโค้ดที่แสดงในตัวอย่างต่อไปนี้ออก
C#
// sign out
PlayGamesPlatform.Instance.SignOut();
ทดสอบเกม
ทดสอบเกมเพื่อให้แน่ใจว่าเกมทำงานได้ตามที่ออกแบบไว้ การทดสอบที่คุณดำเนินการ ขึ้นอยู่กับฟีเจอร์ของเกม
ต่อไปนี้คือรายการการทดสอบที่พบบ่อยซึ่งควรเรียกใช้
ลงชื่อเข้าใช้สำเร็จ
การลงชื่อเข้าใช้โดยอัตโนมัติใช้งานได้ ผู้ใช้ควรลงชื่อเข้าใช้บริการเกมของ Play เมื่อเปิดตัวเกม
ป๊อปอัปต้อนรับจะแสดงขึ้น
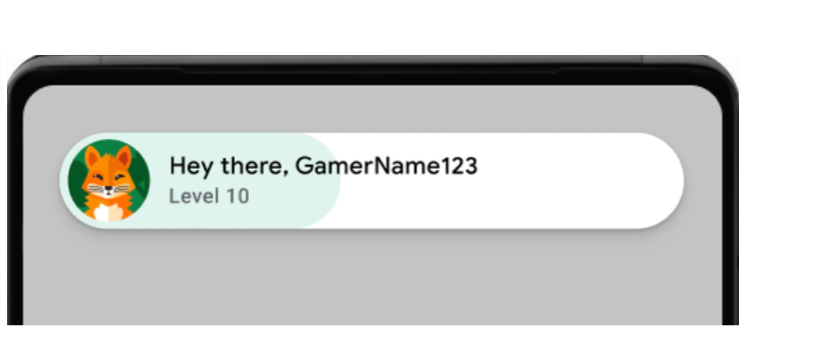
ป๊อปอัปต้อนรับตัวอย่าง (คลิกเพื่อขยาย) ข้อความบันทึกที่สำเร็จจะแสดงขึ้น เรียกใช้คำสั่งต่อไปนี้ ในเทอร์มินัล
adb logcat | grep com.google.android.
ตัวอย่างต่อไปนี้แสดงข้อความในบันทึกที่สำเร็จ
[
ตรวจสอบความสอดคล้องของคอมโพเนนต์ UI
ป๊อปอัป ลีดเดอร์บอร์ด และรางวัลพิเศษแสดงอย่างถูกต้องและสอดคล้องกันในขนาดและการวางแนวหน้าจอต่างๆ ในอินเทอร์เฟซผู้ใช้ (UI) ของบริการเกมของ Play
ตัวเลือกการออกจากระบบไม่ปรากฏใน UI ของบริการเกมของ Play
ตรวจสอบว่าคุณดึงข้อมูลรหัสผู้เล่นได้สำเร็จ และหากมี ความสามารถฝั่งเซิร์ฟเวอร์ทํางานได้ตามที่คาดไว้
หากเกมใช้การตรวจสอบสิทธิ์ฝั่งเซิร์ฟเวอร์ ให้ทดสอบ
requestServerSideAccessโฟลว์อย่างละเอียด ตรวจสอบว่าเซิร์ฟเวอร์ได้รับรหัสการให้สิทธิ์ และแลกเป็นโทเค็นเพื่อการเข้าถึงได้ ทดสอบทั้งสถานการณ์ที่สำเร็จและไม่สำเร็จสำหรับข้อผิดพลาดเกี่ยวกับเครือข่าย สถานการณ์ที่ไม่ถูกต้องclient ID
หากเกมของคุณใช้ฟีเจอร์ใดฟีเจอร์หนึ่งต่อไปนี้ ให้ทดสอบเพื่อให้แน่ใจว่าฟีเจอร์เหล่านั้นทำงานเหมือนเดิมก่อนการย้ายข้อมูล
- ลีดเดอร์บอร์ด: ส่งคะแนนและดูลีดเดอร์บอร์ด ตรวจสอบว่ามีการจัดอันดับและแสดงชื่อและคะแนนของผู้เล่นอย่างถูกต้อง
- รางวัลพิเศษ: ปลดล็อกรางวัลพิเศษและตรวจสอบว่าระบบบันทึกอย่างถูกต้อง และแสดงใน UI ของ Play Games
- เกมที่บันทึกไว้: หากเกมใช้เกมที่บันทึกไว้ ให้ตรวจสอบว่าการบันทึกและโหลดความคืบหน้าของเกมทำงานได้อย่างราบรื่น การทดสอบในอุปกรณ์หลายเครื่องและหลังจากการอัปเดตแอปมีความสำคัญอย่างยิ่ง
งานหลังการย้ายข้อมูล
ทำตามขั้นตอนต่อไปนี้หลังจากย้ายข้อมูลไปยัง SDK เกมเวอร์ชัน 2