Mantenha tudo organizado com as coleções
Salve e categorize o conteúdo com base nas suas preferências.
Esta página descreve como fazer o download, importar e configurar o plug-in do Unity para
o Android Performance Tuner.
Requisitos
Para usar o plug-in no seu jogo, use uma versão compatível do Unity:
Versão 2017.4 ou mais recente do Unity e
versão 4.6 do .NET (link em inglês)
O Unity 2018.2 é necessário para usar arquivos de expansão do APK
Para melhorar o ritmo de frames e as medidas da GPU,
é necessário usar a versão 2019.3.14 ou mais recente do Unity
Para suporte a cenas do Addressables, é preciso ter o Unity 2019.3 ou versão mais recente e o pacote do Addressables 1.19.4 (link em inglês) ou versão mais recente.
Fazer o download do plug-in
Faça o download do plug-in no
repositório do GitHub (link em inglês). Selecione o
download do arquivo .unitypackage.
Importar o plug-in
Antes de importar o plug-in, verifique se o seu projeto está usando a versão 4.6 do .NET.
Isso se aplica à versão 2018.4 e anteriores do Unity. As versões mais recentes do Unity
contêm somente a versão 4.6 do.NET.
Selecione File > Build Settings. Verifique se o Android está selecionado como a
plataforma atual.
Clique no botão Player Settings.
Em Other Settings, encontre Scripting Runtime Version e selecione
.NET 4.6.
O plug-in é disponibilizado como um pacote do Unity que pode ser importado para o projeto.
Selecione Assets > Import Package > Custom Package e selecione o
arquivo .unitypackage que você salvou.
Android Performance Tuner versão 1.5.1 ou mais recente com o Unity 2017
O uso do Android Performance Tuner versão 1.5.1 ou mais recente com o Unity 2017
requer as seguintes etapas extras durante a importação do plug-in:
Acesse a pasta Assets/AndroidPerformanceTuner/Editor.
Clique no arquivo Google.Android.PerformanceTuner.Editor para que ele seja aberto no
Inspector.
Clique na referência de montagem ausente e depois em - para que ela seja removida.
Clique no botão Apply.
Figura 1. Referência de montagem ausente.
Acesse a pasta Assets/AndroidPerformanceTuner/Runtime.
Clique no arquivo Google.Android.PerformanceTuner para que ele seja aberto no
Inspector.
Repita a etapa 3 para remover as duas referências de montagem ausentes.
Reinicie o Unity.
Acesse Window > AndroidPerformanceTuner > Setup e verifique se algum erro
é mostrado.
Como reimportar o plug-in após a exclusão
Se você estiver reimportando o plug-in depois que ele tiver sido removido do projeto, primeiro remova o
ANDROID_PERFORMANCE_TUNER_UTILITIES de
Player Settings > Scripting Define Symbols.
Configurar o plug-in
Para configurar o plug-in, siga estas etapas:
Para a versão 2019.3.14 ou mais recente do Unity:
Ative a biblioteca Android Frame Pacing. O Android Performance Tuner usa
essa biblioteca para medir o desempenho do seu jogo, incluindo
medidas mais detalhadas do que as relatadas somente pelo Unity.
Selecione File > Build Settings e clique no botão Player Settings.
Em Resolution and Presentation, marque a caixa de seleção
Optimized Frame Pacing.
Sincronize a renderização de frame com espaços em branco verticais.
Em "Player Settings", selecione a guia Quality e encontre o
menu VSync Count. Use qualquer seleção, exceto Don't Sync.
As seleções diferentes de Don't Sync possibilitam medições mais precisas em
conjunto com a biblioteca Android Frame Pacing.
Para versões do Unity anteriores a 2019: defina o sistema de compilação como o Gradle. Selecione
File > Build Settings. Localize Build System e selecione Gradle.
Adicione a permissão de acesso à Internet. Em Other Settings, encontre
Internet Access e selecione Require.
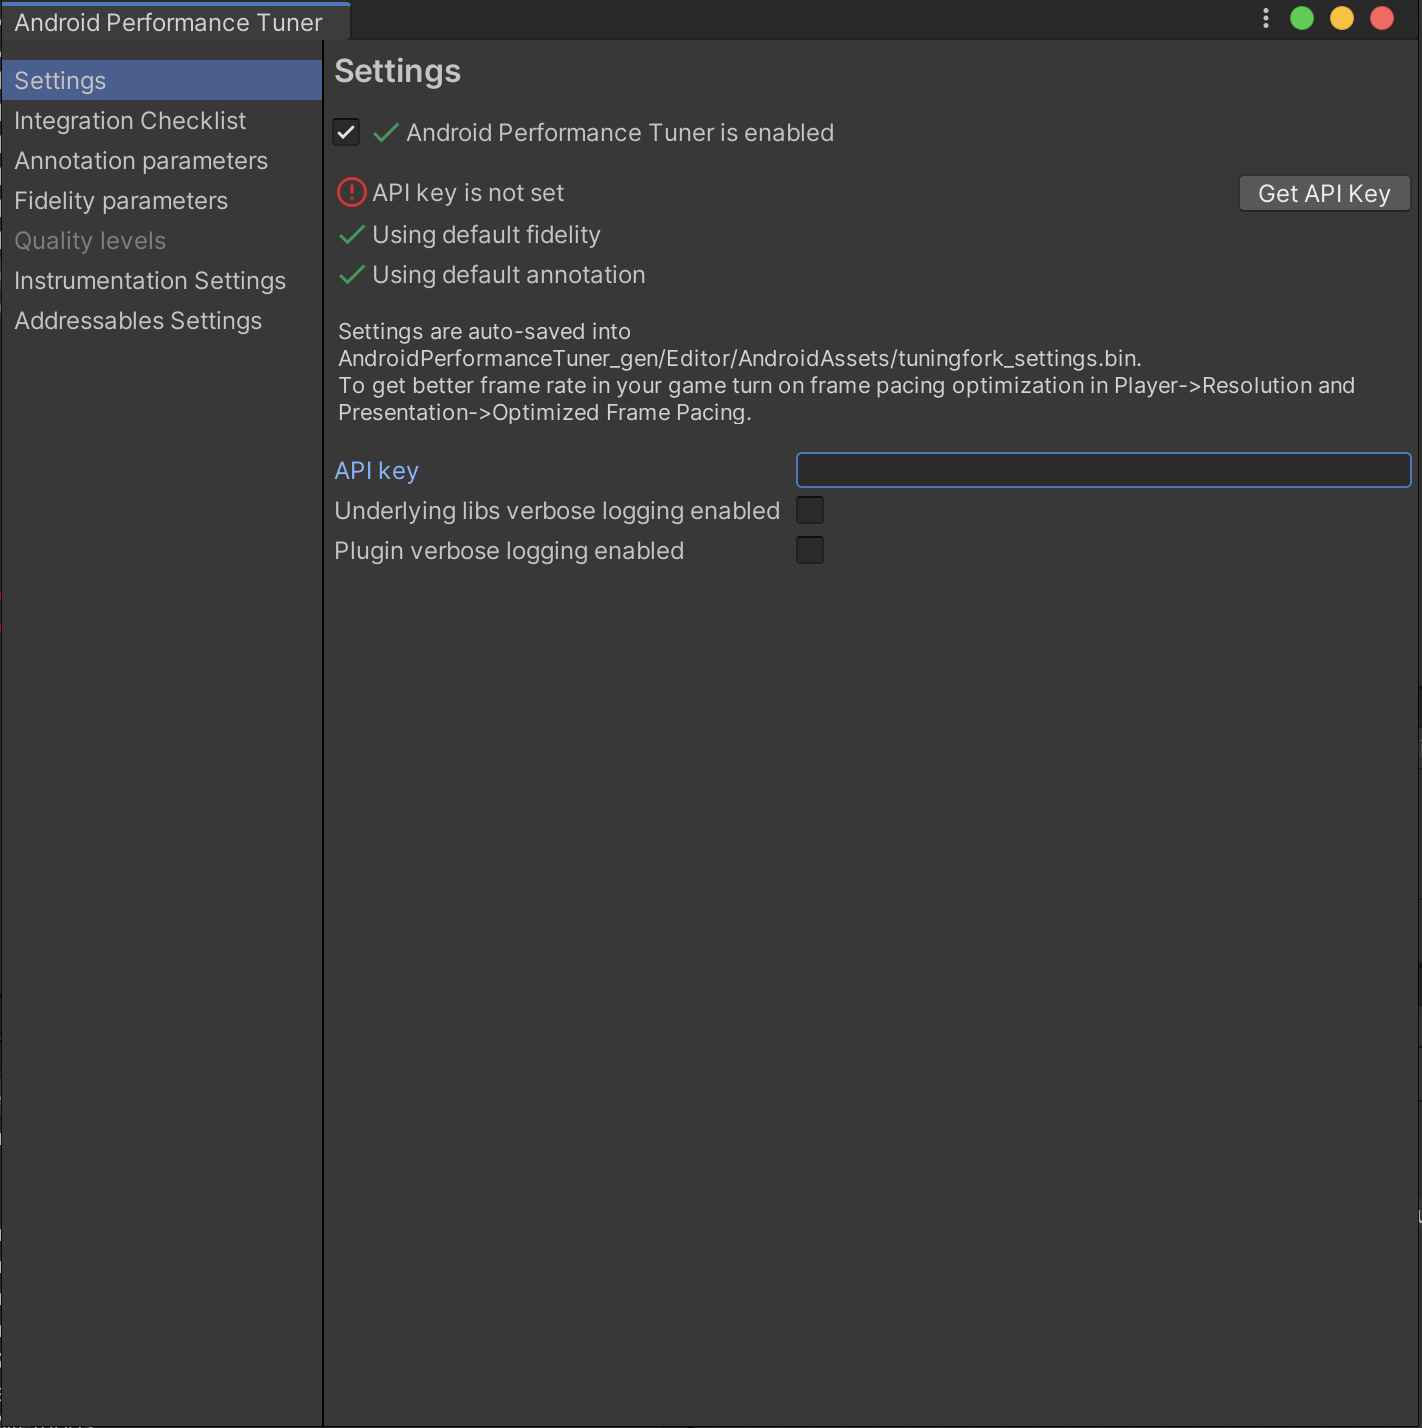
Insira sua chave de API. Depois de instalar o plug-in, você pode inseri-lo no menu
Window > Android Performance Tuner > Setup. Nessa caixa de diálogo, selecione a guia
Settings e digite a
Chave de API do projeto do Google Cloud
no campo API key.
O conteúdo e os exemplos de código nesta página estão sujeitos às licenças descritas na Licença de conteúdo. Java e OpenJDK são marcas registradas da Oracle e/ou suas afiliadas.
Última atualização 2025-08-26 UTC.
[[["Fácil de entender","easyToUnderstand","thumb-up"],["Meu problema foi resolvido","solvedMyProblem","thumb-up"],["Outro","otherUp","thumb-up"]],[["Não contém as informações de que eu preciso","missingTheInformationINeed","thumb-down"],["Muito complicado / etapas demais","tooComplicatedTooManySteps","thumb-down"],["Desatualizado","outOfDate","thumb-down"],["Problema na tradução","translationIssue","thumb-down"],["Problema com as amostras / o código","samplesCodeIssue","thumb-down"],["Outro","otherDown","thumb-down"]],["Última atualização 2025-08-26 UTC."],[],[],null,["This page describes how to download, import, and configure the Unity plugin for\nAndroid Performance Tuner.\n\nRequirements\n\nTo use the plugin in your game, use a supported version of Unity:\n\n- Unity version 2017.4 or later and [.NET version 4.6](https://dotnet.microsoft.com/download/dotnet-framework/net46)\n- To use APK Expansion files, Unity 2018.2 is required\n- For improved frame pacing and GPU measurements, Unity version 2019.3.14 or later is required\n- For Addressables scenes support, Unity 2019.3 or later and [Addressables package 1.19.4](https://docs.unity3d.com/Packages/com.unity.addressables@0.8/manual/index.html) or later are required.\n\nDownload the plugin\n\nDownload the plugin from the\n[GitHub repository](https://github.com/android/tuningfork/releases). Select the\n`.unitypackage` file download.\n\nImport the plugin\n\nBefore importing the plugin, make sure your project is using .NET version 4.6.\nThis applies to Unity version 2018.4 and earlier (later versions of Unity\ncontain .NET version 4.6 only).\n\n1. Select **File \\\u003e Build Settings**. Make sure Android is selected as the current platform.\n2. Click the **Player Settings** button.\n3. Under **Other Settings** , find **Scripting Runtime Version** and select **.NET 4.6**.\n\nThe plugin is provided as a Unity Package that you can import in your project.\nSelect **Assets \\\u003e Import Package \\\u003e Custom Package** and select the\n`.unitypackage` file you downloaded.\n\nAndroid Performance Tuner version **1.5.1 or higher** with **Unity 2017**\n\nUsing Android Performance Tuner version **1.5.1 or higher** with **Unity 2017**\nrequires the following additional steps when importing the plugin:\n\n1. Go to the **Assets/AndroidPerformanceTuner/Editor** folder.\n2. Click the **Google.Android.PerformanceTuner.Editor** file to open it in the **Inspector**.\n3. Click the missing assembly reference and then click **-** to remove it.\n4. Click the **Apply** button.\n\n\n **Figure 1.** Missing assembly reference.\n5. Go to the **Assets/AndroidPerformanceTuner/Runtime** folder.\n\n6. Click the **Google.Android.PerformanceTuner** file to open it in the\n Inspector.\n\n7. Repeat **step 3** to remove the two missing assembly references.\n\n8. Restart Unity.\n\n9. Go to **Window \\\u003e AndroidPerformanceTuner \\\u003e Setup** and verify that no errors\n are displayed.\n\nRe-importing the plugin after deletion\n\nIf you're re-importing the plugin after removing it from the project, remove\n`ANDROID_PERFORMANCE_TUNER_UTILITIES` from\n**Player Settings \\\u003e Scripting Define Symbols** first.\n\nConfigure the plugin\n\nTo configure the plugin, do the following:\n\n1. For Unity version 2019.3.14 or later:\n\n - Enable the Android Frame Pacing library. Android Performance Tuner will use\n this library to measure the performance of your game, including more\n in-depth measures than what Unity alone reports.\n\n Select **File \\\u003e Build Settings** and click the **Player Settings** button.\n Under **Resolution and Presentation** , select the **Optimized Frame Pacing**\n checkbox.\n - Synchronize the frame rendering with vertical blanks.\n\n From the Player Settings, select the **Quality** tab and find the\n **VSync Count** menu. Use any selection (except **Don't Sync** ).\n Selections other than **Don't Sync** enable more precise measurements in\n conjunction with the Android Frame Pacing library.\n2. (For versions of Unity prior to 2019) Set the build system to Gradle. Select\n **File \\\u003e Build Settings** . Find **Build System** and select **Gradle**.\n\n3. Add the internet access permission. Under **Other Settings** , find\n **Internet Access** and select **Require**.\n\n4. Enter your API key. Once the plugin is installed, you can enter it from the\n **Window \\\u003e Android Performance Tuner \\\u003e Setup** menu. On this dialog, select the\n **Settings** tab and enter the\n [API key from your Google Cloud project](/games/sdk/performance-tuner/unity/enable-api)\n into the **API key** field.\n\n | **Note:** If you don't enter your API key, Android Performance Tuner won't send your game performance data to the Google Play Console. Android Performance Tuner logs this error, and you can see the error using `adb logcat`. (You will run `adb logcat` in the next section to confirm the proper operation of Android Performance Tuner.)\n\n\n **Figure 2.** Settings tab in the plugin"]]