সেভ করা পৃষ্ঠা গুছিয়ে রাখতে 'সংগ্রহ' ব্যবহার করুন
আপনার পছন্দ অনুযায়ী কন্টেন্ট সেভ করুন ও সঠিক বিভাগে রাখুন।
এই নির্দেশিকাটি একটি অ্যান্ড্রয়েড অ্যাপ হিসাবে একটি Defold প্রকল্প রপ্তানির প্রক্রিয়া কভার করে৷ Defold স্থানীয় ডিভাইস পরীক্ষার জন্য APK ফাইল এবং Google Play Store-এ জমা দেওয়ার জন্য Android অ্যাপ বান্ডেল উভয়ই তৈরি করতে পারে।
রপ্তানি প্রক্রিয়া শুরু করতে, Defold মেনু বার থেকে Project > Bundle > Android Application … বেছে নিন। বান্ডেল অ্যাপ্লিকেশন উইন্ডো খোলে।
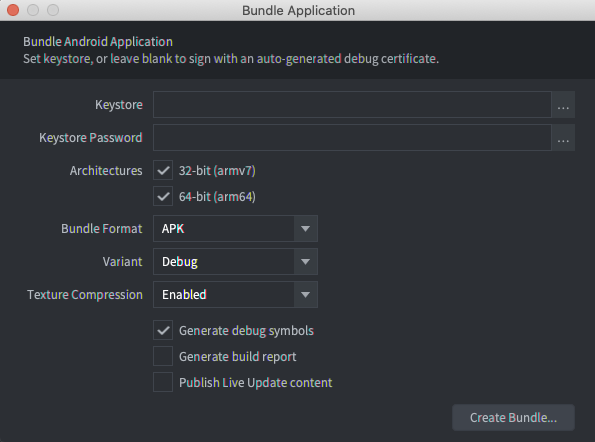
চিত্র 1.বান্ডেল অ্যাপ্লিকেশন উইন্ডো
সাইন বিল্ড করে
কীস্টোর এবং কীস্টোর পাসওয়ার্ড ক্ষেত্রগুলি খালি থাকলে, ডিফোল্ড স্বয়ংক্রিয়ভাবে একটি ডিবাগ কীস্টোর ফাইল তৈরি করে এবং অ্যাপ্লিকেশনটিতে স্বাক্ষর করতে এটি ব্যবহার করে। একটি ডিবাগ কীস্টোর দিয়ে তৈরি করা বিল্ডগুলি স্থানীয় ডিভাইসে ইনস্টল করা হতে পারে, কিন্তু Google Play স্টোরে আপলোড নাও হতে পারে৷
গুগল প্লে স্টোরে আপলোড করার জন্য একটি বিল্ড তৈরি করতে, আপনি একটি রিলিজ কীস্টোর ফাইল তৈরি করতে অ্যান্ড্রয়েড স্টুডিও ব্যবহার করতে পারেন।
আপনার অ্যাপের জন্য একটি রিলিজ কীস্টোর ফাইল তৈরি করতে:
অ্যান্ড্রয়েড স্টুডিও চালু করুন।
অ্যান্ড্রয়েড স্টুডিওতে স্বাগতম উইন্ডোতে, নতুন প্রকল্প তৈরি করুন নির্বাচন করুন।
নো অ্যাক্টিভিটি টেমপ্লেট নির্বাচন করুন এবং পরবর্তীতে ক্লিক করুন।
আপনার প্রকল্প কনফিগার করুন স্ক্রিনে, প্রকল্পটি তৈরি করতে সমাপ্তিতে ক্লিক করুন।
কীস্টোর ফাইল তৈরি করার পরে, অ্যান্ড্রয়েড স্টুডিও ছেড়ে দিন এবং ডিফোল্ড সম্পাদকে ফিরে যান।
বান্ডেল অ্যাপ্লিকেশন উইন্ডোতে, কীস্টোর ক্ষেত্রের পাশে ... বোতামটি নির্বাচন করুন এবং নতুন তৈরি .keystore ফাইলটি নির্বাচন করুন।
কীস্টোর পাসওয়ার্ড ক্ষেত্রে কীস্টোর পাসওয়ার্ড লিখুন।
বিল্ড সেটিংস কনফিগার করুন
বিল্ড সেটিংস কনফিগার করতে বান্ডেল অ্যাপ্লিকেশন উইন্ডোটি ব্যবহার করুন। এটি স্থানীয় ডিভাইসে পরীক্ষার জন্য নাকি Google Play Store-এ আপলোড করার জন্য চূড়ান্ত বিল্ড কিনা তার উপর নির্ভর করে এই সেটিংসগুলি আলাদা।
একটি স্থানীয় ডিভাইসে পরীক্ষার জন্য একটি বিল্ড কনফিগার করতে:
আর্কিটেকচার বিভাগে, 32-বিট এবং 64-বিট উভয়ই নির্বাচন করুন।
বান্ডেল ফরম্যাট তালিকায়, APK নির্বাচন করুন।
বৈকল্পিক তালিকায়, ডিবাগ নির্বাচন করুন।
যখন ভেরিয়েন্টডিবাগে সেট করা হয়, তখন ডিফোল্ড লগ ইঞ্জিন ডিবাগ বার্তাগুলি ডিভাইস logcat পাঠায়। এটি অ্যান্ড্রয়েড স্টুডিওতে logcat উইন্ডোতে বা adb এ logcat কমান্ডের সাথে দেখা যায়। APK ফাইল ইনস্টল করতে এবং লগক্যাট আউটপুট দেখতে adb ব্যবহার করার বিষয়ে আরও তথ্যের জন্য, Android Debug Bridge পৃষ্ঠাটি দেখুন।
গুগল প্লে স্টোরে আপলোড করার জন্য একটি বিল্ড কনফিগার করতে:
আর্কিটেকচার বিভাগে, 32-বিট এবং 64-বিট উভয়ই নির্বাচন করুন।
বান্ডেল ফরম্যাট তালিকায়, AAB নির্বাচন করুন।
ভেরিয়েন্ট তালিকায়, রিলিজ নির্বাচন করুন।
এই পৃষ্ঠার কন্টেন্ট ও কোডের নমুনাগুলি Content License-এ বর্ণিত লাইসেন্সের অধীনস্থ। Java এবং OpenJDK হল Oracle এবং/অথবা তার অ্যাফিলিয়েট সংস্থার রেজিস্টার্ড ট্রেডমার্ক।
2025-07-29 UTC-তে শেষবার আপডেট করা হয়েছে।
[[["সহজে বোঝা যায়","easyToUnderstand","thumb-up"],["আমার সমস্যার সমাধান হয়েছে","solvedMyProblem","thumb-up"],["অন্যান্য","otherUp","thumb-up"]],[["এতে আমার প্রয়োজনীয় তথ্য নেই","missingTheInformationINeed","thumb-down"],["খুব জটিল / অনেক ধাপ","tooComplicatedTooManySteps","thumb-down"],["পুরনো","outOfDate","thumb-down"],["অনুবাদ সংক্রান্ত সমস্যা","translationIssue","thumb-down"],["নমুনা / কোড সংক্রান্ত সমস্যা","samplesCodeIssue","thumb-down"],["অন্যান্য","otherDown","thumb-down"]],["2025-07-29 UTC-তে শেষবার আপডেট করা হয়েছে।"],[],[],null,["# Export Defold projects to Android\n\nThis guide covers the process of exporting a Defold project as an Android app.\nDefold can generate both APK files for local device testing and Android App\nBundles for submission to the Google Play Store.\n\nTo start the export process, choose **Project \\\u003e Bundle \\\u003e Android Application...**\nfrom the Defold menu bar. The **Bundle Application** window opens.\n**Figure 1.** The **Bundle Application** window\n\nSign builds\n-----------\n\nIf the **Keystore** and **Keystore Password** fields are empty, Defold\nautomatically generates a debug keystore file and uses it to sign the application.\nBuilds created with a debug keystore may be installed on local devices, but may\nnot be uploaded to the Google Play Store.\n\nTo create a build for upload to the Google Play Store, you can use Android\nStudio to create a release keystore file.\n\nTo create a release keystore file for your app:\n\n1. Launch Android Studio.\n2. In the **Welcome to Android Studio** window, select **Create New Project**.\n3. Select the **No Activity** template, and click **Next**.\n4. In the **Configure Your Project** screen, click **Finish** to create the project.\n5. Create a keystore file using the instructions at [Generate an upload key and keystore](/studio/publish/app-signing#generate-key).\n6. After creating the keystore file, quit Android Studio and return to the Defold editor.\n7. In the **Bundle Application** window, select the **...** button next to the **Keystore** field and select the newly created `.keystore` file.\n8. Enter the keystore password in the **Keystore Password** field.\n\n| **Caution:** When Defold updates to a new version, it generates a new debug keystore file. Before attempting to install a new build, uninstall any build generated using the previous debug keystore. If you don't follow this uninstall step, you'll get an `INSTALL_PARSE_FAILED_INCONSISTENT_CERTIFICATES` error during installation.\n\nConfigure build settings\n------------------------\n\nUse the **Bundle Application** window to configure build settings. These settings\nare different depending on whether it's for testing on a local device or is a\nfinal build for uploading to the Google Play Store.\n\nTo configure a build for testing on a local device:\n\n- In the **Architectures** section, select both **32-bit** and **64-bit**.\n- In the **Bundle Format** list, select **APK**.\n- In the **Variant** list, select **Debug**.\n\nWhen **Variant** is set to **Debug** , Defold logs engine debug messages to\nthe device `logcat`. This is viewable in the [`logcat` window](/studio/debug/am-logcat)\nin Android Studio or with the `logcat` command in `adb`. For more information on\nusing `adb` to install APK files and view logcat output, see the\n[Android Debug Bridge](/studio/command-line/adb) page.\n\nTo configure a build for upload to the Google Play Store:\n\n- In the **Architectures** section, select both **32-bit** and **64-bit**.\n- In the **Bundle Format** list, select **AAB**.\n- In the **Variant** list, select **Release**."]]