スナップショット
コレクションでコンテンツを整理
必要に応じて、コンテンツの保存と分類を行います。
スナップショットは、Android Virtual Device(AVD)の保存されたイメージであり、OS 設定、アプリの状態、ユーザーデータなど、デバイスが保存された時点の全体的な状態を保持します。スナップショットを読み込むことで、保存されたシステム状態に戻せるため、仮想デバイス上のオペレーティング システムとアプリの再起動を待つ時間を削減でき、テストを再開したい特定の状態にアプリを戻す手間が省けます。スナップショットを読み込んで仮想デバイスを起動することは、実機を電源オフの状態から起動するのではなく、スリープ状態から起動する場合に似ています。
AVD ごとに、1 つのクイックブート スナップショットを作成でき、一般的なスナップショットは無制限に作成できます。
スナップショットを活用する最も簡単な方法は、クイックブート スナップショットを使用することです。デフォルトでは、各 AVD は終了時にクイックブート スナップショットを自動的に保存し、起動時にクイックブート スナップショットから読み込むように設定されています。
AVD を初めて起動するときは、コールドブートを行う必要があります(デバイスの電源を入れるのと同じです)。クイックブートが有効になっている場合、初回以降の起動時にはすべて指定のスナップショットから読み込みが行われ、システムはそのスナップショットに保存された状態に復元されます。
クイックブート スナップショットを使用すると、AVD はコールドブートよりも最大 10 倍速く起動できます。そのため、AVD の初回起動後に(可能であれば)クイックブートを使用することをおすすめします。
スナップショットは、そのスナップショットを保存したときのシステム イメージ、AVD 構成、エミュレータ機能に対して有効です。これらの領域のいずれかを変更すると、影響を受ける AVD のすべてのスナップショットが無効になります。Android Emulator、システム イメージ、または AVD 設定を更新すると、AVD の保存済み状態がリセットされるため、次回 AVD を起動するときはコールドブートを行う必要があります。
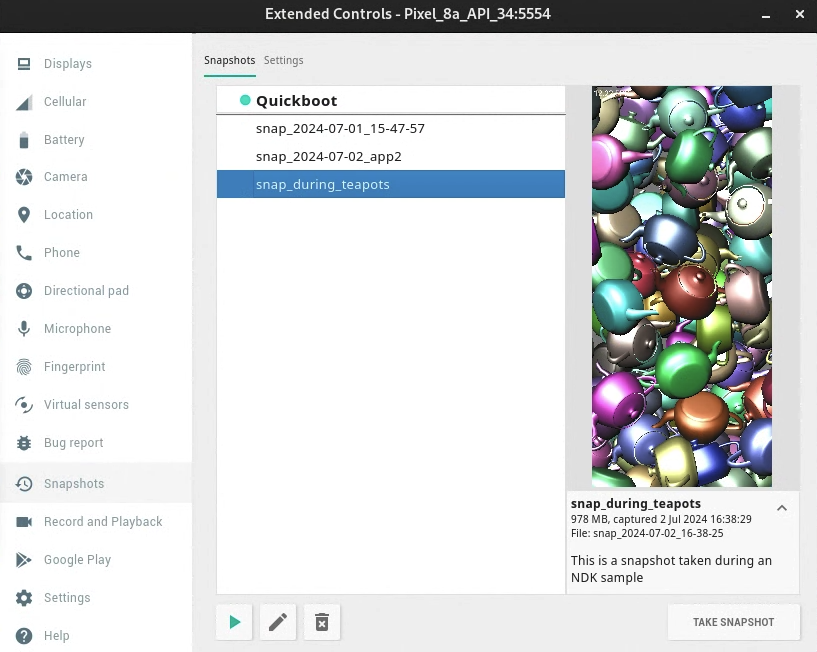
スナップショットの保存、読み込み、管理のコントロールのほとんどは、[Snapshots] ペインの [Snapshots] タブと [Settings] タブにあります。Android Studio のツール ウィンドウでエミュレータを実行している場合は、エミュレータ ツールバーに [Snapshots] ペインボタンが表示されます。Android Studio の外部で、スタンドアロン ウィンドウでエミュレータを実行している場合は、[Extended controls] ウィンドウに [Snapshots] ペインが表示されます。

コマンドラインからエミュレータを起動するときにも、クイックブート オプションを操作できます。
クイックブート スナップショットを保存する
閉じるときエミュレータが自動的にスナップショットを保存するかどうかを指定できます。この動作を制御するには、次の手順で処理します。
- スナップショットの設定を開きます。Android Studio にエミュレータが埋め込まれている場合は、ツールバーの [Snapshots] をクリックします。エミュレータが別のウィンドウに表示されている場合は、[Extended controls] ウィンドウを開きます。
- コントロールの [Snapshots] カテゴリで、[Settings] タブに移動します。
[Auto-save current state to Quickboot] メニューから、次のいずれかのオプションを選択します。
この選択は、開いている AVD にのみ適用されます。ADB がオフラインのとき(AVD の起動中など)にスナップショットを保存することはできません。
一般的なスナップショットを保存する
クイックブート スナップショットは AVD ごとに 1 つしか保存できないのに対して、一般的なスナップショットは AVD ごとに複数保存できます。
一般的なスナップショットを保存するには、[Snapshots] ペインを開き、右下隅にある [Take snapshot] ボタンをクリックします。
選択したスナップショットの名前と説明を編集するには、ペインの下部にある編集ボタン
をクリックします。
スナップショットを削除する
スナップショットを手動で削除するには、[Snapshots] ペインを開き、スナップショットを選択して、ペインの下部にある削除ボタン
をクリックします。
また、AVD 設定やエミュレータのバージョンが変更されたときなどに、無効になったスナップショットを自動的に削除するかどうかも指定できます。デフォルトでは、エミュレータは無効なスナップショットを削除するかどうかを確認します。この設定は、[Snapshots] ペインにある [Settings] タブの [Delete invalid snapshots] メニューで変更できます。
スナップショットを読み込む
必要なときにスナップショットを読み込むには、エミュレータの [Snapshots] ペインを開き、[Snapshots] カテゴリを選択し、スナップショットを選択して、ペインの下部にある読み込みボタン
をクリックします。
Android Studio 3.2 以降では、デバイス設定ごとに、[Virtual Device Configuration] ダイアログの詳細設定に [Boot option] コントロールが表示されます。このコントロールを使用して、AVD の起動時に読み込むスナップショットを指定できます。
クイックブートを無効にする
AVD が常にコールドブートを実行するようにクイックブートを無効にする手順は次のとおりです。
- [Tools] > [Device Manager] を選択し、AVD 編集アイコン
をクリックします。
- [Show Advanced Settings] をクリックし、[Emulated Performance] までスクロールします。
- [Cold boot] を選択します。
一度だけのコールドブート
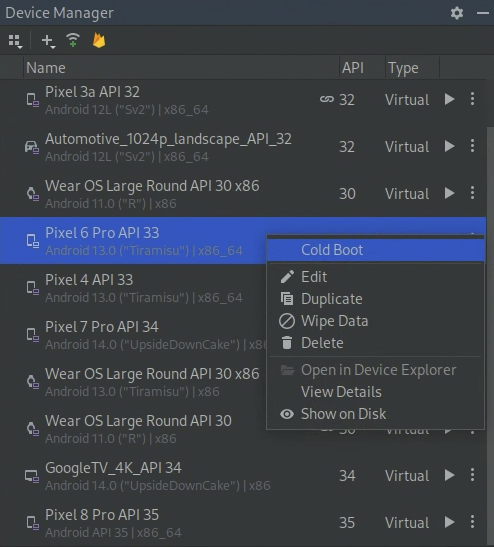
クイックブートを完全に無効にする代わりに、[Device Manager] で AVD のメニューから [Cold Boot] をクリックしてコールドブートできます。

スナップショットの要件とトラブルシューティング
- スナップショットは、Android 4.0.4(API レベル 15)以前では機能しません。
- スナップショットは、Android 8.0(API レベル 26)の ARM システム イメージでは機能しません。
- エミュレータがスナップショットからの起動に失敗した場合は、デバイス マネージャーで AVD の [コールドブート] を選択し、バグレポートを送信します。
- ソフトウェア レンダリングが有効になっている場合、スナップショットの信頼性は低下します。スナップショットが機能しない場合は、デバイス マネージャーで AVD 編集アイコン
をクリックし、[Graphics] を [Hardware] または [Automatic] に変更します。
- スナップショットの読み込みまたは保存は、メモリを集中的に使用する操作です。読み込みまたは保存操作の開始時に十分な RAM を確保できない場合、オペレーティング システムは RAM の内容をハードディスクにスワップすることがあり、操作が大幅に遅くなる可能性があります。スナップショットの読み込みや保存が非常に遅い場合は、RAM を解放するとこうした操作を高速化できることがあります。作業上重要でないアプリケーションを閉じると、簡単に RAM を解放できます。
このページのコンテンツやコードサンプルは、コンテンツ ライセンスに記載のライセンスに従います。Java および OpenJDK は Oracle および関連会社の商標または登録商標です。
最終更新日 2025-07-27 UTC。
[[["わかりやすい","easyToUnderstand","thumb-up"],["問題の解決に役立った","solvedMyProblem","thumb-up"],["その他","otherUp","thumb-up"]],[["必要な情報がない","missingTheInformationINeed","thumb-down"],["複雑すぎる / 手順が多すぎる","tooComplicatedTooManySteps","thumb-down"],["最新ではない","outOfDate","thumb-down"],["翻訳に関する問題","translationIssue","thumb-down"],["サンプル / コードに問題がある","samplesCodeIssue","thumb-down"],["その他","otherDown","thumb-down"]],["最終更新日 2025-07-27 UTC。"],[],[],null,["# Snapshots\n\nA *snapshot* is a stored image of an Android Virtual Device (AVD) that preserves\nthe entire state of the device at the time that it was saved -- including OS\nsettings, application state, and user data. You can return to a saved system\nstate by loading a snapshot, saving you the time of waiting\nfor the operating system and applications on the virtual device to restart, as\nwell as saving you the effort of bringing your app back to the state at which\nyou want to resume your testing. Starting a virtual device by loading a snapshot\nis much like waking a physical device from a sleep state, as opposed to booting\nit from a powered-off state.\n\nFor each AVD, you can have one *Quick Boot* snapshot and any number of general\nsnapshots.\n\nThe simplest way to take advantage of snapshots is to use a Quick Boot snapshot.\nBy default, each AVD is set to automatically save a Quick Boot snapshot on exit\nand load from a Quick Boot snapshot on start.\n\nThe first time that an AVD starts, it must perform a *cold boot*, just like\npowering on a device. If Quick Boot is enabled, all subsequent starts load from\nthe specified snapshot, and the system is restored to the state saved in that\nsnapshot.\n\nAn AVD can boot up to 10 times faster using a *Quick Boot* snapshot\nthan a Cold boot. That's why we would recommend to use\nQuick Boot (when possible) after the initial boot on your AVD.\n\nSnapshots are valid for the system image, AVD configuration, and emulator\nfeatures they are saved with. When you make a change in any of these\nareas, all snapshots of the affected AVD become invalid. Any update to the\nAndroid Emulator, system image, or AVD settings resets the AVD's saved state, so\nthe next time you start the AVD, it must perform a cold boot.\n\nMost controls for saving, loading, and managing snapshots are in the\n**Snapshots** and **Settings** tabs in the **Snapshots** pane. If you're\nrunning the emulator in a tool window in Android Studio, the **Snapshots**\npane button is in the emulator toolbar. If you're running the emulator in\na standalone window outside of Android Studio, the **Snapshots** pane is in\nthe [Extended controls](#extended) window.\n\nYou can also control the Quick Boot options when [starting the emulator from the\ncommand line](/studio/run/emulator-commandline#startup-options).\n\nSave Quick Boot snapshots\n-------------------------\n\nYou can specify whether the emulator automatically saves\na snapshot when you close. To control this behavior, proceed as follows:\n\n1. Open the snapshots settings. If the emulator is embedded in Android Studio, click on **Snapshots** in the toolbar. If the emulator is in a separate window, open the [Extended controls](#extended) window.\n2. In the **Snapshots** category of controls, navigate to the **Settings** tab.\n3. Use the **Auto-save current state to Quickboot** menu to select\n one of the following options:\n\n - **Yes**: Always save an AVD snapshot when you close the emulator. This is\n the default.\n\n | **Note:** When automatic Quick Boot snapshots are enabled, you can skip saving a Quick Boot snapshot by holding the \u003ckbd\u003eShift\u003c/kbd\u003e key down when you close the emulator.\n - **No**: Don't save an AVD snapshot when you close the emulator.\n\nYour selection applies only to the AVD that is open. You can't save\nsnapshots while ADB is offline (such as while the AVD is still booting).\n\nSave general snapshots\n----------------------\n\nWhereas you can only have one Quick Boot snapshot for each AVD, you can have\nmultiple general snapshots for each AVD.\n\nTo save a general snapshot, open the **Snapshots** pane and click the\n**Take snapshot** button in its lower-right corner.\n\nTo edit the name and description of the selected snapshot, click the edit\n\nbutton at the bottom of the pane.\n\nDelete a snapshot\n-----------------\n\nTo manually delete a snapshot, open the **Snapshots** pane, select the\nsnapshot, and click the delete\n\nbutton at the bottom of the pane.\n\nYou can also specify whether you would like the emulator to automatically delete\nsnapshots when they become invalid, such as when the AVD settings or emulator\nversion change. By default, the emulator asks you whether you want it to\ndelete invalid snapshots. You can change this setting with the\n**Delete invalid snapshots** menu in the **Settings** tab of the **Snapshots**\npane.\n\nLoad a snapshot\n---------------\n\nTo load a snapshot at any time, open the emulator's **Snapshots** pane, select\nthe **Snapshots** category, choose a snapshot, and click the\nload\nbutton at the bottom of the pane.\n\nIn Android Studio 3.2 and higher, each device configuration includes a\n**Boot option** control in the advanced settings in the\n[Virtual Device Configuration](/studio/run/managing-avds) dialog.\nYou can use the control to specify which snapshot to load when starting that AVD.\n\n### Disable Quick Boot\n\nIf you want to disable Quick Boot so your AVD always performs a cold boot, do\nthe following:\n\n1. Select **Tools \\\u003e Device Manager** and click **Edit this AVD** .\n2. Click **Show Advanced Settings** and scroll down to **Emulated Performance**.\n3. Select **Cold boot**.\n\nCold boot once\n--------------\n\nInstead of disabling Quick Boot completely, you can cold boot by\nclicking **Cold Boot** from the AVD's menu in the\n**Device Manager**.\n\nSnapshot requirements and troubleshooting\n-----------------------------------------\n\n- Snapshots don't work with Android 4.0.4 (API level 15) or lower.\n- Snapshots don't work with ARM system images for Android 8.0 (API level 26).\n- If the emulator fails to boot from a snapshot, select **Cold Boot** for the AVD in the Device Manager and [submit a bug report](/studio/report-bugs).\n- Snapshots are not reliable when software rendering is enabled. If snapshots don't work, click **Edit this AVD** in the **Device Manager** and change **Graphics** to either **Hardware** or **Automatic**.\n- Loading or saving a snapshot is a memory-intensive operation. If you don't have enough RAM free when a load or save operation begins, the operating system may swap the contents of RAM to the hard disk, which can greatly slow the operation. If you experience very slow snapshot loads or saves, you may be able to speed these operations by freeing RAM. Closing applications that are not essential for your work is a good way to free RAM."]]