プロジェクトへの C / C++ コードの追加
コレクションでコンテンツを整理
必要に応じて、コンテンツの保存と分類を行います。
C / C++ コードを Android プロジェクトに追加するには、プロジェクト モジュールの cpp
ディレクトリにコードを配置します。プロジェクトをビルドすると、このコードがネイティブ ライブラリにコンパイルされ、Gradle によりアプリにパッケージ化できるようになります。Java または Kotlin コードの場合は、JNI(Java Native Interface)を介してネイティブ ライブラリの関数を呼び出すことができます。JNI フレームワークの使用方法について詳しくは、Android での JNI に関するヒントをご覧ください。
Android Studio は、クロス プラットフォーム プロジェクトに適した CMake をサポートしています。Android Studio は、ndk-build
もサポートしています。これは CMake よりも高速ですが、サポート対象は Android のみです。現時点では、CMake と ndk-build
の両方を同じモジュール内で使用することはできません。
既存の ndk-build
ライブラリを Android Studio プロジェクトにインポートする場合は、Gradle をネイティブ ライブラリ プロジェクトにリンクさせる方法をご覧ください。
このページでは、必要なビルドツールを搭載した Android Studio のセットアップ方法、C / C++ のサポートを使用して新しいプロジェクトを作成する方法、プロジェクトに新しい C / C++ ファイルを追加する方法を説明します。
既存のプロジェクトにネイティブ コードを追加する場合は、次の手順を行います。
-
新しいネイティブ ソースファイルを作成して、Android Studio プロジェクトに追加します。
- すでにネイティブ コードがある場合や、ビルド済みネイティブ ライブラリをインポートする場合は、この手順をスキップしてください。
-
ネイティブ ソースコードをライブラリにビルドするように CMake を設定します。このビルド スクリプトは、ビルド済みライブラリやプラットフォーム ライブラリをインポートしてリンクする際に必要になります。
CMakeLists.txt
ビルド スクリプトが存在する既存のネイティブ ライブラリを使用する場合や、ndk-build
を使用して Android.mk
ビルド スクリプトを組み込む場合は、この手順をスキップしてください。
-
CMake または
ndk-build
スクリプト ファイルへのパスを指定して、Gradle を設定します。Gradle は、このビルド スクリプトを使用してソースコードを Android Studio プロジェクトにインポートし、ネイティブ ライブラリをアプリにパッケージ化します。
プロジェクトを設定したら、JNI フレームワークを使用して Java または Kotlin コードからネイティブ関数にアクセスします。アプリをビルドして実行するには、実行アイコン
をクリックします。
注: サポートが終了した ndkCompile
ツールを既存のプロジェクトで使用している場合は、CMake または ndk-build
を使用するように移行する必要があります。
NDK とビルドツールのダウンロード
アプリ用のネイティブ コードをコンパイル、デバッグするには、次のコンポーネントが必要です。
-
Android Native Development Kit(NDK): Android で C / C++ コードを使用できるようにするツールセット。NDK のプラットフォーム ライブラリを活用することで、ネイティブ アクティビティを管理し、センサーやタップ入力など、実際のデバイスのコンポーネントにアクセスできるようになります。
-
CMake: Gradle と連携してネイティブ ライブラリをビルドする外部ビルドツール。
ndk-build
のみを使用する予定の場合は、このコンポーネントは不要です。
-
LLDB: ネイティブ コードをデバッグする Android Studio のデバッガ。
こうしたコンポーネントのインストールについては、NDK と CMake のインストールと設定をご覧ください。
C / C++ のサポートを使用した新しいプロジェクトの作成
ネイティブ コードのサポートを使用した新しいプロジェクトを作成する手順は、他の Android Studio プロジェクトの作成に似ていますが、次の追加の手順を行う必要があります。
- ウィザードの [Choose your project] で、プロジェクト タイプとして [Native C++] を選択します。
-
[Next] をクリックします。
- ウィザードの次のセクションで、他のすべてのフィールドに入力します。
-
[Next] をクリックします。
-
ウィザードの [Customize C++ Support] の [C++ Standard] でプロジェクトをカスタマイズできます。
-
プルダウン リストでは、使用する C++ の標準化を選択します。[Toolchain Default] を選択すると、CMake のデフォルト設定が使用されます。
-
[Finish] をクリックします。
Android Studio による新しいプロジェクトの作成が完了したら、IDE の左側の [Project] ペインを開き、メニューから [Android] ビューを選択します。図 1 に示すように、Android Studio に cpp グループが追加されます。
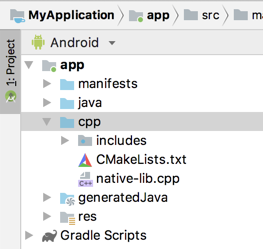
図 1. Android ビューのネイティブ ソースのグループと外部ビルド スクリプトのグループ
注: このビューではディスク上の実際のファイル階層は反映されておらず、プロジェクト内を移動しやすいように類似のファイルがグループ化されています。
cpp グループには、プロジェクトに含まれているすべてのネイティブ ソースファイル、ヘッダー、CMake または ndk-build
のビルド スクリプト、ビルド済みのライブラリがあります。新しいプロジェクトでは、Android Studio によってサンプルの C++ ソースファイルである native-lib.cpp
が作成され、アプリ モジュールの src/main/cpp/
ディレクトリに配置されます。このサンプルコードには、"Hello from C++"
という文字列を返す簡単な C++ 関数 stringFromJNI()
が記述されています。プロジェクトにソースファイルを追加する方法については、新しいネイティブ ソースファイルの作成方法についてのセクションをご覧ください。
build.gradle
ファイルで Gradle にアプリのビルド方法を指示するのと同様に、CMake と ndk-build
はビルド スクリプトでネイティブ ライブラリのビルド方法を確認する必要があります。新しいプロジェクトでは、Android Studio によって CMake ビルド スクリプトである CMakeLists.txt
が作成され、モジュールのルート ディレクトリに配置されます。このビルド スクリプトの内容について詳しくは、CMake の設定をご覧ください。
サンプルアプリをビルドして実行する
実行アイコン
をクリックすると、Android デバイスまたはエミュレータにテキスト「Hello from C++」を表示するアプリが Android Studio によってビルドされ、起動されます。ここでは、サンプルアプリをビルドして実行する際に発生するイベントの概要を説明します。
- Gradle が外部ビルド スクリプト
CMakeLists.txt
を呼び出します。
- CMake がビルド スクリプトのコマンドに従って C++ ソースファイル
native-lib.cpp
をコンパイルして共有オブジェクト ライブラリを生成し、libnative-lib.so
という名前を付けます。次に、Gradle がこのライブラリをアプリにパッケージ化します。
- 実行時には、アプリの
MainActivity
が System.loadLibrary()
を使用してネイティブ ライブラリを読み込みます。これで、ライブラリのネイティブ関数である stringFromJNI()
をアプリで使用できるようになりました。
-
MainActivity.onCreate()
が stringFromJNI()
を呼び出し、返された "Hello from C++"
で TextView
を更新します。
Gradle がネイティブ ライブラリをアプリにパッケージ化したことを確認するには、APK Analyzer を使用します。
-
[Build] > [Build Bundles(s) / APK(s)] > [Build APK(s)] を選択します。
- [Build] > [Analyze APK] を選択します。
app/build/outputs/
ディレクトリで APK または AAB を選択し、[OK] をクリックします。
- 図 2 に示すように、APK Analyzer ウィンドウの
lib/<ABI>/
の下に libnative-lib.so
が表示されます。
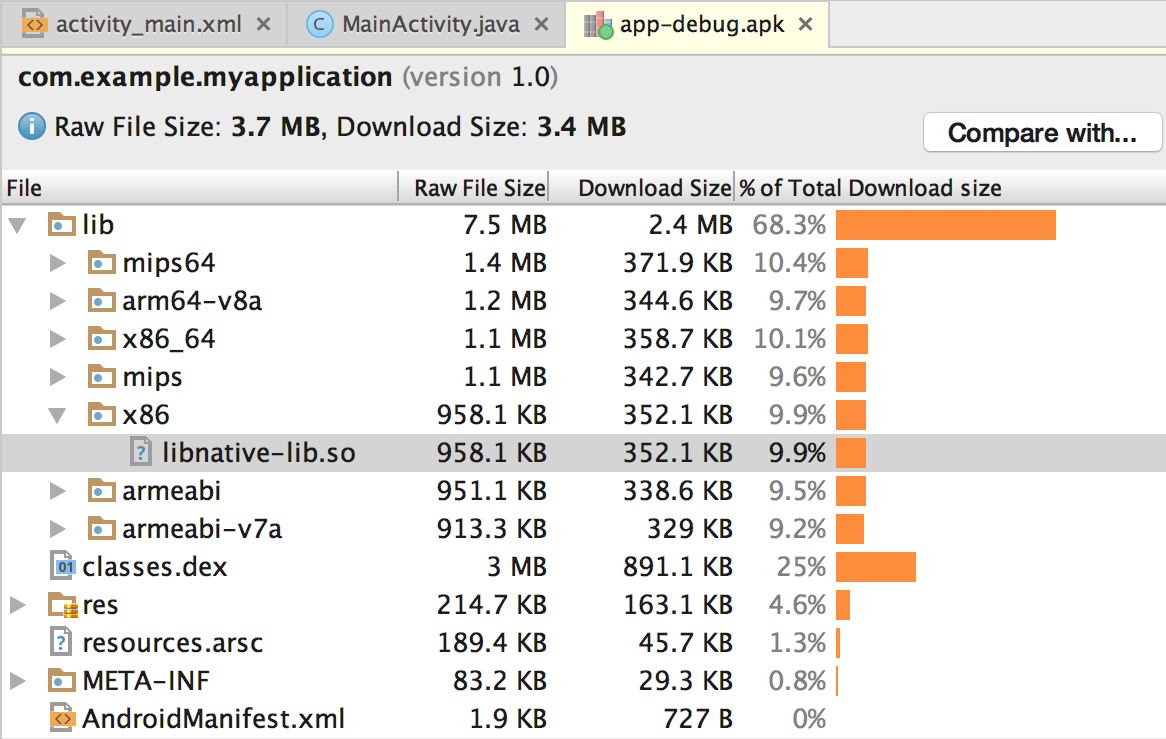
図 2. APK Analyzer を使用してネイティブ ライブラリを特定します。
ヒント: ネイティブ コードを使用する他の Android アプリで試す場合は、[File] > [New] > [Import Sample] をクリックし、[Ndk] リストからサンプル プロジェクトを選択します。
新しい C / C++ ソースファイルの作成
既存のプロジェクトに新しい C / C++ ソースファイルを追加する手順は次のとおりです。
- アプリのメイン ソースセットに
cpp/
ディレクトリをまだ作成していない場合は、次の手順で作成します。
- IDE の左側の [Project] ペインを開き、メニューから [Project] ビューを選択します。
- [your-module > src] に移動します。
- main ディレクトリを右クリックし、[New] > [Directory] を選択します。
- ディレクトリ名として「
cpp
」と入力し、[OK] をクリックします。
cpp/
ディレクトリを右クリックし、[New] > [C/C++ Source File] を選択します。
- ソースファイルの名前(
native-lib
など)を入力します。
- [Type] メニューで、ソースファイルのファイル拡張子(
.cpp
など)を選択します。
- Edit File Types アイコン
をクリックして、メニューにファイル形式(.cxx
、.hxx
など)を追加します。表示された [New File Extensions] ダイアログ ボックスで、[Source Extension] メニューと [Header Extension] メニューから別のファイル拡張子を選択し、[OK] をクリックします。
- ヘッダー ファイルを作成するには、[Create an associated header] チェックボックスをオンにします。
- [OK] をクリックします。
新しい C / C++ ファイルをプロジェクトに追加した後、CMake の設定でそれらのファイルをネイティブ ライブラリに含める必要があります。
参考情報
アプリでの C / C++ コードのサポートについて詳しくは、以下のリソースをご覧ください。
Codelabs
このページのコンテンツやコードサンプルは、コンテンツ ライセンスに記載のライセンスに従います。Java および OpenJDK は Oracle および関連会社の商標または登録商標です。
最終更新日 2025-08-21 UTC。
[[["わかりやすい","easyToUnderstand","thumb-up"],["問題の解決に役立った","solvedMyProblem","thumb-up"],["その他","otherUp","thumb-up"]],[["必要な情報がない","missingTheInformationINeed","thumb-down"],["複雑すぎる / 手順が多すぎる","tooComplicatedTooManySteps","thumb-down"],["最新ではない","outOfDate","thumb-down"],["翻訳に関する問題","translationIssue","thumb-down"],["サンプル / コードに問題がある","samplesCodeIssue","thumb-down"],["その他","otherDown","thumb-down"]],["最終更新日 2025-08-21 UTC。"],[],[],null,["# Add C and C++ code to your project\n\nAdd C and C++ code to your Android project by placing the code into a\n`cpp` directory in your project module. When you build your project, this\ncode is compiled into a native library that Gradle can package with your app.\nYour Java or Kotlin code can then call functions in your native library\nthrough the Java Native Interface (JNI). To learn more about using the JNI\nframework, read [JNI tips for\nAndroid](/training/articles/perf-jni).\n\nAndroid Studio supports CMake, which is useful for cross-platform projects.\nAndroid Studio also supports [`ndk-build`](/ndk/guides/ndk-build), which\ncan be faster than CMake but only supports Android. Using both CMake and\n`ndk-build` in the same module is not currently supported.\n\nTo import an existing `ndk-build` library into your Android Studio\nproject, learn how to\n[link Gradle to your native library project](/studio/projects/gradle-external-native-builds).\n\nThis page shows you how to [set up Android Studio](#download-ndk) with the\nnecessary build tools, [create a new project](#new-project) with C/C++\nsupport, and [add new C/C++ files](#create-sources) to your project.\n\n\nIf instead you want to add native code to an existing project,\nfollow these steps:\n\n1. [Create new native source files](#create-sources) and add the files to your Android Studio project.\n - Skip this step if you already have native code or want to import a prebuilt native library.\n2. [Configure CMake](/studio/projects/configure-cmake) to build your native source code into a library. This build script is required if you are importing and linking against prebuilt or platform libraries.\n - If you have an existing native library that already has a `CMakeLists.txt` build script or uses `ndk-build` and includes an [`Android.mk`](/ndk/guides/android_mk) build script, skip this step.\n3. [Configure\n Gradle](/studio/projects/gradle-external-native-builds) by providing a path to your CMake or `ndk-build` script file. Gradle uses the build script to import source code into your Android Studio project and package your native library into the app.\n\n\nOnce you configure your project, access your native functions from\nJava or Kotlin code using the [JNI framework](http://docs.oracle.com/javase/7/docs/technotes/guides/jni/spec/jniTOC.html). To build and run your app,\nclick **Run** .\n\n\n**Note:** If your existing project uses the deprecated\n`ndkCompile` tool, migrate to using either CMake or\n`ndk-build`.\n\nDownload the NDK and build tools\n--------------------------------\n\n\nTo compile and debug native code for your app, you need the following\ncomponents:\n\n- [The Android Native Development Kit\n (NDK)](/ndk): a toolset that lets you use C and C++ code with Android. NDK provides platform libraries that let you manage native activities and access physical device components, such as sensors and touch input.\n- [CMake](https://cmake.org/): an external build tool that works alongside Gradle to build your native library. You don't need this component if you only plan to use `ndk-build`.\n- [LLDB](http://lldb.llvm.org/): the debugger in Android Studio that [debugs native code](/studio/debug).\n\n\nFor information on installing these components, see [Install and configure the NDK and CMake](/studio/projects/install-ndk).\n\nCreate a new project with C/C++ support\n---------------------------------------\n\n\nTo create a new project with support for native code, the process is similar to\n[creating any other Android\nStudio project](/studio/projects/create-project), but with an additional step:\n\n1. In the **Choose your project** section of the wizard, select the **Native C++** project type.\n2. Click **Next**.\n3. Complete all other fields in the next section of the wizard.\n4. Click **Next**.\n5. In the **Customize C++ Support** section of the wizard, you can customize your project with the **C++ Standard** field.\n - Use the drop-down list to select which standardization of C++ you want to use. Selecting **Toolchain\n Default** uses the default CMake setting.\n6. Click **Finish**.\n\n\nAfter Android Studio finishes creating your new project, open the\n**Project** pane from the left side of the IDE and select the\n**Android** view from the menu. As shown in figure 1, Android\nStudio adds the **cpp** group:\n\n\n**Figure 1.** Android view groups for your native sources\nand external build scripts.\n\n\n**Note:** This view does not reflect the actual file hierarchy\non disk, but groups similar files to simplify navigating your project.\n\n\nThe **cpp** group is where you can find all the native\nsource files, headers, build scripts for CMake or `ndk-build`, and prebuilt\nlibraries that are a part of your project. For new projects, Android Studio\ncreates a sample C++ source file, `native-lib.cpp`, and places it\nin the `src/main/cpp/` directory of your app module. This sample\ncode provides a simple C++ function, `stringFromJNI()`, that\nreturns the string `\"Hello from C++\"`. Learn how to add additional\nsource files to your project in the section about how to\n[create new native source files](#create-sources).\n\nSimilar to how `build.gradle` files instruct Gradle how to build\nyour app, CMake and `ndk-build` require a build script to know how to build\nyour native library. For new projects, Android Studio creates a CMake build\nscript,`CMakeLists.txt`, and places it in your module's root directory.\nTo learn more about the contents of this build script, read\n[Configure CMake](/studio/projects/configure-cmake).\n\n### Build and run the sample app\n\n\nWhen you click **Run** , Android Studio\nbuilds and launches an app that displays the text \"Hello from C++\" on your\nAndroid device or emulator. The following overview describes the events that\noccur to build and run the sample app:\n\n1. Gradle calls on your external build script, `CMakeLists.txt`.\n2. CMake follows commands in the build script to compile a C++ source file, `native-lib.cpp`, into a shared object library and names it `libnative-lib.so`. Gradle then packages it into the app.\n3. During runtime, the app's `MainActivity` loads the native library using [`System.loadLibrary()`](/reference/java/lang/System#loadLibrary(java.lang.String)). The library's native function, `stringFromJNI()`, is now available to the app.\n4. `MainActivity.onCreate()` calls `stringFromJNI()`, which returns `\"Hello from C++\"` and uses it to update the [`TextView`](/reference/android/widget/TextView).\n\n\nTo verify that Gradle packages the native library in the app, use the\n[APK Analyzer](/studio/debug/apk-analyzer):\n\n1. Select **Build \\\u003e Build Bundles(s) / APK(s) \\\u003e Build APK(s)**.\n2. Select **Build \\\u003e Analyze APK**.\n3. Select the APK or AAB from the `app/build/outputs/` directory and click **OK**.\n4. As shown in figure 2, you can see `libnative-lib.so` in the APK Analyzer window under `lib/\u003cABI\u003e/`.\n\n\n **Figure 2.** Locate a native library using the APK\n Analyzer.\n\n\n**Tip:** If you want to experiment with other Android apps that\nuse native code, click **File \\\u003e New \\\u003e Import Sample** and\nselect a sample project from the **Ndk** list.\n\nCreate new C/C++ source files\n-----------------------------\n\n\nTo add new C/C++ source files to an existing project, proceed as follows:\n\n1. If you don't already have a `cpp/` directory in the main source set of your app, create one as follows:\n 1. Open the **Project** pane in the left side of the IDE and select the **Project** view from the menu.\n 2. Navigate to **\u003cvar translate=\"no\"\u003eyour-module\u003c/var\u003e \\\u003e src**.\n 3. Right-click on the **main** directory and select **New \\\u003e\n Directory**.\n 4. Enter `cpp` as the directory name and click **OK**.\n2. Right-click the `cpp/` directory and select **New \\\u003e\n C/C++ Source File**.\n3. Enter a name for your source file, such as `native-lib`.\n4. From the **Type** menu, select the file extension for your source file, such as `.cpp`.\n - Click **Edit File Types** to add other file types to the menu, such as `.cxx` or `.hxx`. In the **New File Extensions** dialog box that pops up, select another file extension from the **Source Extension** and **Header Extension** menus and click **OK**.\n5. To create a header file, select the **Create an\n associated header** checkbox.\n6. Click **OK**.\n\n\u003cbr /\u003e\n\nAfter you add new C/C++ files to you project, you still need to\n[configure CMake](/studio/projects/configure-cmake) to include the files in\nyour native library.\n\nAdditional resources\n--------------------\n\nTo learn more about supporting C/C++ code in your app, try the following\nresource.\n\n### Codelabs\n\n- [Create Hello-CMake with Android Studio](https://codelabs.developers.google.com/codelabs/android-studio-cmake/) This codelab shows you how to use the Android Studio CMake template to start Android NDK project development."]]