Sử dụng bộ sưu tập để sắp xếp ngăn nắp các trang
Lưu và phân loại nội dung dựa trên lựa chọn ưu tiên của bạn.
Hướng dẫn này sẽ đề cập đến các bước sau:
Chọn một phiên bản và bản phát hành Godot.
Tải và cài đặt Godot.
Định cấu hình Godot để phát triển Android.
Định cấu hình hệ thống để phát triển và xuất C# (chỉ dành cho bản phát hành Mono của Godot).
Chọn một phiên bản
Sử dụng bản phát hành ổn định mới nhất của Godot nếu có thể. Để phát triển Android, hãy sử dụng phiên bản 3.3 trở lên.
Tải và chạy Godot
Truy cập trang tải xuống của Godot để tải công cụ phát triển trò chơi xuống cho môi trường mà bạn mong muốn.
Godot cung cấp 2 bản phát hành trên trang tải xuống: standard (tiêu chuẩn) và Mono. Bạn có thể sử dụng một trong hai bản này để phát triển Android. Bản phát hành Mono là cần thiết để phát triển C#.
Godot được phân phối dưới dạng một ứng dụng độc lập. Ứng dụng này không yêu cầu quá trình cài đặt; sau khi giải nén tệp lưu trữ tải xuống, bạn có thể chạy ngay trên đó.
Định cấu hình hỗ trợ cho Android
Định cấu hình chế độ cài đặt SDK Android Studio
Tải xuống và cài đặt bản phát hành ổn định mới nhất của Android Studio (nếu bạn chưa thực hiện).
Mở Android Studio.
Trong cửa sổ Welcome to Android Studio (Chào mừng bạn đến với Android Studio), hãy mở trình đơn thả xuống Configure (Định cấu hình) rồi chọn SDK Manager (Trình quản lý SDK).
Ở đầu cửa sổ, hãy ghi lại Android SDK Location (Vị trí SDK Android) trên máy tính. Bạn cần chỉ định vị trí đó trong Godot editor (trình chỉnh sửa Godot).
Trong thẻ SDK Platforms (Nền tảng SDK), hãy tìm mục danh sách cho Android 11.0 R.
Đánh dấu mục đó (nếu chưa đánh dấu).
Trong thẻ SDK Tools (Công cụ SDK), hãy tìm các mục trong danh sách cho NDK (Side by side) (NDK (Cạnh nhau)), Android SDK Command-line Tools (Công cụ dòng lệnh SDK Android) và CMake. Hãy đánh dấu (nếu chưa đánh dấu).
Nếu mục danh sách nào đó có trạng thái được đặt thành Update Available (Có bản cập nhật), hãy bật hộp kiểm của mục đó để cập nhật lên phiên bản mới nhất.
Nhấp vào nút OK. Xác nhận tải xuống và chấp nhận các thoả thuận cấp phép để hoàn tất quá trình cài đặt.
Tạo một kho khoá gỡ lỗi
Các ứng dụng Android phải được ký kỹ thuật số để chạy trên thiết bị. Để thử nghiệm cục bộ, bạn có thể dùng một tệp kho khoá gỡ lỗi (debug keystore) để ký ứng dụng. Android Studio sẽ tự động tạo một kho khoá gỡ lỗi mặc định. Nếu trước đây bạn từng xây dựng ứng dụng bằng cấu hình gỡ lỗi với Android Studio, thì bạn nên đặt một tệp debug.keystore trong thư mục sau:
Microsoft Windows: C:\Users\$username\.android\debug.keystore
Linux/macOS: ~\.android\debug.keystore
Nếu tệp debug.keystore không tồn tại, hãy tạo tệp bằng cách thực hiện các bước sau:
Mở Android Studio.
Trong cửa sổ Welcome to Android Studio (Chào mừng bạn đến với Android Studio), hãy chọn Import an Android Code Sample (Nhập mã mẫu cho Android).
Chọn mẫu Ndk -> Hello GL2 trong danh sách rồi nhấp vào nút Next (Tiếp theo).
Chọn vị trí cho dự án rồi nhấp vào nút Finish (Hoàn tất).
Đợi dự án tải và đồng bộ hoá với Gradle, sau đó chọn Build (Xây dựng) -> Make Project (Tạo dự án) trên thanh trình đơn của Android Studio.
Hãy đợi quá trình tạo hoàn tất, sau đó xác minh rằng tệp debug.keystore đã được tạo trong thư mục thích hợp.
Đặt vị trí SDK Android và kho khoá gỡ lỗi trong trình chỉnh sửa Godot
Chạy trình chỉnh sửa Godot.
Tạo hoặc mở một dự án
Chọn Editor (Trình chỉnh sửa) -> Editor Settings… (Cài đặt trình chỉnh sửa…) trên thanh trình đơn Editor (Trình chỉnh sửa).
Trong cửa sổ Editor Settings (Cài đặt trình chỉnh sửa), hãy chọn mục Export (Xuất) -> Android trong bảng điều khiển bên trái.
Trong bảng điều khiển bên phải, hãy chuyển đến hộp văn bản Android Sdk Path (Đường dẫn SDK Android) rồi nhập đường dẫn đến SDK Android.
Trong hộp văn bản Debug Keystore (Kho khoá gỡ lỗi), hãy nhập đường dẫn đến tệp debug.keystore.
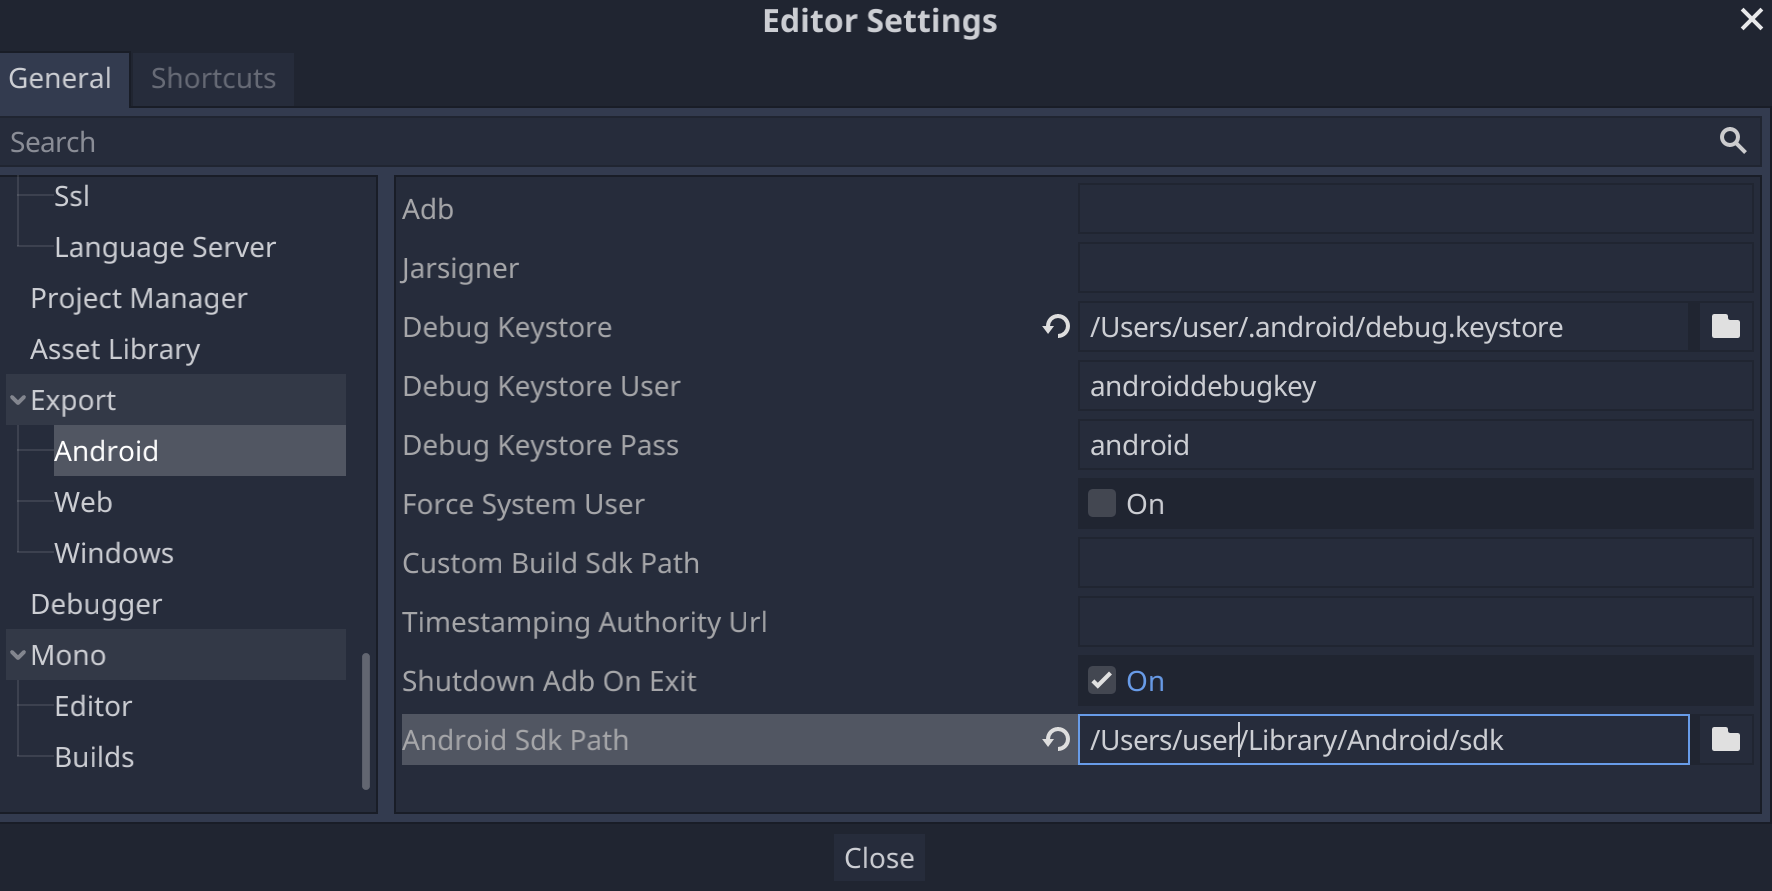
Hình 1. Trường Đường dẫn SDK Android trong phần Cài đặt trình chỉnh sửa
Thiết lập Mono
Cài đặt MSBuild
Bản phát hành Mono của Godot yêu cầu MSBuild để tạo và xuất các dự án sử dụng C#. Cách cài đặt MSBuild:
Godot chỉ hỗ trợ rất ít đối với việc chỉnh sửa mã C#. Bạn nên sử dụng trình chỉnh sửa bên ngoài cho các tệp C#. Godot hỗ trợ các trình chỉnh sửa C# sau đây:
Microsoft Visual Studio/Visual Studio dành cho Mac
Microsoft Visual Studio Code
JetBrains Rider
MonoDevelop
Để định cấu hình trình chỉnh sửa C# bên ngoài, hãy mở một dự án trong trình chỉnh sửa Godot rồi thực hiện các bước sau:
Chọn Editor (Trình chỉnh sửa) -> Editor Settings… (Cài đặt trình chỉnh sửa…) trên thanh trình đơn Editor (Trình chỉnh sửa).
Trong cửa sổ Editor Settings (Cài đặt trình chỉnh sửa), hãy chọn mục Mono -> Editor (Trình chỉnh sửa) trong bảng điều khiển bên trái.
Chọn trình chỉnh sửa mong muốn trên trình đơn thả xuống External Editor (Trình chỉnh sửa bên ngoài).
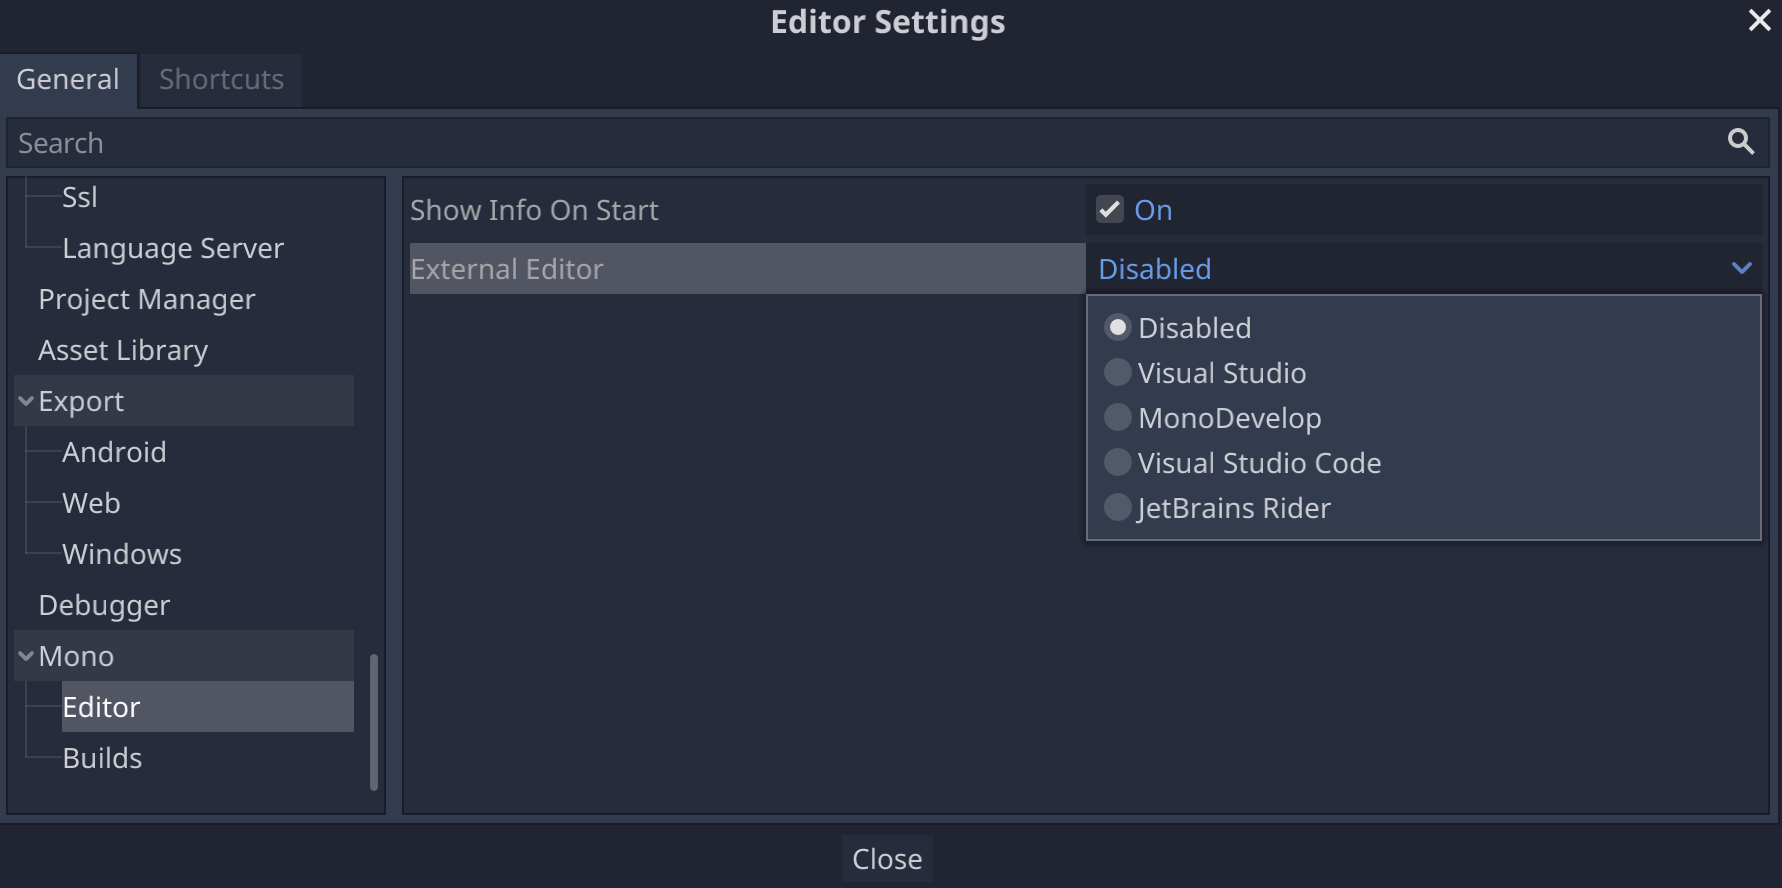
Hình 2:Trường External Editor (Trình chỉnh sửa bên ngoài) trong Editor Settings (Cài đặt trình chỉnh sửa)
Các trình bổ trợ trong trình chỉnh sửa C# cho Godot
Công cụ C# cho Godot: Một trình bổ trợ dành cho Microsoft Visual Studio Code giúp thêm các tính năng hỗ trợ gỡ lỗi C# và hoàn thành một phần mã.
Nội dung và mã mẫu trên trang này phải tuân thủ các giấy phép như mô tả trong phần Giấy phép nội dung. Java và OpenJDK là nhãn hiệu hoặc nhãn hiệu đã đăng ký của Oracle và/hoặc đơn vị liên kết của Oracle.
Cập nhật lần gần đây nhất: 2025-07-27 UTC.
[[["Dễ hiểu","easyToUnderstand","thumb-up"],["Giúp tôi giải quyết được vấn đề","solvedMyProblem","thumb-up"],["Khác","otherUp","thumb-up"]],[["Thiếu thông tin tôi cần","missingTheInformationINeed","thumb-down"],["Quá phức tạp/quá nhiều bước","tooComplicatedTooManySteps","thumb-down"],["Đã lỗi thời","outOfDate","thumb-down"],["Vấn đề về bản dịch","translationIssue","thumb-down"],["Vấn đề về mẫu/mã","samplesCodeIssue","thumb-down"],["Khác","otherDown","thumb-down"]],["Cập nhật lần gần đây nhất: 2025-07-27 UTC."],[],[],null,["# Install Godot and configure projects for Android\n\nThis guide will cover the following steps:\n\n- Selecting a version and release of Godot.\n- Downloading and installing Godot.\n- Configuring Godot for Android development.\n- Configuring your system for C# development and export (Mono release of Godot only).\n\nSelect a version\n----------------\n\nUse the latest stable release of Godot when possible. For Android development,\nuse version 3.3 or higher.\n| **Note:** Starting in August 2021, Google Play will require all Android apps to be submitted as Android App Bundles. Versions of Godot lower than 3.3 don't meet this requirement. For more information, see the [Target API Level](/distribute/best-practices/develop/target-sdk) page.\n\nDownload and run Godot\n----------------------\n\nVisit the\n[Godot download page](https://godotengine.org/download)\nto download the game engine for your preferred environment.\n\nGodot offers two releases on its download page: standard and Mono. Either may be\nused to develop for Android. The Mono release is required for C# development.\n\nGodot is distributed as a standalone application. It does not require an\ninstallation process; after extracting the download archive, you can run it as-is.\n\nConfigure Android support\n-------------------------\n\n### Configure the Android Studio SDK settings\n\n1. If you haven't already done so, [download](/studio) and [install](/studio/install) the latest stable release of Android Studio.\n2. Launch Android Studio.\n3. In the Welcome to Android Studio window, open the **Configure** dropdown menu and select **SDK Manager**.\n4. At the top of the window, make a note of the **Android SDK Location** on your computer. You will need to specify that location in Godot editor.\n5. In the **SDK Platforms** tab, find the list entry for **Android 11.0 R**. Check the item if it is unchecked.\n6. In the **SDK Tools** tab, find the list items for **NDK (Side by side)** , **Android SDK Command-line Tools** , and **CMake**. Check them if they are unchecked.\n7. If any list items have their status set to **Update Available**, enable their check box to update to the latest version.\n8. Click the **OK** button. Confirm the download and accept the license agreements to complete the installation.\n\n### Create a debug keystore\n\nAndroid apps must be [digitally signed](/studio/publish/app-signing#certificates-keystores)\nto run on a device. For local testing, a debug keystore file may be used to sign\napps. Android Studio will automatically create a default debug keystore. If you\nhave previously built apps using a debug configuration with Android Studio, a\n`debug.keystore` file should be located in the following directory:\n\n- **Microsoft Windows** : `C:\\Users\\$username\\.android\\debug.keystore`\n- **Linux/macOS** : `~\\.android\\debug.keystore`\n\nIf the `debug.keystore` file does not exist, create one by performing the\nfollowing steps:\n\n1. Launch Android Studio.\n2. In the Welcome to Android Studio window, select the **Import an Android Code Sample** option.\n3. Select the **Ndk -\\\u003e Hello GL2** sample from the list and click the **Next** button.\n4. Choose a location for the project and click the **Finish** button.\n5. Wait for the project to load and sync with Gradle, then select **Build -\\\u003e Make Project** from the Android Studio menu bar.\n6. Wait for the build to finish, then verify a `debug.keystore` file was created in the appropriate directory.\n\n### Set the Android SDK and debug keystore location in Godot editor\n\n1. Launch the Godot editor.\n2. Create or open a project.\n3. Select **Editor -\\\u003e Editor Settings...** from the **Editor** menu bar.\n4. In the **Editor Settings** window, select the **Export -\\\u003e Android** item in the left panel.\n5. In the right panel, go to the text box for **Android Sdk Path** and enter the path to the Android SDK.\n6. In the text box for **Debug Keystore** enter the path to the `debug.keystore` file.\n\n**Figure 1.** The **Android Sdk Path** field in **Editor Settings**\n\nSet up Mono\n-----------\n\n### Install MSBuild\n\nThe Mono release of Godot requires MSBuild to build and export projects that use\nC#. To install MSBuild:\n\n**Linux and macOS**\n\n- [Download](https://www.mono-project.com/download/stable/) and [install](https://www.mono-project.com/docs/) the latest version of the Mono SDK.\n\n**Microsoft Windows**\n\n- Install [Microsoft Visual Studio](https://visualstudio.microsoft.com/downloads/) or [Microsoft Visual Studio Build Tools](https://visualstudio.microsoft.com/thank-you-downloading-visual-studio/?sku=BuildTools&rel=15). When you run the installer, ensure you have the **.NET Framework 4.5** targeting pack selected for installation.\n\n### Configure a C# editor\n\nGodot has very limited support for editing C# code. Using an external editor for\nC# files is strongly recommended. Godot supports the following C# editors:\n\n- Microsoft Visual Studio/Visual Studio for Mac\n- Microsoft Visual Studio Code\n- JetBrains Rider\n- MonoDevelop\n\nTo configure an external C# editor, open a project in the Godot editor and\nperform the following steps:\n\n1. Select **Editor -\\\u003e Editor Settings...** from the editor menu bar.\n2. In the **Editor Settings** window, select the **Mono -\\\u003e Editor** item in the left panel.\n3. Choose the desired editor from the **External Editor** dropdown menu.\n\n**Figure 2:** The **External Editor** field in **Editor Settings**\n\n### C# editor plugins for Godot\n\n- [C# Tools for Godot](https://marketplace.visualstudio.com/items?itemName=neikeq.godot-csharp-vscode): A plugin for Microsoft Visual Studio Code that adds C# debugging support and partial code completion features.\n- [JetBrains Rider plugin](https://plugins.jetbrains.com/plugin/13882-godot-support): Adds C# debugging support."]]