이 주제에서는 Godot 프로젝트를 Android 앱으로 내보내는 방법을 설명합니다. Godot은 로컬 기기 테스트용 APK 파일과 Google Play 스토어 제출용 Android App Bundle을 모두 생성할 수 있습니다.
Android 빌드 템플릿 설치
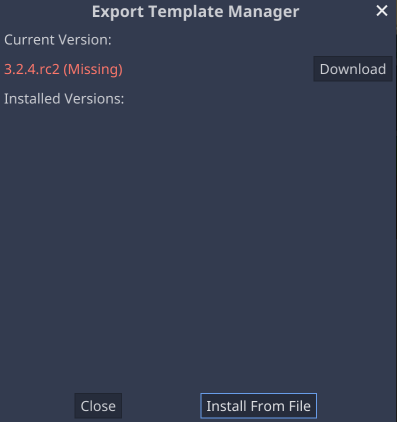
Godot은 빌드 템플릿을 출발점으로 사용하여 Android 앱을 만들고 빌드하는 데 필요한 Gradle 파일과 기타 데이터를 생성합니다. Android 빌드를 내보내기 전에 빌드 템플릿을 Godot 프로젝트로 가져와야 합니다. Godot 버전마다 자체 템플릿이 있습니다. 프로젝트에 Android 빌드 템플릿을 설치하려면 다음 단계를 따르세요.
빌드 템플릿 파일은 프로젝트 루트 디렉터리의 상대 android/build 하위 디렉터리에 저장됩니다. 이 하위 디렉터리의 크기로 인해 프로젝트의 버전 제어 범위에서 이 하위 디렉터리를 생략하는 것이 좋습니다.
Android 내보내기 사전 설정 추가
프로젝트에 대해 Android용 내보내기 사전 설정을 만들어야 합니다. 사전 설정을 만들려면 다음 단계를 수행하세요.
편집기 메뉴 바에서 Project -> Export…를 선택합니다.
Export 창에서 Add... 드롭다운 메뉴를 선택한 후 다음과 같이 Android 옵션을 선택합니다.
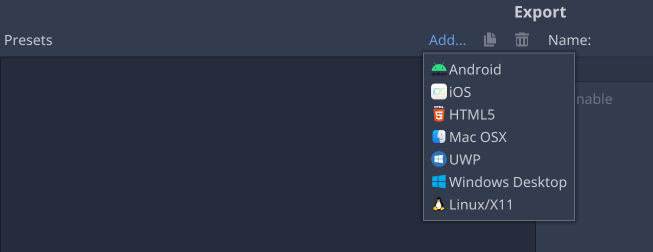
그림 2: Export 창
Android 내보내기 옵션 맞춤설정
프로젝트에 Android 내보내기 사전 설정을 만든 후 Export 창에서 새 사전 설정을 선택하여 내보내기 옵션을 구성할 수 있습니다. 내보내기 옵션은 내보내기 창의 오른쪽에 카테고리별로 그룹화됩니다.
일반적으로 조정할 옵션은 다음과 같습니다.
내보내기 형식 및 맞춤 빌드 사용
Export Format 옵션은 APK 파일로 내보낼지 또는 Android App Bundle(.AAB)로 내보낼지 여부를 나타냅니다. 개발 중에 로컬 기기에서 테스트하는 경우 adb를 사용하여 직접 설치할 수 있으므로 APK 파일이 더 편리합니다. Google Play에 업로드하려는 빌드에는 Android App Bundle을 사용하세요.
Use Custom Build 옵션은 Godot에서 자체 내부 빌드 프로세스를 사용할지 아니면 기존 Gradle 빌드 프로세스를 사용할지 여부를 제어합니다. Use Custom Build가 선택되면 Godot에서 Gradle 빌드를 실행합니다. 다음 조건 중 하나라도 해당하는 경우 Use Custom Build를 선택해야 합니다.
Export Format은 Android App Bundle로 설정됩니다.
프로젝트에서 Godot Android 플러그인 시스템 사용
그림 3: Export Format 및 Custom Build 옵션
아키텍처
Architectures 섹션은 빌드에 포함할 CPU 아키텍처를 지정합니다. 여러 아키텍처가 포함된 빌드를 내보내면 내보낸 APK 또는 AAB 파일의 크기가 늘어나므로 기기에 내보내고 배포할 때 반복 시간이 늘어납니다. 개발 중에는 테스트 기기의 아키텍처만 선택하여 반복 시간을 줄일 수 있습니다. Google Play에 제출할 때 프로젝트에서 지원하는 모든 아키텍처를 사용하여 내보내야 합니다.
그림 4: Architectures 내보내기 옵션
키 저장소
Keystore 섹션에서는 디버그 및 출시 키 저장소 파일이 구성되어 있습니다. 내보낸 앱에 디지털 서명할 때 사용됩니다. Debug 및 Release 필드는 각 키 저장소 파일의 경로여야 합니다. Debug User 및 Release User 필드는 키 저장소의 별칭 이름으로 설정해야 합니다.
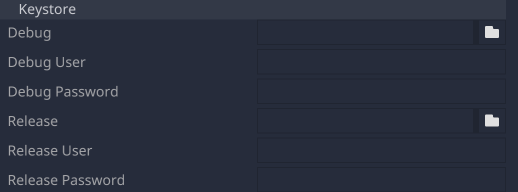
그림 5: 키 저장소 내보내기 옵션
디버그 키 저장소 파일이 전역 Editor Settings -> Export -> Android 섹션에 구성된 경우 프로젝트 내보내기 옵션의 Debug 키 저장소 필드를 비워 둘 수 있으며 전역 디버그 키 저장소 파일이 기본값으로 사용됩니다.
Google Play 스토어에 업로드할 빌드를 만들려면 Android 스튜디오를 사용하여 출시 키 저장소 파일을 만들면 됩니다.
앱의 출시 키 저장소 파일을 만들려면 다음 단계를 따르세요.
Android 스튜디오를 시작합니다.
Welcome to Android Studio 창에서 Create New Project를 선택합니다.
No Activity 템플릿을 선택하고 Next를 클릭합니다.
Configure Your Project 화면에서 Finish를 클릭하여 프로젝트를 만듭니다.
키 저장소 파일을 만든 후 Android 스튜디오를 종료하고 Godot 편집기로 돌아갑니다.
키 저장소 파일을 Release 필드에 추가하고 Release User 및 Release Password 값을 해당 필드에 입력합니다.
버전 및 패키지
버전 및 패키지 섹션은 앱의 버전 코드, 버전 문자열, 패키지 식별자, 패키지 이름을 지정합니다. 고유 이름 필드는 Google Play Console에서 앱이 사용하는 패키지 식별자로 설정해야 합니다.
그림 6: 버전 및 패키지 내보내기 옵션
런처 아이콘
Launcher icons 섹션은 앱의 아이콘으로 사용할 .png 파일을 지정합니다. 아이콘 파일을 지정하지 않으면 Godot에서 기본 아이콘 파일을 사용합니다. Godot은 레거시 애플리케이션 아이콘과 Android 8 이상에서 사용할 수 있는 적응형 아이콘 지정을 모두 지원합니다. 적응형 아이콘 만들기에 관한 도움말은 적응형 아이콘 가이드를 참고하세요.
그림 7: 런처 아이콘 내보내기 옵션
빌드 내보내기
빌드를 내보내려면 다음 단계를 따르세요.
Godot 메뉴 바에서 Project -> Export…를 선택합니다.
사전 설정 목록에서 Android 내보내기 사전 설정을 선택합니다.
Export 창 하단에 있는 Export Project 버튼을 클릭합니다.
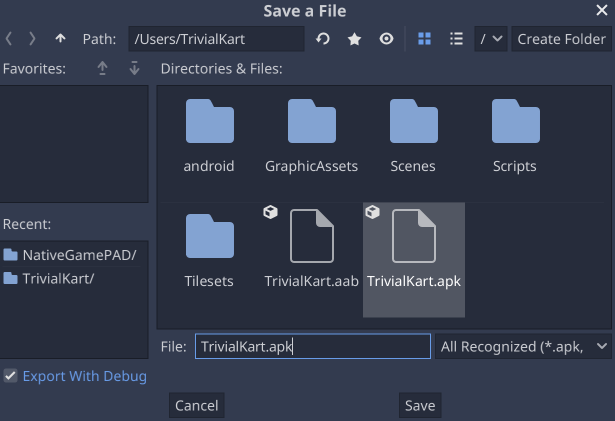
Save a File 대화상자에서 내보낸 파일의 이름을 선택합니다.
Export with Debug 체크박스를 선택 해제하여 출시 빌드를 만듭니다.
Save를 클릭하여 빌드를 내보냅니다.
그림 7: Save a File 내보내기 대화상자
내보내기 사전 설정에서 Use Custom Build 옵션이 선택되어 있으면 내보내기 진행 상황 창이 다르게 표시됩니다. 맞춤 빌드는 Gradle 빌드 프로세스의 출력을 표시합니다.
이 페이지에 나와 있는 콘텐츠와 코드 샘플에는 콘텐츠 라이선스에서 설명하는 라이선스가 적용됩니다. 자바 및 OpenJDK는 Oracle 및 Oracle 계열사의 상표 또는 등록 상표입니다.
최종 업데이트: 2025-07-27(UTC)
[[["이해하기 쉬움","easyToUnderstand","thumb-up"],["문제가 해결됨","solvedMyProblem","thumb-up"],["기타","otherUp","thumb-up"]],[["필요한 정보가 없음","missingTheInformationINeed","thumb-down"],["너무 복잡함/단계 수가 너무 많음","tooComplicatedTooManySteps","thumb-down"],["오래됨","outOfDate","thumb-down"],["번역 문제","translationIssue","thumb-down"],["샘플/코드 문제","samplesCodeIssue","thumb-down"],["기타","otherDown","thumb-down"]],["최종 업데이트: 2025-07-27(UTC)"],[],[],null,["# Export Godot projects to Android\n\nThis topic describes how to export a Godot project as an Android app. Godot can\ngenerate both APK files for local device testing and Android App Bundles for\nsubmission to the Google Play Store.\n\nInstall an Android build template\n---------------------------------\n\nGodot uses a build template as a starting point to generate Gradle files and\nother data necessary to create and build an Android app. A build template must\nbe imported into a Godot project prior to exporting an Android build. Each\nversion of Godot has its own template. To install an Android build template into\na project, perform the following steps:\n\n1. Open the project in the Godot editor.\n2. In the menu bar, select **Project -\\\u003e Install Android Build Template...**\n3. Click the **Manage Templates...** button.\n4. In the **Export Template Manager** window, click the **Download** button for the Godot version being used (Current Version).\n5. Select a mirror location to download the file.\n6. After the download completes, click the **Close** button in the **Export Template Manager** window.\n7. From the editor menubar, select **Project -\\\u003e Install Android Build Template...**\n8. A confirmation dialog will appear. Click the **Install** button.\n\n**Figure 1.** The **Export Template Manager** window\n\nThe build template files will be stored in an `android/build` subdirectory that\nis relative to the project root directory. Due to the size of this subdirectory,\nyou may wish to omit it from the version control scope of your project.\n\nAdd an Android export preset\n----------------------------\n\nAn export preset for Android must be created for the project. To create a\npreset, perform the following steps:\n\n1. From the editor menu bar, select **Project -\\\u003e Export...**\n2. From the **Export** window, select the **Add...** dropdown menu, and then select the **Android** option as follows:\n\n**Figure 2:** The **Export** window\n\nCustomize Android export options\n--------------------------------\n\nAfter creating an Android export preset for your project, you can configure\nexport options by selecting the new preset in the **Export** window. Export\noptions are grouped into categories to the right of the **Export** window.\nCommon options to adjust include:\n\n### Export Format and Use Custom Build\n\nThe **Export Format** option indicates whether to export as an APK file or an\nAndroid App Bundle (.AAB). For testing on a local device during development, an\nAPK file is more convenient, as it can be directly installed using `adb`. For\nbuilds that you intend to upload to Google Play, use an Android App Bundle.\n\nThe **Use Custom Build** option controls whether Godot uses its own internal\nbuild process, or a traditional Gradle build process. If **Use Custom Build** is\nchecked, Godot will perform a Gradle build. **Use Custom Build** must be checked\nif any of the follow conditions apply:\n\n- The **Export Format** is set to Android App Bundle\n- The project is using the Godot Android plugin system\n\n**Figure 3:** The **Export Format** and **Custom Build** options\n\n### Architectures\n\nThe **Architectures** section specifies the CPU architectures to include in the\nbuild. Exporting a build with multiple architectures will increase the size of\nthe exported APK or AAB file, which increases the iteration time when exporting\nand deploying to a device. During development you can reduce the iteration time\nby only selecting the architecture of the test device. When submitting to Google\nPlay, you should export with all available architectures supported by your\nproject.\n| **Note:** Google Play requires 64-bit architectures in submitted App Bundles. If you select the **Armeabi-v7a** architecture you must also select **Arm64-v8a** . Correspondingly, if you select **X86** , you must also select **X86 64**.\n**Figure 4:** The export **Architectures** options\n\n### Keystore\n\nThe **Keystore** section is where debug and release keystore files are\nconfigured. These are used when digitally signing the exported app. The\n**Debug** and **Release** fields should be paths to the respective keystore\nfiles. The **Debug User** and **Release User** fields should be set to the alias\nnames in the keystore.\n**Figure 5:** The export **Keystore** options\n\nIf a debug keystore file has been configured in the global **Editor Settings -\\\u003e\nExport -\\\u003e Android** section, the **Debug** keystore fields in the project Export\noptions may be left blank, and the global debug keystore file will be used as\ndefault.\n\nTo create a build for upload to the Google Play Store, you can use Android\nStudio to create a release keystore file.\n\nTo create a release keystore file for your app:\n\n1. Launch Android Studio.\n2. In the **Welcome to Android Studio** window, select **Create New Project**.\n3. Select the **No Activity** template, and click **Next**.\n4. In the **Configure Your Project** screen, click **Finish** to create the project.\n5. Create a keystore file using the instructions at [Generate an upload key and keystore](/studio/publish/app-signing#generate-key).\n6. After creating the keystore file, quit Android Studio and return to the Godot editor.\n7. Add the keystore file to the **Release** field and enter the **Release User** and **Release Password** values into their respective fields.\n\n| **Note:** The `export_presets.cfg` file in your project directory contains your keystore credentials. To keep your credentials secure, do not distribute this file or commit it to a public version control repository.\n\n### Version and Package\n\nThe **Version** and **Package** sections specify the version code, version\nstring, package identifier, and package name for your app. The **Unique Name**\nfield should be set to the package identifier used by your app in Google Play\nConsole.\n**Figure 6:** The export **Version** and **Package** options\n\n### Launcher icons\n\nThe launcher icons section specifies the .png files to use as icons for your\napp. If icons files are not specified, Godot will use a default icon file. Godot\nsupports specifying both legacy application icons, and the adaptive icons\navailable in Android 8 and later. For tips on creating adaptive icons, see the\n[adaptive icons](/guide/practices/ui_guidelines/icon_design_adaptive) guide.\n**Figure 7:** The export **Launcher Icons** options\n\nExport a build\n--------------\n\nTo export a build, follow these steps:\n\n1. Select **Project -\\\u003e Export...** from the Godot menu bar.\n2. Select an Android export preset from the preset list.\n3. Click the **Export Project** button at the bottom of the **Export** window.\n4. In the **Save a File** dialog box, choose a name for the exported file.\n5. Uncheck the **Export With Debug** checkbox to create a Release build.\n6. Click **Save** to export the build.\n\n**Figure 7:** The export **Save a File** dialog\n\nThe export progress window will look different if the **Use Custom Build**\noption is checked in the export preset. Custom builds display the output of the\nGradle build process."]]