
捷徑協助使用者快速存取應用程式的部分功能,藉此提供特定類型的內容。
至於如何透過捷徑提供內容,則是決於您的用途,以及捷徑的情境是由應用程式驅動還是使用者驅動。雖然靜態捷徑的情境不會變更,動態捷徑的情境則會不斷變更,但無論是哪種情況,情境都是由應用程式驅動。如果使用者選擇應用程式提供內容的方式 (例如透過釘選的捷徑),情境是由使用者定義。以下列舉每個捷徑類型適用的幾種用途:
- 靜態捷徑最適用於在使用者與應用程式互動的生命週期內,使用一致的結構連結內容的應用程式。由於大多數的啟動器一次只能顯示四個捷徑,因此靜態捷徑適合用於以一致的方式執行日常工作,例如使用者希望以特定方式查看日曆或電子郵件。
- 動態捷徑適用於與情境相關的應用程式動作。系統會根據使用者在應用程式中執行的動作,顯示與情境相關的捷徑。舉例來說,假設您打造的遊戲允許使用者在啟動時從目前的關卡開始遊戲,則您應該經常更新捷徑。使用動態捷徑可在使用者每次過關時更新捷徑。
- 固定捷徑適用於使用者驅動的特定動作。舉例來說,使用者可能會將特定網站固定到啟動器畫面上。這種做法有助於讓使用者執行自訂動作,例如直接前往該網站,因為這會比使用瀏覽器的預設執行個體更快。
建立靜態捷徑
靜態捷徑會提供應用程式中一般動作的連結,且這類動作必須在應用程式最新版本的生命週期中保持一致。適合設為靜態捷徑的項目包括查看送出的訊息、設定鬧鐘以及顯示使用者當天的運動活動。
如要建立靜態捷徑,請按照下列步驟操作:
- 在應用程式的
AndroidManifest.xml檔案中,找出意圖篩選器設為android.intent.action.MAIN動作和android.intent.category.LAUNCHER類別的活動。 將
<meta-data>元素新增到此活動 (參照定義了應用程式捷徑的資源檔案):<manifest xmlns:android="http://schemas.android.com/apk/res/android" package="com.example.myapplication"> <application ... > <activity android:name="Main"> <intent-filter> <action android:name="android.intent.action.MAIN" /> <category android:name="android.intent.category.LAUNCHER" /> </intent-filter> <meta-data android:name="android.app.shortcuts" android:resource="@xml/shortcuts" /> </activity> </application> </manifest>建立名為
res/xml/shortcuts.xml的新資源檔案。在新的資源檔案中新增
<shortcuts>根元素,其中包含<shortcut>元素清單。在每個<shortcut>元素中,加入靜態捷徑的相關資訊,包括圖示、說明標籤,以及在應用程式中啟動的意圖:<shortcuts xmlns:android="http://schemas.android.com/apk/res/android"> <shortcut android:shortcutId="compose" android:enabled="true" android:icon="@drawable/compose_icon" android:shortcutShortLabel="@string/compose_shortcut_short_label1" android:shortcutLongLabel="@string/compose_shortcut_long_label1" android:shortcutDisabledMessage="@string/compose_disabled_message1"> <intent android:action="android.intent.action.VIEW" android:targetPackage="com.example.myapplication" android:targetClass="com.example.myapplication.Main" /> <!-- If your shortcut is associated with multiple intents, include them here. The last intent in the list determines what the user sees when they launch this shortcut. --> <categories android:name="android.shortcut.conversation" /> <capability-binding android:key="actions.intent.CREATE_MESSAGE" /> </shortcut> <!-- Specify more shortcuts here. --> </shortcuts>
自訂屬性值
下方清單包含靜態捷徑中不同屬性的說明。請提供 android:shortcutId 和 android:shortcutShortLabel 的值,其他值則為選填。
android:shortcutId字串常值,代表
ShortcutManager物件執行作業時所在的捷徑。android:shortcutShortLabel說明捷徑用途的簡短詞語。請盡可能將簡短說明限制在 10 個半形字元以內。
詳情請參閱「
setShortLabel()」。android:shortcutLongLabel說明捷徑用途的擴充詞組。如果空間足夠,啟動器會顯示這個值,而不是
android:shortcutShortLabel。請盡可能將詳細說明長度限制在 25 個半形字元以內。詳情請參閱「
setLongLabel()」。android:shortcutDisabledMessage當使用者嘗試啟動已停用的捷徑時,支援的啟動器中顯示的訊息。這則訊息必須向使用者說明停用該捷徑的原因。如果
android:enabled是true,此屬性值不會有任何效果。android:enabled決定使用者是否能透過支援的啟動器與捷徑互動。
android:enabled的預設值為true。如果改設為false,請設定android:shortcutDisabledMessage以說明停用該捷徑的原因。如果您認為不需要提供這則訊息,請從 XML 檔案中完全移除捷徑。android:icon啟動器用來向使用者顯示捷徑的點陣圖或自動調整圖示。這個值可以是圖片路徑或包含圖片的資源檔案。請盡可能使用自動調整圖示,以提升效能和一致性。
設定內部元素
列出應用程式靜態捷徑的 XML 檔案在每個 <shortcut> 元素中支援下列元素。您定義的每個靜態捷徑中都必須加入 intent 內部元素,
intent在使用者選取捷徑時,系統啟動的動作。此意圖必須提供
android:action屬性的值。可為單一捷徑提供多個意圖。詳情請參閱「管理多個意圖和活動」、「設定意圖」和
TaskStackBuilder類別參考資料。categories提供應用程式捷徑執行的動作類型群組,例如建立新的即時通訊訊息。
如需支援的捷徑類別清單,請參閱
ShortcutInfo類別參考資料。capability-binding宣告與捷徑連結的功能。
在上述範例中,快速指令連結至為
CREATE_MESSAGE宣告的功能,這是應用程式動作的內建意圖。這個功能繫結可讓使用者透過 Google 助理使用語音指令叫用捷徑。
建立動態捷徑
動態捷徑提供連結,以指向應用程式內與情境相關的特定動作。這些動作可能在每次使用應用程式時變更,且在應用程式執行時也可變更。動態捷徑的用途實例包括撥號給特定人員、導航到特定地點,以及從使用者的最後儲存點載入遊戲。您也可以使用動態捷徑開啟對話。
ShortcutManagerCompat Jetpack 程式庫是 ShortcutManager API 的輔助工具,可用來管理應用程式中的動態捷徑。使用 ShortcutManagerCompat 程式庫可減少樣板程式碼,並確保捷徑在 Android 各版本上的運作方式保持一致。必須使用這個程式庫才能推送動態捷徑,使捷徑能夠顯示在 Google 助理等 Google 途徑,並搭配 Google 捷徑整合程式庫運作。
ShortcutManagerCompat API 可讓應用程式透過動態捷徑執行下列作業:
- 推送及更新:使用
pushDynamicShortcut()發布及更新動態捷徑。如果已有相同 ID 的動態或固定捷徑,就會更新每個可變動的捷徑。 - 移除:使用
removeDynamicShortcuts()移除一組動態捷徑。使用removeAllDynamicShortcuts()移除所有動態捷徑。
如要進一步瞭解如何執行捷徑相關作業,請參閱「管理捷徑」和 ShortcutManagerCompat 參考資料。
以下範例說明如何建立動態捷徑,並將其連結至您的應用程式:
val shortcut = ShortcutInfoCompat.Builder(context, "id1")
        .setShortLabel("Website")
        .setLongLabel("Open the website")
        .setIcon(IconCompat.createWithResource(context, R.drawable.icon_website))
        .setIntent(Intent(Intent.ACTION_VIEW,
                Uri.parse("https://www.mysite.example.com/")))
        .build()

ShortcutManagerCompat.pushDynamicShortcut(context, shortcut)
新增 Google 捷徑整合資料庫
Google 捷徑整合資料庫是選用的 Jetpack 資料庫,可讓您推送在 Android 途徑 (例如啟動器) 和 Google 途徑上均能顯示的動態捷徑。只要使用這個資料庫,使用者就能輕鬆找到捷徑,以在應用程式中快速存取特定內容或重播動作。
使用這個程式庫推送的動態捷徑不會受到捷徑限制影響,這項限制是依裝置強制執行。這樣一來,每當使用者在應用程式中完成相關動作,應用程式就會推送捷徑。以這種方式推送常用捷徑,可讓 Google 瞭解使用者的使用模式,並向他們建議相關捷徑。
舉例來說,Google 助理可以從透過健身追蹤應用程式推送的捷徑得知,使用者每天早上通常都會跑步,因而在使用者早上拿起手機時,主動建議「開始跑步」捷徑。
Google 捷徑整合資料庫本身不提供任何可解決問題的功能。將這個程式庫加入應用程式後,Google 途徑就能使用 ShortcutManagerCompat 擷取應用程式推送的捷徑。
如要在應用程式中使用這個程式庫,請按照下列步驟操作:
更新
gradle.properties檔案以支援 AndroidX 程式庫:android.useAndroidX=true # Automatically convert third-party libraries to use AndroidX android.enableJetifier=true在
app/build.gradle中,新增 Google 捷徑整合程式庫和ShortcutManagerCompat的依附元件:dependencies { implementation "androidx.core:core:1.6.0" implementation 'androidx.core:core-google-shortcuts:1.0.0' ... }
將程式庫依附元件加進 Android 專案後,應用程式即可使用 ShortcutManagerCompat 的 pushDynamicShortcut() 方法推送動態捷徑,且可在啟動器和參與的 Google 介面顯示。
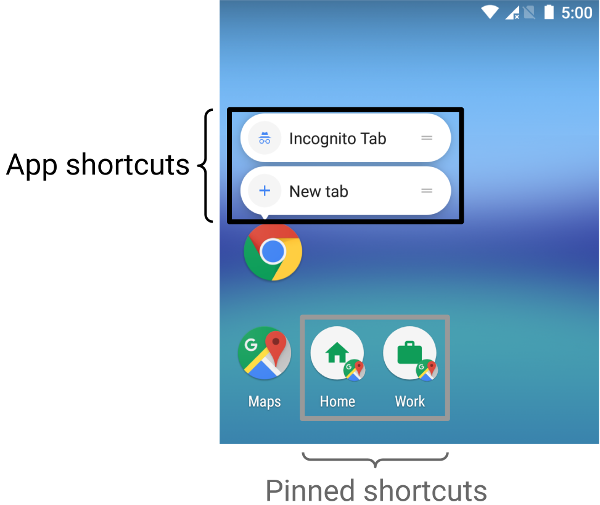
建立固定捷徑
您可以在 Android 8.0 (API 級別 26) 以上版本中建立固定捷徑。與靜態和動態捷徑不同的是,固定捷徑會在支援的啟動器中顯示為個別圖示。圖 1 展示了這兩種捷徑之間的差異。
如要使用應用程式將捷徑固定在支援的啟動器上,請完成下列步驟:
- 使用
isRequestPinShortcutSupported()驗證裝置的預設啟動器支援應用程式內的捷徑固定功能。 根據捷徑是否存在,決定使用下列任一方式建立
ShortcutInfo物件:- 如果捷徑已存在,請建立僅包含現有捷徑 ID 的
ShortcutInfo物件。系統會自動尋找並固定其他與捷徑有關的資訊。 - 如要固定新的捷徑,請建立包含新捷徑 ID、意圖和簡短標籤的
ShortcutInfo物件。
- 如果捷徑已存在,請建立僅包含現有捷徑 ID 的
呼叫
requestPinShortcut()即可將捷徑固定在裝置啟動器。在此過程中,您可以傳入PendingIntent物件;這個物件只會在捷徑成功固定時,向應用程式傳送通知。固定捷徑後,應用程式可以使用
updateShortcuts()方法更新內容。詳情請參閱「更新捷徑」。
以下程式碼片段說明如何建立固定捷徑。
val shortcutManager = getSystemService<ShortcutManager>()

if (shortcutManager!!.isRequestPinShortcutSupported) {
    // Enable the existing shortcut with the ID "my-shortcut".
    val pinShortcutInfo = ShortcutInfo.Builder(context, "my-shortcut").build()

    // Create the PendingIntent object only if your app needs to be notified
    // that the user let the shortcut be pinned. If the pinning operation fails,
    // your app isn't notified. Assume here that the app implements a method
    // called createShortcutResultIntent() that returns a broadcast intent.
    val pinnedShortcutCallbackIntent = shortcutManager.createShortcutResultIntent(pinShortcutInfo)

    // Configure the intent so that your app's broadcast receiver gets the
    // callback successfully. For details, see PendingIntent.getBroadcast().
    val successCallback = PendingIntent.getBroadcast(context, /* request code */ 0,
            pinnedShortcutCallbackIntent, /* flags */ 0)

    shortcutManager.requestPinShortcut(pinShortcutInfo,
            successCallback.intentSender)
}
建立自訂捷徑活動
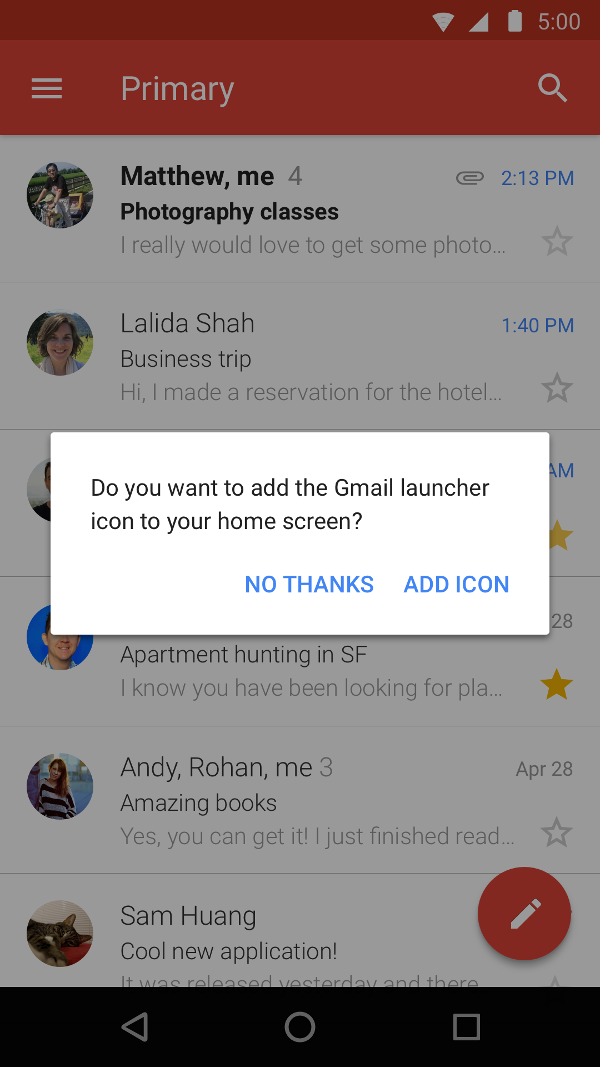
您也可以建立特殊活動,協助使用者建立捷徑、使用自訂選項完成和確認按鈕。圖 2 是 Gmail 應用程式中這類活動的範例。
在應用程式的資訊清單檔案中,將 ACTION_CREATE_SHORTCUT 加入活動的 <intent-filter> 元素。這個宣告會在使用者嘗試建立捷徑時設定下列行為:
- 系統啟動應用程式的特殊活動。
- 使用者設定捷徑的選項。
- 使用者選取確認按鈕。
- 您的應用程式使用
createShortcutResultIntent()方法建立捷徑。這個方法會傳回Intent,讓應用程式使用setResult()轉發回先前執行的活動。 - 應用程式在用來建立自訂捷徑的活動上呼叫
finish()。
同樣地,您的應用程式在使用者安裝或首次啟動後,會提示他們將固定捷徑新增至主畫面。這個方法很有效,因為可協助使用者在一般工作流程中建立捷徑。
測試捷徑
如要測試應用程式捷徑,請在裝置 (具有支援捷徑的啟動器) 上安裝應用程式,然後執行下列動作:
- 按住應用程式的啟動器圖示,即可查看您為應用程式定義的捷徑。
- 拖曳捷徑,將其固定至裝置的啟動器。