
Every text field expects a certain type of text input, such as an email address, phone number, or plain text. You must specify the input type for each text field in your app so the system displays the appropriate soft input method, such as an on-screen keyboard.
Beyond the type of buttons available with an input method, you can specify behaviors such as whether the input method provides spelling suggestions, capitalizes new sentences, and replaces the carriage return button with an action button such as Done or Next. This page shows how to specify these characteristics.
Specify the keyboard type
Always declare the input method for your text fields by adding the
android:inputType
attribute to the
<EditText> element.
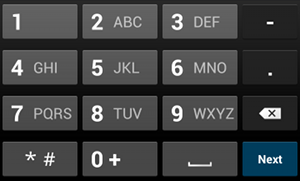
phone input type.For example, if you want an input method for entering a phone number, use the
"phone" value:
<EditText
    android:id="@+id/phone"
    android:layout_width="fill_parent"
    android:layout_height="wrap_content"
    android:hint="@string/phone_hint"
    android:inputType="phone" />
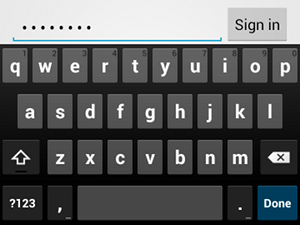
textPassword input type.If the text field is for a password, use the "textPassword" value so the text field
conceals the user's input:
<EditText
    android:id="@+id/password"
    android:hint="@string/password_hint"
    android:inputType="textPassword"
    ... />
There are several possible values documented with the android:inputType attribute,
and you can combine some of the values to specify the input method appearance and additional
behaviors.
Enable spelling suggestions and other behaviors
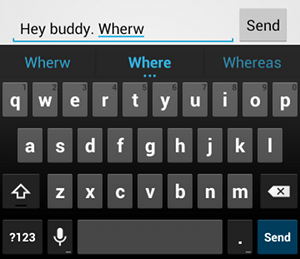
textAutoCorrect provides auto-correction for
misspellings.The android:inputType attribute lets you specify various behaviors for the input
method. Most importantly, if your text field is intended for basic text input—such as for a
text message—enable auto spelling correction with the "textAutoCorrect"
value.
You can combine different behaviors and input method styles with the
android:inputType attribute. For example, here's how to create a text field that
capitalizes the first word of a sentence and also auto-corrects misspellings:
<EditText
    android:id="@+id/message"
    android:layout_width="wrap_content"
    android:layout_height="wrap_content"
    android:inputType=
        "textCapSentences|textAutoCorrect"
    ... />
Specify the input method action
Most soft input methods provide a user action button in the bottom corner that's appropriate for
the current text field. By default, the system uses this button for either a Next or
Done action unless your text field supports multi-line text—such as with
android:inputType="textMultiLine"—in which case the action button is a carriage
return. However, you can specify other actions that might be more appropriate for your text field,
such as Send or Go.
To specify the keyboard action button, use the
android:imeOptions
attribute with an action value such as "actionSend" or "actionSearch". For
example:

android:imeOptions="actionSend".<EditText android:id="@+id/search" android:layout_width="fill_parent" android:layout_height="wrap_content" android:hint="@string/search_hint" android:inputType="text" android:imeOptions="actionSend" />
You can then listen for presses on the action button by defining a
TextView.OnEditorActionListener
for the EditText element. In your
listener, respond to the appropriate IME action ID defined in the
EditorInfo class,
such as
IME_ACTION_SEND,
as shown in the following example:
Kotlin
findViewById<EditText>(R.id.search).setOnEditorActionListener { v, actionId, event ->
    return@setOnEditorActionListener when (actionId) {
        EditorInfo.IME_ACTION_SEND -> {
            sendMessage()
            true
        }
        else -> false
    }
}
Java
EditText editText = (EditText) findViewById(R.id.search);
editText.setOnEditorActionListener(new OnEditorActionListener() {
    @Override
    public boolean onEditorAction(TextView v, int actionId, KeyEvent event) {
        boolean handled = false;
        if (actionId == EditorInfo.IME_ACTION_SEND) {
            sendMessage();
            handled = true;
        }
        return handled;
    }
});
Provide auto-complete suggestions
If you want to provide suggestions to users as they type, you can use a subclass of
EditText called
AutoCompleteTextView.
To implement auto-complete, you must specify an
Adapter that provides the text
suggestions. There are several adapters available, depending on where the data is coming from, such
as from a database or an array.
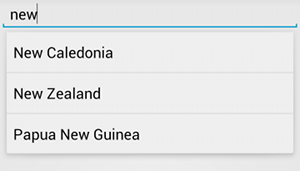
AutoCompleteTextView with text
suggestions.The following procedure describes how to set up an AutoCompleteTextView that
provides suggestions from an array using
ArrayAdapter:
- Add the
AutoCompleteTextViewto your layout. Here's a layout with only the text field:<?xml version="1.0" encoding="utf-8"?> <AutoCompleteTextView xmlns:android="http://schemas.android.com/apk/res/android" android:id="@+id/autocomplete_country" android:layout_width="fill_parent" android:layout_height="wrap_content" />
- Define the array that contains all text suggestions. For example, here's
an array of country names:
<?xml version="1.0" encoding="utf-8"?>
<resources>
    <string-array name="countries_array">
        <item>Afghanistan</item>
        <item>Albania</item>
        <item>Algeria</item>
        <item>American Samoa</item>
        <item>Andorra</item>
        <item>Angola</item>
        <item>Anguilla</item>
        <item>Antarctica</item>
        ...
    </string-array>
</resources>
- In your
ActivityorFragment, use the following code to specify the adapter that supplies the suggestions:Kotlin
// Get a reference to the AutoCompleteTextView in the layout.
val textView = findViewById(R.id.autocomplete_country) as AutoCompleteTextView
// Get the string array.
val countries: Array<out String> = resources.getStringArray(R.array.countries_array)
// Create the adapter and set it to the AutoCompleteTextView.
ArrayAdapter<String>(this, android.R.layout.simple_list_item_1, countries).also { adapter ->
    textView.setAdapter(adapter)
}
Java
// Get a reference to the AutoCompleteTextView in the layout.
AutoCompleteTextView textView = (AutoCompleteTextView) findViewById(R.id.autocomplete_country);
// Get the string array.
String[] countries = getResources().getStringArray(R.array.countries_array);
// Create the adapter and set it to the AutoCompleteTextView.
ArrayAdapter<String> adapter =
        new ArrayAdapter<String>(this, android.R.layout.simple_list_item_1, countries);
textView.setAdapter(adapter);
In the preceding example, a new
ArrayAdapteris initialized to bind each item in thecountries_arraystring array to aTextViewthat exists in thesimple_list_item_1layout. This is a layout provided by Android that provides a standard appearance for text in a list. -
Assign the adapter to the
AutoCompleteTextViewby callingsetAdapter().