
Every screen in your app must be responsive and adapt to the available space.
You can build a responsive UI with
ConstraintLayout that lets a single-pane
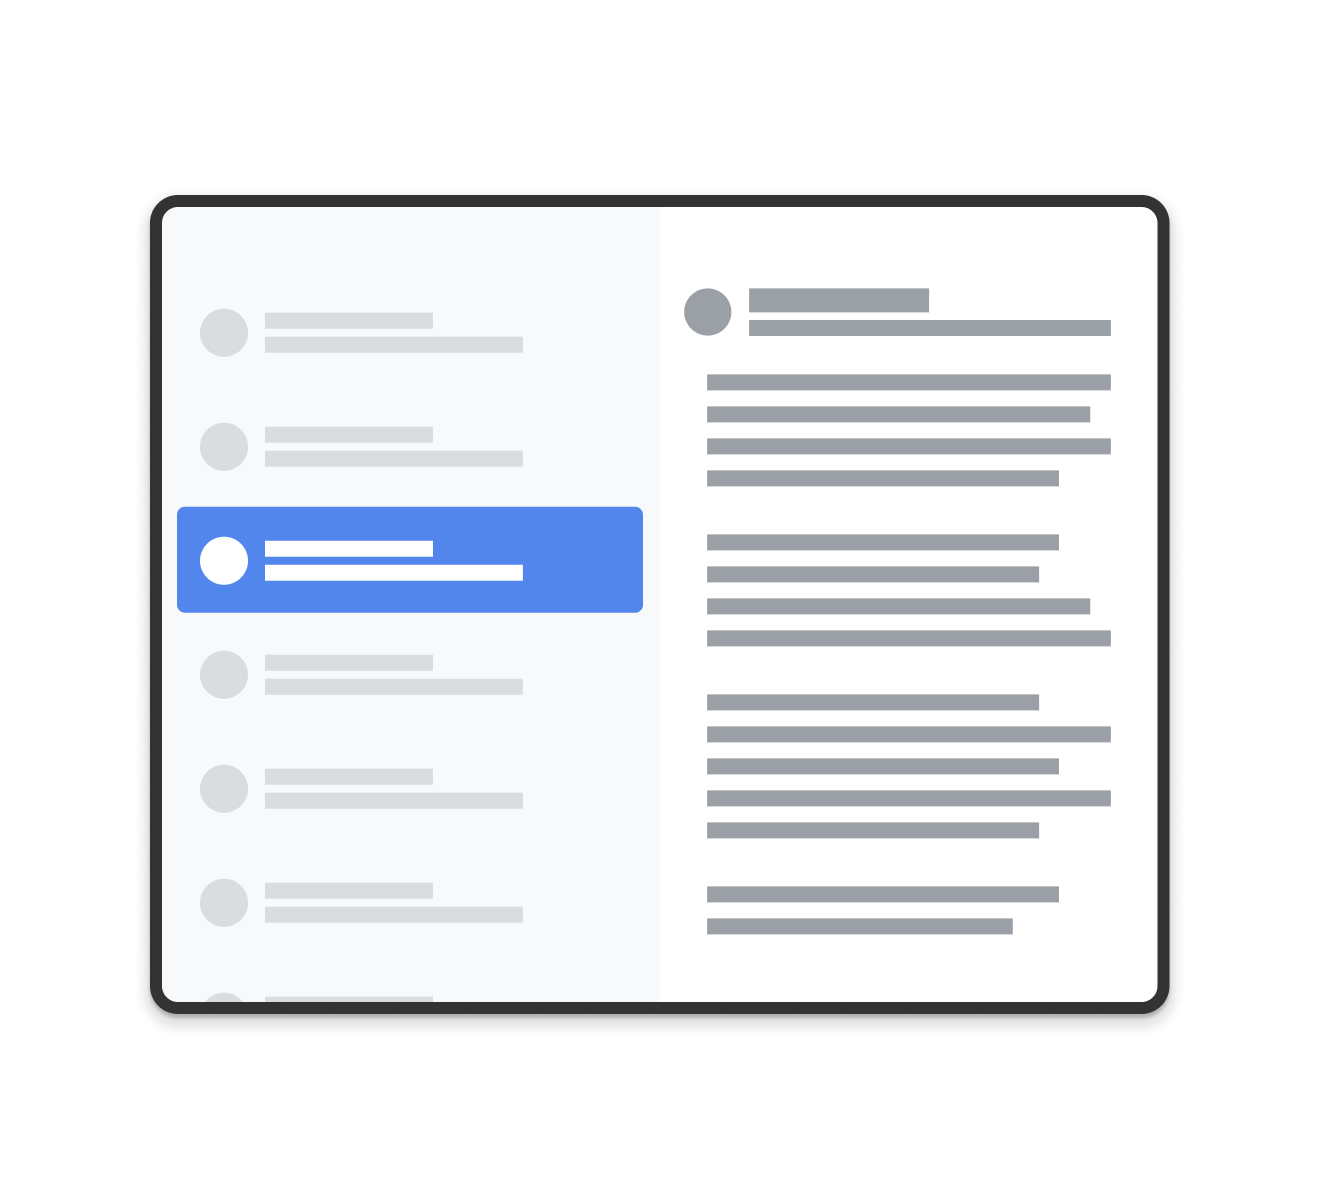
approach scale to many sizes, but larger devices might benefit from splitting
the layout into multiple panes. For example, you might want a screen to show a
list of items next to a list of details of the selected item.
The
SlidingPaneLayout
component supports showing two panes side by side on larger devices and
foldables while automatically adapting to show only one pane at a time on
smaller devices such as phones.
For device-specific guidance, see the screen compatibility overview.
Setup
To use SlidingPaneLayout, include the following dependency in your app's
build.gradle file:
Groovy
dependencies {
    implementation "androidx.slidingpanelayout:slidingpanelayout:1.2.0"
}
Kotlin
dependencies {
    implementation("androidx.slidingpanelayout:slidingpanelayout:1.2.0")
}
XML layout configuration
SlidingPaneLayout provides a horizontal, two-pane layout for use at the top
level of a UI. This layout uses the first pane as a content list or a browser,
subordinate to a primary detail view for displaying content in the other pane.
SlidingPaneLayout.
SlidingPaneLayout uses the width of the two panes to determine whether to show
the panes side by side. For example, if the list pane is measured to have a
minimum size of 200 dp and the detail pane needs 400 dp, then the
SlidingPaneLayout automatically shows the two panes side by side as long as it
has at least 600 dp of width available.
Child views overlap if their combined width exceeds the available width in the
SlidingPaneLayout. In this case, the child views expand to fill the available
width in the SlidingPaneLayout. The user can slide the topmost view out of the
way by dragging it back from the edge of the screen.
If the views don't overlap, SlidingPaneLayout supports the use of the layout
parameter layout_weight on child views to define how to divide leftover space
after measurement is complete. This parameter is only relevant for width.
On a foldable device that has space on the screen to show both views side by
side, SlidingPaneLayout automatically adjusts the size of the two panes so
they are positioned on either side of an overlapping fold or hinge. In this
case, the set widths are considered the minimum width that must exist on each
side of the folding feature. If there isn't enough space to maintain that
minimum size, SlidingPaneLayout switches back to overlapping the views.
Here is an example of using a SlidingPaneLayout that has a
RecyclerView as its
left pane and a
FragmentContainerView
as its primary detail view to display content from the left pane:
<!-- two_pane.xml -->
<androidx.slidingpanelayout.widget.SlidingPaneLayout
   xmlns:android="http://schemas.android.com/apk/res/android"
   android:id="@+id/sliding_pane_layout"
   android:layout_width="match_parent"
   android:layout_height="match_parent">

   <!-- The first child view becomes the left pane. When the combined needed
        width, expressed using android:layout_width, doesn't fit on-screen at
        once, the right pane is permitted to overlap the left. -->

   <androidx.recyclerview.widget.RecyclerView
             android:id="@+id/list_pane"
             android:layout_width="280dp"
             android:layout_height="match_parent"
             android:layout_gravity="start"/>

   <!-- The second child becomes the right (content) pane. In this example,
        android:layout_weight is used to expand this detail pane to consume
        leftover available space when the entire window is wide enough to fit
        the left and right pane.-->
   <androidx.fragment.app.FragmentContainerView
       android:id="@+id/detail_container"
       android:layout_width="300dp"
       android:layout_weight="1"
       android:layout_height="match_parent"
       android:background="#ff333333"
       android:name="com.example.SelectAnItemFragment" />
</androidx.slidingpanelayout.widget.SlidingPaneLayout>
In this example, the android:name attribute on FragmentContainerView adds
the initial fragment to the detail pane, ensuring that users on large-screen
devices don't see an empty right pane when the app first launches.
Programmatically swap out the detail pane
In the preceding XML example, tapping an element in the RecyclerView
triggers a change in the detail pane. When using fragments, this requires a
FragmentTransaction
that replaces the right pane, calling
open()
on the SlidingPaneLayout to swap to the newly visible fragment:
Kotlin
// A method on the Fragment that owns the SlidingPaneLayout,called by the
// adapter when an item is selected.
fun openDetails(itemId: Int) {
    childFragmentManager.commit {
        setReorderingAllowed(true)
        replace<ItemFragment>(R.id.detail_container,
            bundleOf("itemId" to itemId))
        // If it's already open and the detail pane is visible, crossfade
        // between the fragments.
        if (binding.slidingPaneLayout.isOpen) {
            setTransition(FragmentTransaction.TRANSIT_FRAGMENT_FADE)
        }
    }
    binding.slidingPaneLayout.open()
}
Java
// A method on the Fragment that owns the SlidingPaneLayout, called by the
// adapter when an item is selected.
void openDetails(int itemId) {
    Bundle arguments = new Bundle();
    arguments.putInt("itemId", itemId);
    FragmentTransaction ft = getChildFragmentManager().beginTransaction()
            .setReorderingAllowed(true)
            .replace(R.id.detail_container, ItemFragment.class, arguments);
    // If it's already open and the detail pane is visible, crossfade
    // between the fragments.
    if (binding.getSlidingPaneLayout().isOpen()) {
        ft.setTransition(FragmentTransaction.TRANSIT_FRAGMENT_FADE);
    }
    ft.commit();
    binding.getSlidingPaneLayout().open();
}
This code specifically doesn't call
addToBackStack()
on the FragmentTransaction. This avoids building a back stack in the detail
pane.
Navigation component implementation
The examples in this page use SlidingPaneLayout directly and require you to
manage fragment transactions manually. However, the
Navigation component provides a prebuilt implementation of
a two-pane layout through
AbstractListDetailFragment,
an API class that uses a SlidingPaneLayout under the hood to manage your list
and detail panes.
This lets you simplify your XML layout configuration. Instead of explicitly
declaring a SlidingPaneLayout and both of your panes, your layout only needs a
FragmentContainerView to hold your AbstractListDetailFragment
implementation:
<FrameLayout xmlns:android="http://schemas.android.com/apk/res/android"
    xmlns:app="http://schemas.android.com/apk/res-auto"
    android:layout_width="match_parent"
    android:layout_height="match_parent">
    <androidx.fragment.app.FragmentContainerView
        android:id="@+id/two_pane_container"
        <!-- The name of your AbstractListDetailFragment implementation.-->
        android:name="com.example.testapp.TwoPaneFragment"
        android:layout_width="match_parent"
        android:layout_height="match_parent"
        <!-- The navigation graph for your detail pane.-->
        app:navGraph="@navigation/two_pane_navigation" />
</FrameLayout>
Implement
onCreateListPaneView()
and
onListPaneViewCreated()
to provide a custom view for your list pane. For the detail pane,
AbstractListDetailFragment uses a
NavHostFragment.
This means you can define a navigation
graph that only contains the
destinations to be shown in the detail pane. Then, you can use
NavController to swap your
detail pane between the destinations in the self-contained navigation graph:
Kotlin
fun openDetails(itemId: Int) {
    val navController = navHostFragment.navController
    navController.navigate(
        // Assume the itemId is the android:id of a destination in the graph.
        itemId,
        null,
        NavOptions.Builder()
            // Pop all destinations off the back stack.
            .setPopUpTo(navController.graph.startDestination, true)
            .apply {
                // If it's already open and the detail pane is visible,
                // crossfade between the destinations.
                if (binding.slidingPaneLayout.isOpen) {
                    setEnterAnim(R.animator.nav_default_enter_anim)
                    setExitAnim(R.animator.nav_default_exit_anim)
                }
            }
            .build()
    )
    binding.slidingPaneLayout.open()
}
Java
void openDetails(int itemId) {
    NavController navController = navHostFragment.getNavController();
    NavOptions.Builder builder = new NavOptions.Builder()
            // Pop all destinations off the back stack.
            .setPopUpTo(navController.getGraph().getStartDestination(), true);
    // If it's already open and the detail pane is visible, crossfade between
    // the destinations.
    if (binding.getSlidingPaneLayout().isOpen()) {
        builder.setEnterAnim(R.animator.nav_default_enter_anim)
                .setExitAnim(R.animator.nav_default_exit_anim);
    }
    navController.navigate(
        // Assume the itemId is the android:id of a destination in the graph.
        itemId,
        null,
        builder.build()
    );
    binding.getSlidingPaneLayout().open();
}
The destinations in the detail pane's navigation graph must not be present in
any outer, app-wide navigation graph. However, any deep links within the detail
pane's navigation graph must be attached to the destination that hosts the
SlidingPaneLayout. This helps ensure that external deep links first navigate
to the SlidingPaneLayout destination and then navigate to the correct detail
pane destination.
See the TwoPaneFragment example for a full implementation of a two-pane layout using the Navigation component.
Integrate with the system back button
On smaller devices where the list and detail panes overlap, make sure the system
back button takes the user from the detail pane back to the list pane. Do this
by providing custom back
navigation and connecting an
OnBackPressedCallback to
the current state of the SlidingPaneLayout:
Kotlin
class TwoPaneOnBackPressedCallback(
    private val slidingPaneLayout: SlidingPaneLayout
) : OnBackPressedCallback(
    // Set the default 'enabled' state to true only if it is slidable, such as
    // when the panes overlap, and open, such as when the detail pane is
    // visible.
    slidingPaneLayout.isSlideable && slidingPaneLayout.isOpen
), SlidingPaneLayout.PanelSlideListener {

    init {
        slidingPaneLayout.addPanelSlideListener(this)
    }

    override fun handleOnBackPressed() {
        // Return to the list pane when the system back button is tapped.
        slidingPaneLayout.closePane()
    }

    override fun onPanelSlide(panel: View, slideOffset: Float) { }

    override fun onPanelOpened(panel: View) {
        // Intercept the system back button when the detail pane becomes
        // visible.
        isEnabled = true
    }

    override fun onPanelClosed(panel: View) {
        // Disable intercepting the system back button when the user returns to
        // the list pane.
        isEnabled = false
    }
}
Java
class TwoPaneOnBackPressedCallback extends OnBackPressedCallback
        implements SlidingPaneLayout.PanelSlideListener {

    private final SlidingPaneLayout mSlidingPaneLayout;

    TwoPaneOnBackPressedCallback(@NonNull SlidingPaneLayout slidingPaneLayout) {
        // Set the default 'enabled' state to true only if it is slideable, such
        // as when the panes overlap, and open, such as when the detail pane is
        // visible.
        super(slidingPaneLayout.isSlideable() && slidingPaneLayout.isOpen());
        mSlidingPaneLayout = slidingPaneLayout;
        slidingPaneLayout.addPanelSlideListener(this);
    }

    @Override
    public void handleOnBackPressed() {
        // Return to the list pane when the system back button is tapped.
        mSlidingPaneLayout.closePane();
    }

    @Override
    public void onPanelSlide(@NonNull View panel, float slideOffset) { }

    @Override
    public void onPanelOpened(@NonNull View panel) {
        // Intercept the system back button when the detail pane becomes
        // visible.
        setEnabled(true);
    }

    @Override
    public void onPanelClosed(@NonNull View panel) {
        // Disable intercepting the system back button when the user returns to
        // the list pane.
        setEnabled(false);
    }
}
You can add the callback to the
OnBackPressedDispatcher
using
addCallback():
Kotlin
class TwoPaneFragment : Fragment(R.layout.two_pane) {

    override fun onViewCreated(view: View, savedInstanceState: Bundle?) {
        val binding = TwoPaneBinding.bind(view)

        // Connect the SlidingPaneLayout to the system back button.
        requireActivity().onBackPressedDispatcher.addCallback(viewLifecycleOwner,
            TwoPaneOnBackPressedCallback(binding.slidingPaneLayout))

        // Set up the RecyclerView adapter.
    }
}
Java
class TwoPaneFragment extends Fragment {

    public TwoPaneFragment() {
        super(R.layout.two_pane);
    }

    @Override
    public void onViewCreated(@NonNull View view,
             @Nullable Bundle savedInstanceState) {
        TwoPaneBinding binding = TwoPaneBinding.bind(view);

        // Connect the SlidingPaneLayout to the system back button.
        requireActivity().getOnBackPressedDispatcher().addCallback(
            getViewLifecycleOwner(),
            new TwoPaneOnBackPressedCallback(binding.getSlidingPaneLayout()));

        // Set up the RecyclerView adapter.
    }
}
Lock mode
SlidingPaneLayout always lets you manually call open() and
close()
to transition between the list and detail panes on phones. These methods have no
effect if both panes are visible and don't overlap.
When the list and detail panes overlap, users can swipe in both directions by
default, freely switching between the two panes even when not using gesture
navigation. You can control the swipe direction
by setting the lock mode of the SlidingPaneLayout:
Kotlin
binding.slidingPaneLayout.lockMode = SlidingPaneLayout.LOCK_MODE_LOCKED
Java
binding.getSlidingPaneLayout().setLockMode(SlidingPaneLayout.LOCK_MODE_LOCKED);
Learn more
To learn more about designing layouts for different form factors, see the following documentation: