
回転する三角形のようなプリセット プログラムに従ってオブジェクトを動かすと、
注目を集めていますが、ユーザーに OpenGL ES グラフィックスを操作してもらいたい場合はどうでしょうか。
OpenGL ES アプリをタッチ インタラクティブにするための鍵は、
GLSurfaceView:
onTouchEvent(): タッチイベントをリッスンします。
このレッスンでは、タッチイベントをリッスンしてユーザーによる OpenGL ES オブジェクトの回転を可能にする方法について紹介します。
タッチリスナーを設定する
OpenGL ES アプリがタッチイベントに応答できるようにするには、
onTouchEvent() メソッドを
GLSurfaceView クラス。以下の実装例は、
MotionEvent.ACTION_MOVE のイベントを作成し、それを次の言語に翻訳する
図形の回転角度。
Kotlin
private const val TOUCH_SCALE_FACTOR: Float = 180.0f / 320f
...
private var previousX: Float = 0f
private var previousY: Float = 0f

override fun onTouchEvent(e: MotionEvent): Boolean {
    // MotionEvent reports input details from the touch screen
    // and other input controls. In this case, you are only
    // interested in events where the touch position changed.

    val x: Float = e.x
    val y: Float = e.y

    when (e.action) {
        MotionEvent.ACTION_MOVE -> {

            var dx: Float = x - previousX
            var dy: Float = y - previousY

            // reverse direction of rotation above the mid-line
            if (y > height / 2) {
                dx *= -1
            }

            // reverse direction of rotation to left of the mid-line
            if (x < width / 2) {
                dy *= -1
            }

            renderer.angle += (dx + dy) * TOUCH_SCALE_FACTOR
            requestRender()
        }
    }

    previousX = x
    previousY = y
    return true
}
Java
private final float TOUCH_SCALE_FACTOR = 180.0f / 320;
private float previousX;
private float previousY;

@Override
public boolean onTouchEvent(MotionEvent e) {
    // MotionEvent reports input details from the touch screen
    // and other input controls. In this case, you are only
    // interested in events where the touch position changed.

    float x = e.getX();
    float y = e.getY();

    switch (e.getAction()) {
        case MotionEvent.ACTION_MOVE:

            float dx = x - previousX;
            float dy = y - previousY;

            // reverse direction of rotation above the mid-line
            if (y > getHeight() / 2) {
              dx = dx * -1 ;
            }

            // reverse direction of rotation to left of the mid-line
            if (x < getWidth() / 2) {
              dy = dy * -1 ;
            }

            renderer.setAngle(
                    renderer.getAngle() +
                    ((dx + dy) * TOUCH_SCALE_FACTOR));
            requestRender();
    }

    previousX = x;
    previousY = y;
    return true;
}
このメソッドでは、回転角度の計算後、
requestRender():
フレームをレンダリングするタイミングであることを通知します。この例では、このアプローチが最も効率的です
これは、回転に変更がない限りフレームを再描画する必要がないためです。ただし、
ただし、次の場合にのみレンダラに再描画をリクエストしない限り、効率に影響はありません。
setRenderMode() を使用してデータが変更される
そのため、レンダラで次の行を必ずコメント化解除してください。
Kotlin
class MyGlSurfaceView(context: Context) : GLSurfaceView(context) {

    init {
        // Render the view only when there is a change in the drawing data
        renderMode = GLSurfaceView.RENDERMODE_WHEN_DIRTY
    }
}
Java
public MyGLSurfaceView(Context context) {
    ...
    // Render the view only when there is a change in the drawing data
    setRenderMode(GLSurfaceView.RENDERMODE_WHEN_DIRTY);
}
回転角度を公開する
上記のサンプルコードでは、回転角をレンダラで公開する必要があります。
公開メンバーの追加などですレンダラのコードはメインユーザーとは別のスレッドで実行されるため
渡すには、このパブリック変数を volatile として宣言する必要があります。
変数を宣言し、ゲッターとセッターを対で公開するコードを次に示します。
Kotlin
class MyGLRenderer4 : GLSurfaceView.Renderer {

    @Volatile
    var angle: Float = 0f
}
Java
public class MyGLRenderer implements GLSurfaceView.Renderer {
    ...

    public volatile float mAngle;

    public float getAngle() {
        return mAngle;
    }

    public void setAngle(float angle) {
        mAngle = angle;
    }
}
回転を適用する
タップ入力によって生成された回転を適用するには、角度を生成するコードをコメントアウトし、 タップ入力で生成された角度を含む変数を追加します。
Kotlin
override fun onDrawFrame(gl: GL10) {
    ...
    val scratch = FloatArray(16)

    // Create a rotation for the triangle
    // long time = SystemClock.uptimeMillis() % 4000L;
    // float angle = 0.090f * ((int) time);
    Matrix.setRotateM(rotationMatrix, 0, angle, 0f, 0f, -1.0f)

    // Combine the rotation matrix with the projection and camera view
    // Note that the mvpMatrix factor *must be first* in order
    // for the matrix multiplication product to be correct.
    Matrix.multiplyMM(scratch, 0, mvpMatrix, 0, rotationMatrix, 0)

    // Draw triangle
    triangle.draw(scratch)
}
Java
public void onDrawFrame(GL10 gl) {
    ...
    float[] scratch = new float[16];

    // Create a rotation for the triangle
    // long time = SystemClock.uptimeMillis() % 4000L;
    // float angle = 0.090f * ((int) time);
    Matrix.setRotateM(rotationMatrix, 0, mAngle, 0, 0, -1.0f);

    // Combine the rotation matrix with the projection and camera view
    // Note that the vPMatrix factor *must be first* in order
    // for the matrix multiplication product to be correct.
    Matrix.multiplyMM(scratch, 0, vPMatrix, 0, rotationMatrix, 0);

    // Draw triangle
    mTriangle.draw(scratch);
}
上記の手順が完了したら、プログラムを実行し、画面の上で指をドラッグして 三角形を回転させます。
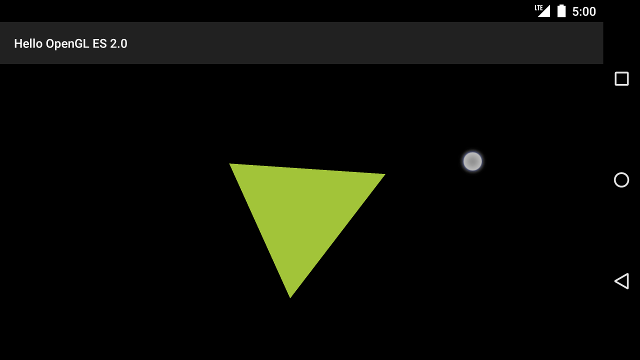
図 1. タップ入力で回転している三角形(円はタップを示しています) 設定されます。