创建 Java 类或类型
使用集合让一切井井有条
根据您的偏好保存内容并对其进行分类。
借助 Android Studio 中的 Create New Class 对话框和文件模板,您可以快速新建以下类和类型:
在您填写 Create New Class 对话框中的字段并点击 OK 后,Android Studio 会创建一个包含框架代码的 .java
文件,其中包括 package 语句、任意必要的导入、标头以及类或类型声明。接下来,您可以向此文件中添加代码。
文件模板可指定 Android Studio 如何生成框架代码。您可以按原样使用随 Android Studio 提供的文件模板,也可以在这些模板的基础上进行自定义,使其适合您的开发流程。
查看和自定义文件模板
Android Studio 提供了文件模板,用于决定使用 Create New Class 对话框如何创建新的 Java 类和类型。您可以自定义这些模板。
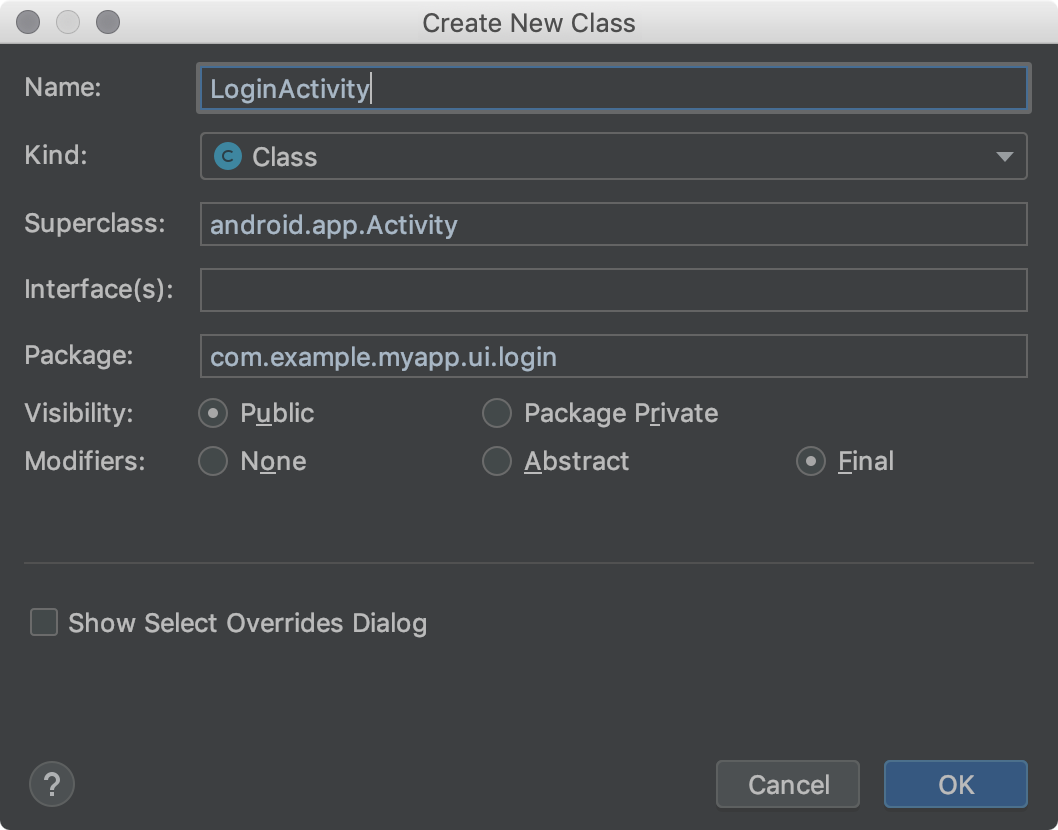
图 1. Create New Class 对话框。
Android Studio 文件模板包含 Velocity 模板语言 (VTL) 代码以及用于处理这些附加选项的变量。Create New Class 对话框使用 AnnotationType、Class、Enum、Interface 和 Singleton 文件模板。
要查看模板、查找自定义内容和修改模板,请按以下步骤操作:
执行以下其中一项操作:
- 对于 Windows 或 Linux,依次选择 File > Settings > Editor > File and Code Templates > Files。
- 对于 macOS,依次选择 Android Studio > Preferences > Editor > File and Code Templates > Files。
在模板列表中,内部模板名称以粗体显示。自定义的模板名称以突出显示颜色(例如蓝色)显示。
根据需要自定义文件模板。
如果您要使用 Create New Class 对话框中的字段,请确保您所做的更改符合 Android Studio 文件模板代码的要求。
如需详细了解文件模板(包括 VTL),请参阅文件和代码模板以及文件和代码模板对话框。
创建 Java 类或类型
借助 Android Studio,您可以根据文件模板创建新的 Java 类、枚举和单例类以及接口和注解类型。
要创建新的 Java 类或类型,请按以下步骤操作:
- 在 Project 窗口中,右键点击某个 Java 文件或文件夹,然后依次选择 New > Java Class。
也可以在 Project 窗口中选择某个 Java 文件或文件夹,或者在代码编辑器中点击某个 Java 文件。然后,依次选择 File > New > Java Class。
您选择的内容决定了新类或新类型的默认软件包。
- 在 Create New Class 对话框中,填写以下字段:
- Name - 新类或新类型的名称。它必须符合 Java 名称要求。请勿输入文件扩展名。
- Kind - 选择类或类型的类别。
- Superclass - 指定该新类从哪个类继承而来。您可以输入软件包和类名称,也可以只输入类名称,然后双击下拉列表中的匹配项即可将其自动填入。
- Interface(s) - 该新类或新类型实现的一个或多个接口。多个接口之间应该用英文逗号分隔,逗号后面可以跟一个空格。您可以输入软件包和接口名称,也可只输入接口名称,然后双击下拉列表中的匹配项即可将其自动填入。
自动填充功能仅适用于第一个接口名称。请注意,虽然英文逗号和后面的接口名称可能会引发提示错误,但您可以忽略该错误,因为它不会影响生成的代码。
- Package - 表示该类或类型将放入哪个软件包。该字段中会自动显示默认值。如果您在该字段中输入一个软件包名称,软件包标识符中不存在的任何部分都会以红色突出显示;在这种情况下,Android Studio 会在您点击 OK 后创建相应的软件包。该字段必须包含值;否则,Java 文件将不包含
package
语句,并且相应类或类型将不会放在项目中的软件包内。
默认值取决于您启动 Create New Class 对话框的方式。如果您首先在 Project 窗口中选择了某个 Java 文件或文件夹,则默认值为您所选内容对应的软件包。如果您首先在代码编辑器中点击了某个 Java 文件,则默认值为包含此文件的软件包。
- Visibility - 指定相应类或类型是对所有类都可见,还是仅对各自软件包中的类可见。
- Modifiers - 选择 Abstract 或 Final 作为 Class 的修饰符,或两者都不选择。
- Show Select Overrides Dialog - 将 Kind 设置为 Class 时,如果选中此选项,在您点击 OK 后会打开“Select Methods to Override/Implement”对话框。在此对话框中,您可以选择想要替换或实现的方法,Android Studio 将为这些方法生成框架代码。
不适用于 Kind 的所有字段都将处于隐藏状态。
- 点击 OK。
Android Studio 会使用框架代码创建一个您可以修改的 Java 文件。它会在代码编辑器中打开该文件。
注意:您可以通过依次选择 File > New > Singleton 或 File > New > Java Class 创建单例类;后一种方法提供了更多选项。
Android Studio 文件模板
本部分列出了用 VTL 脚本语言编写的 Android Studio 文件模板代码,后面是变量的定义。您在 Create New Class 对话框中提供的值将成为模板中的变量值。
请注意,以 #if (${VISIBILITY}
开头的行一直延续到左大括号 ({
) 为止。
AnnotationType 文件模板
#if (${PACKAGE_NAME} != "")package ${PACKAGE_NAME};#end
#if (${IMPORT_BLOCK} != "")${IMPORT_BLOCK}
#end
#parse("File Header.java")
#if (${VISIBILITY} == "PUBLIC")public #end @interface ${NAME} #if (${INTERFACES} != "")extends ${INTERFACES} #end {
}
类文件模板
#if (${PACKAGE_NAME} != "")package ${PACKAGE_NAME};#end
#if (${IMPORT_BLOCK} != "")${IMPORT_BLOCK}
#end
#parse("File Header.java")
#if (${VISIBILITY} == "PUBLIC")public #end #if (${ABSTRACT} == "TRUE")abstract #end #if (${FINAL} == "TRUE")final #end class ${NAME} #if (${SUPERCLASS} != "")extends ${SUPERCLASS} #end #if (${INTERFACES} != "")implements ${INTERFACES} #end {
}
枚举文件模板
#if (${PACKAGE_NAME} != "")package ${PACKAGE_NAME};#end
#if (${IMPORT_BLOCK} != "")${IMPORT_BLOCK}
#end
#parse("File Header.java")
#if (${VISIBILITY} == "PUBLIC")public #end enum ${NAME} #if (${INTERFACES} != "")implements ${INTERFACES} #end {
}
接口文件模板
#if (${PACKAGE_NAME} != "")package ${PACKAGE_NAME};#end
#if (${IMPORT_BLOCK} != "")${IMPORT_BLOCK}
#end
#parse("File Header.java")
#if (${VISIBILITY} == "PUBLIC")public #end enum ${NAME} #if (${INTERFACES} != "")implements ${INTERFACES} #end {
#end {
}
单例文件模板
#if (${PACKAGE_NAME} != "")package ${PACKAGE_NAME};#end
#if (${IMPORT_BLOCK} != "")${IMPORT_BLOCK}
#end
#parse("File Header.java")
#if (${VISIBILITY} == "PUBLIC")public #end class ${NAME} #if (${SUPERCLASS} != "")extends ${SUPERCLASS} #end #if (${INTERFACES} != "")implements ${INTERFACES} #end {
private static final ${NAME} ourInstance = new ${NAME}();
#if (${VISIBILITY} == "PUBLIC")public #end static ${NAME} getInstance() {
return ourInstance;
}
private ${NAME}() {
}
}
文件模板变量
Android Studio 会将文件模板变量替换为生成的 Java 文件中的值。您需要在 Create New Class 对话框中输入这些值。模板包含以下可供您使用的变量:
IMPORT_BLOCK
- 以换行符分隔的 Java import
语句列表,这些语句都是支持任何父类或接口所必需的;或者为空字符串 (""
)。例如,如果您仅实现 Runnable
接口而不扩展任何内容,则此变量将为 "import java.lang.Runnable;\n"
。如果您实现 Runnable
接口并扩展 Activity
类,则此变量将为 "import android.app.Activity;\nimportjava.lang.Runnable;\n"
。
VISIBILITY
- 表示相应类是否支持公开访问。其值可以为 PUBLIC
或 PACKAGE_PRIVATE
。
SUPERCLASS
- 单个类名称,或为空。如果存在,则新类名称后面将有一个 extends ${SUPERCLASS}
子句。
INTERFACES
- 以英文逗号分隔的接口列表,或为空。如果存在,则父类后面将有一个 implements ${INTERFACES}
子句;如果没有父类,则类名称后面将有一个该子句。对于接口和注解类型,接口具有 extends
关键字。
ABSTRACT
- 相应类是否应为抽象类。其值可以为 TRUE
或 FALSE
。FINAL
- 相应类是否应为最终类。其值可以为 TRUE
或 FALSE
。
本页面上的内容和代码示例受内容许可部分所述许可的限制。Java 和 OpenJDK 是 Oracle 和/或其关联公司的注册商标。
最后更新时间 (UTC):2025-08-27。
[[["易于理解","easyToUnderstand","thumb-up"],["解决了我的问题","solvedMyProblem","thumb-up"],["其他","otherUp","thumb-up"]],[["没有我需要的信息","missingTheInformationINeed","thumb-down"],["太复杂/步骤太多","tooComplicatedTooManySteps","thumb-down"],["内容需要更新","outOfDate","thumb-down"],["翻译问题","translationIssue","thumb-down"],["示例/代码问题","samplesCodeIssue","thumb-down"],["其他","otherDown","thumb-down"]],["最后更新时间 (UTC):2025-08-27。"],[],[],null,["With the **Create New Class** dialog and file templates, Android\nStudio helps you to quickly create the following new classes and types:\n\n- Java classes\n- Enumeration and singleton classes\n- Interface and annotation types\n\n\nAfter you fill in the **Create New Class** dialog fields and click\n**OK** , Android Studio creates a `.java` file containing\nskeleton code, including a package statement, any necessary imports, a header,\nand a class or type declaration. Next, you can add your code to this file.\n\n\nFile templates specify how Android Studio generates the skeleton code. You can\nuse the file templates provided with Android Studio as is, or customize them to\nsuit your development process.\n\nViewing and customizing file templates\n\n\nAndroid Studio provides file templates that determine how new Java classes and\ntypes are created with the **Create New Class** dialog. You can\ncustomize these templates.\n\n\n**Figure 1** . The **Create New Class**\ndialog.\n\nThe Android Studio file templates include Velocity Template Language ([VTL](https://velocity.apache.org/engine/)) code\nand variables that handle these additional options.\nThe **Create New Class** dialog uses the **AnnotationType** ,\n**Class** ,\n**Enum** , **Interface** , and **Singleton**\nfile templates.\n\n\nTo view the templates, find customizations, and modify the templates, follow\nthese steps:\n\n1. Do one of the following:\n\n - For Windows or Linux, select **File \\\u003e Settings \\\u003e Editor \\\u003e File and Code\n Templates \\\u003e Files**.\n - For macOS, select **Android Studio \\\u003e Preferences \\\u003e Editor \\\u003e File and Code\n Templates \\\u003e Files**.\n\n In the [template list](https://www.jetbrains.com/help/idea/2025.1/settings-file-and-code-templates.html),\n internal template names are in bold font. Customized template names are\n displayed in a highlight color, such as blue.\n2. Customize the file templates as needed.\n\n If you want to use the **Create New Class** dialog fields, make sure your\n changes comply with the [Android Studio file template code](#templates).\n\n\nFor more information about file templates, including VTL, see [File\nand Code Templates](https://www.jetbrains.com/help/idea/2025.1/file-and-code-templates.html) and [File\nand Code Templates Dialog](https://www.jetbrains.com/help/idea/2025.1/settings-file-and-code-templates.html).\n\nCreating a Java class or type\n\n\nAndroid Studio helps you to create new Java classes; enumeration and singleton\nclasses; and interface and annotation types based on [file templates](#templates).\n\n\nTo create a new Java class or type, follow these steps:\n\n1. In the **Project** window, right-click a Java file or folder, and select **New** \\\u003e **Java Class**.\n2. Alternatively, select a Java file or folder in the **Project** window, or click in a Java file in the Code Editor. Then select **File** \\\u003e **New** \\\u003e **Java Class**.\n3. The item you select determines the default package for the new class or type.\n4. In the **Create New Class** dialog, fill in the fields:\n - **Name** - The name of the new class or type. It must comply with Java name requirements. Don't type a file name extension.\n - **Kind** - Select the category of class or type.\n - **Superclass** - The class that your new class inherits from. You can type the package and class name, or just the class name and then double-click an item in the drop-down list to autocomplete it.\n - **Interface(s)** - One or more interfaces that the new class or type implements. Multiple interfaces should be separated by a comma followed by an optional space. You can type the package and interface name, or just the interface name and then double-click an item in the drop-down list to autocomplete it.\n - Autocomplete works for the first interface name only. Note that while the comma and the following interface name can bring up a tooltip error, you can ignore the error because it doesn't affect the generated code.\n - **Package** - The package that the class or type will reside in. The default automatically appears in the field. If you type a package name in the field, any portions of the package identifier that don't exist are highlighted red; in this case, Android Studio creates the package after you click **OK** . This field must contain a value; otherwise, the Java file won't contain a `package` statement, and the class or type won't be placed within a package in the project.\n - The default depends on how you launched the **Create New Class** dialog. If you first selected a Java file or folder in the **Project** window, the default is the package for the item you selected. If you first clicked in a Java file in the Code Editor, the default is the package that contains this file.\n - **Visibility** - Select whether the class or type is visible to all classes, or just to those in its own package.\n - **Modifiers** - Select the **Abstract** or **Final** modifier for a **Class**, or neither.\n - **Show Select Overrides Dialog** - For a **Kind** of **Class** , check this option to open the [Select\n Methods to Override/Implement dialog](https://www.jetbrains.com/help/idea/2025.1/overriding-methods-of-a-superclass.html) after you click **OK**. In this dialog, you can select methods that you would like to override or implement, and Android Studio will generate skeleton code for these methods.\n5. Any fields that don't apply to the **Kind** are hidden.\n6. Click **OK**.\n7. Android Studio creates a Java file with skeleton code that you can modify. It opens the file in the Code Editor.\n\n\n**Note:** You can create a singleton class by selecting\n**File** \\\u003e **New** \\\u003e **Singleton** or\n**File** \\\u003e **New** \\\u003e **Java Class**; the\nlatter technique offers more options.\n\n\u003cbr /\u003e\n\nAndroid Studio file templates\n\n\nThis section lists the Android Studio file template code written in the [VTL](https://velocity.apache.org/engine/) scripting language, followed\nby definitions of the variables. The values that you provide in the\n**Create New Class** dialog become the variable values in the template.\nNote that the lines that begin with\n`#if (${VISIBILITY}` extend all the way to the open brace (\n`{` ).\n\nAnnotationType file template \n\n```\n#if (${PACKAGE_NAME} != \"\")package ${PACKAGE_NAME};#end\n\n#if (${IMPORT_BLOCK} != \"\")${IMPORT_BLOCK}\n#end\n#parse(\"File Header.java\")\n\n#if (${VISIBILITY} == \"PUBLIC\")public #end @interface ${NAME} #if (${INTERFACES} != \"\")extends ${INTERFACES} #end {\n}\n```\n\nClass file template \n\n```\n#if (${PACKAGE_NAME} != \"\")package ${PACKAGE_NAME};#end\n\n#if (${IMPORT_BLOCK} != \"\")${IMPORT_BLOCK}\n#end\n#parse(\"File Header.java\")\n\n#if (${VISIBILITY} == \"PUBLIC\")public #end #if (${ABSTRACT} == \"TRUE\")abstract #end #if (${FINAL} == \"TRUE\")final #end class ${NAME} #if (${SUPERCLASS} != \"\")extends ${SUPERCLASS} #end #if (${INTERFACES} != \"\")implements ${INTERFACES} #end {\n}\n```\n\nEnum file template \n\n```\n#if (${PACKAGE_NAME} != \"\")package ${PACKAGE_NAME};#end\n\n#if (${IMPORT_BLOCK} != \"\")${IMPORT_BLOCK}\n#end\n#parse(\"File Header.java\")\n\n#if (${VISIBILITY} == \"PUBLIC\")public #end enum ${NAME} #if (${INTERFACES} != \"\")implements ${INTERFACES} #end {\n}\n```\n\nInterface file template \n\n```\n#if (${PACKAGE_NAME} != \"\")package ${PACKAGE_NAME};#end\n\n#if (${IMPORT_BLOCK} != \"\")${IMPORT_BLOCK}\n#end\n#parse(\"File Header.java\")\n\n#if (${VISIBILITY} == \"PUBLIC\")public #end enum ${NAME} #if (${INTERFACES} != \"\")implements ${INTERFACES} #end {\n#end {\n}\n```\n\nSingleton file template \n\n```\n#if (${PACKAGE_NAME} != \"\")package ${PACKAGE_NAME};#end\n\n#if (${IMPORT_BLOCK} != \"\")${IMPORT_BLOCK}\n#end\n#parse(\"File Header.java\")\n\n#if (${VISIBILITY} == \"PUBLIC\")public #end class ${NAME} #if (${SUPERCLASS} != \"\")extends ${SUPERCLASS} #end #if (${INTERFACES} != \"\")implements ${INTERFACES} #end {\n private static final ${NAME} ourInstance = new ${NAME}();\n\n #if (${VISIBILITY} == \"PUBLIC\")public #end static ${NAME} getInstance() {\n return ourInstance;\n }\n\n private ${NAME}() {\n }\n}\n```\n\nFile template variables\n\n\u003cbr /\u003e\n\n\nAndroid Studio replaces file template variables with values in the generated\nJava file. You enter the values in the **Create New Class** dialog.\nThe template has the following variables that you can use:\n\n- `IMPORT_BLOCK` - A newline-delimited list of Java `import` statements necessary to support any superclass or interfaces, or an empty string (`\"\"`). For example, If you only implement the `Runnable` interface and extend nothing, this variable will be `\"import java.lang.Runnable;\\n\"`. If you implement the `Runnable` interface and extend the `Activity` class, it will be `\"import android.app.Activity;\\nimportjava.lang.Runnable;\\n\"`.\n- `VISIBILITY` - Whether the class will have public access or not. It can have a value of `PUBLIC` or `PACKAGE_PRIVATE`.\n- `SUPERCLASS` - A single class name, or empty. If present, there will be an `extends ${SUPERCLASS}` clause after the new class name.\n- `INTERFACES` - A comma-separated list of interfaces, or empty. If present, there will be an `implements ${INTERFACES}` clause after the superclass, or after the class name if there's no superclass. For interfaces and annotation types, the interfaces have the `extends` keyword.\n- `ABSTRACT` - Whether the class should be abstract or not. It can have a value of `TRUE` or `FALSE`.\n- `FINAL` - Whether the class should be final or not. It can have a value of `TRUE` or `FALSE`.\n\n\u003cbr /\u003e"]]