Android 11 以降では、クイック アクセス デバイス コントロール機能を利用して、ユーザーは、照明、サーモスタット、カメラなどの外部デバイスをデフォルトのランチャーから 3 回以内の操作で表示し、操作することができます。デバイス OEM は、使用するランチャーを選択します。デバイス アグリゲータ(Google Home など)やサードパーティ ベンダーのアプリは、このスペースに表示されるデバイスを指定できます。このページでは、このスペースにデバイス コントロールを表示し、コントロール アプリにリンクする方法について説明します。
このサポートを追加するには、ControlsProviderService を作成して宣言します。事前定義されたコントロール
タイプに基づいてアプリがサポートするコントロールを作成し、さらにそれらのコントロール用にパブリッシャーを作成します。
ユーザー インターフェース
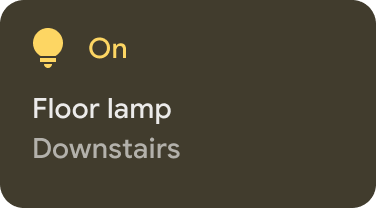
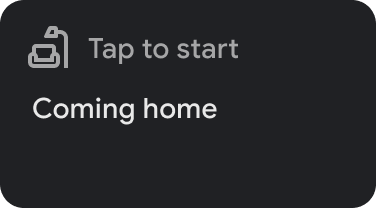
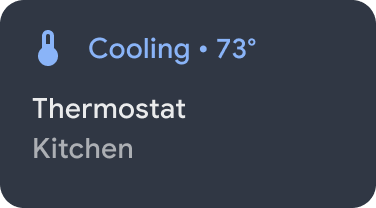
デバイスは、[デバイス コントロール] の下にテンプレート化されたウィジェットとして表示されます。次の図に示すように、5 つのデバイス コントロール ウィジェットを使用できます。
|
|
|
|
|
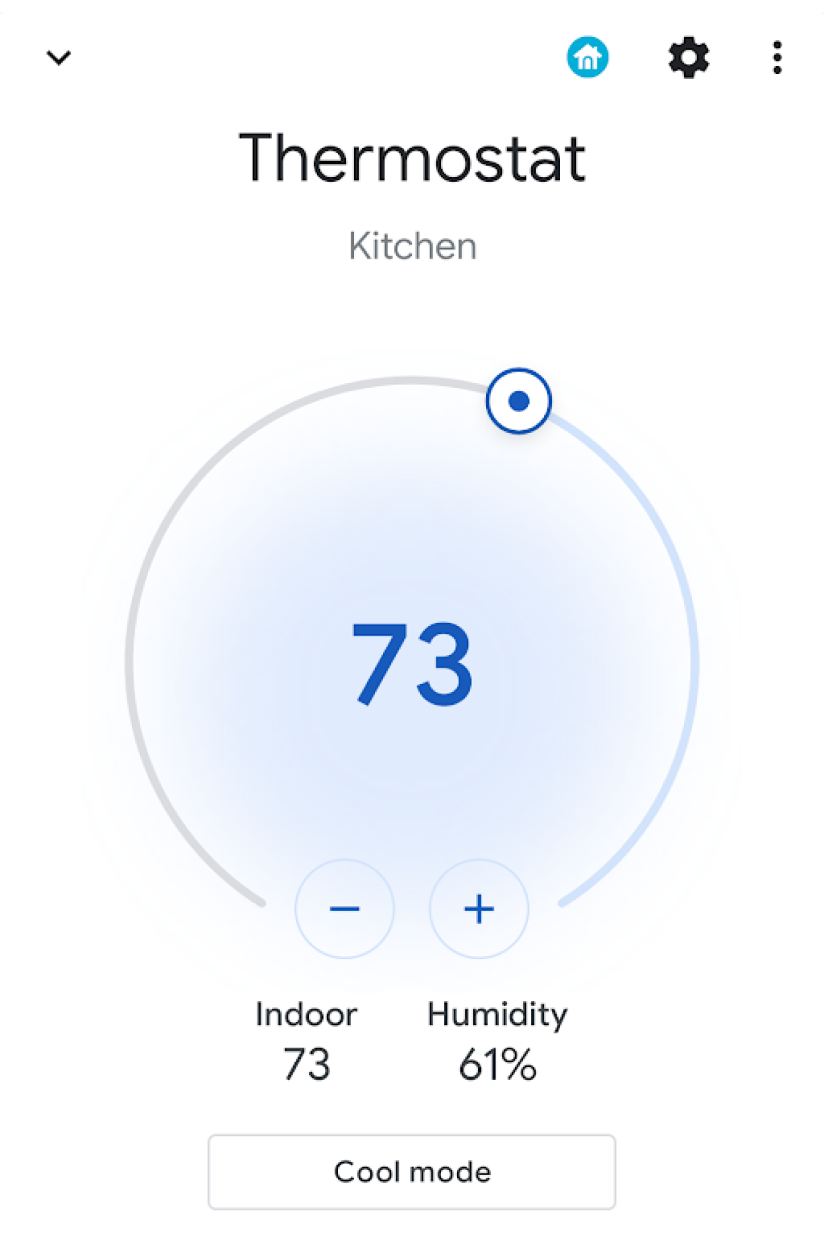
ウィジェットを長押しすると、アプリでさらに詳細な制御が可能になります。各ウィジェットのアイコンと色をカスタマイズできますが、デフォルトのセットがデバイスと一致する場合は、デフォルトのアイコンと色を使用することをおすすめします。
サービスを作成する
このセクションでは、
ControlsProviderService を作成する方法について説明します。
このサービスは、Android
UI の [デバイス コントロール] エリアに表示されるデバイス コントロールがアプリに含まれていることを、Android のシステム UI
に伝えます。
ControlsProviderService API では、Reactive Streams GitHub プロジェクトで定義されて Java 9 Flow インターフェースに実装されている、リアクティブ ストリームに習熟していることが前提になっています。この API
は、次のコンセプトに基づいて構築されています。
- パブリッシャー: アプリがパブリッシャーになる。
- サブスクライバー: システム UI がサブスクライバーであり、パブリッシャーから複数のコントロールをリクエストできる。
- サブスクリプション: パブリッシャーがシステム UI にアップデートを送信できる期間。この期間はパブリッシャーまたはサブスクライバーが終了できる。
サービスを宣言する
アプリでは、アプリ マニフェストでサービス(MyCustomControlService など)を宣言する必要があります。
サービスには ControlsProviderService のインテント フィルタが含まれている必要があります。このフィルタにより、アプリはシステム
UI にコントロールを提供できます。
また、システム UI のコントロールに表示される label も必要です。
サービスの宣言方法を次の例に示します。
<service
    android:name="MyCustomControlService"
    android:label="My Custom Controls"
    android:permission="android.permission.BIND_CONTROLS"
    android:exported="true"
    >
    <intent-filter>
      <action android:name="android.service.controls.ControlsProviderService" />
    </intent-filter>
</service>
次に、MyCustomControlService.kt という名前の新しい Kotlin ファイルを作成し、ControlsProviderService()
を拡張します。
Kotlin
    class MyCustomControlService : ControlsProviderService() {
        ...
    }
Java
    public class MyCustomJavaControlService extends ControlsProviderService {
        ...
    }
正しいコントロール タイプを選択する
API には、コントロールを作成するためのビルダー メソッドが用意されています。ビルダーに入力するには、制御するデバイスとユーザーがデバイスを操作する方法を決定します。次の手順を行います。
- コントロールが表すデバイスのタイプを選択します。The
DeviceTypesクラスは、 サポートされているすべてのデバイスの列挙です。このタイプは、UI でデバイスのアイコンと色を決定するために使用されます。 - ユーザー向けの名前、デバイスの位置情報(キッチンなど)、コントロールに関連付けられているその他の UI テキスト要素を決定します。
- ユーザー インタラクションをサポートする最適なテンプレートを選択します。コントロールには、アプリケーションから
ControlTemplateが割り当てられます。このテンプレートはコントロールの状態と、利用可能な入力方法(ControlAction)をユーザーに直接示します。次の表は、利用可能なテンプレートの一部と、そのテンプレートでサポートされるアクションを示しています。
| テンプレート | アクション | 説明 |
ControlTemplate.getNoTemplateObject()
|
None
|
アプリはこれを使用してコントロールに関する情報を伝達できますが、 ユーザーは操作できません。 |
ToggleTemplate
|
BooleanAction
|
有効状態と無効状態を切り替えられるコントロールを表します。
BooleanAction オブジェクトには、ユーザーがコントロールをタップしたときに、リクエストされた新しい状態を表すように変化するフィールドが含まれています。
|
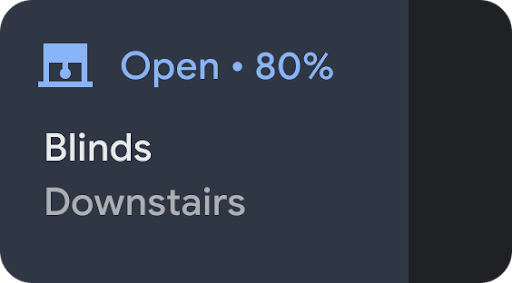
RangeTemplate
|
FloatAction
|
指定された最小値、最大値、ステップ値を示すスライダー ウィジェットを表します。ユーザーがスライダーを操作したら、更新された値を含む新しい FloatAction オブジェクトをアプリに返します。 |
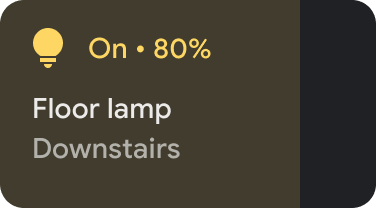
ToggleRangeTemplate
|
BooleanAction, FloatAction
|
このテンプレートは ToggleTemplate と
RangeTemplate を組み合わせたものです。調光可能な照明の制御など、タッチイベントやスライダーがサポートされています。
|
TemperatureControlTemplate
|
ModeAction, BooleanAction, FloatAction
|
上記のアクションの 1 つをカプセル化するのに加えて、このテンプレートでは ユーザーが暖房、冷房、暖房・冷房、エコ、オフなどのモードを設定できます。 |
StatelessTemplate
|
CommandAction
|
リモートの IR テレビのように、タップ機能があるが状態 を判定できないコントロールを示すために使用されます。この テンプレートを使用して、コントロール と状態の変化を集約したルーティンやマクロを定義できます。 |
この情報を使用して、コントロールを作成できます。
- コントロールの状態が不明な場合は
Control.StatelessBuilderビルダークラスを使用します。 - コントロールの状態がわかっている場合は
Control.StatefulBuilderビルダークラスを使用します。
たとえば、スマート電球とサーモスタットを制御するには、次の定数を MyCustomControlService に追加します。
Kotlin
    private const val LIGHT_ID = 1234
    private const val LIGHT_TITLE = "My fancy light"
    private const val LIGHT_TYPE = DeviceTypes.TYPE_LIGHT
    private const val THERMOSTAT_ID = 5678
    private const val THERMOSTAT_TITLE = "My fancy thermostat"
    private const val THERMOSTAT_TYPE = DeviceTypes.TYPE_THERMOSTAT

    class MyCustomControlService : ControlsProviderService() {
      ...
    }
Java
    public class MyCustomJavaControlService extends ControlsProviderService {

    private final int LIGHT_ID = 1337;
    private final String LIGHT_TITLE = "My fancy light";
    private final int LIGHT_TYPE = DeviceTypes.TYPE_LIGHT;
    private final int THERMOSTAT_ID = 1338;
    private final String THERMOSTAT_TITLE = "My fancy thermostat";
    private final int THERMOSTAT_TYPE = DeviceTypes.TYPE_THERMOSTAT;

    ...
    }
コントロール用のパブリッシャーを作成する
コントロールを作成したら、次にパブリッシャーが必要になります。パブリッシャーは、システム UI にコントロールの存在を通知します。ControlsProviderService クラスには、アプリケーション コードでオーバーライドする必要がある 2 つのパブリッシャー メソッドがあります。
createPublisherForAllAvailable(): アプリで使用可能なすべてのコントロール用にPublisherを作成します。このパブリッシャーについてはControl.StatelessBuilder()を使用してControlオブジェクトをビルドします。createPublisherFor(): 文字列識別子によって識別される特定のコントロールのリストについて、Publisherを作成します。 これらのControlオブジェクトをビルドするにはControl.StatefulBuilderを使用します。パブリッシャーが各コントロールに状態を割り当てる必要があるためです。
パブリッシャーを作成する
アプリが最初にコントロールをシステム UI に公開するとき、アプリは各コントロールの状態を認識していません。状態の取得は、デバイス
プロバイダのネットワークで多くのホップを伴う時間のかかるオペレーションになる可能性があります。
createPublisherForAllAvailable()
メソッドを使用して、使用可能なコントロールをシステムにアドバタイズします。このメソッドは、各コントロールの状態が不明なため、Control.StatelessBuilder
ビルダークラスを使用します。
Android UI にコントロールが表示されると、ユーザーはお気に入りのコントロールを選択できます。
Kotlin コルーチンを使用して ControlsProviderService を作成するには、build.gradle
に新しい依存関係を追加します。
Groovy
dependencies {
    implementation "org.jetbrains.kotlinx:kotlinx-coroutines-jdk9:1.6.4"
}
Kotlin
dependencies {
    implementation("org.jetbrains.kotlinx:kotlinx-coroutines-jdk9:1.6.4")
}
Gradle ファイルを同期したら、次のスニペットを Service に追加して createPublisherForAllAvailable()
を実装します。
Kotlin
class MyCustomControlService : ControlsProviderService() { override fun createPublisherForAllAvailable(): Flow.Publisher= flowPublish { send(createStatelessControl(LIGHT_ID, LIGHT_TITLE, LIGHT_TYPE)) send(createStatelessControl(THERMOSTAT_ID, THERMOSTAT_TITLE, THERMOSTAT_TYPE)) } private fun createStatelessControl(id: Int, title: String, type: Int): Control { val intent = Intent(this, MainActivity::class.java) .putExtra(EXTRA_MESSAGE, title) .addFlags(Intent.FLAG_ACTIVITY_NEW_TASK) val action = PendingIntent.getActivity( this, id, intent, PendingIntent.FLAG_UPDATE_CURRENT or PendingIntent.FLAG_IMMUTABLE ) return Control.StatelessBuilder(id.toString(), action) .setTitle(title) .setDeviceType(type) .build() } override fun createPublisherFor(controlIds: List ): Flow.Publisher { TODO() } override fun performControlAction( controlId: String, action: ControlAction, consumer: Consumer ) { TODO() } }
Java
    public class MyCustomJavaControlService extends ControlsProviderService {

        private final int LIGHT_ID = 1337;
        private final String LIGHT_TITLE = "My fancy light";
        private final int LIGHT_TYPE = DeviceTypes.TYPE_LIGHT;
        private final int THERMOSTAT_ID = 1338;
        private final String THERMOSTAT_TITLE = "My fancy thermostat";
        private final int THERMOSTAT_TYPE = DeviceTypes.TYPE_THERMOSTAT;

        private boolean toggleState = false;
        private float rangeState = 18f;
        private final Map<String, ReplayProcessor> controlFlows = new HashMap<>();

        @NonNull
        @Override
        public Flow.Publisher createPublisherForAllAvailable() {
            List controls = new ArrayList<>();
            controls.add(createStatelessControl(LIGHT_ID, LIGHT_TITLE, LIGHT_TYPE));
            controls.add(createStatelessControl(THERMOSTAT_ID, THERMOSTAT_TITLE, THERMOSTAT_TYPE));
            return FlowAdapters.toFlowPublisher(Flowable.fromIterable(controls));
        }

        @NonNull
        @Override
        public Flow.Publisher createPublisherFor(@NonNull List controlIds) {
            ReplayProcessor updatePublisher = ReplayProcessor.create();

            controlIds.forEach(control -> {
                controlFlows.put(control, updatePublisher);
                updatePublisher.onNext(createLight());
                updatePublisher.onNext(createThermostat());
            });

            return FlowAdapters.toFlowPublisher(updatePublisher);
        }
    }
システム メニューを下にスワイプして、図 4 に示す [デバイス コントロール] ボタンを見つけます。
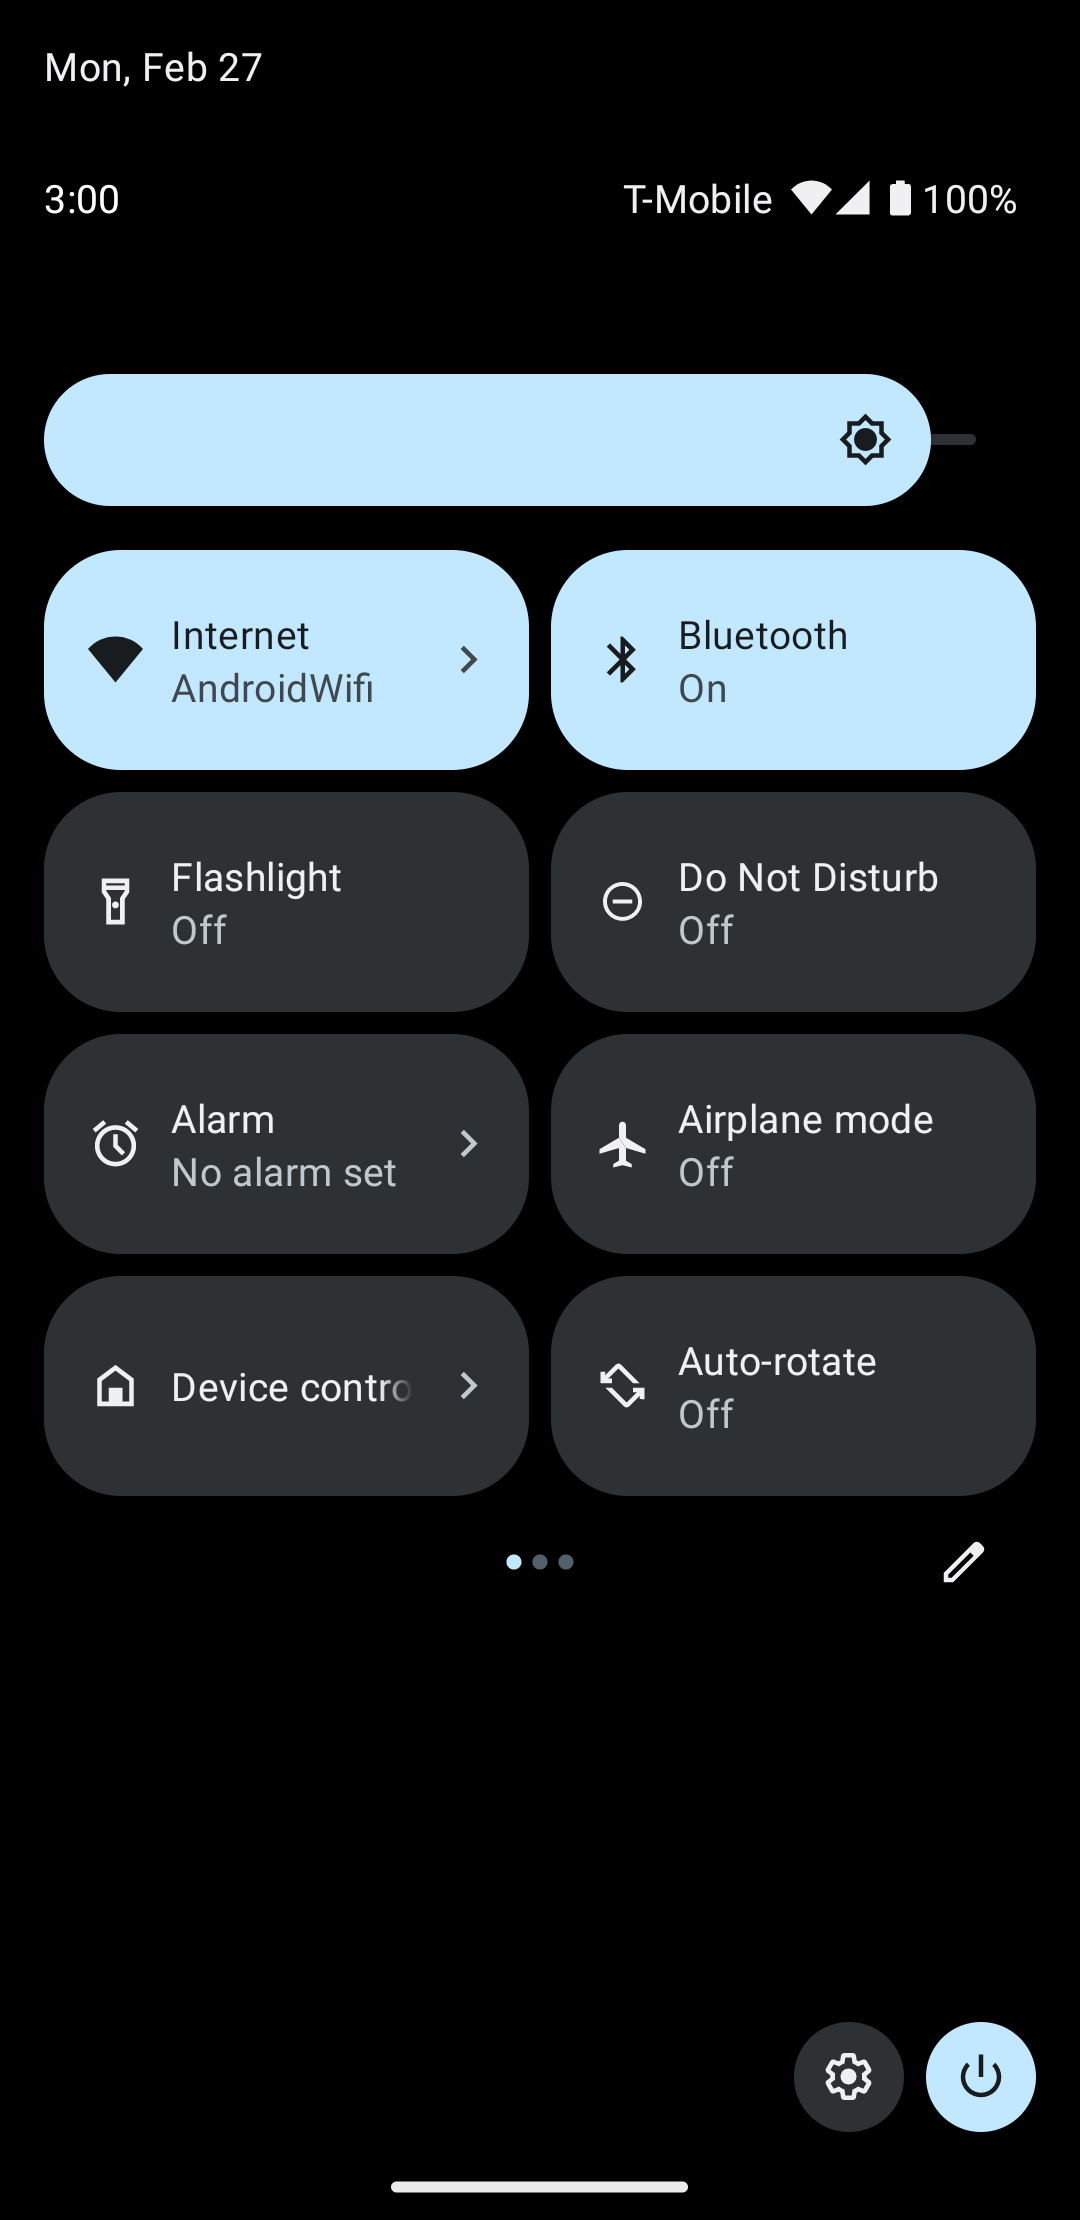
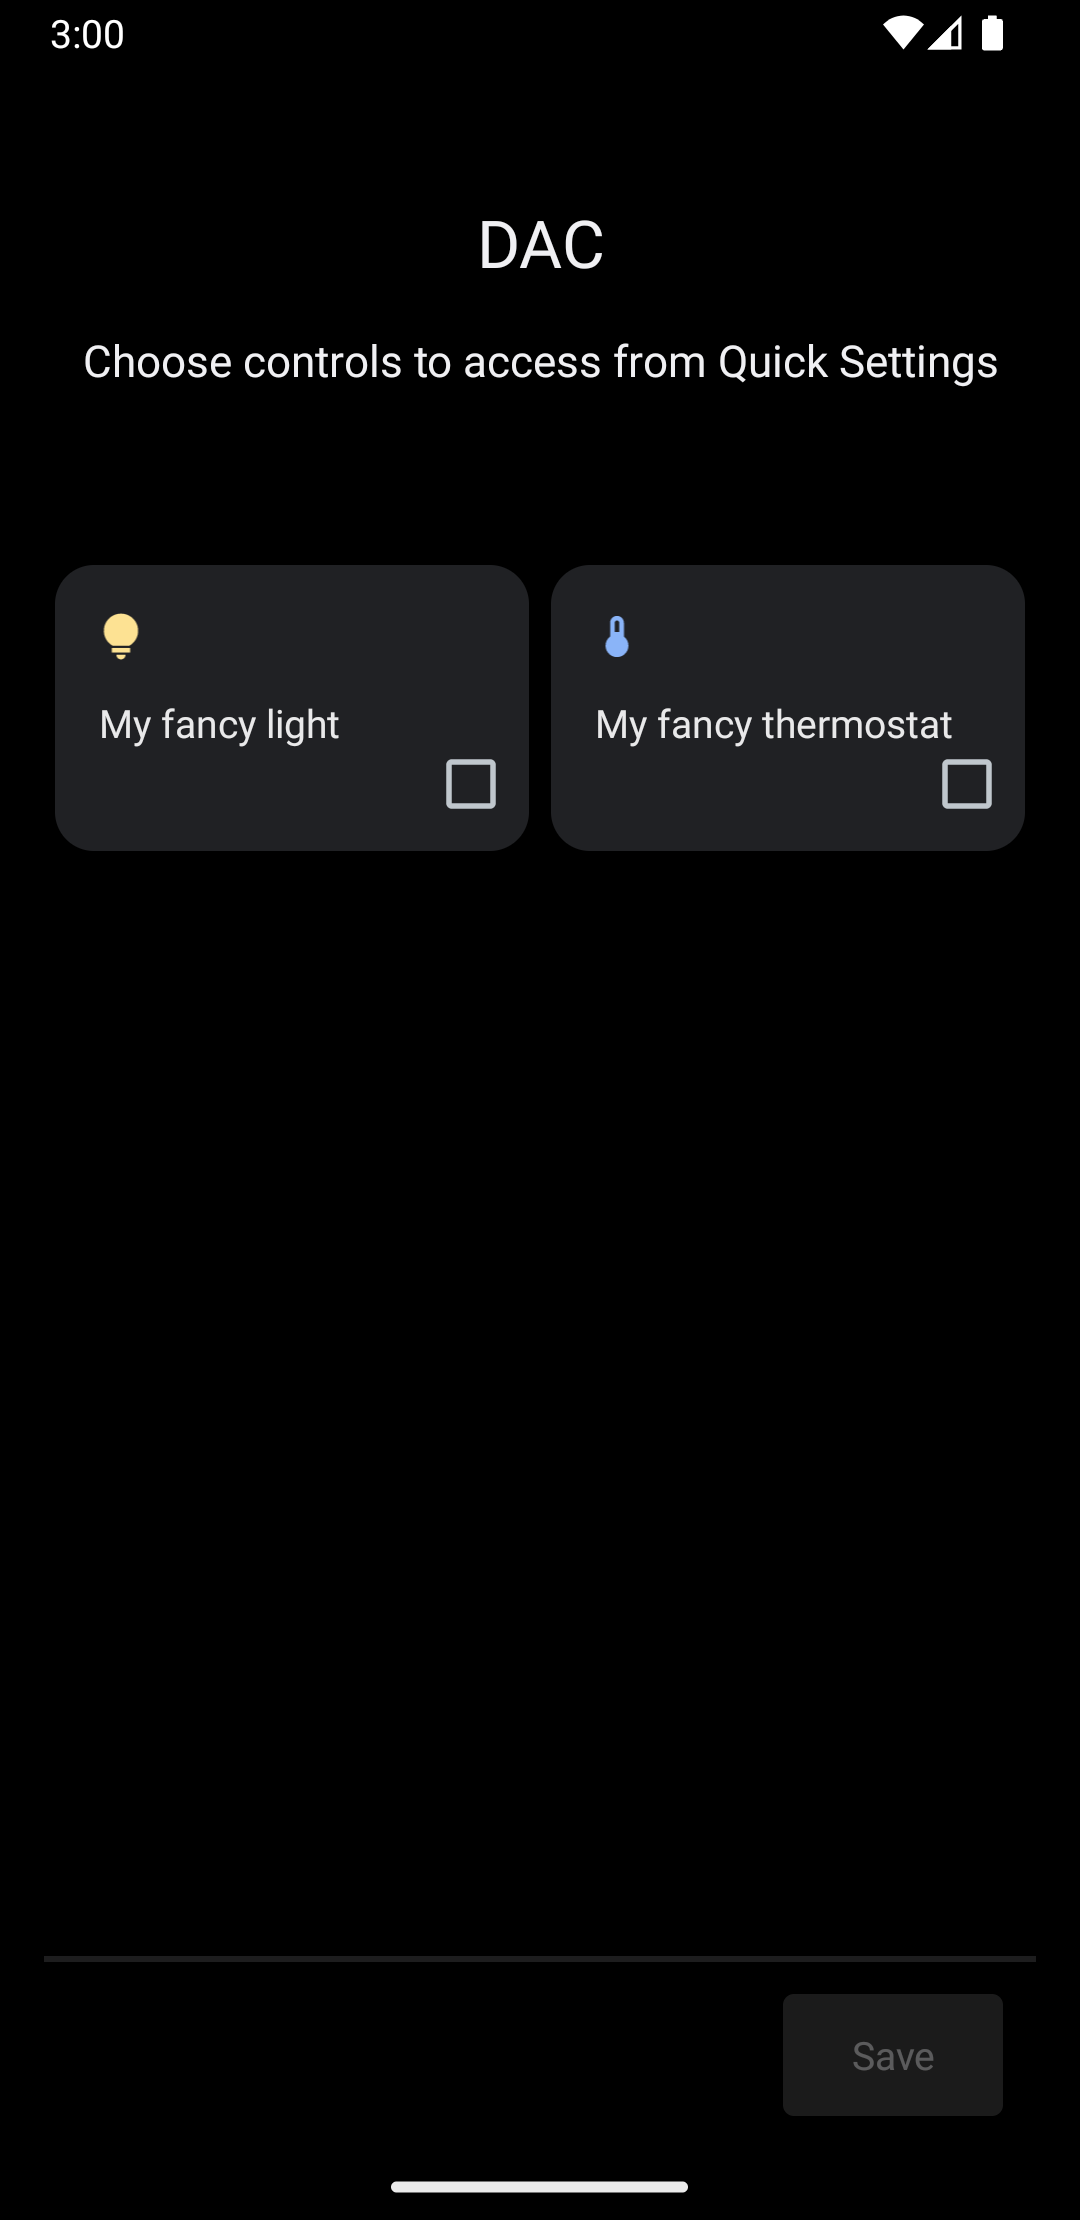
[デバイス コントロール] をタップすると、アプリを選択できる 2 つ目の画面に移動します。アプリを選択すると、図 5 に示すように、前のスニペットで新しいコントロールを表示するカスタム システム メニューが作成されます。
次に、createPublisherFor() メソッドを実装し、次のコードを Service に追加します。
Kotlin
private val job = SupervisorJob() private val scope = CoroutineScope(Dispatchers.IO + job) private val controlFlows = mutableMapOf<String, MutableSharedFlow>() private var toggleState = false private var rangeState = 18f override fun createPublisherFor(controlIds: List ): Flow.Publisher { val flow = MutableSharedFlow (replay = 2, extraBufferCapacity = 2) controlIds.forEach { controlFlows[it] = flow } scope.launch { delay(1000) // Retrieving the toggle state. flow.tryEmit(createLight()) delay(1000) // Retrieving the range state. flow.tryEmit(createThermostat()) } return flow.asPublisher() } private fun createLight() = createStatefulControl( LIGHT_ID, LIGHT_TITLE, LIGHT_TYPE, toggleState, ToggleTemplate( LIGHT_ID.toString(), ControlButton( toggleState, toggleState.toString().uppercase(Locale.getDefault()) ) ) ) private fun createThermostat() = createStatefulControl( THERMOSTAT_ID, THERMOSTAT_TITLE, THERMOSTAT_TYPE, rangeState, RangeTemplate( THERMOSTAT_ID.toString(), 15f, 25f, rangeState, 0.1f, "%1.1f" ) ) private fun createStatefulControl(id: Int, title: String, type: Int, state: T, template: ControlTemplate): Control { val intent = Intent(this, MainActivity::class.java) .putExtra(EXTRA_MESSAGE, "$title $state") .addFlags(Intent.FLAG_ACTIVITY_NEW_TASK) val action = PendingIntent.getActivity( this, id, intent, PendingIntent.FLAG_UPDATE_CURRENT or PendingIntent.FLAG_IMMUTABLE ) return Control.StatefulBuilder(id.toString(), action) .setTitle(title) .setDeviceType(type) .setStatus(Control.STATUS_OK) .setControlTemplate(template) .build() } override fun onDestroy() { super.onDestroy() job.cancel() }
Java
@NonNull @Override public Flow.PublishercreatePublisherFor(@NonNull List controlIds) { ReplayProcessor updatePublisher = ReplayProcessor.create(); controlIds.forEach(control -> { controlFlows.put(control, updatePublisher); updatePublisher.onNext(createLight()); updatePublisher.onNext(createThermostat()); }); return FlowAdapters.toFlowPublisher(updatePublisher); } private Control createStatelessControl(int id, String title, int type) { Intent intent = new Intent(this, MainActivity.class) .putExtra(EXTRA_MESSAGE, title) .addFlags(Intent.FLAG_ACTIVITY_NEW_TASK); PendingIntent action = PendingIntent.getActivity( this, id, intent, PendingIntent.FLAG_UPDATE_CURRENT | PendingIntent.FLAG_IMMUTABLE ); return new Control.StatelessBuilder(id + "", action) .setTitle(title) .setDeviceType(type) .build(); } private Control createLight() { return createStatefulControl( LIGHT_ID, LIGHT_TITLE, LIGHT_TYPE, toggleState, new ToggleTemplate( LIGHT_ID + "", new ControlButton( toggleState, String.valueOf(toggleState).toUpperCase(Locale.getDefault()) ) ) ); } private Control createThermostat() { return createStatefulControl( THERMOSTAT_ID, THERMOSTAT_TITLE, THERMOSTAT_TYPE, rangeState, new RangeTemplate( THERMOSTAT_ID + "", 15f, 25f, rangeState, 0.1f, "%1.1f" ) ); } private Control createStatefulControl(int id, String title, int type, T state, ControlTemplate template) { Intent intent = new Intent(this, MainActivity.class) .putExtra(EXTRA_MESSAGE, "$title $state") .addFlags(Intent.FLAG_ACTIVITY_NEW_TASK); PendingIntent action = PendingIntent.getActivity( this, id, intent, PendingIntent.FLAG_UPDATE_CURRENT | PendingIntent.FLAG_IMMUTABLE ); return new Control.StatefulBuilder(id + "", action) .setTitle(title) .setDeviceType(type) .setStatus(Control.STATUS_OK) .setControlTemplate(template) .build(); }
この例では、createPublisherFor() メソッドに、アプリが行う必要のある処理(デバイスと通信してステータスを取得し、そのステータスをシステムに送信する)の偽の実装が含まれています。
createPublisherFor() メソッドは、Kotlin コルーチンとフローを使用して、次の処理を行うことで、必要な Reactive
Streams API を満たします。
Flowを作成します。- 1 秒間待機します。
- スマートライトの状態を作成して送信します。
- さらに 1 秒間待機します。
- サーモスタットの状態を作成して送信します。
アクションを処理する
performControlAction()
メソッドは、ユーザーが公開されたコントロールを操作したときに通知します。送信される ControlAction
のタイプによってアクションが決まります。
指定されたコントロールに対して適切なアクションを実行し、Android UI
でデバイスの状態を更新します。
この例を完成させるには、次のコードを Service に追加します。
Kotlin
override fun performControlAction( controlId: String, action: ControlAction, consumer: Consumer) { controlFlows[controlId]?.let { flow -> when (controlId) { LIGHT_ID.toString() -> { consumer.accept(ControlAction.RESPONSE_OK) if (action is BooleanAction) toggleState = action.newState flow.tryEmit(createLight()) } THERMOSTAT_ID.toString() -> { consumer.accept(ControlAction.RESPONSE_OK) if (action is FloatAction) rangeState = action.newValue flow.tryEmit(createThermostat()) } else -> consumer.accept(ControlAction.RESPONSE_FAIL) } } ?: consumer.accept(ControlAction.RESPONSE_FAIL) }
Java
@Override public void performControlAction(@NonNull String controlId, @NonNull ControlAction action, @NonNull Consumerconsumer) { ReplayProcessor processor = controlFlows.get(controlId); if (processor == null) return; if (controlId.equals(LIGHT_ID + "")) { consumer.accept(ControlAction.RESPONSE_OK); if (action instanceof BooleanAction) toggleState = ((BooleanAction) action).getNewState(); processor.onNext(createLight()); } if (controlId.equals(THERMOSTAT_ID + "")) { consumer.accept(ControlAction.RESPONSE_OK); if (action instanceof FloatAction) rangeState = ((FloatAction) action).getNewValue() processor.onNext(createThermostat()); } }
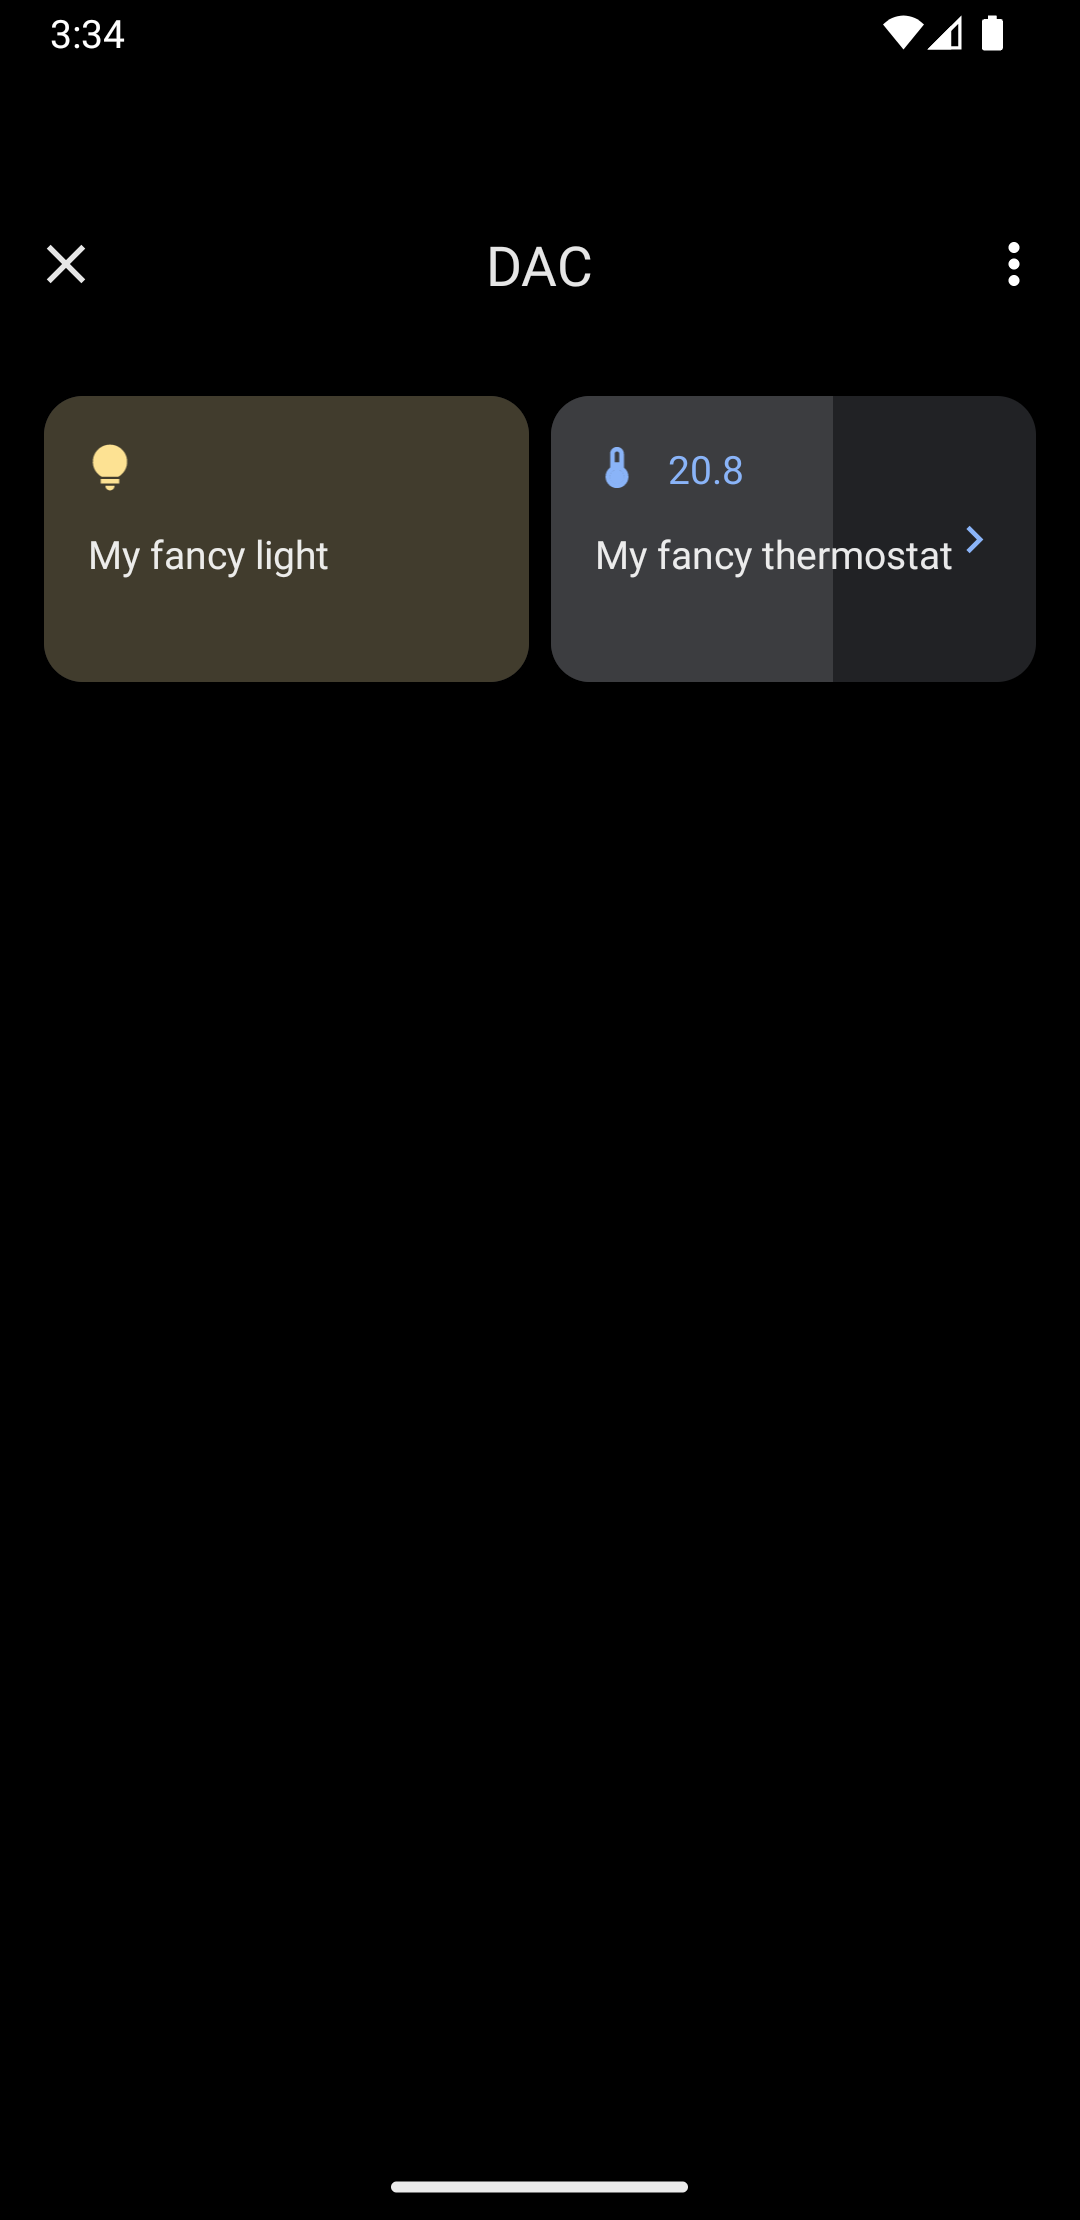
アプリを実行し、[デバイス コントロール] メニューにアクセスして、照明とサーモスタットのコントロールを確認します。