
通常來說,巢狀導覽圖最適合呈現應用程式內的登入流程、精靈或其他子流程。像這樣為獨立的子導覽流程建立巢狀結構,應用程式 UI 的主要流程將更容易理解與管理。
此外,巢狀圖還可以重複使用。這類圖表也提供一定程度的封裝,也就是說,巢狀圖以外的目的地無法直接存取圖表中的任何目的地。這些目的地應 navigate() 至巢狀圖本身,這張圖表的內部邏輯可以變更,不會影響其餘部分。
範例
就應用程式的「頂層」導覽圖而言,應該將起始處設在應用程式啟動時首先向使用者顯示的目的地,而且應包含他們在應用程式中到處瀏覽時看到的目的地。
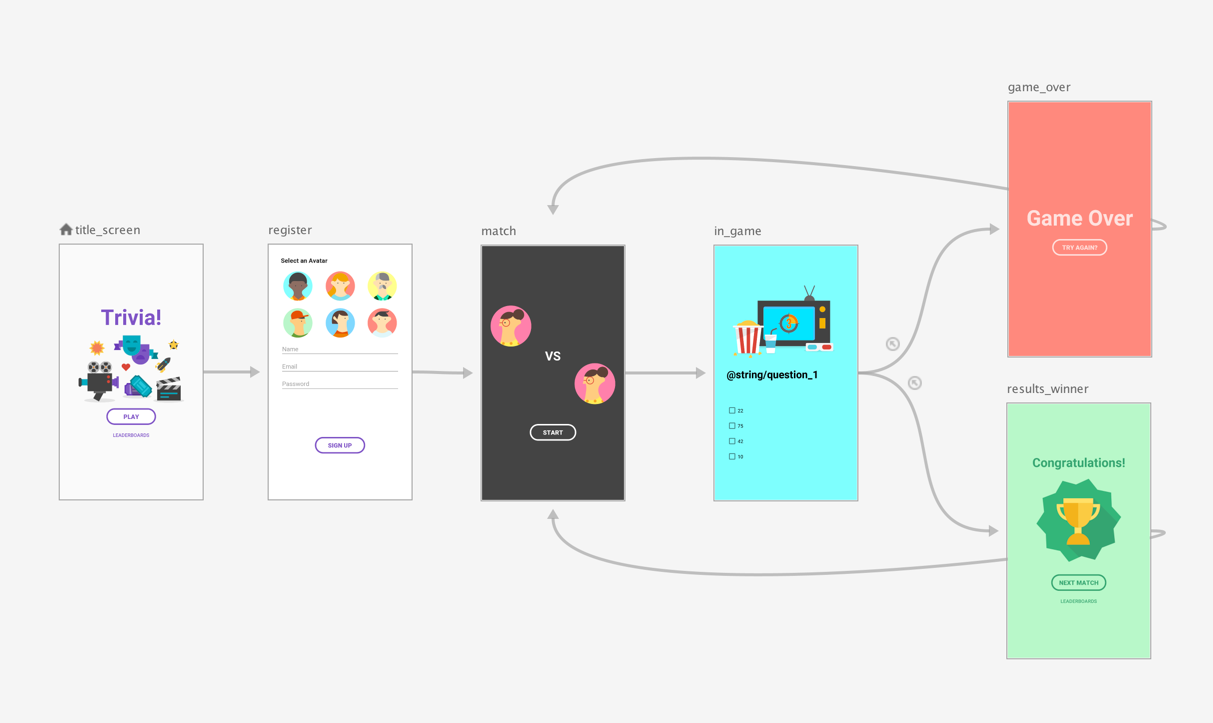
以圖 1 的頂層導覽圖為例,假設您只想要求使用者在首次啟動應用程式時查看 title_screen 和 register 畫面。系統之後會儲存使用者資訊,而當應用程式後續啟動時,應該直接將使用者導向 match 畫面。
最佳做法是將 match 畫面設為頂層導覽圖的「起始目的地」,然後將標題和註冊畫面移至巢狀圖,如圖 1 所示:
match 畫面啟動後,請查看是否有已註冊的使用者,並將尚未註冊的使用者導向註冊畫面。
如需進一步瞭解條件式導覽情境,請參閱「條件式導覽」。
Compose
如要透過 Compose 建立巢狀導覽圖,請使用 NavGraphBuilder.navigation() 函式。將目的地加入圖表時,會用到 navigation(),就像 NavGraphBuilder.composable() 和 NavGraphBuilder.dialog() 函式一樣。
主要差異在於 navigation 會建立巢狀圖,而非新目的地。接著在 navigation() 的 lambda 中呼叫 composable() 和 dialog(),將目的地加入巢狀圖。
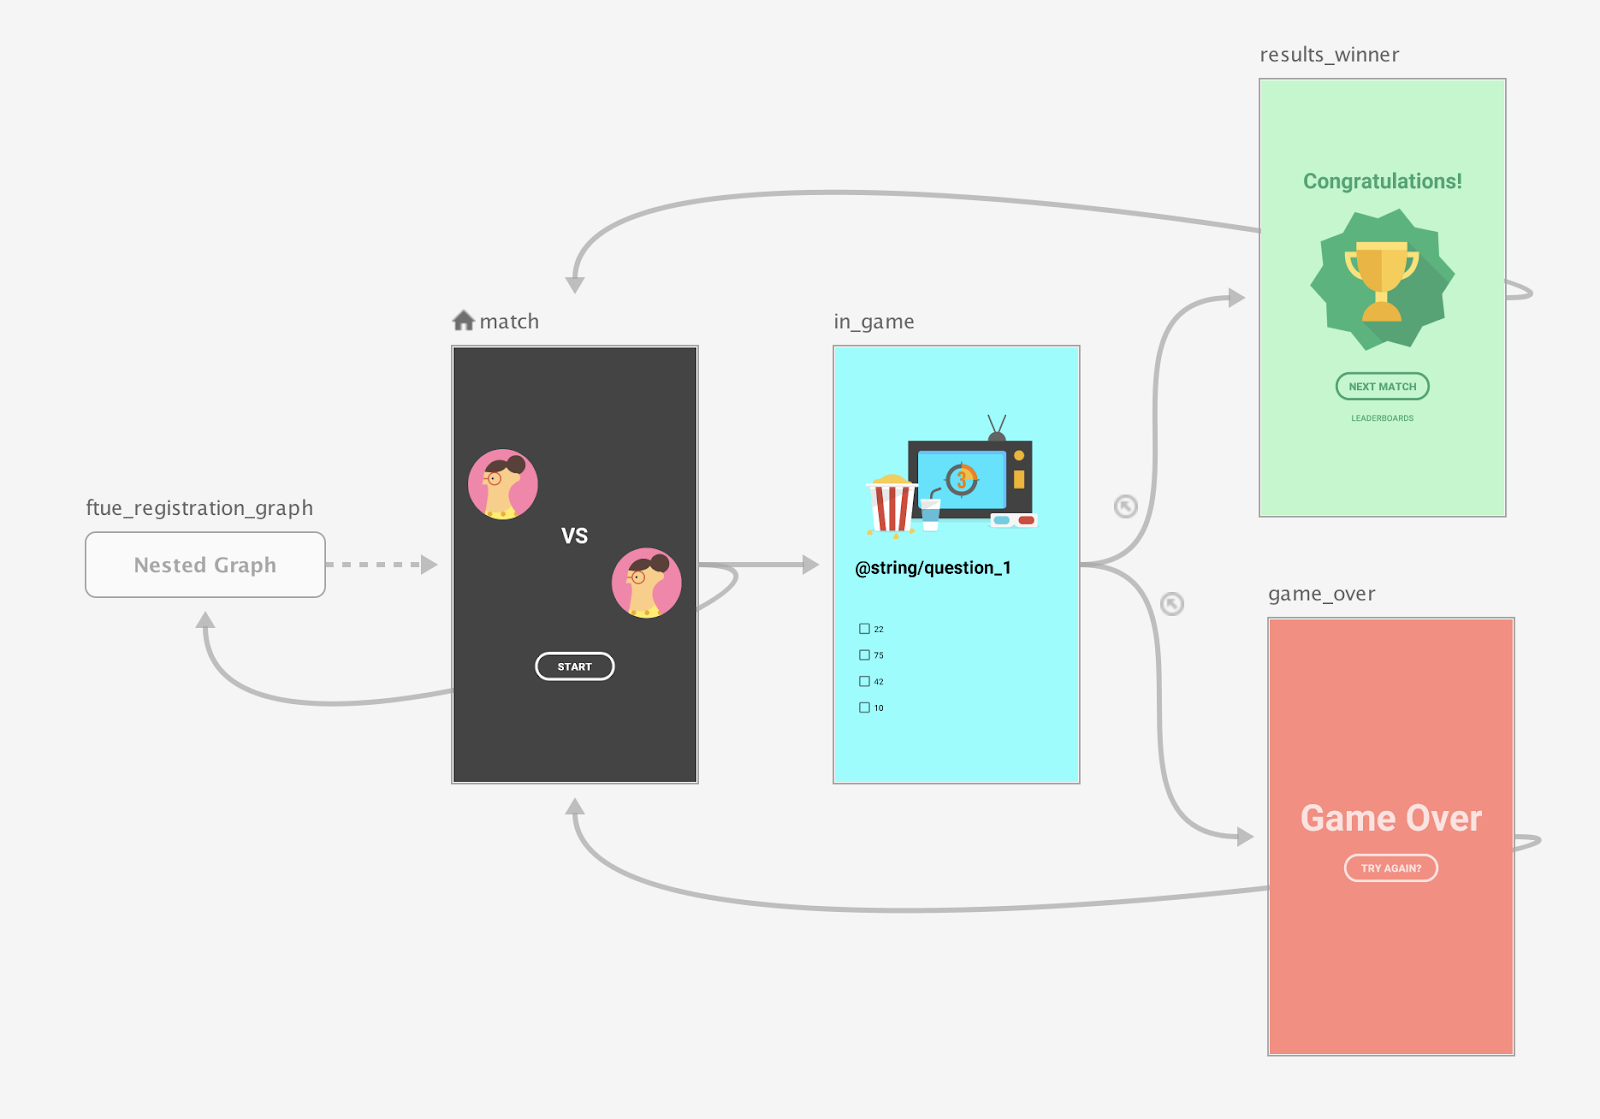
請考慮下列程式碼片段如何透過 Compose 實作圖 2 中的圖表:
// Routes
@Serializable object Title
@Serializable object Register

// Route for nested graph
@Serializable object Game

// Routes inside nested graph
@Serializable object Match
@Serializable object InGame
@Serializable object ResultsWinner
@Serializable object GameOver

NavHost(navController, startDestination = Title) {
   composable<Title> {
       TitleScreen(
           onPlayClicked = { navController.navigate(route = Register) },
           onLeaderboardsClicked = { /* Navigate to leaderboards */ }
       )
   }
   composable<Register> {
       RegisterScreen(
           onSignUpComplete = { navController.navigate(route = Game) }
       )
   }
   navigation<Game>(startDestination = Match) {
       composable<Match> {
           MatchScreen(
               onStartGame = { navController.navigate(route = InGame) }
           )
       }
       composable<InGame> {
           InGameScreen(
               onGameWin = { navController.navigate(route = ResultsWinner) },
               onGameLose = { navController.navigate(route = GameOver) }
           )
       }
       composable<ResultsWinner> {
           ResultsWinnerScreen(
               onNextMatchClicked = {
                   navController.navigate(route = Match) {
                       popUpTo(route = Match) { inclusive = true }
                   }
               },
               onLeaderboardsClicked = { /* Navigate to leaderboards */ }
           )
       }
       composable<GameOver> {
           GameOverScreen(
               onTryAgainClicked = {
                   navController.navigate(route = Match) {
                       popUpTo(route = Match) { inclusive = true }
                   }
               }
           )
       }
   }
}
如要直接導覽至巢狀目的地,請使用路徑類型,就像處理任何其他目的地一樣。這是因為路徑屬於全域概念,可做為任何畫面的導覽目的地:
navController.navigate(route = Match)
XML
使用 XML 時,可以透過 Navigation 編輯器建立巢狀圖,步驟如下:
- 在 Navigation 編輯器中按住 Shift 鍵,然後點選要加入巢狀圖的目的地。
按一下滑鼠右鍵即可開啟內容選單,然後依序選取「Move to Nested Graph」>「New Graph」。這些到達網頁會包含巢狀圖中。圖 2 顯示導覽編輯器中的巢狀圖:
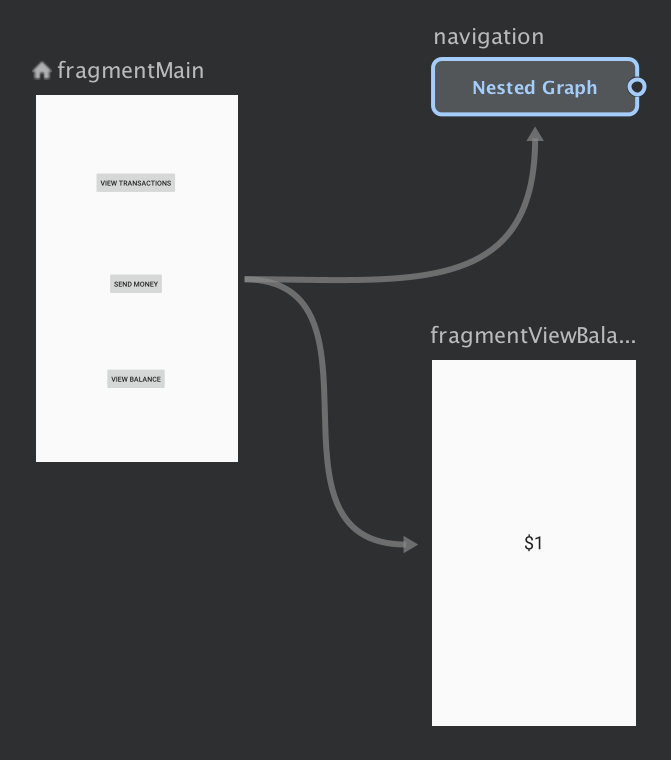
圖 3:Navigation 編輯器中的巢狀圖。 按一下巢狀圖。「Attributes」面板中會顯示以下屬性:
- 類型:包含「巢狀圖」
- ID:包含巢狀圖的系統指派 ID。這個 ID 用於在程式碼中參照的巢狀圖。
按兩下巢狀圖即可顯示其到達網頁。
按一下「Text」分頁標籤,切換至 XML 檢視畫面。巢狀導覽圖現已加入圖表。這張導覽圖有專屬的
navigation元素和 ID,還有一個startDestination屬性指向巢狀圖中的第一個目的地:<?xml version="1.0" encoding="utf-8"?> <navigation xmlns:app="http://schemas.android.com/apk/res-auto" xmlns:tools="http://schemas.android.com/tools" xmlns:android="http://schemas.android.com/apk/res/android" app:startDestination="@id/mainFragment"> <fragment android:id="@+id/mainFragment" android:name="com.example.cashdog.cashdog.MainFragment" android:label="fragment_main" tools:layout="@layout/fragment_main" > <action android:id="@+id/action_mainFragment_to_sendMoneyGraph" app:destination="@id/sendMoneyGraph" /> <action android:id="@+id/action_mainFragment_to_viewBalanceFragment" app:destination="@id/viewBalanceFragment" /> </fragment> <fragment android:id="@+id/viewBalanceFragment" android:name="com.example.cashdog.cashdog.ViewBalanceFragment" android:label="fragment_view_balance" tools:layout="@layout/fragment_view_balance" /> <navigation android:id="@+id/sendMoneyGraph" app:startDestination="@id/chooseRecipient"> <fragment android:id="@+id/chooseRecipient" android:name="com.example.cashdog.cashdog.ChooseRecipient" android:label="fragment_choose_recipient" tools:layout="@layout/fragment_choose_recipient"> <action android:id="@+id/action_chooseRecipient_to_chooseAmountFragment" app:destination="@id/chooseAmountFragment" /> </fragment> <fragment android:id="@+id/chooseAmountFragment" android:name="com.example.cashdog.cashdog.ChooseAmountFragment" android:label="fragment_choose_amount" tools:layout="@layout/fragment_choose_amount" /> </navigation> </navigation>在程式碼中,將根圖表連結動作的資源 ID 傳遞至巢狀圖:
Kotlin
view.findNavController().navigate(R.id.action_mainFragment_to_sendMoneyGraph)
Java
Navigation.findNavController(view).navigate(R.id.action_mainFragment_to_sendMoneyGraph);
- 回到「Design」分頁,按一下「Root」即可返回根圖表。
使用 include 參照其他導覽圖
如要將圖表結構模組化,也可以使用父項導覽圖中的 <include> 元素,將某張圖表「加入」另一張圖表。這樣就能在個別模組或整個專案中定義所含圖表,盡量重複利用。
下列程式碼片段將示範如何使用 <include>:
<!-- (root) nav_graph.xml -->
<?xml version="1.0" encoding="utf-8"?>
<navigation xmlns:android="http://schemas.android.com/apk/res/android"
    xmlns:app="http://schemas.android.com/apk/res-auto"
    xmlns:tools="http://schemas.android.com/tools"
    android:id="@+id/nav_graph"
    app:startDestination="@id/fragment">

    <include app:graph="@navigation/included_graph" />

    <fragment
        android:id="@+id/fragment"
        android:name="com.example.myapplication.BlankFragment"
        android:label="Fragment in Root Graph"
        tools:layout="@layout/fragment_blank">
        <action
            android:id="@+id/action_fragment_to_second_graph"
            app:destination="@id/second_graph" />
    </fragment>

    ...
</navigation>
<!-- included_graph.xml -->
<?xml version="1.0" encoding="utf-8"?>
<navigation xmlns:android="http://schemas.android.com/apk/res/android"
    xmlns:app="http://schemas.android.com/apk/res-auto"
    xmlns:tools="http://schemas.android.com/tools"
    android:id="@+id/second_graph"
    app:startDestination="@id/includedStart">

    <fragment
        android:id="@+id/includedStart"
        android:name="com.example.myapplication.IncludedStart"
        android:label="fragment_included_start"
        tools:layout="@layout/fragment_included_start" />
</navigation>