
Carousel は、ユーザーがスクロールできる要素のリストを表示するカスタム カルーセル ビューを構築するためのモーション ヘルパー オブジェクトです。このようなビューを実装する他の方法と比較して、このヘルパーを使用すると、Carousel の複雑なモーションとサイズの変更をすばやく作成できます。MotionLayout
Carousel風景写真を表示する
の例。
Carousel ウィジェットは、開始と終了のあるリストと、円形のラップアラウンド リストをサポートしています。
MotionLayout を使用したカルーセルの仕組み
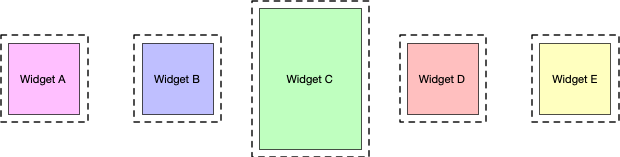
中央の項目が拡大された水平方向の Carousel ビューを作成するとします。
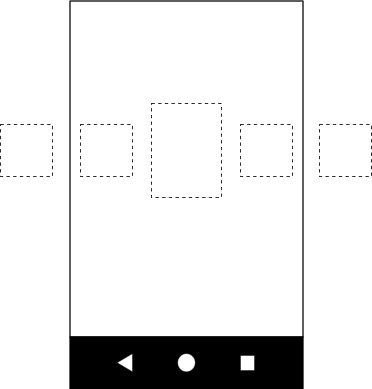
Carousel の例。
この基本的なレイアウトには、Carousel 項目を表すいくつかのビューが含まれています。
次の 3 つの状態を持つ MotionLayout を作成し、ID を付けます。
- 前へ
- start
- 次へ
start 状態が基本レイアウトに対応する場合、前へ 状態と次へ 状態では、Carousel 項目がそれぞれ左と右に 1 つずつシフトします。
たとえば、図 3 の 5 つのビューがあるとします。start 状態では、ビュー B、C、D が表示され、A と E が画面外にあるとします。A、B、C、D の位置が B、C、D、E の位置になるように、前へ 状態を設定します。ビューは左から右に移動します。次へ 状態では、B、C、D、E が A、B、C、D の位置に移動し、ビューが右から左に移動します。これは図 4 に示されています。
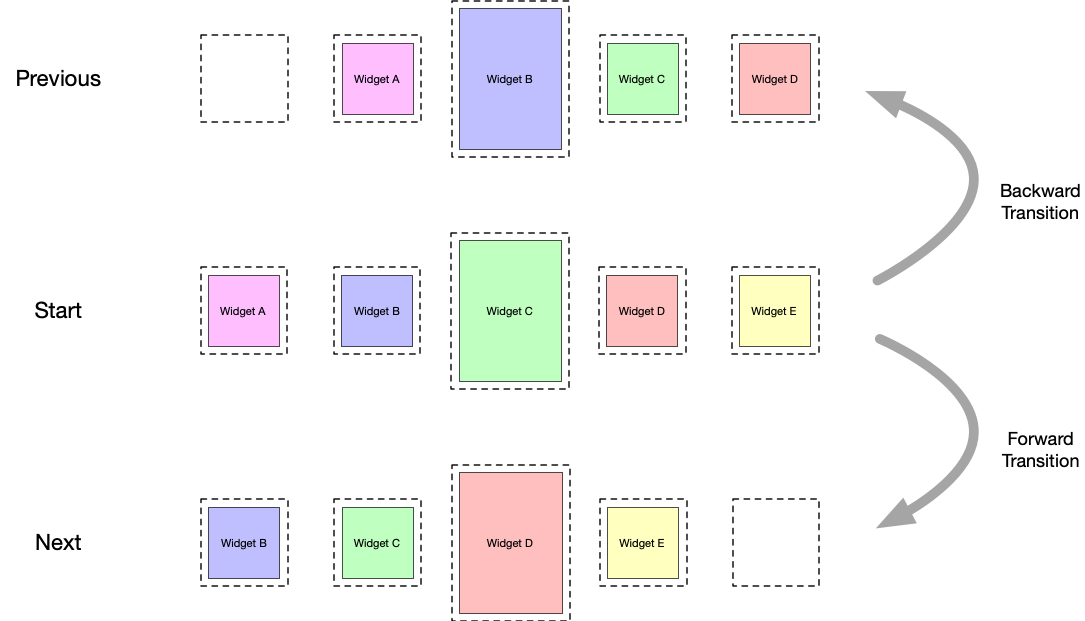
Carousel スワイプ
切り替え。
ビューが元のビューの開始位置とまったく同じ位置に配置されることが重要です。
Carousel は、実際のビューを元の位置に戻し、新しい一致するコンテンツで再初期化することで、要素の無限コレクションのような錯覚を与えます。 このメカニズムを次の図に示します。[項目番号] の値に注意してください。
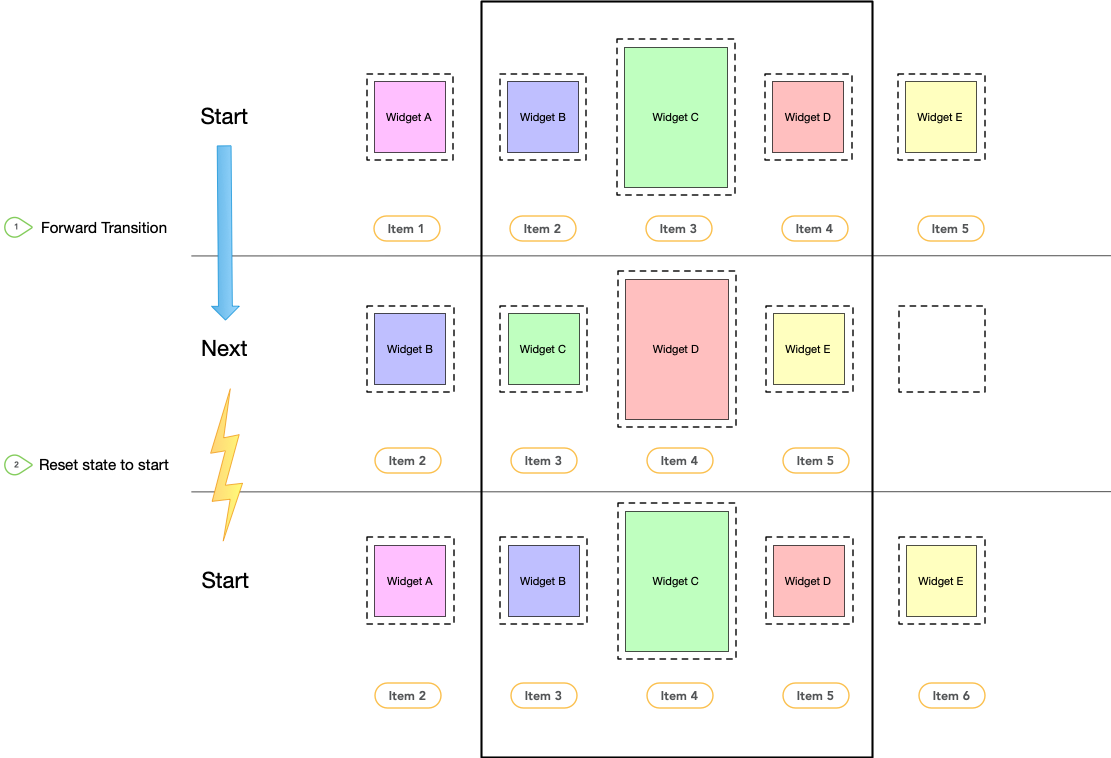
Carousel スワイプ
切り替えと状態のリセット。
切り替え効果
モーション シーン ファイルで定義されたこれら 3 つの制約セットを使用して、start 状態と次へ 状態の間、およびstart 状態と前へ 状態の間に、順方向と逆方向の 2 つの切り替え効果を作成します。ジェスチャーに応じて切り替え効果をトリガーする
OnSwipeハンドラを、次の
例に示すように追加します。
    <Transition
        motion:constraintSetStart="@id/start"
        motion:constraintSetEnd="@+id/next"
        motion:duration="1000"
        android:id="@+id/forward">
        <OnSwipe
            motion:dragDirection="dragLeft"
            motion:touchAnchorSide="left" />
    </Transition>

    <Transition
        motion:constraintSetStart="@+id/start"
        motion:constraintSetEnd="@+id/previous"
        android:id="@+id/backward">
        <OnSwipe
            motion:dragDirection="dragRight"
            motion:touchAnchorSide="right" />
    </Transition>
カルーセルを追加する
この基本的なモーション シーンを作成したら、レイアウトに Carousel ヘルパーを追加し、前のアニメーションと次のアニメーションを実装するのと同じ順序でビューを参照します。
Carousel ヘルパーに次の属性を設定します。
app:carousel_firstView:Carouselの最初の要素を表すビュー。この例では C。app:carousel_previousState: 前へ 状態のConstraintSetID。app:carousel_nextState: 次へ 状態のConstraintSetID。app:carousel_backwardTransition:Transition状態と 状態の間に適用される ID。app:carousel_forwardTransition:TransitionID が start 状態と next 状態の間に適用されます。
たとえば、レイアウト XML ファイルに次のようなものがあります。
    <androidx.constraintlayout.motion.widget.MotionLayout ... >

        <ImageView  android:id="@+id/imageView0" .. />
        <ImageView  android:id="@+id/imageView1" .. />
        <ImageView  android:id="@+id/imageView2" .. />
        <ImageView  android:id="@+id/imageView3" .. />
        <ImageView  android:id="@+id/imageView4" .. />

        <androidx.constraintlayout.helper.widget.Carousel
            android:id="@+id/carousel"
            android:layout_width="wrap_content"
            android:layout_height="wrap_content"
            app:carousel_forwardTransition="@+id/forward"
            app:carousel_backwardTransition="@+id/backward"
            app:carousel_previousState="@+id/previous"
            app:carousel_nextState="@+id/next"
            app:carousel_infinite="true"
            app:carousel_firstView="@+id/imageView2"
            app:constraint_referenced_ids="imageView0,imageView1,imageView2,imageView3,imageView4" />

    </androidx.constraintlayout.motion.widget.MotionLayout>
コードで Carousel アダプターを設定します。
Kotlin
carousel.setAdapter(object : Carousel.Adapter {
            override fun count(): Int {
              // Return the number of items in the Carousel.
            }

            override fun populate(view: View, index: Int) {
                // Implement this to populate the view at the given index.
            }

            override fun onNewItem(index: Int) {
                // Called when an item is set.
            }
        })
Java
carousel.setAdapter(new Carousel.Adapter() {
            @Override
            public int count() {
                // Return the number of items in the Carousel.
            }

            @Override
            public void populate(View view, int index) {
                // Populate the view at the given index.
            }

            @Override
            public void onNewItem(int index) {
                 // Called when an item is set.
            }
        });
その他の注意事項
Carousel で現在選択されている項目に応じて、前後の項目を表すビューを非表示にして、Carousel の開始 と終了 を正しく処理する必要がある場合があります。Carousel ヘルパーはこれを自動的に処理します。デフォルトでは、このような状況でこれらのビューを View.INVISIBLE としてマークするため、レイアウト全体は変更されません。
別のモードでは、Carousel ヘルパーがこれらのビューを View.GONE としてマークします。このモードは、次のプロパティを使用して設定できます。
app:carousel_emptyViewsBehavior="gone"
例
Carousel ヘルパーを使用するその他の例については、 GitHub のサンプル プロジェクト をご覧ください。