Organiza tus páginas con colecciones
Guarda y categoriza el contenido según tus preferencias.
Para compilar y depurar el código nativo para tu app, necesitas los siguientes componentes:
El kit de desarrollo nativo (NDK) de Android: es un conjunto de herramientas que te permite utilizar código C y C++ con Android.
CMake: es una herramienta de compilación externa que funciona junto con Gradle para compilar tu biblioteca nativa. No necesitas este componente si solo planeas usar ndk-build.
LLDB es el depurador que usa Android Studio para depurar código nativo. De forma predeterminada, LLDB se instala junto con Android Studio.
En esta página, se describe cómo instalar esos componentes automáticamente, como también mediante Android Studio o la herramienta sdkmanager para descargarlos e instalarlos de forma manual.
Cómo instalar NDK y CMake automáticamente
Android Gradle Plugin 4.2.0 y sus versiones posteriores pueden instalar automáticamente los NDK y CMake necesarios cuando compilas el proyecto por primera vez si se aceptaron las licencias con anticipación.
Si ya leíste y aceptas los términos de la licencia, entonces puedes aceptar previamente las licencias en las secuencias de comandos con el siguiente comando:
Cuando instalas el NDK, Android Studio selecciona el último NDK disponible. Para la mayoría de los proyectos, instalar esa versión predeterminada del NDK es suficiente.
Sin embargo, si tu proyecto necesita una o más versiones específicas del NDK, puedes descargarlas y configurarlas. Eso te ayudará a garantizar compilaciones reproducibles en proyectos que dependan de una versión específica del NDK. Android Studio instala todas las versiones del NDK en el directorio android-sdk/ndk/.
Para instalar CMake y el NDK predeterminado en Android Studio, debes hacer lo siguiente:
Con un proyecto abierto, haz clic en Tools > SDK Manager.
Haz clic en la pestaña SDK Tools.
Selecciona las casillas de verificación NDK (Side by side) y CMake.
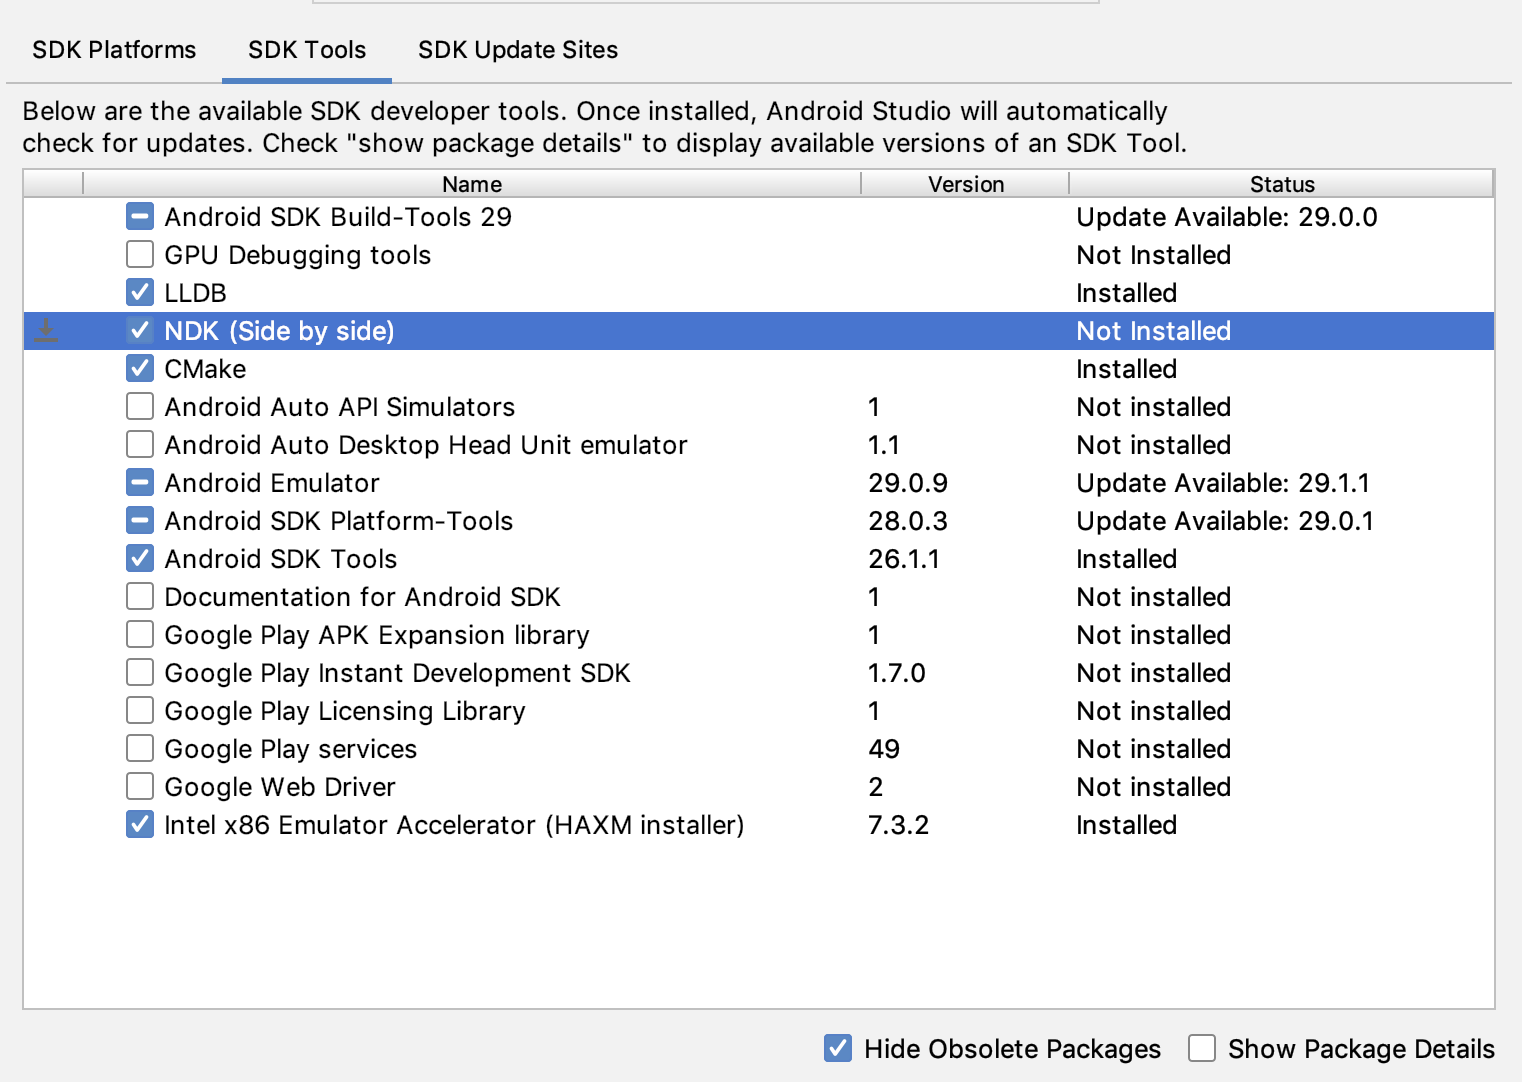
Figura 1: La ventana SDK Tools donde se muestra la opción NDK (Side by side)
Haz clic en OK.
Un cuadro de diálogo te indica cuánto espacio consume el paquete NDK en el disco.
Haz clic en OK.
Cuando finalices la instalación, haz clic en Finish.
Tu proyecto sincronizará automáticamente el archivo de compilación y realizará una.
Resuelve cualquier error que se genere.
Cómo configurar una versión específica de CMake
SDK Manager incluye la versión bifurcada de CMake 3.6.0 y 3.10.2. Los proyectos en los que no se configura una versión específica de CMake se compilan con CMake 3.10.2. Para configurar la versión de CMake, agrega lo siguiente al archivo build.gradle de tu módulo:
Si deseas usar una versión de CMake que no se incluye en SDK Manager, sigue estos pasos:
Descarga e instala CMake desde el sitio web oficial de CMake.
Especifica la versión de CMake que deseas que use Gradle en el archivo build.gradle del módulo.
Agrega la ruta de acceso a la instalación de CMake a la variable de entorno PATH o inclúyela en el archivo local.properties del proyecto, como se muestra a continuación. Si Gradle no encuentra la versión de CMake que especificaste en el archivo build.gradle, se mostrará un error de compilación.
# If you set this property, Gradle no longer uses PATH to find CMake.
cmake.dir = "path-to-cmake"</pre>
Si aún no tienes instalado el sistema de compilación Ninja en tu estación de trabajo, accede al sitio web oficial y descarga e instala la versión más reciente disponible para tu SO. Asegúrate de agregar también la ruta de acceso a la instalación de Ninja a la variable de entorno PATH.
Cómo instalar una versión específica del NDK
Para instalar una versión específica del NDK, debes hacer lo siguiente:
Con un proyecto abierto, haz clic en Tools > SDK Manager.
Haz clic en la pestaña SDK Tools.
Selecciona la casilla de verificación Show Package Details.
Selecciona la casilla de verificación NDK (Side by side) y las que se encuentran debajo de ella que correspondan a las versiones del NDK que deseas instalar. Android Studio instala todas las versiones del NDK en el directorio android-sdk/ndk/.
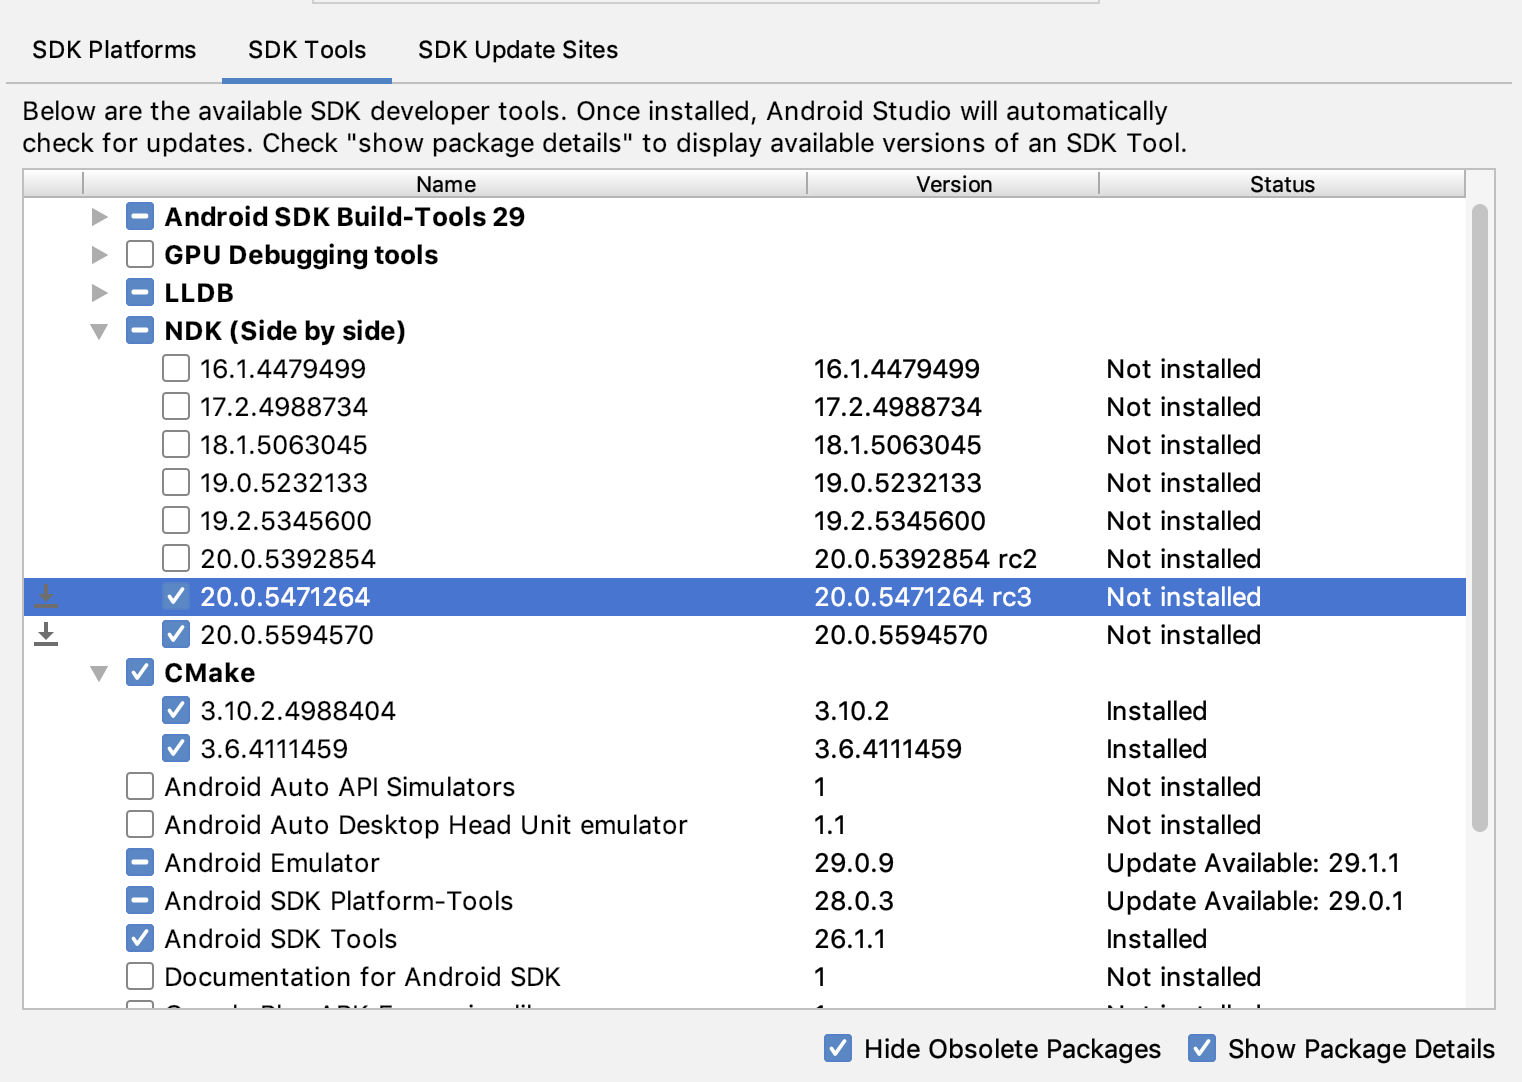
Figura 2: La ventana SDK Tools donde se muestran las opciones de NDK (Side by side)
Haz clic en OK.
Un cuadro de diálogo te indica cuánto espacio consumen los paquetes NDK.
Haz clic en OK.
Cuando finalices la instalación, haz clic en Finish.
Tu proyecto sincronizará automáticamente el archivo de compilación y realizará una.
Resuelve cualquier error que se genere.
Configura cada módulo con la versión del NDK que quieres que use. Cuando usas Android Studio 3.6 o una versión posterior, si no especificas la versión, el complemento de Gradle para Android elige una que reconoce como compatible.
Cómo configurar versiones específicas del NDK en tu proyecto
Es posible que debas configurar la versión del NDK en tu proyecto si se cumple alguna de las siguientes condiciones:
Hay varias versiones del NDK instaladas y quieres usar una específica. En ese caso, indica la versión mediante la propiedad android.ndkVersion en el archivo build.gradle del módulo, como se muestra en la siguiente muestra de código.
Versión predeterminada del NDK según la versión del AGP
Antes del lanzamiento, cada versión de AGP se prueba de manera exhaustiva con la versión estable del NDK más reciente en ese momento. Esta versión del NDK se usa para compilar tus proyectos si no especificas una versión del NDK en el archivo build.gradle. La versión predeterminada del NDK para las diferentes versiones de AGP se documenta en las notas de la versión de AGP y las notas de versiones anteriores de AGP.
El contenido y las muestras de código que aparecen en esta página están sujetas a las licencias que se describen en la Licencia de Contenido. Java y OpenJDK son marcas registradas de Oracle o sus afiliados.
Última actualización: 2025-08-21 (UTC)
[[["Fácil de comprender","easyToUnderstand","thumb-up"],["Resolvió mi problema","solvedMyProblem","thumb-up"],["Otro","otherUp","thumb-up"]],[["Falta la información que necesito","missingTheInformationINeed","thumb-down"],["Muy complicado o demasiados pasos","tooComplicatedTooManySteps","thumb-down"],["Desactualizado","outOfDate","thumb-down"],["Problema de traducción","translationIssue","thumb-down"],["Problema con las muestras o los códigos","samplesCodeIssue","thumb-down"],["Otro","otherDown","thumb-down"]],["Última actualización: 2025-08-21 (UTC)"],[],[],null,["To compile and debug native code for your app, you need the following components:\n\n- The Android Native Development Kit (NDK): a set of tools that allows you to use C and C++ code with Android.\n- CMake: an external build tool that works alongside Gradle to build your native library. You do not need this component if you only plan to use ndk-build.\n- LLDB: the debugger Android Studio uses to debug native code. By default, LLDB will be installed alongside Android Studio.\n\nThis page describes how to install these components automatically, or by using\nAndroid Studio or the `sdkmanager` tool to download and install them manually.\n\nInstall NDK and CMake automatically\n\nAndroid Gradle Plugin 4.2.0+ can automatically install the required NDK and CMake\nthe first time you build your project if their licenses have been accepted in advance.\nIf you've already read and agree to the license terms, then you can pre-accept\nthe licenses in scripts with the following command: \n\n yes | ${sdk}/cmdline-tools/latest/bin/sdkmanager --licenses\n\nInstall the NDK and CMake\n\nWhen you install the NDK, Android Studio selects the latest available NDK. For\nmost projects, installing this default version of the NDK is sufficient.\nIf your project needs one or more specific versions of the NDK, though, you can\n[download and configure specific versions](#specific-version). Doing so helps\nyou ensure reproducible builds across projects that each depend on a specific\nversion of the NDK. Android Studio installs all versions of the NDK in the\n\u003cvar translate=\"no\"\u003eandroid-sdk\u003c/var\u003e`/ndk/` directory.\n\nTo install CMake and the default NDK in Android Studio, do the following:\n\n1. With a project open, click **Tools \\\u003e SDK Manager**.\n\n2. Click the **SDK Tools** tab.\n\n3. Select the **NDK (Side by side)** and **CMake** checkboxes.\n\n\n **Figure 1.** The **SDK Tools** window showing the **NDK (Side by side)**\n option\n | **Note:** If you have an NDK installed in the `ndk-bundle` folder, it appears in the list with the label **NDK** . If you are using Android Gradle plugin 3.5.0 or later, you can select this checkbox or clear it. Clearing the checkbox uninstalls the NDK, freeing up disk space, and causes the checkbox to disappear from the list. If you uninstall the legacy NDK, remove the `ndk.dir` value, which is now deprecated, from your projects' `local.properties` files.\n4. Click **OK**.\n\n A dialog box tells you how much space the NDK package consumes on disk.\n5. Click **OK**.\n\n6. When the installation is complete, click **Finish**.\n\n7. Your project automatically syncs the build file and performs a build.\n Resolve any errors that occur.\n\nConfigure a specific version of CMake\n\nThe SDK Manager includes the 3.6.0 forked version of\nCMake and version 3.10.2. Projects that don't set a\nspecific CMake version are built with CMake 3.10.2. To\nset the CMake version, add the following to your module's `build.gradle` file: \n\nGroovy \n\n```groovy\nandroid {\n ...\n externalNativeBuild {\n cmake {\n ...\n version \"\u003cvar translate=\"no\"\u003ecmake-version\u003c/var\u003e\"\n }\n }\n}\n```\n\nKotlin \n\n```kotlin\nandroid {\n ...\n externalNativeBuild {\n cmake {\n ...\n version = \"\u003cvar translate=\"no\"\u003ecmake-version\u003c/var\u003e\"\n }\n }\n}\n```\n\nIf you want to use a CMake version that is not included by the\nSDK Manager, follow these steps:\n\n1. Download and install [CMake](https://cmake.org/download/) from the official CMake website.\n2. Specify the CMake version you want Gradle to use in your module's `build.gradle` file.\n3. Either add the path to the CMake installation to your `PATH` environment\n variable or include it in your project's `local.properties` file, as\n shown. If Gradle is unable to find the version of CMake you specified in\n your `build.gradle` file, you get a build error.\n\n # If you set this property, Gradle no longer uses PATH to find CMake.\n cmake.dir = \"\u003cvar translate=\"no\"\u003epath-to-cmake\u003c/var\u003e\"\u003c/pre\u003e\n\n4. If you don't already have the Ninja build system installed on your\n workstation, go to the [official Ninja website](https://ninja-build.org/),\n and download and install the latest version of Ninja available for your OS.\n Make sure to also add the path to the Ninja installation to your\n `PATH` environment variable.\n\nInstall a specific version of the NDK\n\nTo install a specific version of the NDK, do the following:\n\n1. With a project open, click **Tools \\\u003e SDK Manager**.\n\n2. Click the **SDK Tools** tab.\n\n3. Select the **Show Package Details** checkbox.\n\n4. Select the **NDK (Side by side)** checkbox and the checkboxes below it that\n correspond to the NDK versions you want to install. Android Studio installs\n all versions of the NDK in the \u003cvar translate=\"no\"\u003eandroid-sdk\u003c/var\u003e`/ndk/`\n directory.\n\n | **Note:** Preview releases (for example, canary and beta) of the NDK do not show up in this list unless you [change the update channel](/studio/preview/install-preview#change_your_update_channel) for Android Studio. You can [install an Android Studio preview](/studio/preview/install-preview) side-by-side with the stable version.\n\n\n **Figure 2.** The **SDK Tools** window showing the **NDK (Side by side)**\n options\n | **Note:** If you have an NDK installed in the `ndk-bundle` folder, it appears in the list with the label **NDK** . If you are using Gradle version 3.5 or later, you can select this checkbox or clear it. Clearing it uninstalls the NDK installed, freeing up disk space, and cause the checkbox to disappear from the list. If you uninstall the legacy NDK, remove the `ndk.dir` value, which is now deprecated, from your projects' `local.properties` files.\n5. Click **OK**.\n\n A dialog box tells you how much space the NDK package(s) consumes.\n6. Click **OK**.\n\n7. When the installation is complete, click **Finish**.\n\n8. Your project automatically syncs the build file and performs a build.\n Resolve any errors that occur.\n\n9. [Configure each module](#apply-specific-version) with the version of the NDK\n you want it to use. When using Android Studio 3.6 or higher, if you do not\n specify the version, the Android Gradle plugin chooses a version that it is\n known to be compatible with.\n\nConfigure specific versions of the NDK in your project\n\nYou may need to configure the version of the NDK in your project if one of the\nfollowing is true:\n\n- Your project is inherited and you need to use specific versions of the NDK and the Android Gradle plugin (AGP). For more information, see [Configure the NDK for the Android Gradle plugin](/studio/projects/configure-agp-ndk).\n- You have multiple versions of the NDK installed and you want to use a specific\n one. In this case, specify the version using the `android.ndkVersion`\n property in the module's `build.gradle` file, as shown in the following code\n sample.\n\n Groovy \n\n ```groovy\n android {\n ndkVersion \"\u003cvar translate=\"no\"\u003emajor\u003c/var\u003e.\u003cvar translate=\"no\"\u003eminor\u003c/var\u003e.\u003cvar translate=\"no\"\u003ebuild\u003c/var\u003e\" // e.g., ndkVersion \"21.3.6528147\"\n }\n ```\n\n Kotlin \n\n ```kotlin\n android {\n ndkVersion = \"\u003cvar translate=\"no\"\u003emajor\u003c/var\u003e.\u003cvar translate=\"no\"\u003eminor\u003c/var\u003e.\u003cvar translate=\"no\"\u003ebuild\u003c/var\u003e\" // e.g., ndkVersion \"21.3.6528147\"\n }\n ```\n\nDefault NDK version per AGP version\n\nBefore release, each AGP version is thoroughly tested with the latest stable NDK\nrelease at that time. This NDK version is used to build your projects if you\ndon't specify an NDK version in the `build.gradle` file. The default NDK version\nfor different versions of AGP are documented in the\n[AGP release notes](/build/releases/gradle-plugin#compatibility) and\n[AGP past release notes](/build/releases/past-releases)."]]